Test in a live environment
Test in production without watermarks.
Works wherever you need it to.
The Node.js PDF Library

Welcome to the tutorial on creating PDF documents from a React application! In this tutorial, we'll explore various libraries to generate PDFs and learn how to use the popular jsPDF library to create PDF files directly from your React components. So, let's dive in and get started!
PDF (Portable Document Format) is a widely used file format for sharing and printing documents while preserving their layout and formatting. As a React web developer, you might come across scenarios where you need to generate PDF documents, such as invoices, reports, or sales contracts, directly from your React application.
Creating PDF documents in a React application can be a daunting task, especially if you're new to the landscape. Thankfully, we have several third-party libraries at our disposal that significantly simplify this process. Each library comes with its own unique features and utilities, catering to different use-cases. Let's explore these libraries in a bit more detail.
jsPDF is a widely popular library among developers for generating PDF files from JavaScript. One of its main selling points is its simplicity. Its syntax and usage are pretty straightforward, allowing you to transform your HTML content into a PDF file in no time.
It enables you to control the formatting and layout of your PDFs, from changing the font size and color to adjusting the page orientation and size. jsPDF is a robust solution that works in both browser and server environments, making it an excellent choice for a wide range of JavaScript applications.
pdfmake stands out as a client/server-side PDF printing solution in pure JavaScript. This library is an excellent choice for creating more complex PDFs, thanks to its comprehensive API and flexible layout options. With pdfmake, you can define your document content and structure using a simple JavaScript object, then transform it into a valid PDF document.
React-PDF is a unique library that provides powerful functionality for creating PDF files using React components. Instead of manually writing your document structure in a JavaScript object, you can create your PDF just like you would build a typical React application - using reusable components and props. The IronPDF website has a tutorial on creating PDFs using the React-PDF library.
While all three libraries provide powerful tools to generate PDF documents in React, we'll use jsPDF in this tutorial due to its simplicity, flexibility, and wide adoption in the community. It provides a lower entry barrier for beginners, and its robust feature set makes it a suitable choice for many use cases. The principles we'll explore with jsPDF will give you a solid foundation to generate PDFs, and you'll be able to pick up other libraries more easily if your project demands it.
Before we dive into this tutorial, it's essential to ensure you're adequately equipped with the necessary tools and knowledge to follow along smoothly. The prerequisites for this tutorial are as follows:
First and foremost, you should have a basic understanding of React, a popular JavaScript library for building user interfaces, especially single-page applications. You should be familiar with concepts like JSX (JavaScript XML), components, state, and props in React.
You should also have a development environment set up on your computer for building React applications. This includes a text editor or an Integrated Development Environment (IDE). Text editors such as Visual Studio Code, Atom, or Sublime Text are all good options.
To manage our project and its dependencies, we'll be using Node.js and npm (Node Package Manager). Ensure that you have Node.js installed on your computer. Node.js is a JavaScript runtime that allows us to run JavaScript on our servers. It comes with npm installed, so you can manage libraries required for your project.
You can check whether Node.js and npm are installed by running the following terminal commands:
node -v
npm -v
These commands will display the version of Node.js and npm installed on your system, respectively. If you don't have them installed or if your versions are outdated, you should download and install the latest Long Term Support (LTS) version of Node.js from their official website.
Let's start by setting up our React project. Open your terminal and navigate to the desired directory where you want to create your project. Run the following command to create a new React application:
npx create-react-app pdf-from-react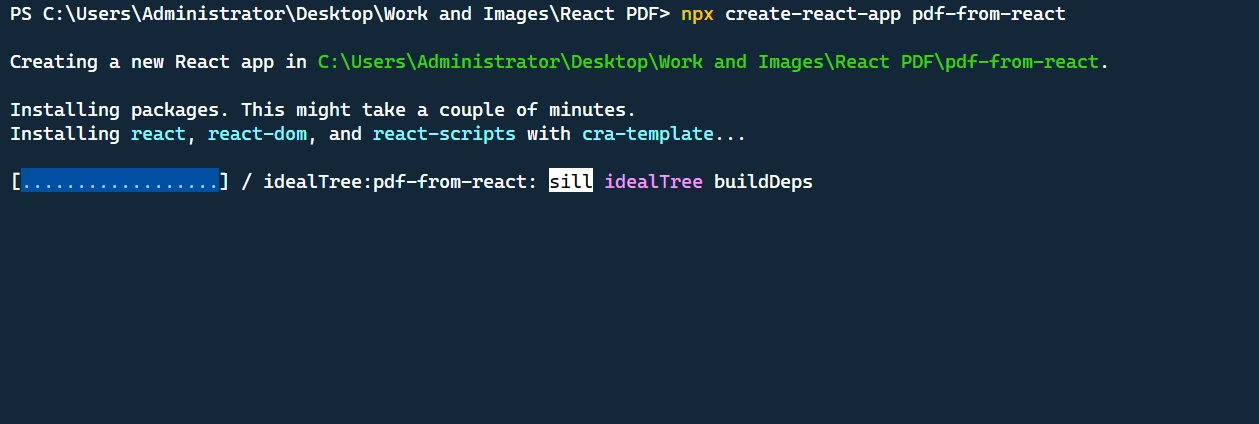
This command will create a new directory called pdf-from-react with a basic React project structure.
Next, navigate into the project directory:
cd pdf-from-reactNow, we can open the project in our code editor and proceed with the implementation.
First, we need to install the necessary packages. Install react, react-dom, @mui/material, and jspdf using the following terminal command.
npm install jspdf @mui/material @emotion/react @emotion/styled @mui/icons-materialWe begin by importing the necessary dependencies for our application. These include various components from the Material-UI library, the jsPDF library for generating PDFs, and styling utilities.
import React, { useState } from "react";
import "./App.css";
import {
  Button,
  TextField,
  Box,
  Container,
  Typography,
  Table,
  TableBody,
  TableCell,
  TableContainer,
  TableHead,
  TableRow,
  Paper,
  IconButton,
  Snackbar,
  Alert,
} from "@mui/material";
import Grid from "@mui/material/Grid";
import DeleteIcon from "@mui/icons-material/Delete";
import jsPDF from "jspdf";
import { styled } from "@mui/material/styles";
import { tableCellClasses } from "@mui/material/TableCell";To add consistent cross-browser behavior to our app, we've used the styled utility from the MUI library to create StyledTableCell and StyledTableRow.
const StyledTableCell = styled(TableCell)(({ theme }) => ({
[`&.${tableCellClasses.head}`]: {
backgroundColor: theme.palette.common.black,
color: theme.palette.common.white,
},
[`&.${tableCellClasses.body}`]: {
fontSize: 14,
},
}));
const StyledTableRow = styled(TableRow)(({ theme }) => ({
"&:nth-of-type(odd)": {
backgroundColor: theme.palette.action.hover,
},
"&:last-child td, &:last-child th": {
border: 0,
},
}));The main component of our application is the App component. We have four state variables: customerName and customerAddress to keep track of customer's data, items to keep track of the list of items in the invoice, and error to display an error message when necessary.
function App() {
// State variables
const [customerName, setCustomerName] = useState("");
const [customerAddress, setCustomerAddress] = useState("");
const [items, setItems] = useState([{ name: "", quantity: "", price: "" }]);
const [error, setError] = useState(false);In this block of code, we've defined functions to handle user interactions: changing item details, adding a new item, and deleting an item. The handleItemChange function updates the properties of an item when a user modifies them. The addItem function adds a new item to the list. The deleteItem function removes an item from the list.
const handleItemChange = (index, event) => {
let newItems = [...items];
newItems[index][event.target.name] = event.target.value;
setItems(newItems);
};
const addItem = () => {
setItems([...items, { name: "", quantity: "", price: "" }]);
};
const deleteItem = (index) => {
let newItems = [...items];
newItems.splice(index, 1);
setItems(newItems);
};The following is the generateInvoice function code:
// Generate invoice
const generateInvoice = () => {
// Validate the input fields
if (
!customerName
!customerAddress
items.some((item) => !item.name
!item.quantity
!item.price)
) {
setError(true);
return;
}
// Create a new jsPDF instance
let doc = new jsPDF("p", "pt");
// Add invoice header
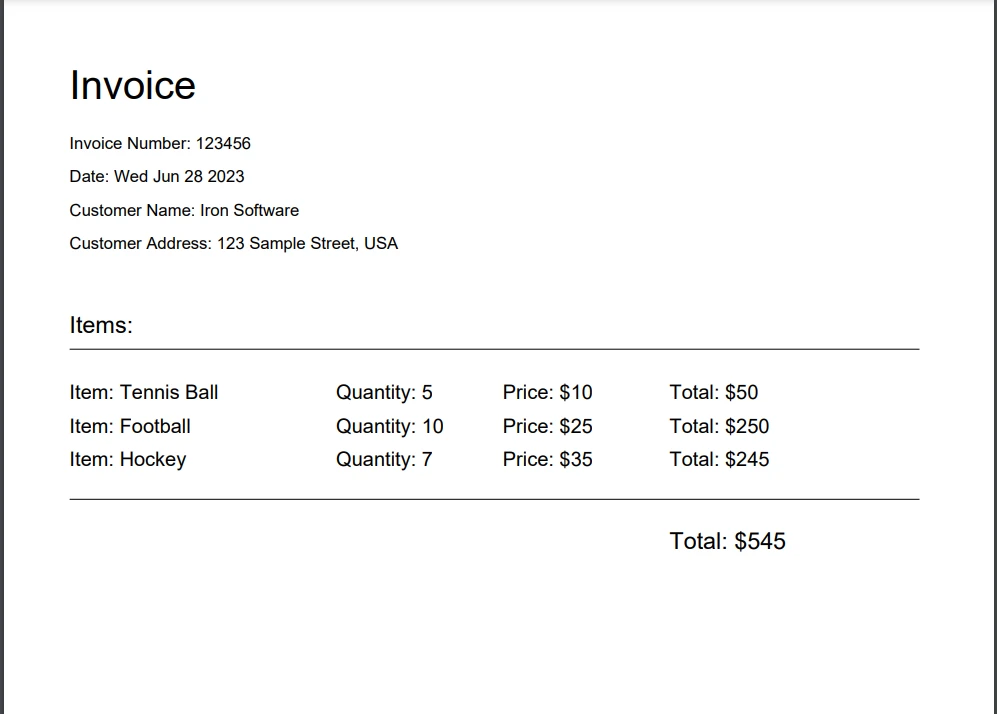
doc.setFontSize(24);
doc.text("Invoice", 40, 60);
doc.setFontSize(10);
doc.text("Invoice Number: 123456", 40, 90);
doc.text("Date: " + new Date().toDateString(), 40, 110);
doc.text(`Customer Name: ${customerName}`, 40, 130);
doc.text(`Customer Address: ${customerAddress}`, 40, 150);
// Add items section
doc.setFontSize(14);
doc.text("Items:", 40, 200);
doc.line(40, 210, 550, 210);
// Add item details
doc.setFontSize(12);
let yOffset = 240;
let total = 0;
items.forEach((item) => {
let itemTotal = item.quantity * item.price;
total += itemTotal;
doc.text(`Item: ${item.name}`, 40, yOffset);
doc.text(`Quantity: ${item.quantity}`, 200, yOffset);
doc.text(`Price: $${item.price}`, 300, yOffset);
doc.text(`Total: $${itemTotal}`, 400, yOffset);
yOffset += 20;
});
// Add total
doc.line(40, yOffset, 550, yOffset);
doc.setFontSize(14);
doc.text(`Total: $${total}`, 400, yOffset + 30);
// Save the generated PDF as "invoice.pdf"
doc.save("invoice.pdf");
// Reset error state
setError(false);
};In the generateInvoice function, we first perform validation on the input fields to ensure that the customer name, customer address, and item details are filled in. If any of these fields are empty, we set the error state to true and return early.
Next, we create a new instance of jsPDF by calling new jsPDF("p", "pt"). The first argument "p" specifies the page orientation as portrait, and the second argument "pt specifies the measurement unit as points.
We then start adding the content to our PDF document. We set the font size using doc.setFontSize and use the doc.text method to add text at specific coordinates on the page. We add the invoice header, including the title, invoice number, date, customer name, and customer address.
After the header, we add the "Items" section by setting the font size and adding a line using doc.line to separate the items from the header. Next, we iterate over each item in the items array and calculate the total price for each item by multiplying the quantity by the price. We update the total variable with the sum of all item totals.
For each item, we use doc.text to add the item name, quantity, price, and item-total to the PDF document. We increment the yOffset variable to move to the next line for each item. Finally, we add a line to separate the items from the total and use doc.text to add the total amount at the bottom right of the document.
Once the content is added, we use doc.save("invoice.pdf") to save the generated PDF as "invoice.pdf" on the user's computer. Finally, we reset the error state to false to clear any previous validation errors.
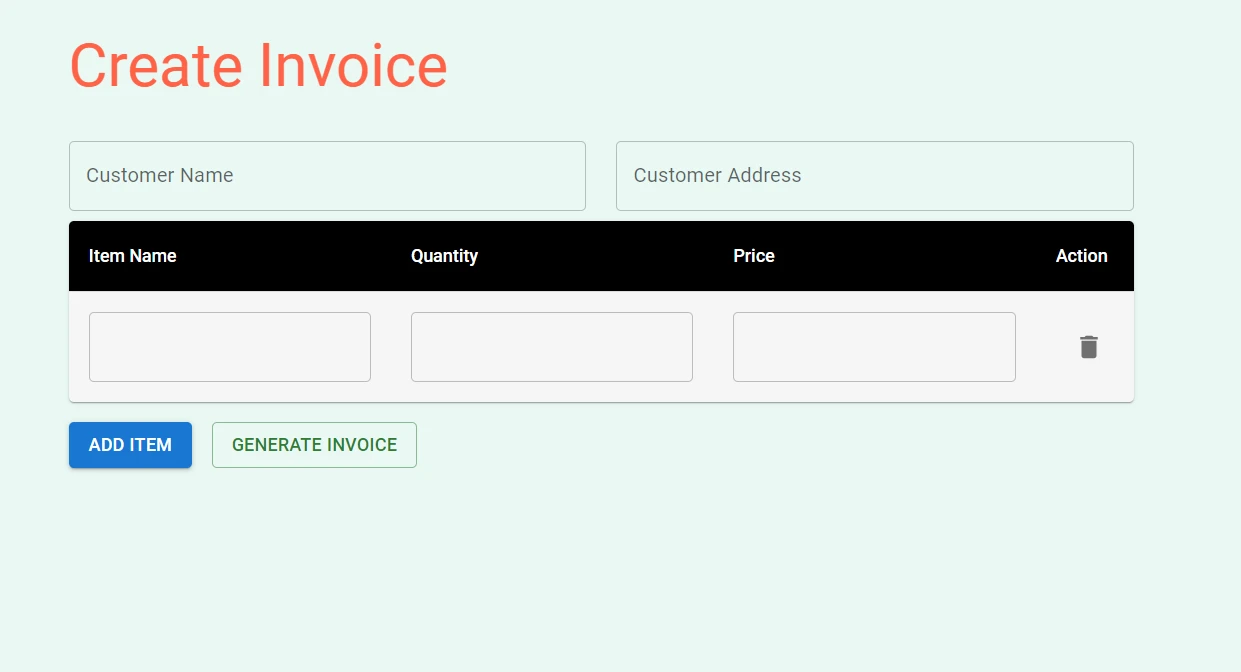
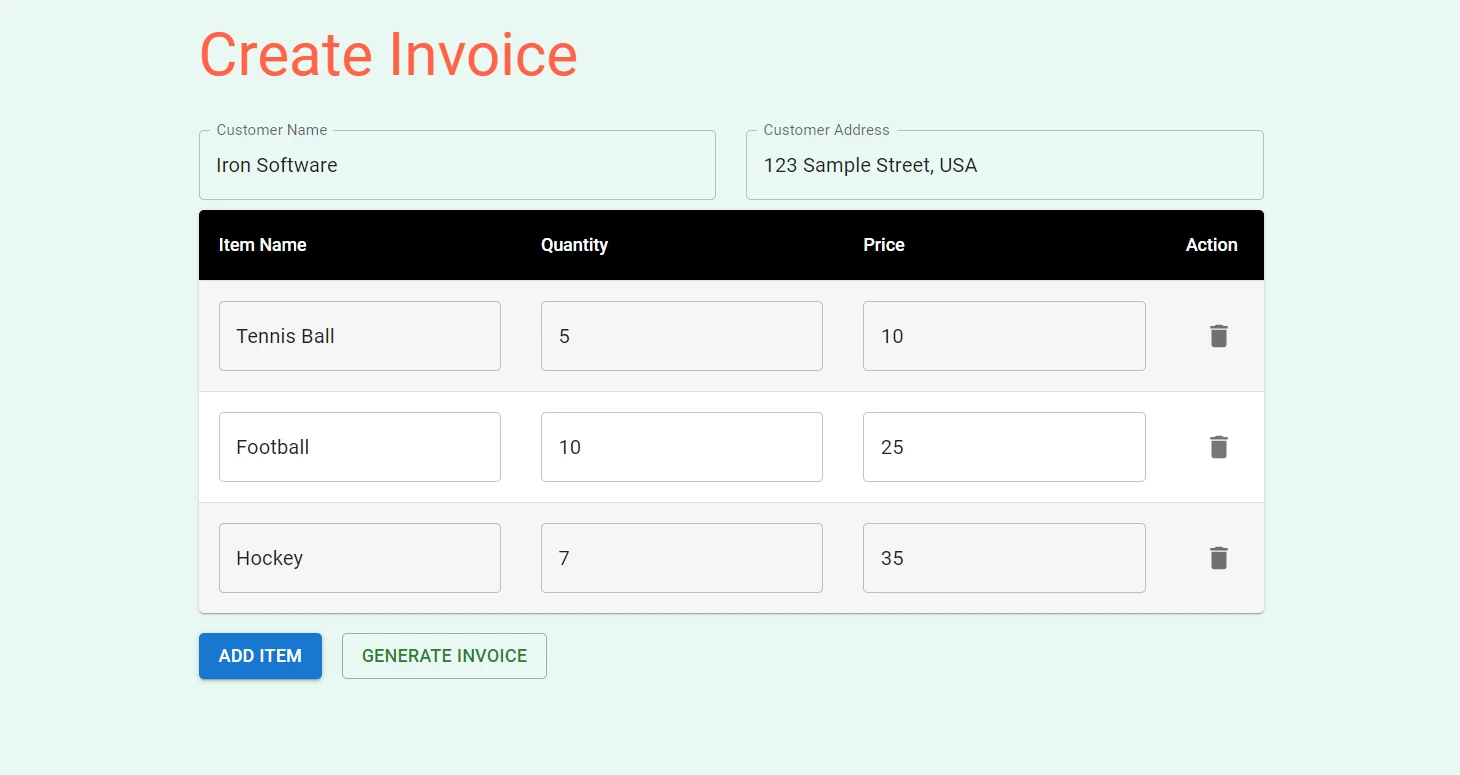
The return statement contains the JSX code that handles the rendering process. It includes input fields for customer name and address, a table to enter item details, buttons for adding items and generating the invoice, and an error snackbar for displaying validation errors.
It uses components from the Material-UI library, such as Button, TextField, Box, Container, Typography, Table, TableBody, TableCell, TableContainer, TableHead, TableRow, Paper, IconButton, Snackbar, and Alert, to create basic components. These components are used to create the form fields, tables, buttons, and error notifications.
return (
<Container maxWidth="md">
<Box sx={{ my: 4 }}>
<Typography variant="h3" component="h1" gutterBottom>
Create Invoice
</Typography>
{/* Customer Name and Address fields */}
<Grid container spacing={3}>
<Grid item xs={6}>
<TextField
label="Customer Name"
fullWidth
margin="normal"
value={customerName}
onChange={(e) => setCustomerName(e.target.value)}
/>
</Grid>
<Grid item xs={6}>
<TextField
label="Customer Address"
fullWidth
margin="normal"
value={customerAddress}
onChange={(e) => setCustomerAddress(e.target.value)}
/>
</Grid>
</Grid>
{/* Items table */}
<TableContainer component={Paper}>
<Table sx={{ minWidth: 700 }} aria-label="invoice table">
<TableHead>
<TableRow>
<StyledTableCell>Item Name</StyledTableCell>
<StyledTableCell align="left">Quantity</StyledTableCell>
<StyledTableCell align="left">Price</StyledTableCell>
<StyledTableCell align="left">Action</StyledTableCell>
</TableRow>
</TableHead>
<TableBody>
{items.map((item, index) => (
<StyledTableRow key={index}>
<StyledTableCell component="th" scope="row">
<TextField
fullWidth
value={item.name}
onChange={(event) => handleItemChange(index, event)}
name="name"
/>
</StyledTableCell>
<StyledTableCell align="right">
<TextField
fullWidth
value={item.quantity}
onChange={(event) => handleItemChange(index, event)}
name="quantity"
/>
</StyledTableCell>
<StyledTableCell align="right">
<TextField
fullWidth
value={item.price}
onChange={(event) => handleItemChange(index, event)}
name="price"
/>
</StyledTableCell>
<StyledTableCell align="right">
<IconButton onClick={() => deleteItem(index)}>
<DeleteIcon />
</IconButton>
</StyledTableCell>
</StyledTableRow>
))}
</TableBody>
</Table>
</TableContainer>
{/* Buttons */}
<Box mt={2} display="flex" gap={2}>
<Button variant="contained" onClick={addItem}>
Add Item
</Button>
<Button variant="outlined" color="success" onClick={generateInvoice}>
Generate Invoice
</Button>
</Box>
</Box>
{/* Error Snackbar */}
<Snackbar
open={error}
autoHideDuration={6000}
onClose={() => setError(false)}
anchorOrigin={{ vertical: "top", horizontal: "right" }}
>
<Alert onClose={() => setError(false)} severity="error">
Please fill in all required fields.
</Alert>
</Snackbar>
</Container>
);Here is the complete App.js code which you can copy and paste into your project:
import React, { useState } from "react";
import "./App.css";
import {
  Button,
  TextField,
  Box,
  Container,
  Typography,
  Table,
  TableBody,
  TableCell,
  TableContainer,
  TableHead,
  TableRow,
  Paper,
  IconButton,
  Snackbar,
  Alert,
} from "@mui/material";
import Grid from "@mui/material/Grid";
import DeleteIcon from "@mui/icons-material/Delete";
import jsPDF from "jspdf";
import { styled } from "@mui/material/styles";
import { tableCellClasses } from "@mui/material/TableCell";
const StyledTableCell = styled(TableCell)(({ theme }) => ({
  [`&.${tableCellClasses.head}`]: {
    backgroundColor: theme.palette.common.black,
    color: theme.palette.common.white,
  },
  [`&.${tableCellClasses.body}`]: {
    fontSize: 14,
  },
}));

const StyledTableRow = styled(TableRow)(({ theme }) => ({
  "&:nth-of-type(odd)": {
    backgroundColor: theme.palette.action.hover,
  },
  "&:last-child td, &:last-child th": {
    border: 0,
  },
}));
function App() {
  // State variables
  const [customerName, setCustomerName] = useState("");
  const [customerAddress, setCustomerAddress] = useState("");
  const [items, setItems] = useState([{ name: "", quantity: "", price: "" }]);
  const [error, setError] = useState(false);
// Event handler for item changes
const handleItemChange = (index, event) => {
let newItems = [...items];
newItems[index][event.target.name] = event.target.value;
setItems(newItems);
};
// Add new item to the list
const addItem = () => {
setItems([...items, { name: "", quantity: "", price: "" }]);
};
// Delete an item from the list
const deleteItem = (index) => {
let newItems = [...items];
newItems.splice(index, 1);
setItems(newItems);
};
// Generate invoice
const generateInvoice = () => {
  // Validate the input fields
  if (
    !customerName

    !customerAddress

    items.some((item) => !item.name

 !item.quantity

 !item.price)
  ) {
    setError(true);
    return;
  }

  // Create a new jsPDF instance
  let doc = new jsPDF("p", "pt");

  // Add invoice header
  doc.setFontSize(24);
  doc.text("Invoice", 40, 60);
  doc.setFontSize(10);
  doc.text("Invoice Number: 123456", 40, 90);
  doc.text("Date: " + new Date().toDateString(), 40, 110);
  doc.text(`Customer Name: ${customerName}`, 40, 130);
  doc.text(`Customer Address: ${customerAddress}`, 40, 150);

  // Add items section
  doc.setFontSize(14);
  doc.text("Items:", 40, 200);
  doc.line(40, 210, 550, 210);

  // Add item details
  doc.setFontSize(12);
  let yOffset = 240;
  let total = 0;

  items.forEach((item) => {
    let itemTotal = item.quantity * item.price;
    total += itemTotal;

    doc.text(`Item: ${item.name}`, 40, yOffset);
    doc.text(`Quantity: ${item.quantity}`, 200, yOffset);
    doc.text(`Price: $${item.price}`, 300, yOffset);
    doc.text(`Total: $${itemTotal}`, 400, yOffset);

    yOffset += 20;
  });

  // Add total
  doc.line(40, yOffset, 550, yOffset);
  doc.setFontSize(14);
  doc.text(`Total: $${total}`, 400, yOffset + 30);

  // Save the generated PDF as "invoice.pdf"
  doc.save("invoice.pdf");

  // Reset error state
  setError(false);
};
return (
  <Container maxWidth="md">
    <Box sx={{ my: 4 }}>
      <Typography variant="h3" component="h1" gutterBottom>
        Create Invoice
      </Typography>

      {/* Customer Name and Address fields */}
      <Grid container spacing={3}>
        <Grid item xs={6}>
          <TextField
            label="Customer Name"
            fullWidth
            margin="normal"
            value={customerName}
            onChange={(e) => setCustomerName(e.target.value)}
          />
        </Grid>
        <Grid item xs={6}>
          <TextField
            label="Customer Address"
            fullWidth
            margin="normal"
            value={customerAddress}
            onChange={(e) => setCustomerAddress(e.target.value)}
          />
        </Grid>
      </Grid>

      {/* Items table */}
      <TableContainer component={Paper}>
        <Table sx={{ minWidth: 700 }} aria-label="invoice table">
          <TableHead>
            <TableRow>
              <StyledTableCell>Item Name</StyledTableCell>
              <StyledTableCell align="left">Quantity</StyledTableCell>
              <StyledTableCell align="left">Price</StyledTableCell>
              <StyledTableCell align="left">Action</StyledTableCell>
            </TableRow>
          </TableHead>
          <TableBody>
            {items.map((item, index) => (
              <StyledTableRow key={index}>
                <StyledTableCell component="th" scope="row">
                  <TextField
                    fullWidth
                    value={item.name}
                    onChange={(event) => handleItemChange(index, event)}
                    name="name"
                  />
                </StyledTableCell>
                <StyledTableCell align="right">
                  <TextField
                    fullWidth
                    value={item.quantity}
                    onChange={(event) => handleItemChange(index, event)}
                    name="quantity"
                  />
                </StyledTableCell>
                <StyledTableCell align="right">
                  <TextField
                    fullWidth
                    value={item.price}
                    onChange={(event) => handleItemChange(index, event)}
                    name="price"
                  />
                </StyledTableCell>
                <StyledTableCell align="right">
                  <IconButton onClick={() => deleteItem(index)}>
                    <DeleteIcon />
                  </IconButton>
                </StyledTableCell>
              </StyledTableRow>
            ))}
          </TableBody>
        </Table>
      </TableContainer>

      {/* Buttons */}
      <Box mt={2} display="flex" gap={2}>
        <Button variant="contained" onClick={addItem}>
          Add Item
        </Button>
        <Button variant="outlined" color="success" onClick={generateInvoice}>
          Generate Invoice
        </Button>
      </Box>
    </Box>

    {/* Error Snackbar */}
    <Snackbar
      open={error}
      autoHideDuration={6000}
      onClose={() => setError(false)}
      anchorOrigin={{ vertical: "top", horizontal: "right" }}
    >
      <Alert onClose={() => setError(false)} severity="error">
        Please fill in all required fields.
      </Alert>
    </Snackbar>
  </Container>
);
}
export default App;Here is the App.css code:
@import url('https://fonts.googleapis.com/css2?family=Poppins:wght@400;700&display=swap');
.App {
  text-align: center;
}

.App-logo {
  height: 40vmin;
  pointer-events: none;
}

@media (prefers-reduced-motion: no-preference) {
  .App-logo {
    animation: App-logo-spin infinite 20s linear;
  }
}

h1,
h2,
h3,
h4,
h5,
h6 {
  font-weight: bold;
  /* This is the weight for bold in Poppins */
  color: #FF6347;
  /* This is the color Tomato. Replace with your preferred color */
}

body {
  font-family: 'Poppins', sans-serif;
  background-color: #E9F8F4;
}

.App-header {
  background-color: #282c34;
  min-height: 100vh;
  display: flex;
  flex-direction: column;
  align-items: center;
  justify-content: center;
  font-size: calc(10px + 2vmin);
  color: white;
}

.App-link {
  color: #61dafb;
}

@keyframes App-logo-spin {
  from {
    transform: rotate(0deg);
  }
  to {
    transform: rotate(360deg);
  }
}To test the PDF generation feature, run the following command in the terminal:
npm startThis will start the development server, and you can view the application in your browser at http://localhost:3000.
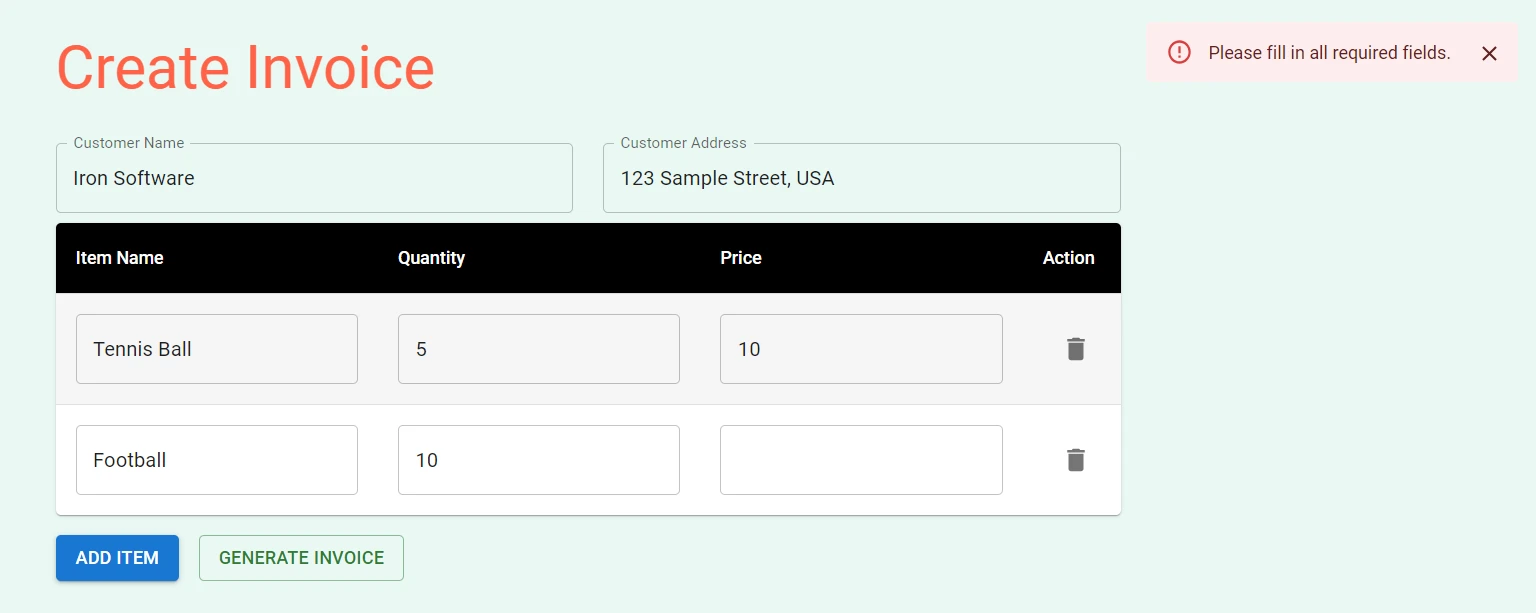
Fill in the customer name, address, and item details in the input fields and click the "Generate Invoice" button. The PDF file will be downloaded to your computer, and you can open it to see the full-page view of the generated invoice.
When you click on the "Generate Invoice" button, the PDF file will be generated.
If you try to generate a PDF with any empty field, an error message will be shown in the top right corner.
IronPDF is a comprehensive Node.js PDF library that excels in accuracy, ease of use, and speed. It offers a vast array of features for generating, editing, and formatting PDFs directly from HTML, URLs, and images in React. With support for various platforms including Windows, MacOS, Linux, Docker, and cloud platforms like Azure and AWS, IronPDF ensures cross-platform compatibility. Its user-friendly API allows developers to quickly integrate PDF generation and manipulation into their Node.js projects.
Notable features of IronPDF Node.js include: pixel-perfect rendering, extensive formatting options, and advanced editing capabilities like merging and splitting PDFs, adding annotations, and creating PDF forms.
Here is an example of generating a PDF document from HTML File, HTML String, and URL:
import {PdfDocument} from "@ironsoftware/ironpdf";

(async () => {
    const pdfFromUrl = await PdfDocument.fromUrl("https://getbootstrap.com/");
    await pdfFromUrl.saveAs("website.pdf");

    const pdfFromHtmlFile = await PdfDocument.fromHtml("design.html");
    await pdfFromHtmlFile.saveAs("markup.pdf");

    const pdfFromHtmlString = await PdfDocument.fromHtml("<p>Hello World</p>");
    await pdfFromHtmlString.saveAs("markup_with_assets.pdf");
})();For more code examples on PDF related tasks, please visit this code examples page.
In conclusion, creating PDFs in a React application doesn't have to be intimidating. With the right tools and a clear understanding, you can effortlessly generate beautiful, well-structured PDF documents. We have explored various libraries such as jsPDF, pdfmake, and React-PDF, each with its own strengths and unique features.
With IronPDF's straightforward integration process for frameworks and libraries in JavaScript, excellent documentation, and responsive technical support, developers can get up and running in no time, making it a top choice for generating professional-grade PDFs in Node.js applications.
IronPDF offers a free trial for testing out its complete functionality. It is also available for other languages like C# .NET, Java and Python. Visit the IronPDF website for more details.
30-day Trial Key instantly.
30-day Trial Key instantly.
Your trial key should be in the email.
If it is not, please contact
support@ironsoftware.com
Want to deploy IronPDF to a live project for FREE?
Your trial key should be in the email.![]()
The trial form was submitted
successfully.
If it is not, please contact
support@ironsoftware.com
Want to deploy IronPDF to a live project for FREE?
Your trial key should be in the email.![]()
The trial form was submitted
successfully.
If it is not, please contact
support@ironsoftware.com
Want to deploy IronPDF to a live project for FREE?
Your trial key should be in the email.![]()
The trial form was submitted
successfully.
If it is not, please contact
support@ironsoftware.com
Want to deploy IronPDF to a live project for FREE?
Your trial key should be in the email.![]()
The trial form was submitted
successfully.
If it is not, please contact
support@ironsoftware.com

Get started for FREE
No credit card required
Test in production without watermarks.
Works wherever you need it to.
Get 30 days of fully functional product.
Have it up and running in minutes.
Full access to our support engineering team during your product trial
![]() No credit card or account creation required
No credit card or account creation required
Your trial key should be in the email.
If it is not, please contact
support@ironsoftware.com
9 .NET API products for your office documents
Thank you!
Your license key has been delivered to the email provided. Contact us

24-Hour Upgrade Offer:
Save 50% on a
Professional Upgrade
Go Professional to cover 10 developers
and unlimited projects.
hours
:
minutes
:
seconds

Professional
$600 USD
$299 USD
5 .NET Products for the Price of 2
Total Suite Value:
$7,192 USD