

HTML to PDF NodeJS
The ability to create high-fidelity PDFs from raw HTML, CSS, and JavaScript is IronPDF's most powerful and most popular feature. This tutorial is a comprehensive primer for helping Node developers leverage IronPDF to incorporate HTML to PDF generation into their own projects.
IronPDF is a high level API library that helps developers implement powerful and robust PDF processing capabilities into software applications quickly and easily. IronPDF is available in multiple programming languages. For detailed coverage on how to create PDFs in .NET, Java, and Python, consult the official doc pages. This tutorial covers its usage as it applies to Node.js projects.
How to Convert HTML to PDF in Node.js
- Install the HTML to PDF Node library via NPM:
npm install @ironsoftware/ironpdf. - Import the PdfDocument class from the
@ironsoftware/ironpdfpackage. - Convert from HTML string, file, or web URL.
- (optional) Add headers & footers, change page size, orientation and color.
- Call
PdfDocument.saveAsto save the generated PDF
Getting Started
Install with npm
npm i @ironsoftware/ironpdf
Install the IronPDF Library for Node.js
Install the IronPDF Node.js package by running the NPM command given below in your chosen Node project:
npm install @ironsoftware/ironpdfYou can also download and install the IronPDF package manually.
Install the IronPDF Engine Manually (optional)
IronPDF for Node.js currently requires an IronPDF Engine binary to work properly.
Install the IronPDF Engine binary by installing the appropriate package for your operating system:
Please note
@ironpdf will automatically download and install the proper binary for your browser and operating system from NPM on its first execution. Installing this binary explicitly, however, will be vital in situations where access to the internet is limited, reduced, or undesired.Apply a License Key (optional)
By default, IronPDF will brand all documents that it generates or modifies with a titled background watermark.
 Obtain a license key at ironpdf.com/nodejs/licensing/ to generate PDF documents without watermarks.
To use IronPDF without the added watermark branding, you must set the licenseKey property on the global IronPdfGlobalconfig object with a valid license key. The source code for making this happen is given below:
import {IronPdfGlobalConfig} from "@ironsoftware/ironpdf";

var config = IronPdfGlobalConfig.getConfig();
config.licenseKey = "{YOUR-LICENSE-KEY-HERE}";Purchase a license key from our licensing page, or contact us to obtain a free trial license key.
Please note
The proceeding sections of this tutorial will assume that we have a license key and that we have set it in a separate JavaScript file called config.js. We import this script wherever we will make use of IronPDF functionality:
import {PdfDocument} from "@ironsoftware/ironpdf";
import('./config.js');
// ...Convert HTML to PDF
The Node release of the IronPDF Library provides three approaches for creating PDF files from HTML content:
- From a string of HTML code
- From a local HTML file
- From an online website
This section will explain all three methods in detail.
Create a PDF File from an HTML String
PdfDocument.fromHtml is a method that allows you to generate PDFs from strings of raw web page markup.
This method offers the most flexibility of the three approaches. This is because data in the HTML string can be sourced from virtually anywhere: text files, data streams, an HTML template, generated HTML data, etc.
The code example below demonstrates how to use the PdfDocument.fromHtml method in practice:
import {PdfDocument} from "@ironsoftware/ironpdf";
import('./config.js');
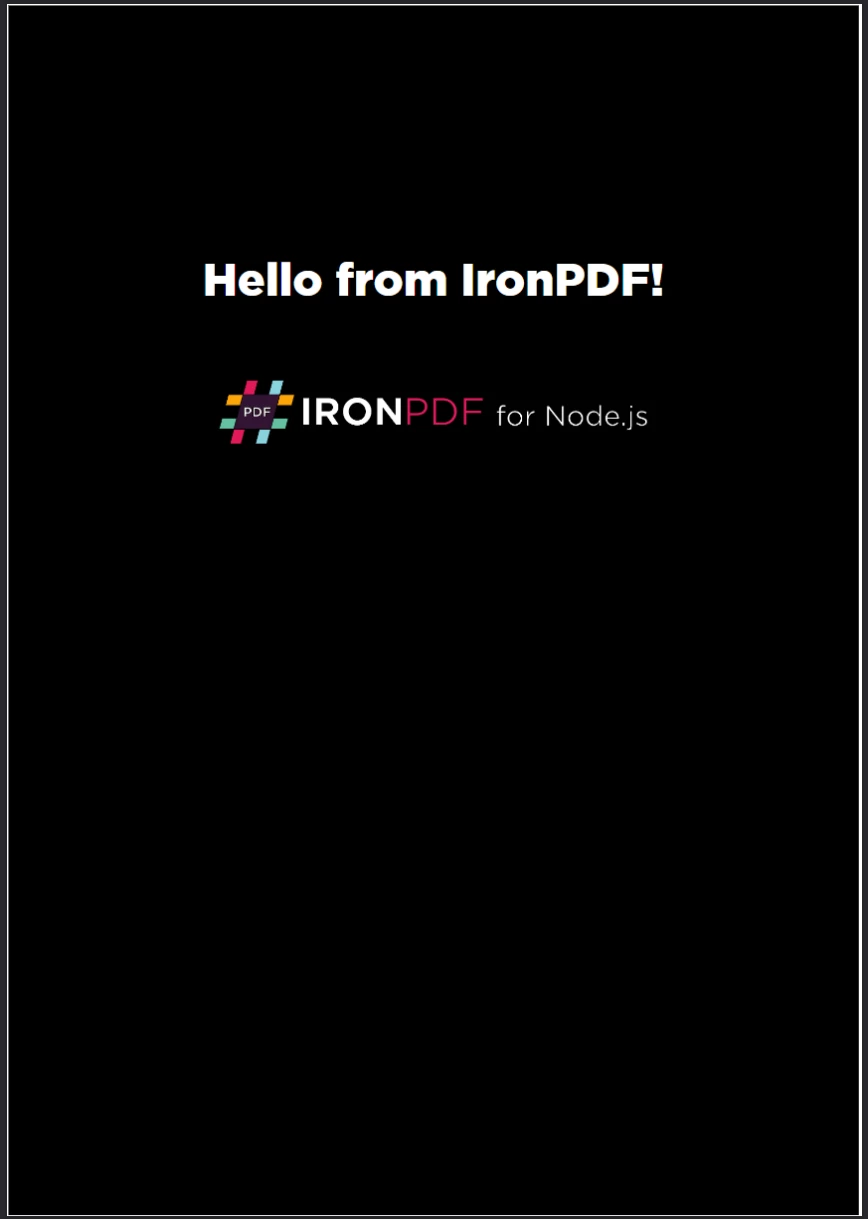
// Create a PDF from the HTML String "Hello world!"
const pdf = await PdfDocument.fromHtml("<h1>Hello from IronPDF!</h1>");
// Save the PDF document to the file system.
await pdf.saveAs("html-string-to-pdf.pdf");As shown above, we call the PdfDocument.fromHtml method with a text string containing the markup code for a level one headline element.
PdfDocument.fromHtml returns a Promise that resolves to an instance of the PdfDocument class. A PdfDocument represents a PDF file that the library has produced from some source content. This class forms the cornerstone of most of IronPDF's core features, driving significant PDF creation and editing use cases.
Finally, we use the saveAs method on the PdfDocument to save the file to disk. The saved PDF file is shown below.
 The PDF generated from the HTML string "
<h1>Hello from IronPDF!</h1>". The PDF files that PdfDocument.fromHtml generates appear just web page content would appear.
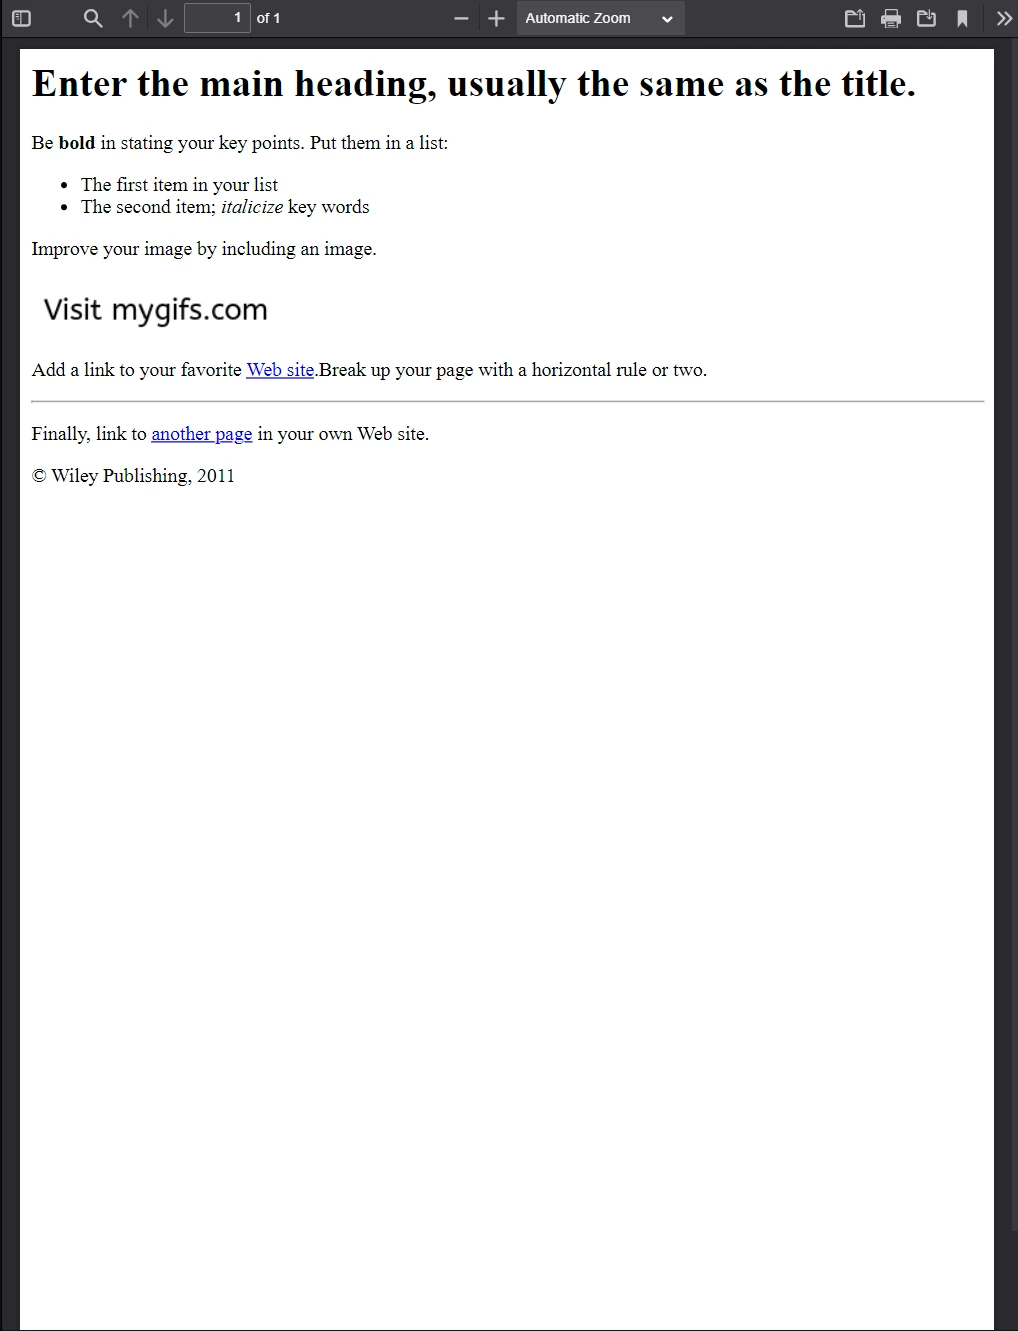
Create a PDF File from an HTML File
PdfDocument.fromHtml doesn't just work with HTML strings. The method also accepts a path to a local HTML document.
In our next example, we will work with this sample web page.
 Our sample HTML page as it appears in Google Chrome. Download this page and similar ones from the File Samples website: https://filesamples.com/samples/code/html/sample2.html
The following lines of code convert the entire sample document into a PDF. In place of an HTML string, we call PdfDocument.fromHtml with a valid file path to our sample file:
import {PdfDocument} from "@websiteironsoftware/ironpdf";
import('./config.js');

// Render a PDF from an HTML File
const pdf = await PdfDocument.fromHtml("./sample2.html");

// Save the PDF document to the same folder as our project.
await pdf.saveAs("html-file-to-pdf-1.pdf");We have included the contents of the resulting PDF below. Notice that IronPDF not only preserves the appearance of the original HTML document, but it also retains the functionality of links, forms, and other common interactive elements.
 This PDF was generated from the previous code example. Compare its appearance with the previous image, and note the remarkable resemblance!
If you've examined the source code for the sample page, you will notice it is more complex. It uses more types of HTML elements (paragraphs, unordered lists, line breaks, horizontal rules, hyperlinks, images, etc.) and also includes some amount of scripting (used for setting cookies).
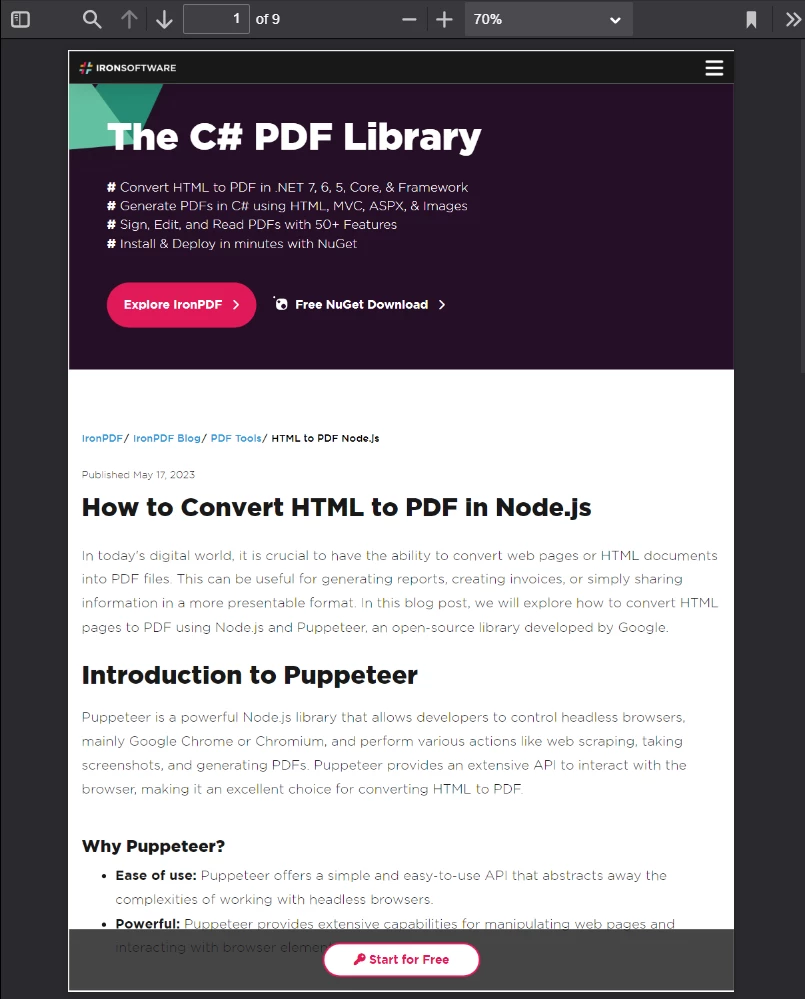
IronPDF is capable of rendering web content that is far more complex than what we have been using so far. To demonstrate this, let us consider the following page:
 An article written about Puppeteer, a Node Library popularized for its ability to control Chrome programmatically using a headless browser instance
The page depicted above is of an article written about the Puppeteer Node Library. Puppeteer runs headless browser sessions that Node developers use to automate numerous browser tasks on the server side or on the client side (one of which includes server-side HTML PDF Generation).
The new page sources numerous assets (CSS files, images, script files, etc.) and uses an even more complex layout. For this next example, will be converting a saved copy of this page (along with its source assets) into a pixel-perfect PDF.
The code snippet below assumes that the page is saved in the same directory as our project as "sample4.html":
// Render a from even more complex HTML code.
PdfDocument.fromHtml("./sample4.html").then((pdf) async {
    return await pdf.saveAs("html-file-to-pdf-2.pdf");
});The following image shows the results of the above code snippet.
 If it looks good in Google Chrome, then it will look good when converted into a PDF. This includes CSS and JavaScript-heavy page designs.
Create a PDF File from a URL
IronPDF can convert HTML strings and HTML files of any size and complexity. You are not limited to just using raw markup from strings and files, however. IronPDF can also request HTML from a URL.
Consider the Wikipedia article located at https://en.wikipedia.org/wiki/PDF.
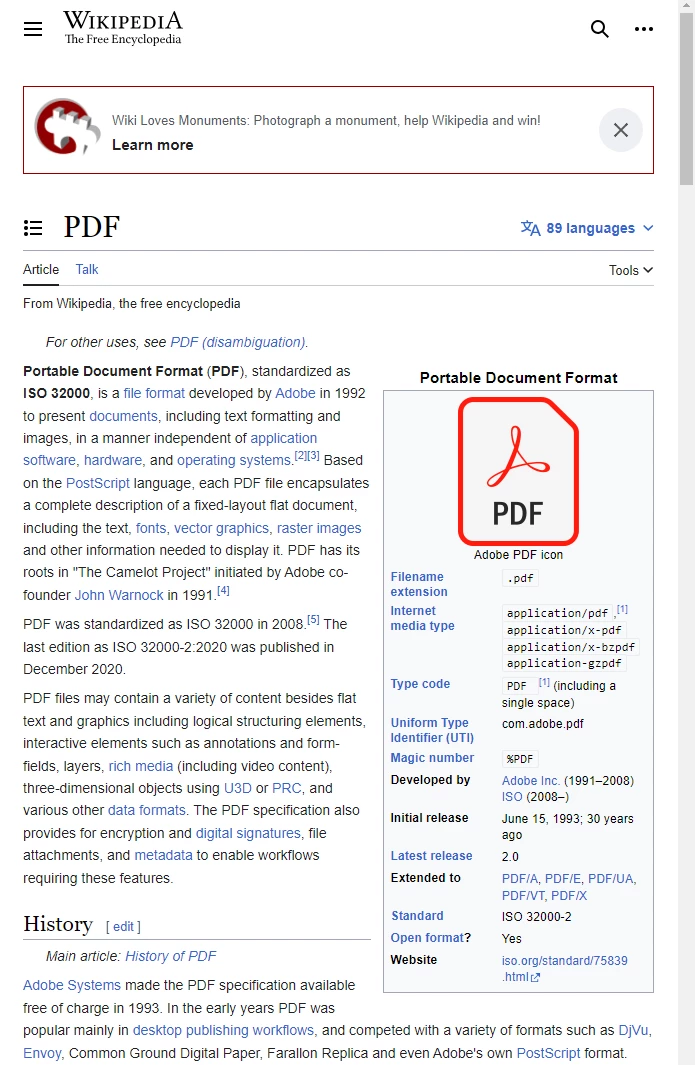 The Wikipedia article about the PDF format, as it appears in a standards-compliant web browser.
Use this source code to convert this Wikipedia article into a PDF:
import {PdfDocument} from "@ironsoftware/ironpdf";
import('./config.js');

// Convert the Web Page to a pixel-perfect PDF file.
const pdf = await PdfDocument.fromUrl("https://en.wikipedia.org/wiki/PDF");

// Save the document.
await pdf.saveAs("url-to-pdf.pdf");Above, we use PdfDocument.fromUrl to convert the web page into a PDF within a few lines of code. IronPDF will grab the HTML code for the web address for you and render it seamlessly. No HTML files or text strings are required!
 The PDF generated from calling
 PdfDocument.fromUrl on a Wikipedia article. Note its similarities to the original web page.
Create a PDF File from a Zip Archive
Use PdfDocument.fromZip to convert a specific HTML file located in a compressed (zip) file into a PDF.
For instance, let's assume that we have a Zip file in the project directory with the following internal structure:
html-zip.zip
├─ index.html
├─ style.css
├─ logo.png
The index.html file contains the code:
<!DOCTYPE html>

<html lang="en">
  <head>
    <meta charset="UTF-8">
    <meta name="viewport" content="width=device-width, initial-scale=1">
    <title>Hello world!</title>
    <link rel="stylesheet" href="style.css">
  </head>
  <body>
    <h1>Hello from IronPDF!</h1>
    <a href="https://ironpdf.com/nodejs/">
      <img src="logo.png" alt="IronPDF for Node.js">
    </a>
  </body>
</html>
<!DOCTYPE html>
<html lang="en">
<head>
<meta charset="UTF-8">
<meta name="viewport" content="width=device-width, initial-scale=1">
<title>Hello world!</title>
<link rel="stylesheet" href="style.css">
</head>
<body>
<h1>Hello from IronPDF!</h1>
<a href="https://ironpdf.com/nodejs/">
<img src="logo.png" alt="IronPDF for Node.js">
</a>
</body>
</html>style.css declares five CSS rules:
@font-face {
font-family: 'Gotham-Black';
src: url('gotham-black-webfont.eot?') format('embedded-opentype'), url('gotham-black-webfont.woff2') format('woff2'), url('gotham-black-webfont.woff') format('woff'), url('gotham-black-webfont.ttf') format('truetype'), url('gotham-black-webfont.svg') format('svg');
font-weight: normal;
font-style: normal;
font-display: swap;
}

body {
    display: flex;
    flex-direction: column;
    justify-content: center;
    margin-left: auto;
    margin-right: auto;
    margin-top: 200px;
    margin-bottom: auto;
    color: white;
    background-color: black;
    text-align: center;
    font-family: "Helvetica"
}

h1 {
    font-family: "Gotham-Black";
    margin-bottom: 70px;
    font-size: 32pt;
}

img {
    width: 400px;
    height: auto;
}

p {
    text-decoration: underline;
    font-size: smaller;
}
Lastly, logo.png depicts our product logo:
 The sample image inside a hypothetical HTML zip file.
When calling the fromZip method, specify a valid path to the zip in the first argument, along with a JSON object that sets the mainHtmlFile property with the name of the HTML file from the zip that we want to convert.
We convert the index.html file inside the zip folder in like manner:
import {PdfDocument} from "@ironsoftware/ironpdf";
import('./config.js');

// Render the HTML string
PdfDocument.fromZip("./html-zip.zip", {
    mainHtmlFile: "index.html"
}).then(async (pdf) => {
    return await pdf.saveAs("html-zip-to-pdf.pdf");
}); PDF Creation using the
 PdfDocument.fromZip function. This function successfully renders the HTML code contained in the ZIP file, with its contained assets.
Advanced HTML to PDF Generation Options
The ChromePdfRenderOptions interface allows Node developers to modify the library's HTML rendering behavior. The properties exposed there enable granular customization of the appearance of PDFs prior to PDF rendering. In addition, they make it possible to handle specific HTML-PDF conversion edge cases.
IronPDF renders new PDFs initially using some default ChromePdfRenderOptions values. You can poll these preset values for yourself by calling the defaultChromePdfRenderOptions function:
// Retrieve a ChromePdfRenderOptions object with default settings.
var options = defaultChromePdfRenderOptions();This section will breeze through the most popular HTML-to-PDF rendering use cases that require the use of the ChromePdfRenderOptions interface.
Each subsection will start with the preset values and modify them as needed to achieve the target outcome.
Customize PDF Generation Output
Add Custom Headers and Footers
With the textHeader and textFooter properties, you can affix custom header and/or footer content to newly rendered PDFs.
The example below creates a PDF version of the Google search homepage with a custom header and footer made from text content. We use divider lines to separate this content from the page body. We also use distinct fonts in the header and footer to make the distinctions clearer.
import {PdfDocument, defaultChromePdfRenderOptions, AffixFonts} from "@ironsoftware/ironpdf";
import('./config.js');

var options = defaultChromePdfRenderOptions();

// Build a Custom Text-Based Header
options.textHeader = {
    centerText: "https://www.adobe.com",
    dividerLine: true,
    font: AffixFonts.CourierNew,
    fontSize: 12,
    leftText: "URL to PDF"
};

// Build a custom Text-Based Footer
options.textFooter = {
    centerText: "IronPDF for Node.js",
    dividerLine: true,
    fontSize: 14,
    font: AffixFonts.Helvetica,
    rightText: "HTML to PDF in Node.js"
};

// Render a PDF from an HTML File
PdfDocument.fromUrl("https://www.google.com/", {renderOptions: options}).then(async (pdf) => {
    return await pdf.saveAs("add-custom-headers-footers-1.pdf");
});The source code produces this PDF:
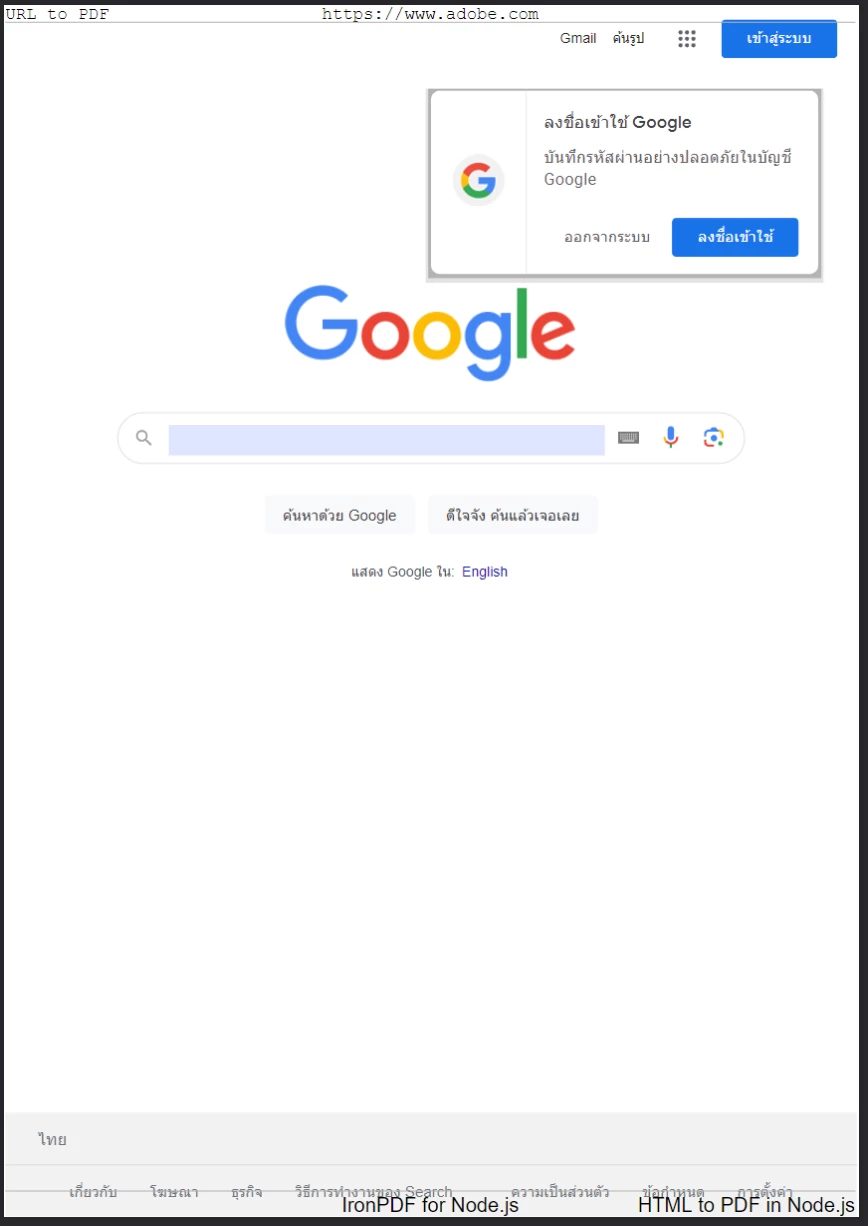 A new page was created in PDF format, generated from the Google home page. Note the inclusion of additional headers and footers.
For even more control over the layout, positioning, and content included in the header and the footer, you can also define them using raw HTML in lieu of text.
In the subsequent code block, we use HTML to incorporate richer content in the header and footer. In the header, we bold and center-align the page URL; in the footer, we embed and center a logo.
import {PdfDocument, defaultChromePdfRenderOptions} from "@ironsoftware/ironpdf";
import('./config.js');

var options = defaultChromePdfRenderOptions();
options.htmlHeader = {
    htmlFragment: "<strong>https://www.google.com/</strong>",
    dividerLine: true,
    dividerLineColor: "blue",
    loadStylesAndCSSFromMainHtmlDocument: true,
};
options.htmlFooter = {
    htmlFragment: "<img src='logo.png' alt='IronPDF for Node.js' style='display: block; width: 150px; height: auto; margin-left: auto; margin-right: auto;'>",
    dividerLine: true,
    loadStylesAndCSSFromMainHtmlDocument: true
};

// Render a PDF from an HTML File
await PdfDocument.fromUrl("https://www.google.com/", {renderOptions: options}).then(async (pdf) => {
    return await pdf.saveAs("add-html-headers-footers.pdf");
});The image below shows the result of these changes.
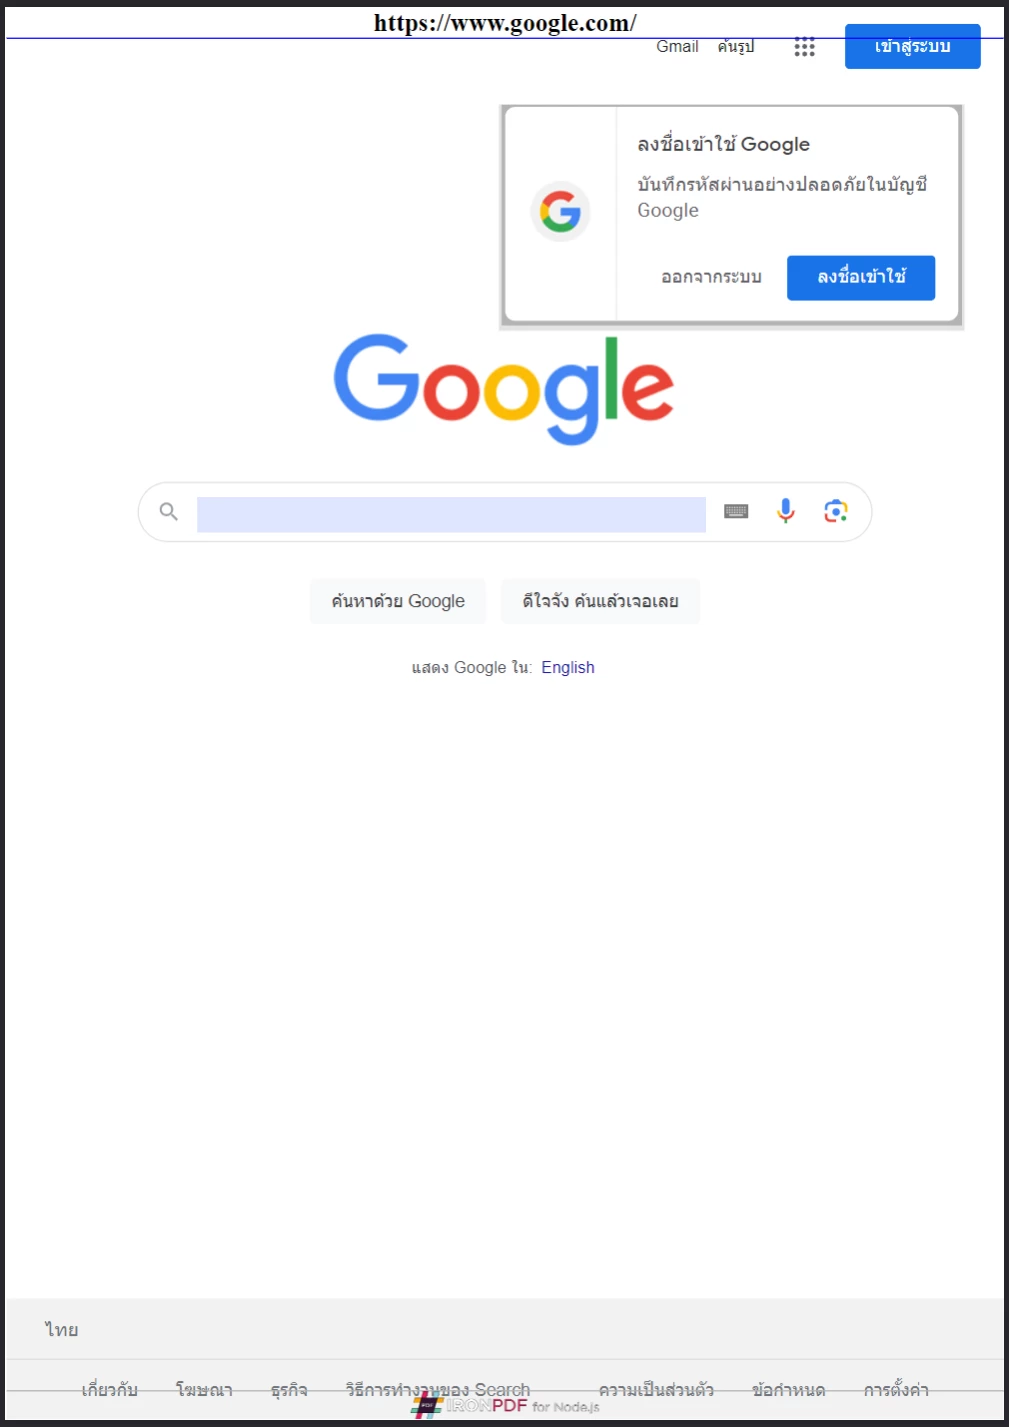 IronPDF for Node.js can apply customizations to your HTML pages while converting into PDFs.
Set Margins, Page Sizes, Page Orientation, and Color
IronPDF supports additional settings for defining custom page margins, page sizes, and page orientations for freshly converted PDFs.
import {PdfDocument, defaultChromePdfRenderOptions, PaperSize, FitToPaperModes, PdfPaperOrientation} from "@ironsoftware/ironpdf";
import('./config.js');

var options = defaultChromePdfRenderOptions();

// Set top, left, right, and bottom page margins in millimeters.
options.margin = {
    top: 50,
    bottom: 50,
    left: 60,
    right: 60
};
options.paperSize = PaperSize.A5;
options.fitToPaperMode = FitToPaperModes.FitToPage;
options.paperOrientation = PdfPaperOrientation.Landscape;
options.grayScale = true;

// Create a PDF from the Google.com Home Page
PdfDocument.fromUrl("https://www.google.com/", {renderOptions: options}).then(async (pdf) => {
    return await pdf.saveAs("set-margins-and-page-size.pdf");
});In the block of code above, we configure IronPDF to generate our Google homepage PDF in grayscale using landscape orientation and with at least 50 millimeters of margin space. We also set it to fit the content for A5 paper sizing.
Generate PDFs from Dynamic Web Pages
For web pages that contain content that is not immediately available and rendered on page load, it may be necessary to pause the rendering of that page's content until certain conditions have been satisfied.
For instance, the developer may want to generate a PDF containing content that only appears 15 seconds after the page loads. In another case, this same content may only appear once some complex client-side code executes.
To handle both of these edge cases (and many more), the Node release of IronPDF defines the WaitFor mechanism. Developers can include this property in their ChromePdfRenderOptions settings to instruct IronPDF's Chrome Rendering engine to convert a page's content when certain events occur.
The following code block sets IronPDF to wait for 20 seconds to elapse before capturing our home page's content as a PDF:
import {PdfDocument, defaultChromePdfRenderOptions, WaitForType} from "@ironsoftware/ironpdf";
import('./config.js');

// Configure the Chrome Renderer to wait until 20 seconds has passed
// before rendering the web page as a PDF.
var options = defaultChromePdfRenderOptions();
options.waitFor = {
    type: WaitForType.RenderDelay,
    delay: 20000
}
PdfDocument.fromUrl("https://ironpdf.com/nodejs/", {renderOptions: options}).then(async (pdf) => {
    return await pdf.saveAs("waitfor-renderdelay.pdf");
});The next code block configures IronPDF to wait until an element on a popular SEO text editor can be selected successfully.
import {PdfDocument, defaultChromePdfRenderOptions, WaitForType} from "@ironsoftware/ironpdf";
import('./config.js');

// Configure the Chrome Renderer to wait up to 20 seconds for a specific element to appear
options.waitFor = {
    type: WaitForType.HtmlElement,
    htmlQueryStr: "div.ProseMirror",
    maxWaitTime: 20000,
}
PdfDocument.fromUrl("https://app.surferseo.com/drafts/s/V7VkcdfgFz-dpkldsfHDGFFYf4jjSvvjsdf", {renderOptions: options}).then(async (pdf) => {
    return await pdf.saveAs("waitfor-htmlelement.pdf");
});Generate PDFs from an HTML Template
In the final section of this tutorial, we will apply all the knowledge introduced in the previous sections to accomplish a very practical automation: generating one or more PDFs using an HTML template.
The template that we will be using for this section is shown below. It was adapted from this publicly accessible invoice template to include placeholder tags (e.g. {COMPANY-NAME}, {FULL-NAME}, {INVOICE-NUMBER}, etc.) for replaceable content.
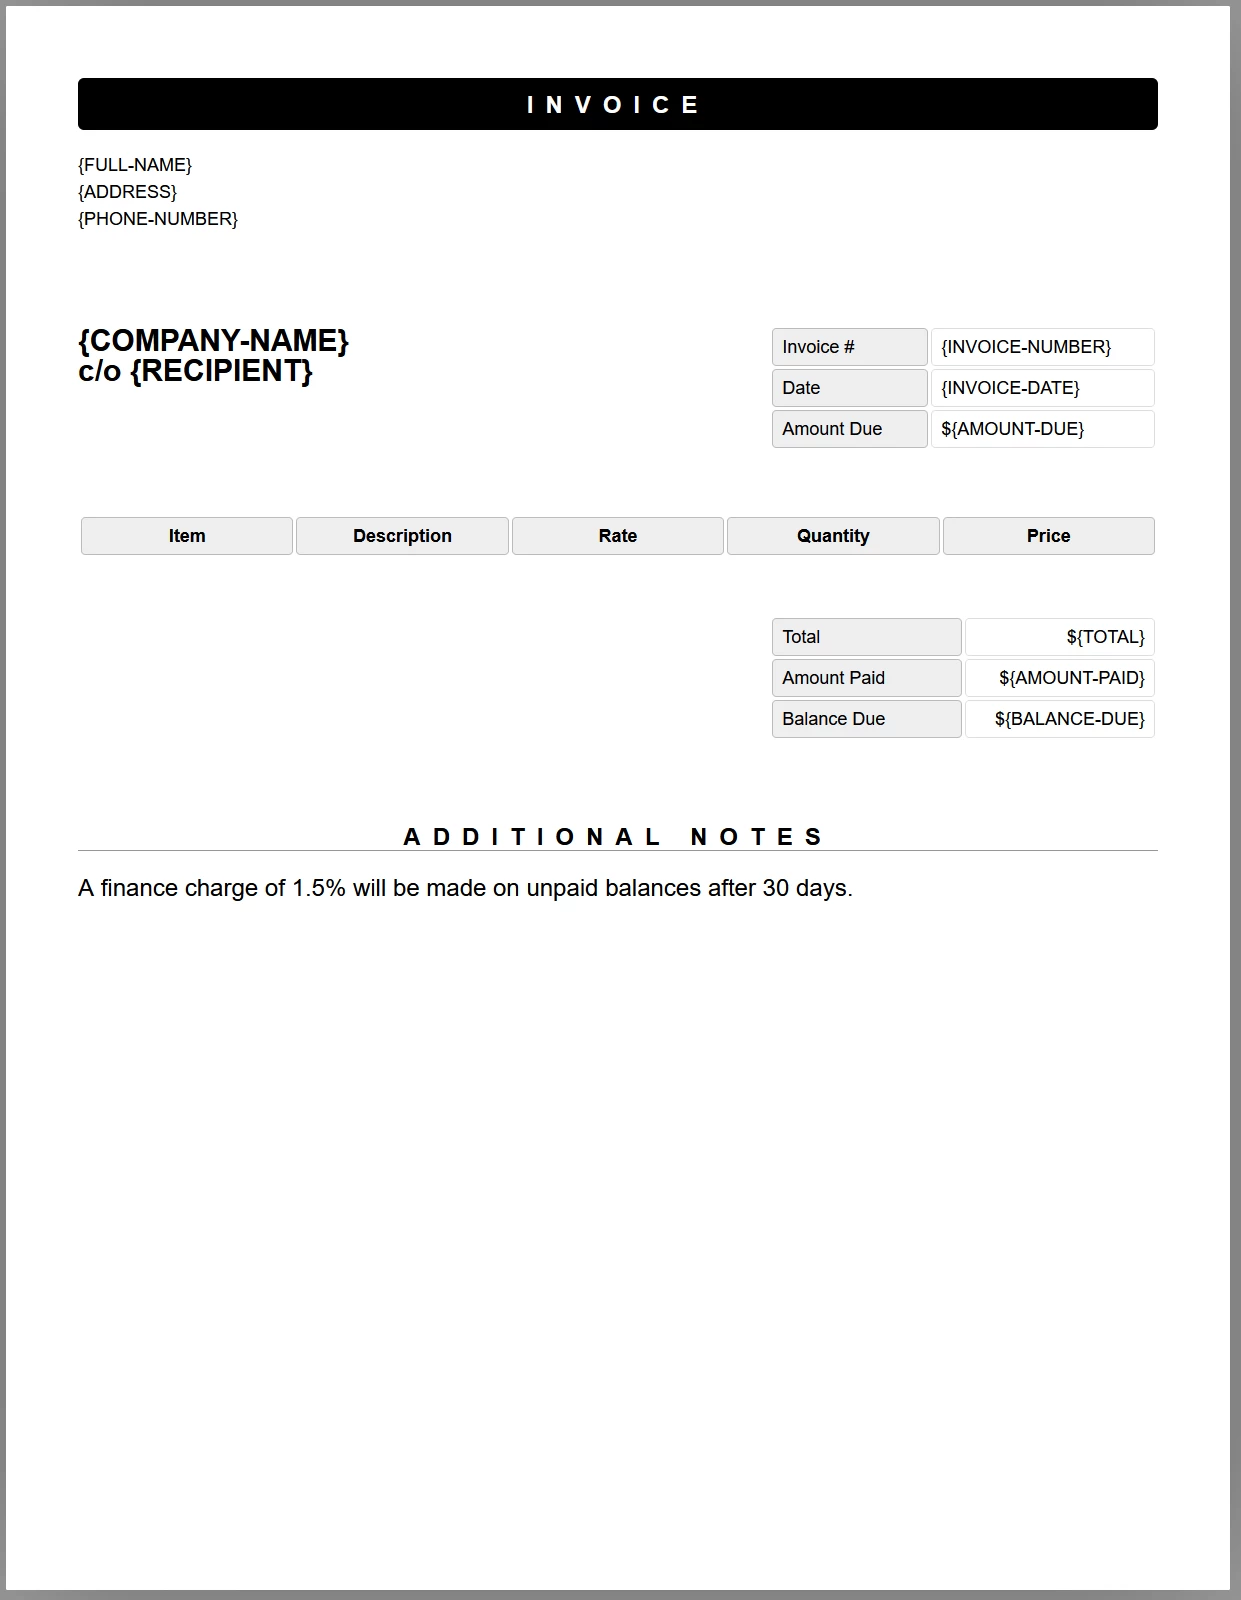 A sample invoice template. We will write additional JavaScript code that will add dynamic data to this template before we generate it into PDFs.
Before continuing, you can download this HTML template and examine it in your preferred IDE.
In the next block of source code, we will load the HTML template into a new PdfDocument object, replace the placeholders that we defined with some dummy test data, and then save the PdfDocument object to the file system.
import {PdfDocument} from "@ironsoftware/ironpdf";
import('./config.js');

/**
 * Loads an HTML template from the file system.
 */
async function getTemplateHtml(fileLocation) {
    // Return promise for loading template file
    return PdfDocument.fromFile(fileLocation);
}

/**
 * Save the PDF document at a given location.
 */
async function generatePdf(pdf, location) {
    return pdf.saveAs(location);
}

/**
 * Use the PdfDocument.replaceText method to replace
 * a specified placeholder with a provided value.
 */
async function addTemplateData(pdf, key, value) {
    return pdf.replaceText(key, value);
}

const template = "./sample-invoice.html";
getTemplateHtml(template).then(async (doc) => { // load HTML template from file
    await addTemplateData(doc, "{FULL-NAME}", "Lizbeth Presland");
    await addTemplateData(doc, "{ADDRESS}", "678 Manitowish Alley, Portland, OG");
    await addTemplateData(doc, "{PHONE-NUMBER}", "(763) 894-4345");
    await addTemplateData(doc, "{INVOICE-NUMBER}", "787");
    await addTemplateData(doc, "{INVOICE-DATE}", "August 28, 2023");
    await addTemplateData(doc, "{AMOUNT-DUE}", "13,760.13");
    await addTemplateData(doc, "{RECIPIENT}", "Celestyna Farmar"),
    await addTemplateData(doc, "{COMPANY-NAME}", "BrainBook");
    await addTemplateData(doc, "{TOTAL}", "13,760.13");
    await addTemplateData(doc, "{AMOUNT-PAID}", "0.00");
    await addTemplateData(doc, "{BALANCE-DUE}", "13,760.13");
    await addTemplateData(doc, "{ITEM}", "Training Sessions");
    await addTemplateData(doc, "{DESCRIPTION}", "60 Minute instruction");
    await addTemplateData(doc, "{RATE}", "3,440.03");
    await addTemplateData(doc, "{QUANTITY}", "4");
    await addTemplateData(doc, "{PRICE}", "13,760.13");
    return doc;
}).then(async (doc) => await generatePdf(doc, "html-template-to-pdf.pdf"));The source above defines three asynchronous helper functions:
getTemplateHtml: uses thePdfDocument.fromHtmlmethod to load an HTML template into a newPdfDocumentobject.addTemplateData: uses thePdfDocument.replaceTextmethod to substitute a provided placeholder (referred to as a key), with its replacement data value.generatePdf: saves aPdfDocumentto a given file location.
Moreover, we declare a const template variable to hold the location of our HTML template file. The PDF generated from the source code above is shown below.
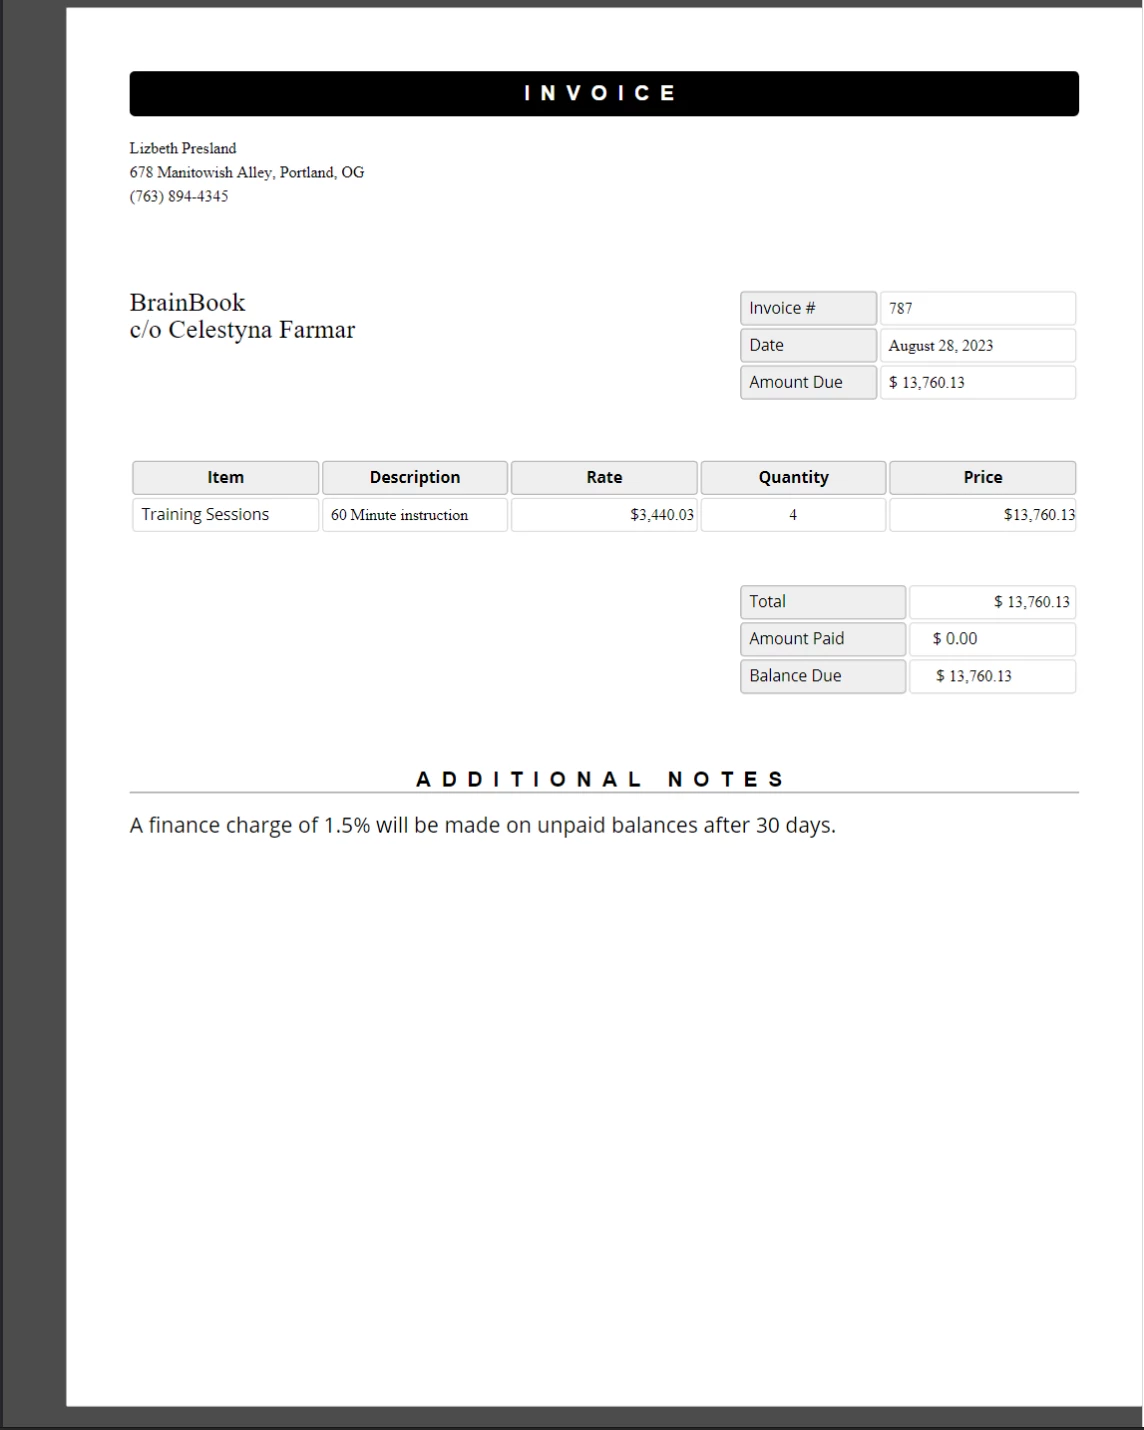 The new PDF document created from substituting placeholders defined in an HTML template with real data. This document retains the CSS styles and layout that we would expect if no such replacements ever took place.
Further Reading
This tutorial has only scratched the surface of what is possible with IronPDF's high-level API functions. Consider studying these related topics to further your knowledge and understanding.
- The
PdfGeneratorclass: this is a dedicated utility class for creatingPdfDocumentobjects from HTML, URLs, Zip archives, and other source media. This class offers a viable alternative to using the PDF rendering functions defined on thePdfDocumentclass. HttpLoginCredentials: if you ever need to generate PDFs from web pages that require specific cookies or that is password-protected, then this reference will prove to be extremely useful.


