FastAPI Python(如何為開發人員運作)
FastAPI 是一個現代化的高效能網頁框架,用於使用 Python 建立 API。 它設計為易於使用和學習,同時提供強大的功能,如自動驗證、序列化和自動互動 API 文件。 此外,它能與任何模板引擎一起使用,讓您可以使用專案所需的任何預設模板配置。
讓我們深入了解 FastAPI 的細節、其功能以及如何有效地使用它。 在這篇文章的後面,我們還將探討來自 Iron Software 的 PDF 生成 Python 套件 IronPDF。
FastAPI 的關鍵功能
- 高效能: FastAPI 是現有最快的 Python 框架之一,與 Node.js 和 Go 相當,這要歸功於它使用 Starlette 處理網頁部分及 Pydantic 處理資料部分。
- 易於使用: 它設計為直觀,並減少閱讀文件的時間。 框架使用標準的 Python 型別提示來進行資料驗證和序列化。
- 自動互動文件: FastAPI 使用 OpenAPI 和 JSON Schema 自動生成互動 API 文件,可透過 /docs (Swagger UI) 和 /redoc (ReDoc) 存取。 任何 API 的更新都會自動反映在文件中。
- 編輯器支援: 為如 VS Code 之類的編輯器提供卓越的程式碼補全和型別檢查支援,讓開發更快、更少錯誤。
- 基於標準: 它是基於(並完全相容)API 的開放標準:OpenAPI 和 JSON Schema。
安裝
您可以使用 pip 安裝 FastAPI 和 Uvicorn(一個 ASGI 伺服器):
pip install fastapi
pip install "uvicorn[standard]"
pip install fastapi
pip install "uvicorn[standard]"建立您的第一個 FastAPI 應用程式
這是一個簡單的範例,讓您開始使用 FastAPI,並通過使用者介面展示 Python 資料:
from fastapi import FastAPI

# Create a FastAPI 'app' instance
app = FastAPI()

# Root path operation
@app.get("/")
def read_root():
    return {"Hello": "World"}

# Path operation for items including query parameter 'q'
@app.get("/items/{item_id}")
def read_item(item_id: int, q: str = None):
    return {"item_id": item_id, "q": q}
from fastapi import FastAPI
# Create a FastAPI 'app' instance
app = FastAPI()
# Root path operation
@app.get("/")
def read_root():
return {"Hello": "World"}
# Path operation for items including query parameter 'q'
@app.get("/items/{item_id}")
def read_item(item_id: int, q: str = None):
return {"item_id": item_id, "q": q}要運行應用程式,請使用 Uvicorn:
uvicorn main:app --reloaduvicorn main:app --reload此命令將啟動一個開發伺服器,並在程式碼更改時自動重新載入。 您可以在 http://127.0.0.1:8000/docs 存取互動 API 文件。
進階功能
FastAPI 支援廣泛的進階功能,使其適合於複雜的應用程式:
- 依賴注入: FastAPI 提供強大的依賴注入系統,使您可以清晰高效地管理依賴關係。
- 背景任務: 您可以定義背景任務在返回回應後執行,適用於發送電子郵件或處理資料等任務。
- WebSockets: FastAPI 支援 WebSockets,實現使用者端和伺服器之間的實時通信。
- 安全性: FastAPI 包括處理安全性的工具,包括 OAuth2、JWT 令牌等。
- 資料庫整合: FastAPI 可以使用如 SQLAlchemy 或 Tortoise-ORM 等程式庫輕鬆整合資料庫。
範例:建立一個 CRUD API
讓我們建立一個簡單的 CRUD(建立、讀取、更新、刪除)API 來管理項目。
- 定義資料模型:
from pydantic import BaseModel

# Define a Pydantic model for the item with default description and tax
class Item(BaseModel):
    name: str
    description: str = None
    price: float
    tax: float = None
from pydantic import BaseModel
# Define a Pydantic model for the item with default description and tax
class Item(BaseModel):
name: str
description: str = None
price: float
tax: float = None- 建立 FastAPI 應用程式:
from fastapi import FastAPI, HTTPException

# Initialize 'app' instance and an empty 'items' dictionary
app = FastAPI()
items = {}

# Create operation: Add a new item
@app.post("/items/")
def create_item(item: Item):
    item_id = len(items) + 1
    items[item_id] = item
    return item

# Read operation: Retrieve an item by 'item_id'
@app.get("/items/{item_id}")
def read_item(item_id: int):
    if item_id not in items:
        raise HTTPException(status_code=404, detail="Item not found")
    return items[item_id]

# Update operation: Replace an existing item
@app.put("/items/{item_id}")
def update_item(item_id: int, item: Item):
    if item_id not in items:
        raise HTTPException(status_code=404, detail="Item not found")
    items[item_id] = item
    return item

# Delete operation: Remove an item by 'item_id'
@app.delete("/items/{item_id}")
def delete_item(item_id: int):
    if item_id not in items:
        raise HTTPException(status_code=404, detail="Item not found")
    del items[item_id]
    return {"message": "Item deleted"}
from fastapi import FastAPI, HTTPException
# Initialize 'app' instance and an empty 'items' dictionary
app = FastAPI()
items = {}
# Create operation: Add a new item
@app.post("/items/")
def create_item(item: Item):
item_id = len(items) + 1
items[item_id] = item
return item
# Read operation: Retrieve an item by 'item_id'
@app.get("/items/{item_id}")
def read_item(item_id: int):
if item_id not in items:
raise HTTPException(status_code=404, detail="Item not found")
return items[item_id]
# Update operation: Replace an existing item
@app.put("/items/{item_id}")
def update_item(item_id: int, item: Item):
if item_id not in items:
raise HTTPException(status_code=404, detail="Item not found")
items[item_id] = item
return item
# Delete operation: Remove an item by 'item_id'
@app.delete("/items/{item_id}")
def delete_item(item_id: int):
if item_id not in items:
raise HTTPException(status_code=404, detail="Item not found")
del items[item_id]
return {"message": "Item deleted"}介紹 IronPDF
IronPDF 是一個強大的 Python 程式庫,設計用於從 HTML、CSS、圖片和 JavaScript 建立、編輯和簽署 PDF。 它提供商業級的性能,並具備低記憶體佔用。 其主要功能包括:
HTML 到 PDF 轉換
將 HTML 文件、HTML 字串和 URL 轉換為 PDF。 例如,使用 Chrome PDF 轉換器將網頁渲染為 PDF。
跨平台支援
相容各種 .NET 平台,包括 .NET Core、.NET Standard 和 .NET Framework。 它支援 Windows、Linux 和 macOS。
編輯和簽署
設置屬性、用密碼和權限增加安全性,並將數位簽名應用於您的 PDF。
頁面模板和設置
可透過頁眉、頁腳、頁碼和可調整的邊距自訂 PDF。 支持響應式佈局和自訂紙張大小。
標準合規
遵循 PDF 標準,如 PDF/A 和 PDF/UA。 支援 UTF-8 字元編碼,處理圖片、CSS 和字體等資產。
使用 IronPDF 和 FastAPI 生成 PDF 文件
pip install fastapi ironpdf
from fastapi import FastAPI
from fastapi.responses import FileResponse
from ironpdf import *
# Apply your IronPDF license key
License.LicenseKey = "key"
# Initialize 'app' instance
app = FastAPI()
# Route for simple greeting
@app.get("/")
def read_root():
return {"Hello": "IronPDF"}
# Route that reads items with path and query parameters
@app.get("/items/{item_id}")
def read_item(item_id: int, q: str = None):
return {"item_id": item_id, "q": q}
# Route for generating a PDF document
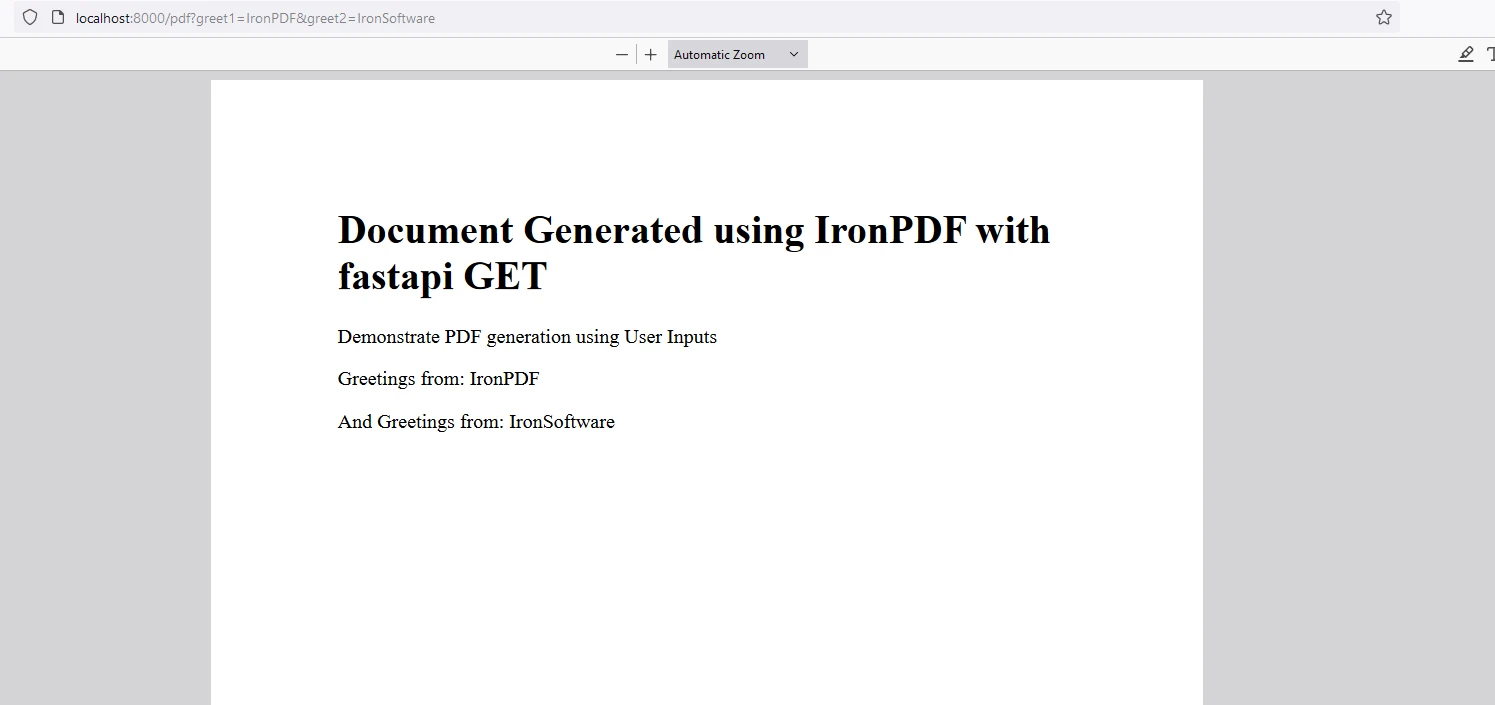
@app.get("/pdf")
async def get_pdf(greet1: str = None, greet2: str = None):
# Use ChromePdfRenderer to create PDF from HTML
renderer = ChromePdfRenderer()
content = "<h1>Document Generated using IronPDF with FastAPI GET</h1>"
content += "<p> Demonstrate PDF generation using User Inputs</p>"
content += f"<p>Greetings from: {greet1}</p>"
content += f"<p>And Greetings from: {greet2}</p>"
pdf = renderer.RenderHtmlAsPdf(content)
# Save the PDF to a file
pdf.SaveAs("fastapi.pdf")
# Create a response with the generated PDF
headers = {
"Content-Disposition": "inline; filename=sample.pdf"
}
return FileResponse("fastapi.pdf", media_type="application/pdf", headers=headers)from fastapi import FastAPI
from fastapi.responses import FileResponse
from ironpdf import *
# Apply your IronPDF license key
License.LicenseKey = "key"
# Initialize 'app' instance
app = FastAPI()
# Route for simple greeting
@app.get("/")
def read_root():
return {"Hello": "IronPDF"}
# Route that reads items with path and query parameters
@app.get("/items/{item_id}")
def read_item(item_id: int, q: str = None):
return {"item_id": item_id, "q": q}
# Route for generating a PDF document
@app.get("/pdf")
async def get_pdf(greet1: str = None, greet2: str = None):
# Use ChromePdfRenderer to create PDF from HTML
renderer = ChromePdfRenderer()
content = "<h1>Document Generated using IronPDF with FastAPI GET</h1>"
content += "<p> Demonstrate PDF generation using User Inputs</p>"
content += f"<p>Greetings from: {greet1}</p>"
content += f"<p>And Greetings from: {greet2}</p>"
pdf = renderer.RenderHtmlAsPdf(content)
# Save the PDF to a file
pdf.SaveAs("fastapi.pdf")
# Create a response with the generated PDF
headers = {
"Content-Disposition": "inline; filename=sample.pdf"
}
return FileResponse("fastapi.pdf", media_type="application/pdf", headers=headers)程式碼說明
此程式碼片段展示了如何將 IronPDF 與 FastAPI 結合,以根據使用者輸入動態生成 PDF 文件並作為可下載回應提供。
設置授權金鑰: 應用 IronPDF 授權金鑰以啟用其功能。
FastAPI 初始化: 初始化一個 FastAPI 實例(
app)來處理 HTTP 請求。基本路徑處理程式:
read_root():存取根 URL(/)時,回應一個簡單的 JSON 訊息,指示 "Hello IronPDF"。read_item():接受一個item_id路徑參數和一個可選的q查詢參數。 返回一個包含這些參數的 JSON 回應。
PDF 生成路徑(
/pdf):get_pdf():這個非同步功能處理針對/pdf端點的 GET 請求,具有可選的查詢參數greet1和greet2。- 構建一個 HTML 字串(
content),包括:- 一個指示文件來源和目的的標題。
- 一段文字演示使用使用者輸入生成 PDF(
greet1和greet2)。
- 使用 IronPDF 的
ChromePdfRenderer()將 HTML 內容渲染為 PDF(pdf = renderer.RenderHtmlAsPdf(content))。 - 將生成的 PDF 保存為 "fastapi.pdf"(
pdf.SaveAs("fastapi.pdf"))。
- 提供 PDF:
- 配置回應頭以指定 PDF 應在瀏覽器中內嵌查看(
"Content-Disposition": "inline; filename=sample.pdf")。 - 建立一個
FileResponse物件,指向生成的 PDF 文件,具有合適的媒體型別("application/pdf")。 - 返回
FileResponse物件,當存取/pdf端點時觸發 PDF 文件的下載。
- 配置回應頭以指定 PDF 應在瀏覽器中內嵌查看(
此程式碼片段展示如何將 IronPDF 無縫整合到 FastAPI 中,以根據使用者輸入動態生成和提供 PDF 文件。 它展示了如何將 HTML 內容轉換為 PDF,適用於需要即時文件生成和通過 HTTP 傳遞的應用程式。
輸出
下方顯示從 API 生成的 Swagger 輸出

IronPDF 授權
IronPDF 在 Python 的授權金鑰下運行。 IronPDF for Python 提供一個 免費試用 授權金鑰,讓使用者在購買之前查看功能。
將授權金鑰放在腳本開始處,以便在使用 IronPDF 套件之前使用:
from ironpdf import *
# Apply your license key
License.LicenseKey = "key"
from ironpdf import *
# Apply your license key
License.LicenseKey = "key"結論
FastAPI 是一個強大且易於使用的框架,用於在 Python 中建立 API。 FastAPI 具有高效能、自動文件和進階功能,使之成為初學者和經驗豐富的開發人員的絕佳選擇。 無論您是構建一個簡單的 API 還是一個複雜的網頁應用程式,FastAPI 都提供了您成功所需的工具。
IronPDF 是用於從 HTML 內容建立、操作和渲染 PDF 文件的强大 Python 程式庫。 它提供 HTML 到 PDF 的轉換、互動式表單建立、PDF 操作(合併、拆分)、以及文字提取的功能。 非常適合用於輕鬆生成動態 PDF 並整合到各種 Python 應用程式中。
常見問題
如何在Python應用程式中將HTML內容轉換為PDF?
您可以使用IronPDF的ChromePdfRenderer將HTML、CSS和JavaScript內容轉換為PDF文件。這使得在Python應用程式中能夠無縫整合,從網頁內容生成PDF文件。
使用FastAPI建構API有什麼好處?
FastAPI提供高效能、自動驗證、序列化和互動式API文件。它利用Starlette和Pydantic確保速度和效率,可與Node.js和Go相媲美,同時支援OpenAPI等開放標準。
如何在FastAPI中提供PDF文件?
您可以在FastAPI中生成PDF文件並使用FastAPI的FileResponse返回。這種方法允許您根據客戶端的請求動態建立和提供PDF。
什麼使FastAPI適合即時應用程式?
FastAPI支援WebSockets,這使得客戶端和伺服器之間能夠實現即時通信,成為需要即時資料更新或即時互動的應用程式的理想選擇。
FastAPI如何處理資料驗證和序列化?
FastAPI使用Pydantic模型和標準Python型別提示來處理資料驗證和序列化。這確保輸入資料正確驗證並轉換為所需格式,減少錯誤的可能性。
FastAPI提供哪些安全功能?
FastAPI提供強大的安全功能,包括OAuth2、JWT身份驗證和依賴注入,允許開發者輕鬆建立安全的應用程式。
可以在跨平台應用程式中使用IronPDF嗎?
可以,IronPDF的設計是跨平台的,支援Windows、Linux和macOS。這使得它成為開發者在不同操作系統中整合PDF生成的多用途選擇。
FastAPI如何提高開發者的生產力?
FastAPI通過提供自動API文件、程式碼補全和型別檢查來提高開發者的生產力。這減少了大量手動文件的需求,並有助於在開發過程中早期發現錯誤。