
LoopBack node js (How It Works For Developers)
A complete solution for dynamic PDF generation within LoopBack framework applications is provided by the smooth integration of IronPDF, a library for programmatically creating PDF documents, with LoopBack, a Node.js framework for constructing APIs. With features like model creation, data source validation, remote method, and access control, the LoopBack framework makes API/web development easier, and IronPDF improves it with more sophisticated PDF production capabilities.
Developers can create PDFs on the fly with this integration by pulling data from multiple sources, including external APIs and databases. This makes it possible to create customized records or business domain objects to meet project requirements, such as invoices, certificates, reports, and more. Because LoopBack is asynchronous, it complements IronPDF's features to handle PDF-generating duties well without interfering with the event loop, guaranteeing responsiveness and optimal performance.
To begin working with LoopBack and IronPDF, create a new project using LoopBack's CLI tool and install IronPDF as a dependency using npm. Utilizing LoopBack's middleware and remote method capabilities to create PDFs instantly in response to client requests makes integration simple. All things considered, this integration gives developers the ability to handle various document-generating requirements within LoopBack apps efficiently.
What is LoopBack Node.js?
A powerful Node.js framework called LoopBack was created to make the process of creating APIs and linking them to different data sources easier. With LoopBack, a product of StrongLoop, developers can easily design scalable and adaptable apps. Fundamentally, LoopBack is built over an express framework and it is based on a model-driven development methodology, which lets programmers create data models that symbolize the domain of their applications. Relational databases like MySQL and PostgreSQL, NoSQL databases like MongoDB, as well as external REST APIs and SOAP services, can all be easily integrated with these models.
LoopBack is unique in that it streamlines the API development process by automatically generating RESTful endpoints based on provided models. Furthermore, LoopBack comes with integrated support for validation, permission, and authentication, allowing programmers to safeguard their APIs and guarantee data integrity. Because LoopBack's middleware architecture is based on Express.js, it is extensible and flexible, enabling developers to work with pre-existing middleware or create bespoke middleware to satisfy unique needs.
Whether you're creating a straightforward REST API or a sophisticated microservices architecture, LoopBack has the capabilities and tools required to speed up development and produce reliable, scalable solutions. Because of its extensive documentation and vibrant community, developers frequently choose it when creating cutting-edge online and mobile applications.
Features of LoopBack
- Model-Driven Architecture: By enabling developers to define data models through a schema-based approach, LoopBack supports model-driven development. A variety of data sources, including databases, REST APIs, and SOAP services, can be represented using models.
- Data Source Agnosticism: Relational databases (MySQL, PostgreSQL), NoSQL databases (MongoDB), external REST APIs, and SOAP services are just a few of the many data sources that LoopBack supports.
- Automated REST API Generation: LoopBack uses predefined models to automatically create RESTful API endpoints in API Explorer, cutting down on boilerplate code and expediting development.
- Built-in Support for Authentication and Authorization: LoopBack offers built-in support for these features, enabling developers to incorporate role-based access control (RBAC), user authentication, and other security measures into their APIs.
- Middleware and Remote Methods: To alter the behavior of API endpoints, developers can provide middleware and remote methods using LoopBack. While remote methods offer customized functionality that may be called remotely over HTTP, middleware functions can intercept and modify requests and answers.
- Command Line Interface (CLI) for LoopBack: LoopBack includes a robust CLI tool that makes typical activities like creating models and controllers, building new projects, and performing migrations easier.
- Integrating with LoopBack Components: LoopBack facilitates the use of components, which are reusable modules that provide email delivery, file storage, and authentication capabilities. This saves developers from having to start from scratch when adding new features to their apps.
- LoopBack Explorer: Developers are able to interactively examine and test API endpoints with LoopBack's integrated API explorer tool. This facilitates troubleshooting and understanding the possibilities of the API.
Create and Config LoopBack Node.js JS
You can use the following procedures to set up and construct a LoopBack application in Node.js:
Install LoopBack CLI
Installing the LoopBack Command Line Interface (CLI), which offers resources for building and administering LoopBack applications, is the first step. Use npm to install it globally:
npm install -g @loopback/clinpm install -g @loopback/cliCreate a New LoopBack Application
To scaffold a brand new core LoopBack application, use the CLI. Open the directory in which you wish to construct your application and execute it there:
lb4 applb4 appTo provide information about your application, like its name and directory and the functionality you wish to enable, simply follow the prompts.
You will be prompted to provide the following information:
- Project name: Enter the name of your application, for example, my-loopback-app.
- Project description: Optionally describe your application.
- Project root directory: Accept the default or specify a different directory.
- Application class name: Accept the default Application.
- Enable prettier: Choose whether to enable Prettier for code formatting.
- Enable TSLINT: Choose whether to enable TSLint for code linting.
- Enable Mocha: Choose whether to enable Mocha for running tests.
The CLI will generate the project structure and install the necessary dependencies.
Explore the Project Structure
Your project directory will have the following structure:
my-loopback-app/
├── src/
│   ├── controllers/
│   ├── models/
│   ├── repositories/
│   ├── index.ts
│   ├── application.ts
│   └── ...
├── package.json
├── tsconfig.json
└── ...
Define Models
To specify the structure of your data, either manually develop models or use the LoopBack CLI. Models, which can be supported by a variety of data structures and sources, represent things in your program. For instance, run the following command to generate a new model called Product:
lb4 modellb4 modelTo specify the attributes and connections of your model, adhere to the instructions.
Create a Controller
To handle requests for creating PDF documents, create a new controller. To create a new controller, use the following command in LoopBack CLI:
lb4 controllerlb4 controllerTo define the name and related model of the controller, simply follow the prompts. Let's say we want to associate the property name of the controller with the Report model and call it ReportController.
Define Data Sources
Determine which data sources your models will communicate with. Many databases, such as MySQL, PostgreSQL, MongoDB, and others, are supported by LoopBack. To configure your data sources, either update the datasources.json file or use the LoopBack CLI.
Explore LoopBack
Use the built-in API explorer tool, available at http://localhost:3000/explorer, to investigate LoopBack's features. You may explore and test your API endpoints right here.
Sample Ping Controller code
import {inject} from '@loopback/core';
import {
Request,
RestBindings,
get,
response,
ResponseObject,
} from '@loopback/rest';
/**
* OpenAPI response for ping()
*/
const PING_RESPONSE: ResponseObject = {
description: 'Ping Response',
content: {
'application/json': {
schema: {
type: 'object',
title: 'PingResponse',
properties: {
greeting: {type: 'string'},
date: {type: 'string'},
url: {type: 'string'},
headers: {
type: 'object',
properties: {
'Content-Type': {type: 'string'},
},
additionalProperties: true,
},
},
},
},
},
};
/**
* A simple controller to bounce back http requests
*/
export class PingController {
constructor(@inject(RestBindings.Http.REQUEST) private req: Request) {}
// Map to `GET /ping`
@get('/ping')
@response(200, PING_RESPONSE)
ping(): object {
// Reply with a greeting, the current time, the url, and request headers
return {
greeting: 'Hello from LoopBack',
date: new Date(),
url: this.req.url,
headers: Object.assign({}, this.req.headers),
};
}
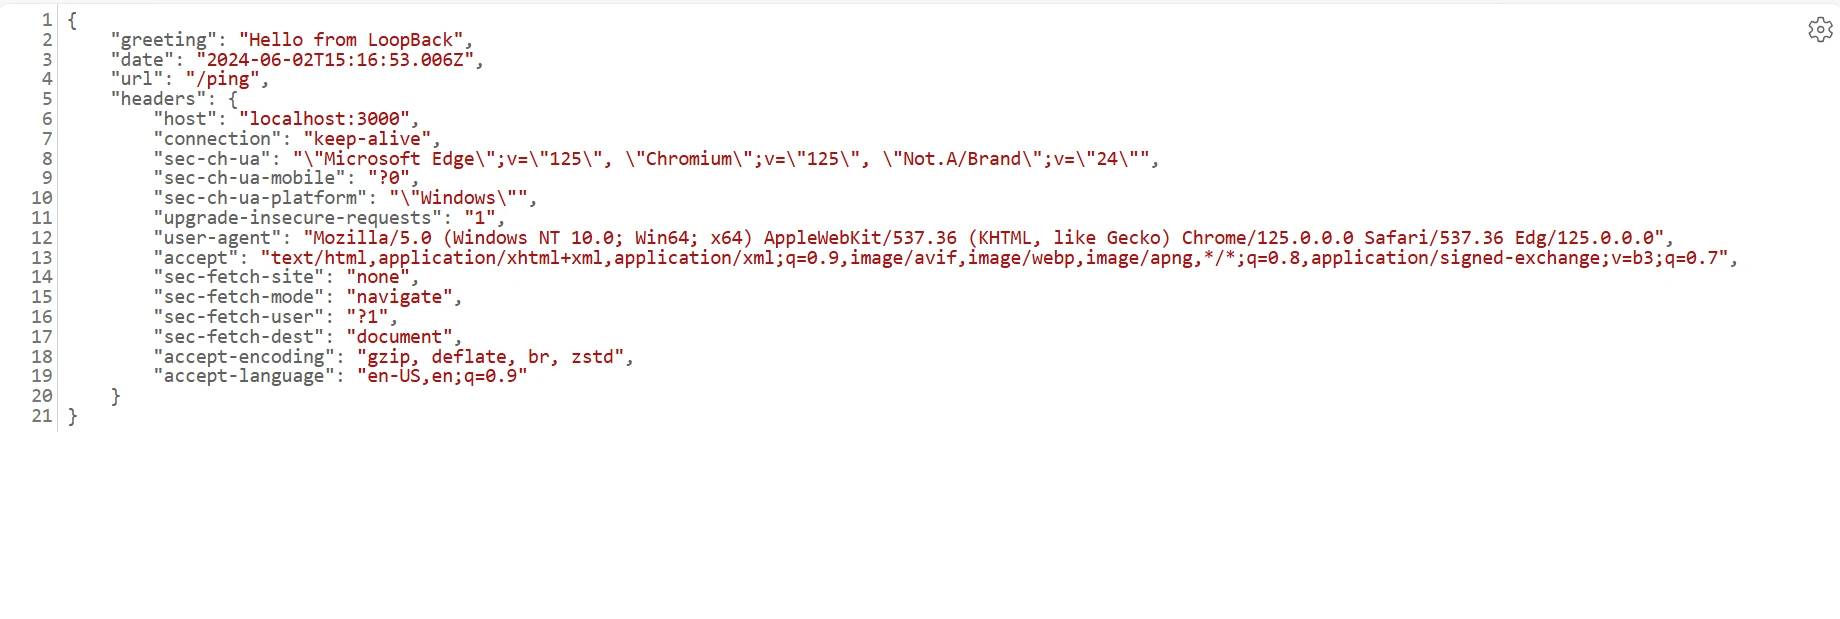
}Output from the above code.
Getting started
We'll start by creating an example application that uses LoopBack Node.js and IronPDF to create a PDF document with dynamically generated information. This is a step-by-step manual with thorough explanations.
What is IronPDF?
An application library called IronPDF was developed to make creating, editing, and maintaining PDFs easier. With this application, developers can extract text and images from HTML documents, apply headers and watermarks, combine numerous PDF documents, and carry out a variety of other activities. Developers may create high-quality PDF documents automatically with ease thanks to IronPDF's user-friendly API and comprehensive documentation. IronPDF offers all the features and capabilities required to improve document workflows and offer first-rate user experiences in a variety of scenarios, whether they are being used for preparing invoices, reports, or documentation.
Features of IronPDF
- HTML to PDF conversion is a simple and quick process that can be used for any HTML content, including CSS and JavaScript.
- PDF file merging: To make document management duties easier, combine multiple PDF documents into a single PDF file.
- Text and Image Extraction: Take out text and images from PDF files to make them available for additional data analysis or processing.
- Watermarking: For security or branding reasons, you can add text or picture watermarks to PDF pages.
- Include Header and Footer: The headers and footers of PDF documents allow you to include a customized message or page numbers.
Install IronPDF
To enable IronPDF capability, install the necessary Node.js packages using the node package manager.
npm install @ironsoftware/ironpdfnpm install @ironsoftware/ironpdfIntegrate LoopBack with IronPDF Node.js
Implement the following logic in the created controller file (report.controller.ts or report.controller.js) to create PDF documents using IronPDF:
import {inject} from '@loopback/core';
import {Request, RestBindings, get, response} from '@loopback/rest';
const IronPdf = require('@ironsoftware/ironpdf');
// Configure IronPDF license key, if needed
var config = IronPdf.IronPdfGlobalConfig;
config.setConfig({licenseKey: ''});
/**
* Controller handling PDF generation
*/
export class ReportController {
constructor(@inject(RestBindings.Http.REQUEST) private req: Request) {}
@get('/generate-pdf', {
responses: {
'200': {
description: 'PDF file',
content: {'application/pdf': {schema: {type: 'string', format: 'binary'}}},
},
},
})
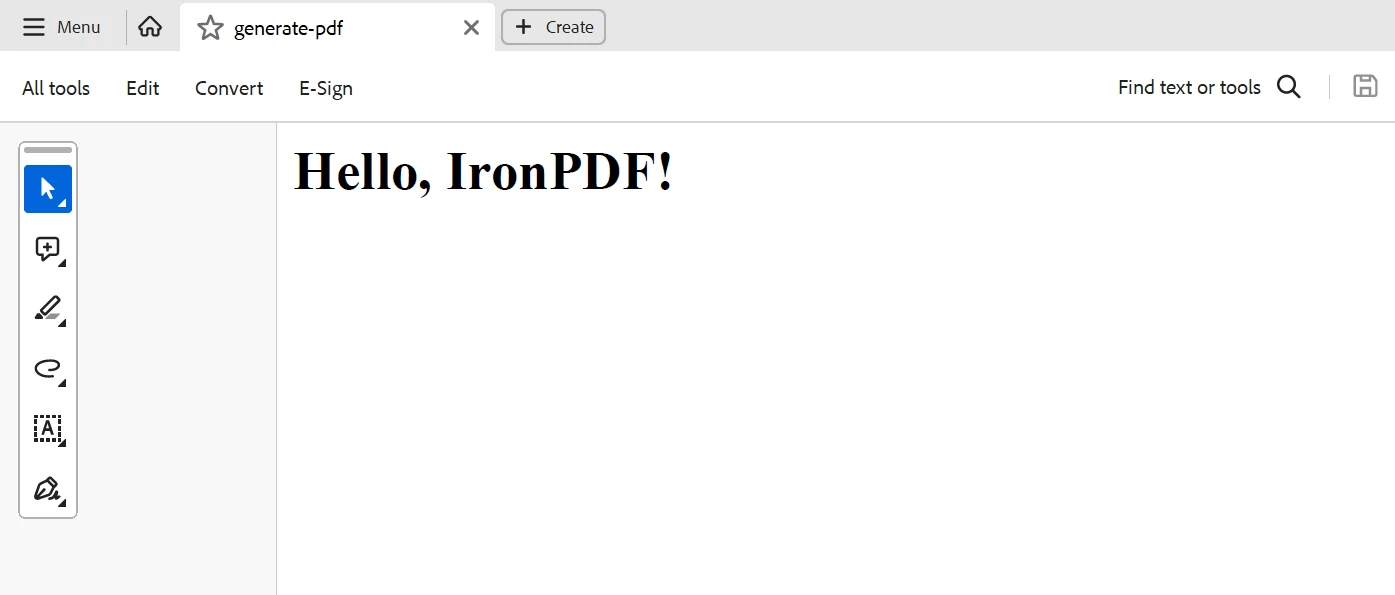
async generatePdf(): Promise<Buffer> {
// HTML content to be converted to PDF
const htmlContent = '<html><body><h1>Hello, IronPDF!</h1></body></html>';
// Generate PDF from HTML
const pdf = await IronPdf.PdfDocument.fromHtml(htmlContent);
// Get the PDF as a Buffer
const pdfBuffer = await pdf.saveAsBuffer();
// Return the PDF buffer to serve as a downloadable file
return pdfBuffer;
}
}The creation of Report instances and PDF generation are handled by the ReportController. The HTML content is converted into a PDF buffer using IronPDF and returned via the generatePdf method. To render HTML as a PDF, the generatePdf function uses IronPDF. The LoopBack controller handles this integration with ease. The HTML content from the client is then received by defining a GET endpoint, /generate-pdf. We transform the supplied HTML information into a PDF inside the endpoint by utilizing the IronPDF library.
Specifically, we use pdf.saveAsBuffer() to produce a binary buffer of the PDF file and IronPdf.PdfDocument.fromHtml(htmlContent) to construct a PDF object from a JSON file. After that, the client receives this buffer back with the proper MIME type (application/pdf). Any issues that arise when creating PDFs are detected and logged by the server, which is listening on port 3000. The client receives a 500 status code in response. This configuration makes it possible to create dynamic PDFs from HTML content, which is helpful when creating bills, reports, or other papers for a web application.
Conclusion
Finally, the integration of IronPDF with LoopBack 4 offers a potent combo for online application development. With LoopBack 4, developers can easily create RESTful APIs with a strong framework that frees them up to concentrate on business logic instead of boilerplate code. However, IronPDF has smooth PDF-generating features that make it possible to create dynamic PDF documents from HTML text.
Furthermore, the development process is streamlined by the flexibility and ease of use of both LoopBack 4 and IronPDF, enabling developers to produce high-quality applications quickly. Because LoopBack 4 manages the API backend access controls and IronPDF handles PDF creation, developers can concentrate on satisfying business needs and providing great user experiences.
We can guarantee feature-rich, high-end software solutions for clients and end users by integrating IronPDF and eight other libraries into your development stack. Furthermore, this strong base will optimize processes, backend systems, and initiatives. Starting at $799 apiece, these technologies are a good fit for contemporary software development projects because of their comprehensive documentation, vibrant online developer community, and frequent updates.


