
sockjs NPM (How It Works For Developers)
SockJS and IronPDF play different but complementary roles in building online applications. A JavaScript package called SockJS offers a bi-directional HTTP API for client-server communication that resembles WebSockets. It makes it possible for web browsers and servers to communicate in real-time and through events, enabling the use of apps like chat rooms, live news, and teamwork tools. However, in Node.js settings, IronPDF is a potent JavaScript library that provides it for producing and modifying PDF documents programmatically.
While IronPDF allows for the creation and management of PDF documents dynamically, the SockJS client manages real-time data interchange and collaboration features in online applications through a cross-domain communication channel. By integrating the SockJS server counterpart with IronPDF, developers can easily generate and serve PDF documents based on dynamic data or user interactions while enhancing their apps with real-time changes. With this combination, developers may design sophisticated online apps that support a variety of use cases, including document-intensive applications and collaborative platforms, by utilizing both real-time communication and dynamic PDF creation.
What is SockJS NPM?
SockJS is a browser-side JavaScript library that facilitates real-time, bi-directional communication between web clients and servers. It abstracts WebSocket and offers a fallback mechanism to alternative transport protocols like HTTP long-polling and XHR streaming, ensuring compatibility across various web browsers and environments. It provides a straightforward JavaScript API for establishing and managing connections and handling events such as connection opening, message receipt, and closing. Additionally, SockJS includes a command-line client for testing and debugging purposes, making it versatile for both development and production environments. Overall, the SockJS JavaScript object simplifies the implementation of real-time features in web applications, supporting scalable and responsive communication channels.
Key features of SockJS
Cross-Browser Compatibility
SockJS ensures consistent behavior and functionality across many web browsers and environments.
Fallback Mechanism
If WebSocket connections are unavailable or fail, SockJS may transparently switch to other transport protocols, such as HTTP long-polling, XHR streaming, or even JSONP polling.
Real-Time Communication
It allows server-side applications (usually using Node.js or other server-side technologies) and client-side JavaScript apps (running in web browsers) to communicate in real-time and event-driven fashion.
Ease of Use
Because SockJS offers a straightforward API equivalent to WebSocket, developers can easily include and utilize it in their projects.
Scalability
SockJS facilitates the development of scalable apps that can manage numerous concurrent connections and a range of network situations by supporting multiple transport protocols and fallback techniques.
Ease of Integration
It makes real-time feature implementation easier by providing a simple API that developers can incorporate into their web applications without requiring complex low-level network programming.
Transport Protocol Abstraction:
WebSocket, HTTP long-polling, and other underlying transport protocols are abstracted by SockJS. Because of its adaptability, dependable communication is guaranteed even in situations where WebSocket connections are restricted or unavailable.
Create and Configure SockJS
You usually need to set up SockJS on both the client side (in your web browser) and the server side (using a browser or server framework like Node.js) to construct and configure it for real-time communication in an online application. The following is a basic how-to for creating and configuring SockJS:
Install SockJS
SockJS can be installed using NPM or included directly via a CDN:
npm install sockjs-clientnpm install sockjs-clientInclude SockJS in Your HTML
Include the SockJS JavaScript library in the HTML file you create:
<script src="https://cdn.jsdelivr.net/npm/sockjs-client@1/dist/sockjs.min.js"></script><script src="https://cdn.jsdelivr.net/npm/sockjs-client@1/dist/sockjs.min.js"></script>Initialize SockJS Connection
Create a SockJS instance in your JavaScript file (app.js or something similar) and connect to your server:
<html lang="en">
<head>
<meta charset="UTF-8" />
<title>SockJS + IronPDF Example</title>
</head>
<body>
<script src="https://cdn.jsdelivr.net/npm/sockjs-client@1/dist/sockjs.min.js"></script>
<script>
// Initialize SockJS connection
const sock = new SockJS("http://localhost:3000/socket");
// Event handlers
sock.onopen = function () {
console.log("Connection opened");
};
sock.onmessage = function (e) {
console.log("Message received:", e.data);
};
sock.onclose = function () {
console.log("Connection closed");
};
// Example function to send a message
function sendMessage(message) {
sock.send(message);
}
</script>
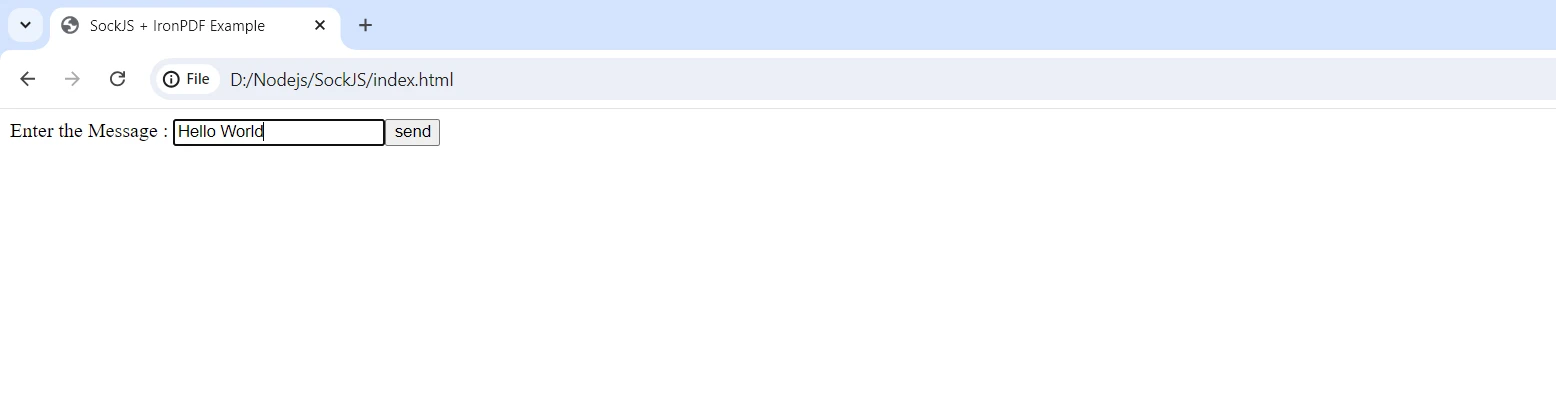
Enter the Message:
</body>
</html><html lang="en">
<head>
<meta charset="UTF-8" />
<title>SockJS + IronPDF Example</title>
</head>
<body>
<script src="https://cdn.jsdelivr.net/npm/sockjs-client@1/dist/sockjs.min.js"></script>
<script>
// Initialize SockJS connection
const sock = new SockJS("http://localhost:3000/socket");
// Event handlers
sock.onopen = function () {
console.log("Connection opened");
};
sock.onmessage = function (e) {
console.log("Message received:", e.data);
};
sock.onclose = function () {
console.log("Connection closed");
};
// Example function to send a message
function sendMessage(message) {
sock.send(message);
}
</script>
Enter the Message:
</body>
</html>The URL of your server-side WebSocket endpoint should be used instead of "http://localhost:3000/socket."
Server-Side Setup
Install SockJS-Node
To install the SockJS-Node package, use npm:
npm install sockjsnpm install sockjsConfigure SockJS Server
In your Node.js server, configure SockJS:
// Import necessary modules
const http = require('http');
const sockjs = require('sockjs');
// Create a SockJS server
const sockjsServer = sockjs.createServer();
// Attach the server to an HTTP server instance
const server = http.createServer();
// Install SockJS handlers
sockjsServer.installHandlers(server, { prefix: '/socket' });
// Define SockJS event handlers
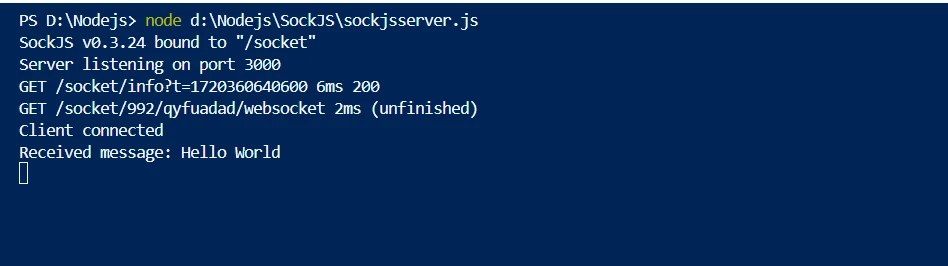
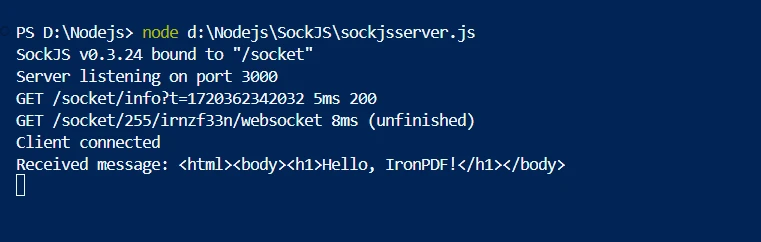
sockjsServer.on('connection', function(conn) {
console.log('Client connected');
conn.on('data', function(message) {
console.log('Received message:', message);
// Handle incoming messages from client
});
conn.on('close', function() {
console.log('Client disconnected');
});
});
// Start the server
const PORT = 3000;
server.listen(PORT, function() {
console.log(`Server listening on port ${PORT}`);
});// Import necessary modules
const http = require('http');
const sockjs = require('sockjs');
// Create a SockJS server
const sockjsServer = sockjs.createServer();
// Attach the server to an HTTP server instance
const server = http.createServer();
// Install SockJS handlers
sockjsServer.installHandlers(server, { prefix: '/socket' });
// Define SockJS event handlers
sockjsServer.on('connection', function(conn) {
console.log('Client connected');
conn.on('data', function(message) {
console.log('Received message:', message);
// Handle incoming messages from client
});
conn.on('close', function() {
console.log('Client disconnected');
});
});
// Start the server
const PORT = 3000;
server.listen(PORT, function() {
console.log(`Server listening on port ${PORT}`);
});Make sure the server-side code is customized to meet the requirements of your application and works with the server framework or configuration you already have.
Cross-Origin Requests (CORS): Ensure your server handles CORS settings effectively if your server and client are on separate domains.
Error Handling: Implement error handling and security measures (such as authentication and authorization) as per the specifications of your application.
Deployment: Set up HTTPS for secure connections and configure SockJS and your server for deployment environments.
This configuration offers a fundamental basis for establishing real-time communication between a web client and a web server using SockJS. Depending on the requirements and architecture of your particular application, adjustments may be required.
Getting Started
Setting up a web application that makes use of SockJS's real-time communication capabilities and integrates IronPDF for dynamic PDF creation is the first step in getting started with SockJS and IronPDF. Here's a starting point guide:
What is IronPDF?
A powerful Node.js tool called IronPDF is made to transform HTML data into extraordinarily high-quality PDF files. Without sacrificing the original web content, it expedites the process of converting HTML, CSS, and other JavaScript files into correctly formatted PDFs. This is a very helpful tool for web applications that need to generate dynamic, printable documents like reports, invoices, and certifications.
Customizable page settings, headers, footers, and the ability to add fonts and images are just a few of IronPDF's capabilities. It can handle intricate layouts and styles to guarantee that every test PDF output satisfies the requirements. Furthermore, IronPDF manages the execution of JavaScript inside HTML, enabling precise dynamic and interactive content rendering.
Features of IronPDF
1. PDF Generation from HTML
Convert JavaScript, HTML, and CSS to PDF. Supports media queries and responsive design, two contemporary web standards. Useful for dynamically decorating PDF reports, invoices, and documents with HTML and CSS.
2. PDF Editing
Pre-existing PDFs can have text, images, and other content added to them. Extract text and images from PDF files. Combine multiple PDFs into one file. Divide PDF files into multiple separate documents. Include watermarks, annotations, headers, and footers.
3. Performance and Reliability
High performance and dependability are desired design qualities in industrial settings. Manages big document sets with ease.
Install IronPDF
Install the IronPDF package to get the tools you need to work with PDFs in Node.js projects. Run the following command:
npm install @ironsoftware/ironpdfnpm install @ironsoftware/ironpdfCombine SockJS with IronPDF
Configure SockJS on your Node.js server to handle requests for PDF generation and to manage client connections:
// server.js

// Import necessary modules
const http = require("http");
const sockjs = require("sockjs");
const IronPdf = require("@ironsoftware/ironpdf");

// Configure IronPDF with your license key
var config = IronPdf.IronPdfGlobalConfig;
config.setConfig({
  licenseKey: "",  // Add your IronPDF license key here
});

// Create a SockJS server
const sockjsServer = sockjs.createServer();

// Attach the SockJS server to an HTTP server instance
const server = http.createServer();
sockjsServer.installHandlers(server, { prefix: "/socket" });

// Handle SockJS connections and messages
sockjsServer.on("connection", function (conn) {
  console.log("Client connected");

  // Handle incoming messages (PDF generation requests)
  conn.on("data", async function(message) {
    console.log("Received message:", message);

    // Generate PDF using IronPDF
    let pdfdata = await generatePdf(message);

    // Send generated PDF data back to client
    conn.write(pdfdata);
  });

  conn.on("close", function () {
    console.log("Client disconnected");
  });
});

// Function to generate PDF using IronPDF
const generatePdf = async (htmlContent) => {
  const pdfDocument = IronPdf.PdfDocument;
  let result = (await pdfDocument.fromHtml(htmlContent));
  const pdfBuffer = await result.saveAsBuffer();
  return pdfBuffer;
};

// Start the HTTP server
const PORT = 3000;
server.listen(PORT, function () {
  console.log(`Server listening on port ${PORT}`);
});
// server.js
// Import necessary modules
const http = require("http");
const sockjs = require("sockjs");
const IronPdf = require("@ironsoftware/ironpdf");
// Configure IronPDF with your license key
var config = IronPdf.IronPdfGlobalConfig;
config.setConfig({
licenseKey: "", // Add your IronPDF license key here
});
// Create a SockJS server
const sockjsServer = sockjs.createServer();
// Attach the SockJS server to an HTTP server instance
const server = http.createServer();
sockjsServer.installHandlers(server, { prefix: "/socket" });
// Handle SockJS connections and messages
sockjsServer.on("connection", function (conn) {
console.log("Client connected");
// Handle incoming messages (PDF generation requests)
conn.on("data", async function(message) {
console.log("Received message:", message);
// Generate PDF using IronPDF
let pdfdata = await generatePdf(message);
// Send generated PDF data back to client
conn.write(pdfdata);
});
conn.on("close", function () {
console.log("Client disconnected");
});
});
// Function to generate PDF using IronPDF
const generatePdf = async (htmlContent) => {
const pdfDocument = IronPdf.PdfDocument;
let result = (await pdfDocument.fromHtml(htmlContent));
const pdfBuffer = await result.saveAsBuffer();
return pdfBuffer;
};
// Start the HTTP server
const PORT = 3000;
server.listen(PORT, function () {
console.log(`Server listening on port ${PORT}`);
});Client-Side Setup
Configure SockJS on the client side to interact with the server and submit requests to generate PDFs.
<!DOCTYPE html>
<html lang="en">
<head>
<meta charset="UTF-8">
<title>SockJS + IronPDF Example</title>
</head>
<body>
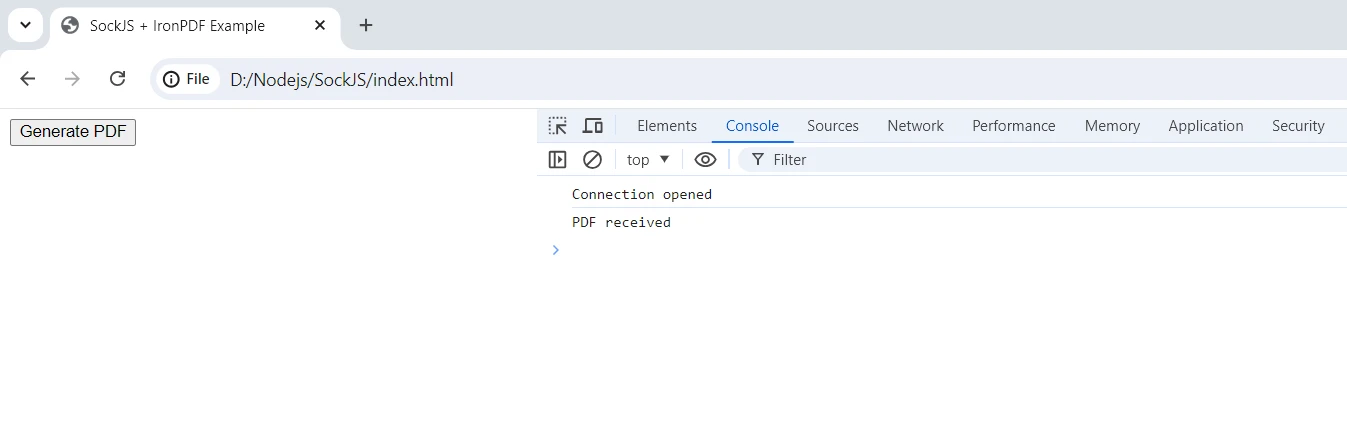
<button onclick="generatePdf()">Generate PDF</button>
<script src="https://cdn.jsdelivr.net/npm/sockjs-client@1/dist/sockjs.min.js"></script>
<script>
// Initialize SockJS connection
const sock = new SockJS('http://localhost:3000/socket');
// Event handlers
sock.onopen = function() {
console.log('Connection opened');
};
sock.onmessage = function(e) {
console.log('PDF received');
// Example: Display or download PDF received from server
displayPdf(e.data);
};
sock.onclose = function() {
console.log('Connection closed');
};
// Function to generate PDF
function generatePdf() {
// Example: HTML content to generate PDF
const htmlContent = '<html><body><h1>Hello, IronPDF!</h1></body></html>';
// Send HTML content to server for PDF generation
sock.send(htmlContent);
}
// Function to display or download PDF data
function displayPdf(pdfData) {
// Example: Display or download PDF data received from server
const pdfBlob = new Blob([atob(pdfData)], { type: 'application/pdf' });
const pdfUrl = URL.createObjectURL(pdfBlob);
window.open(pdfUrl, '_blank');
}
</script>
</body>
</html>
<!DOCTYPE html>
<html lang="en">
<head>
    <meta charset="UTF-8">
    <title>SockJS + IronPDF Example</title>
</head>
<body>
    <button onclick="generatePdf()">Generate PDF</button>

    <script src="https://cdn.jsdelivr.net/npm/sockjs-client@1/dist/sockjs.min.js"></script>
    <script>
        // Initialize SockJS connection
        const sock = new SockJS('http://localhost:3000/socket');

        // Event handlers
        sock.onopen = function() {
            console.log('Connection opened');
        };

        sock.onmessage = function(e) {
            console.log('PDF received');
            // Example: Display or download PDF received from server
            displayPdf(e.data);
        };

        sock.onclose = function() {
            console.log('Connection closed');
        };

        // Function to generate PDF
        function generatePdf() {
            // Example: HTML content to generate PDF
            const htmlContent = '<html><body><h1>Hello, IronPDF!</h1></body></html>';
            // Send HTML content to server for PDF generation
            sock.send(htmlContent);
        }

        // Function to display or download PDF data
        function displayPdf(pdfData) {
            // Example: Display or download PDF data received from server
            const pdfBlob = new Blob([atob(pdfData)], { type: 'application/pdf' });
            const pdfUrl = URL.createObjectURL(pdfBlob);
            window.open(pdfUrl, '_blank');
        }
    </script>
</body>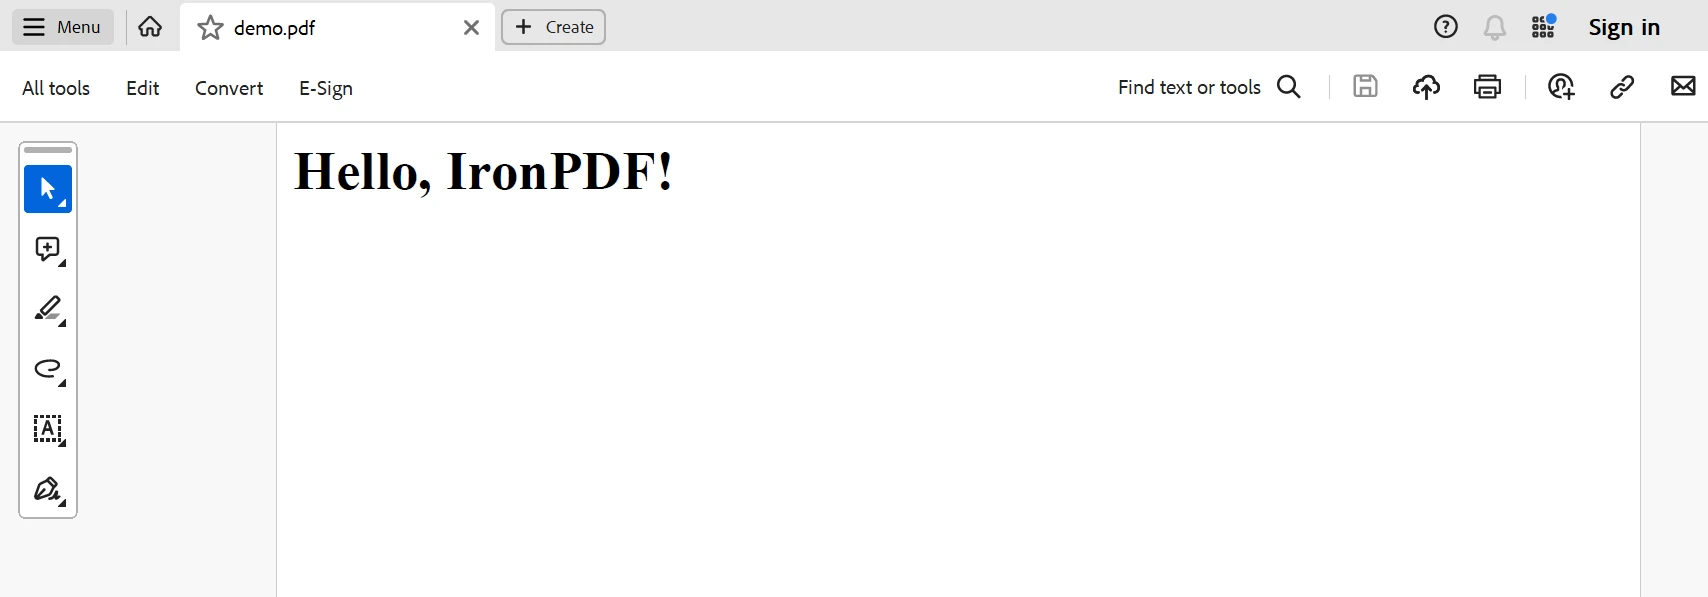
</html>Server-Side: The Node.js server configures a SockJS server (sockjsServer) and listens for connections on the /socket path. It uses IronPDF (IronPdf.PdfDocument) to invoke the generatePdf() function in order to handle incoming messages (PDF generation requests). After generating the PDF, it uses the SockJS connection to send the base64-encoded PDF data back to the client.
Client-Side: The client connects to the server via a SockJS connection (sock) and listens for events such as onopen, onmessage, and onclose. The user uses sock.send(htmlContent) to send HTML content (htmlContent) to the server for PDF generation when they click the "Generate PDF" button. It shows or downloads the PDF, after obtaining the PDF data from the server (sock.onmessage).
Below is the output generated from the code.
Conclusion
A strong synergy is created in web application development when SockJS is used for real-time communication and IronPDF is used for dynamic PDF production. With SockJS, bi-directional communication between clients and servers is made easy, enabling features like interactive collaboration and real-time updates. However, IronPDF gives programmers the ability to create and modify PDF documents programmatically. It can even dynamically convert HTML text into PDFs.
Complex web applications that may create PDF documents instantly in response to user input or real-time data updates are made possible by the integration of these technologies. Applications requiring real-time document generating, group editing, or interactive reporting functionalities will find this integration especially helpful. Through the utilization of SockJS for instantaneous updates and IronPDF for dynamic PDF creation, developers may optimize user experience, optimize workflows, and provide resilient solutions that satisfy a range of business requirements for any serious SockJS user.
We can increase the utility of your Node.js app development toolkit by utilizing IronPDF to add OCR, barcode scanning, PDF production, Excel interaction, and many other features. Iron Software's highly configurable systems and extensive library of community-supported plugins enable developers to build features and web applications more rapidly.
Developers can use IronPDF's numerous features with a free trial license and a range of code samples from the firm before opting to purchase. For more information about IronPDF's perpetual licensing, visit the license page. For further instructions on how to begin using IronPDF, visit the documentation page.


