dotnetify.NET (How It Works For Developers)
DotNetify is an open-source framework made with .NET and Blazor designed for creating real-time web applications on a .NET platform. By utilizing SignalR's power for real-time interactions between the client and server, it simplifies the construction of dynamic and interactive web applications. DotNetify provides a programming model that synchronizes client-side views with server-side scripting data, allowing developers to design rich, responsive, and performant online interfaces quickly and easily.
Conversely, IronPDF PDF Generation Library is a potent .NET package that facilitates creating, editing, and manipulating PDF documents programmatically. It is an excellent choice for creating dynamic, data-driven documents like reports, invoices, and forms, offering an intuitive API for transforming HTML text into PDFs.
By integrating DotNetify with IronPDF, real-time web interactivity and robust PDF production capabilities are combined in a C# application. This integration is particularly beneficial for applications requiring real-time data display and the ability to dynamically create and distribute PDF documents based on the most recent data. Developers can create extensive, interactive online apps that address complex business requirements and enhance user experiences through seamless document generation and distribution by leveraging IronPDF's versatile PDF generation and DotNetify's real-time data synchronization.
What is DotNetify?
DotNetify is an open-source framework designed to simplify creating interactive, real-time web apps with .NET and Blazor. Developers can create dynamic and responsive user interfaces that effortlessly synchronize with server-side data by utilizing SignalR, facilitating real-time communication between the client and server. DotNetify uses a reactive programming approach, abstracting the complexities of real-time data binding and event handling, thereby simplifying the creation of complex online applications with minimal code.
DotNetify allows developers to construct server-side view models that immediately propagate changes to the client, ensuring that the user interface always reflects the application's state. This framework offers flexibility in choosing client-side technology, supporting both classic JavaScript front-ends and Blazor front-ends. It is ideal for applications requiring real-time updates, such as dashboards, collaborative tools, and live data streams, due to its ease of use and effectiveness.
DotNetify's real-time handling of intricate interactions and data flows significantly enhances user experience by enabling smooth data synchronization and immediate feedback. Overall, DotNetify is a valuable tool for .NET developers aiming to build reactive, cutting-edge, real-time online applications quickly and efficiently.
Features of DotNetify
DotNetify in C# offers a myriad of features that simplify the creation of interactive, real-time online apps, including:
- Real-Time Communication: Utilizes SignalR for bi-directional, real-time client-server communication, enabling interactive user interfaces and instant updates.
- Reactive Programming Model: Provides a reactive programming model, automatically synchronizing client-side views and server-side view models to keep the user interface current with the latest information.
- Server-Side View Models: Facilitates the creation of server-side view models that client-side components can bind to, simplifying state management and data flow within the application.
- Blazor and JavaScript Support: Supports both classic JavaScript front-ends and Blazor front-ends, allowing developers to choose the client-side technology that best fits their requirements.
- Ease of Integration: Seamlessly integrates real-time functionality into new or existing projects, and works well with front-end UI component frameworks like WebSockets, blending with projects using React Native, Vue, and Blazor.
- Scalability: Inherits SignalR's scalability features, enabling applications to manage many concurrent connections effectively.
- MVVM Architecture: Adopts the Model-View-ViewModel (MVVM) architecture, aiding in separating responsibilities and maintaining organized and clean code.
- Event Handling: Reduces the boilerplate code needed for handling UI interactions and state changes by streamlining event handling and data binding.
- Extensible and Customizable: Provides extensibility points and hooks for behavior customization and necessary integration with other libraries or frameworks.
- Robust Infrastructure: Offers a dynamic routing mechanism that can be entirely defined on the back end, capable of nested routing, token-based authentication, and more.
- Open Source and Community-Driven: As an open-source project, DotNetify benefits from community participation and contributions, ensuring ongoing upgrades and improvements.
Creating and Configuring DotNetify in C#
To establish a simple project and begin configuring DotNetify in a C# online application, follow these steps. This tutorial demonstrates how to use ASP.NET Core and Blazor to set up a basic DotNetify server and client.
Set Up a New ASP.NET Core Blazor Server Project
- Open Visual Studio: Launch Visual Studio and create a new project.
- Create a Blazor Server App: Choose the Blazor Server App template from the project templates and click "Next."
- Configure Your Project: Provide a name for your project (e.g., "DotNetifyWebApp") and make the necessary configuration changes. Click "Create."
Install DotNetify via NuGet
- Manage NuGet Packages: In the Solution Explorer, right-click your project and choose "Manage NuGet Packages."
- Search for DotNetify: Install the DotNetify and DotNetify.Blazor packages.
Configure DotNetify
To configure DotNetify, open Startup.cs and use the ConfigureServices and Configure methods.
using DotNetify;
using DotNetify.Blazor;

public class Startup
{
    public void ConfigureServices(IServiceCollection services)
    {
        services.AddRazorPages();
        services.AddServerSideBlazor();
        services.AddSignalR();
        services.AddDotNetify();
    }

    public void Configure(IApplicationBuilder app, IWebHostEnvironment env)
    {
        if (env.IsDevelopment())
        {
            app.UseDeveloperExceptionPage();
        }
        else
        {
            app.UseExceptionHandler("/Error");
            app.UseHsts();
        }

        app.UseHttpsRedirection();
        app.UseStaticFiles();
        app.UseRouting();
        app.UseEndpoints(endpoints =>
        {
            endpoints.MapBlazorHub();
            endpoints.MapFallbackToPage("/_Host");
            endpoints.MapHub<DotNetifyHub>("/dotnetify");
        });
    }
}
using DotNetify;
using DotNetify.Blazor;
public class Startup
{
public void ConfigureServices(IServiceCollection services)
{
services.AddRazorPages();
services.AddServerSideBlazor();
services.AddSignalR();
services.AddDotNetify();
}
public void Configure(IApplicationBuilder app, IWebHostEnvironment env)
{
if (env.IsDevelopment())
{
app.UseDeveloperExceptionPage();
}
else
{
app.UseExceptionHandler("/Error");
app.UseHsts();
}
app.UseHttpsRedirection();
app.UseStaticFiles();
app.UseRouting();
app.UseEndpoints(endpoints =>
{
endpoints.MapBlazorHub();
endpoints.MapFallbackToPage("/_Host");
endpoints.MapHub<DotNetifyHub>("/dotnetify");
});
}
}Imports DotNetify
Imports DotNetify.Blazor
Public Class Startup
Public Sub ConfigureServices(ByVal services As IServiceCollection)
services.AddRazorPages()
services.AddServerSideBlazor()
services.AddSignalR()
services.AddDotNetify()
End Sub
Public Sub Configure(ByVal app As IApplicationBuilder, ByVal env As IWebHostEnvironment)
If env.IsDevelopment() Then
app.UseDeveloperExceptionPage()
Else
app.UseExceptionHandler("/Error")
app.UseHsts()
End If
app.UseHttpsRedirection()
app.UseStaticFiles()
app.UseRouting()
app.UseEndpoints(Sub(endpoints)
endpoints.MapBlazorHub()
endpoints.MapFallbackToPage("/_Host")
endpoints.MapHub(Of DotNetifyHub)("/dotnetify")
End Sub)
End Sub
End ClassCreate a ViewModel
Create a new class file in your project (for example, HelloWorldViewModel.cs) and design a basic ViewModel.
using DotNetify;
public class HelloWorldViewModel : BaseVM
{
public string Greetings => "Hello, World!";
}using DotNetify;
public class HelloWorldViewModel : BaseVM
{
public string Greetings => "Hello, World!";
}Imports DotNetify
Public Class HelloWorldViewModel
Inherits BaseVM
Public ReadOnly Property Greetings() As String
Get
Return "Hello, World!"
End Get
End Property
End ClassRegister ViewModel
Before registering the ViewModel, open Program.cs.
using Microsoft.AspNetCore.Hosting;
using Microsoft.Extensions.DependencyInjection;
using Microsoft.Extensions.Hosting;
public class Program
{
public static void Main(string[] args)
{
CreateHostBuilder(args).Build().Run();
}
public static IHostBuilder CreateHostBuilder(string[] args) =>
Host.CreateDefaultBuilder(args)
.ConfigureWebHostDefaults(webBuilder =>
{
webBuilder.UseStartup<Startup>();
})
.ConfigureServices(services =>
{
services.AddTransient<HelloWorldViewModel>();
});
}using Microsoft.AspNetCore.Hosting;
using Microsoft.Extensions.DependencyInjection;
using Microsoft.Extensions.Hosting;
public class Program
{
public static void Main(string[] args)
{
CreateHostBuilder(args).Build().Run();
}
public static IHostBuilder CreateHostBuilder(string[] args) =>
Host.CreateDefaultBuilder(args)
.ConfigureWebHostDefaults(webBuilder =>
{
webBuilder.UseStartup<Startup>();
})
.ConfigureServices(services =>
{
services.AddTransient<HelloWorldViewModel>();
});
}Imports Microsoft.AspNetCore.Hosting
Imports Microsoft.Extensions.DependencyInjection
Imports Microsoft.Extensions.Hosting
Public Class Program
Public Shared Sub Main(ByVal args() As String)
CreateHostBuilder(args).Build().Run()
End Sub
Public Shared Function CreateHostBuilder(ByVal args() As String) As IHostBuilder
Return Host.CreateDefaultBuilder(args).ConfigureWebHostDefaults(Sub(webBuilder)
webBuilder.UseStartup(Of Startup)()
End Sub).ConfigureServices(Sub(services)
services.AddTransient(Of HelloWorldViewModel)()
End Sub})
End FunctionCreate Blazor Component
In your project, add a new Blazor component (such as HelloWorld.razor) and connect it to the ViewModel.
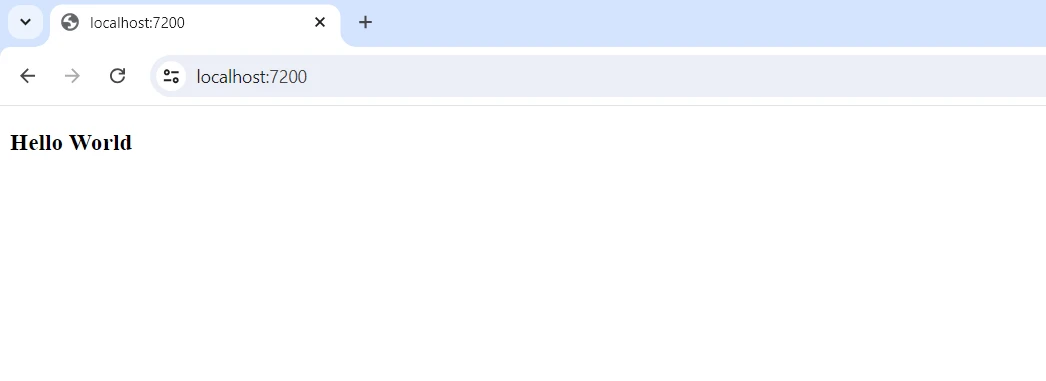
@page "/"
@using DotNetify
@using DotNetify.Blazor
@inject IDotNetifyService DotNetify
<h3>@greetings</h3>
@code {
private string greetings;
protected override async Task OnInitializedAsync()
{
var vm = await DotNetify.ConnectAsync<HelloWorldViewModel>(this);
greetings = vm.Greetings;
}
}- Sets up the application to utilize DotNetify, Blazor, Razor Pages, and SignalR.
- Configures DotNetify and Blazor endpoints and routing.
- Describes a basic ViewModel with a greeting message-returning attribute.
- Registers the HelloWorldViewModel as a service.
- The Blazor component establishes a connection with the HelloWorldViewModel, retrieves the welcome text, and displays it on the screen.
Getting Started
To use DotNetify and IronPDF, you need to create a .NET project and incorporate both libraries into your application. Here's a step-by-step tutorial to get you started:
What is IronPDF?
The feature-rich .NET library IronPDF PDF Library enables C# programs to produce, read, and edit PDF documents. With this library, developers can quickly turn HTML, CSS, and JavaScript information into high-quality, print-ready PDFs. Key tasks include adding headers and footers, splitting and merging PDFs, watermarking documents, and converting HTML to PDF.
IronPDF is relevant to a variety of applications because it supports both .NET Framework and .NET Core. With their simplicity of use and abundant information, PDFs can be easily integrated into developers' products. IronPDF handles complex data layouts and formatting, ensuring the PDFs it generates closely resemble the client's original HTML text. Additionally, IronPDF supports cross-platform apps like Windows, web, and mobile environments.
Features of IronPDF
-
PDF Generation from HTML: Convert JavaScript, HTML, and CSS to PDF. IronPDF supports media queries and responsive design, two contemporary web standards. Its support for modern web standards is useful for dynamically decorating PDF invoices, reports, and documents with HTML and CSS.
-
PDF Editing: Pre-existing PDFs can have text, images, and other content added to them. Developers can use IronPDF to extract text and images from PDF files, combine multiple PDFs into one file, split PDF files into several separate papers, and include watermarks, annotations, headers, and footers.
-
PDF Conversion: Convert several file formats, including Word, Excel, and picture files, to PDF format. IronPDF also supports PDF-to-image conversion (PNG, JPEG, etc.).
- Performance and Reliability: High performance and reliability are desired design qualities in industrial settings. With IronPDF, developers can manage large document sets with ease.
Install IronPDF
To gain the tools needed to work with PDFs in .NET projects, install the IronPDF package.
Install-Package IronPdf
Integrate DotNetify with IronPDF
Configure DotNetify:
Startup Configuration: Open Startup.cs and configure DotNetify using the ConfigureServices and Configure methods.
using DotNetify;
using DotNetify.Blazor;

public class Startup
{
    public void ConfigureServices(IServiceCollection services)
    {
        services.AddRazorPages();
        services.AddServerSideBlazor();
        services.AddSignalR();
        services.AddDotNetify();
    }

    public void Configure(IApplicationBuilder app, IWebHostEnvironment env)
    {
        if (env.IsDevelopment())
        {
            app.UseDeveloperExceptionPage();
        }
        else
        {
            app.UseExceptionHandler("/Error");
            app.UseHsts();
        }

        app.UseHttpsRedirection();
        app.UseStaticFiles();
        app.UseRouting();
        app.UseEndpoints(endpoints =>
        {
            endpoints.MapBlazorHub();
            endpoints.MapFallbackToPage("/_Host");
            endpoints.MapHub<DotNetifyHub>("/dotnetify");
        });
    }
}using DotNetify;
using DotNetify.Blazor;
public class Startup
{
public void ConfigureServices(IServiceCollection services)
{
services.AddRazorPages();
services.AddServerSideBlazor();
services.AddSignalR();
services.AddDotNetify();
}
public void Configure(IApplicationBuilder app, IWebHostEnvironment env)
{
if (env.IsDevelopment())
{
app.UseDeveloperExceptionPage();
}
else
{
app.UseExceptionHandler("/Error");
app.UseHsts();
}
app.UseHttpsRedirection();
app.UseStaticFiles();
app.UseRouting();
app.UseEndpoints(endpoints =>
{
endpoints.MapBlazorHub();
endpoints.MapFallbackToPage("/_Host");
endpoints.MapHub<DotNetifyHub>("/dotnetify");
});
}
}Imports DotNetify
Imports DotNetify.Blazor
Public Class Startup
Public Sub ConfigureServices(ByVal services As IServiceCollection)
services.AddRazorPages()
services.AddServerSideBlazor()
services.AddSignalR()
services.AddDotNetify()
End Sub
Public Sub Configure(ByVal app As IApplicationBuilder, ByVal env As IWebHostEnvironment)
If env.IsDevelopment() Then
app.UseDeveloperExceptionPage()
Else
app.UseExceptionHandler("/Error")
app.UseHsts()
End If
app.UseHttpsRedirection()
app.UseStaticFiles()
app.UseRouting()
app.UseEndpoints(Sub(endpoints)
endpoints.MapBlazorHub()
endpoints.MapFallbackToPage("/_Host")
endpoints.MapHub(Of DotNetifyHub)("/dotnetify")
End Sub)
End Sub
End ClassCreate a ViewModel
Add a new class file in your project (e.g., PdfViewModel.cs) and create a ViewModel that will produce a PDF.
using DotNetify;
using IronPdf;
public class PdfViewModel : BaseVM
{
public string PdfUrl { get; set; }
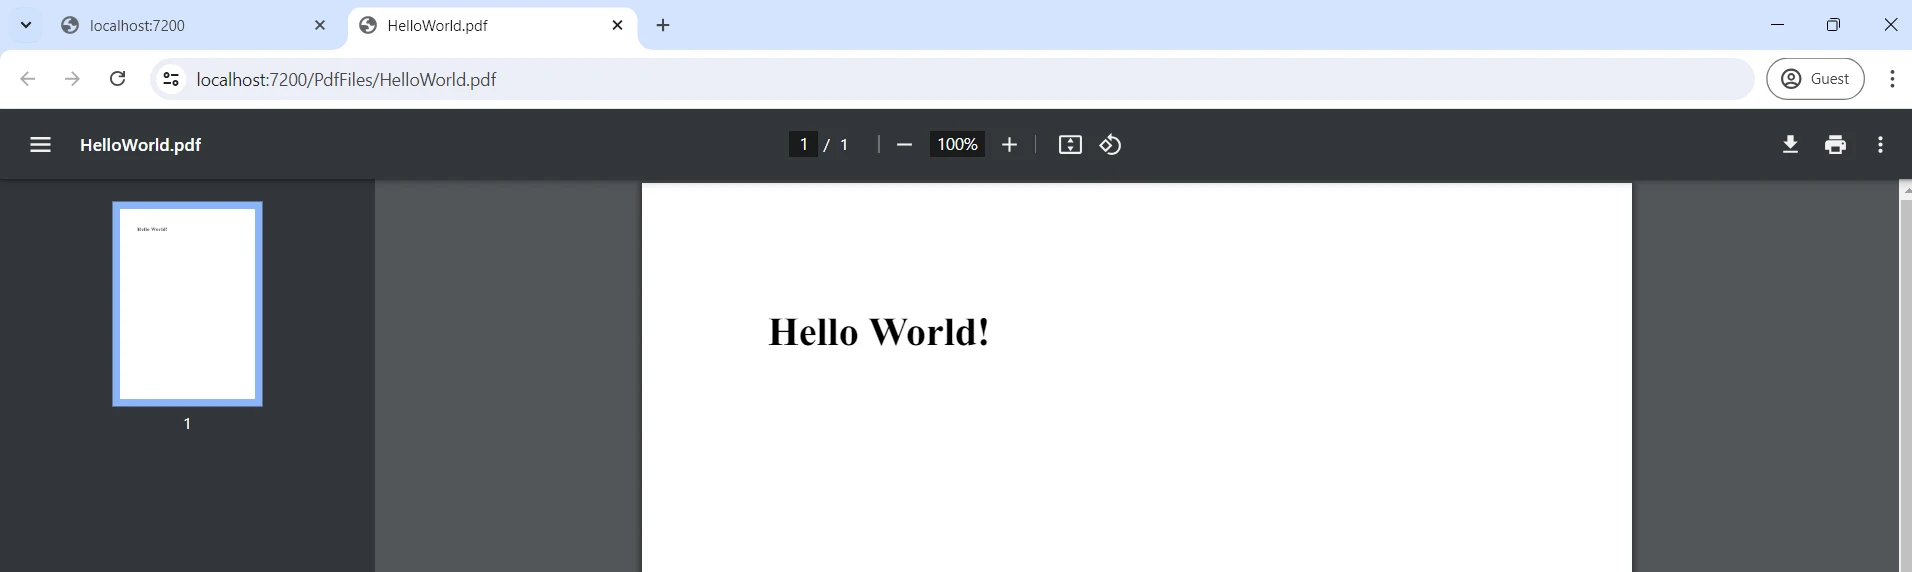
public void GeneratePdf()
{
// Create a new PDF renderer instance
var Renderer = new ChromePdfRenderer();
// Render HTML as a PDF document
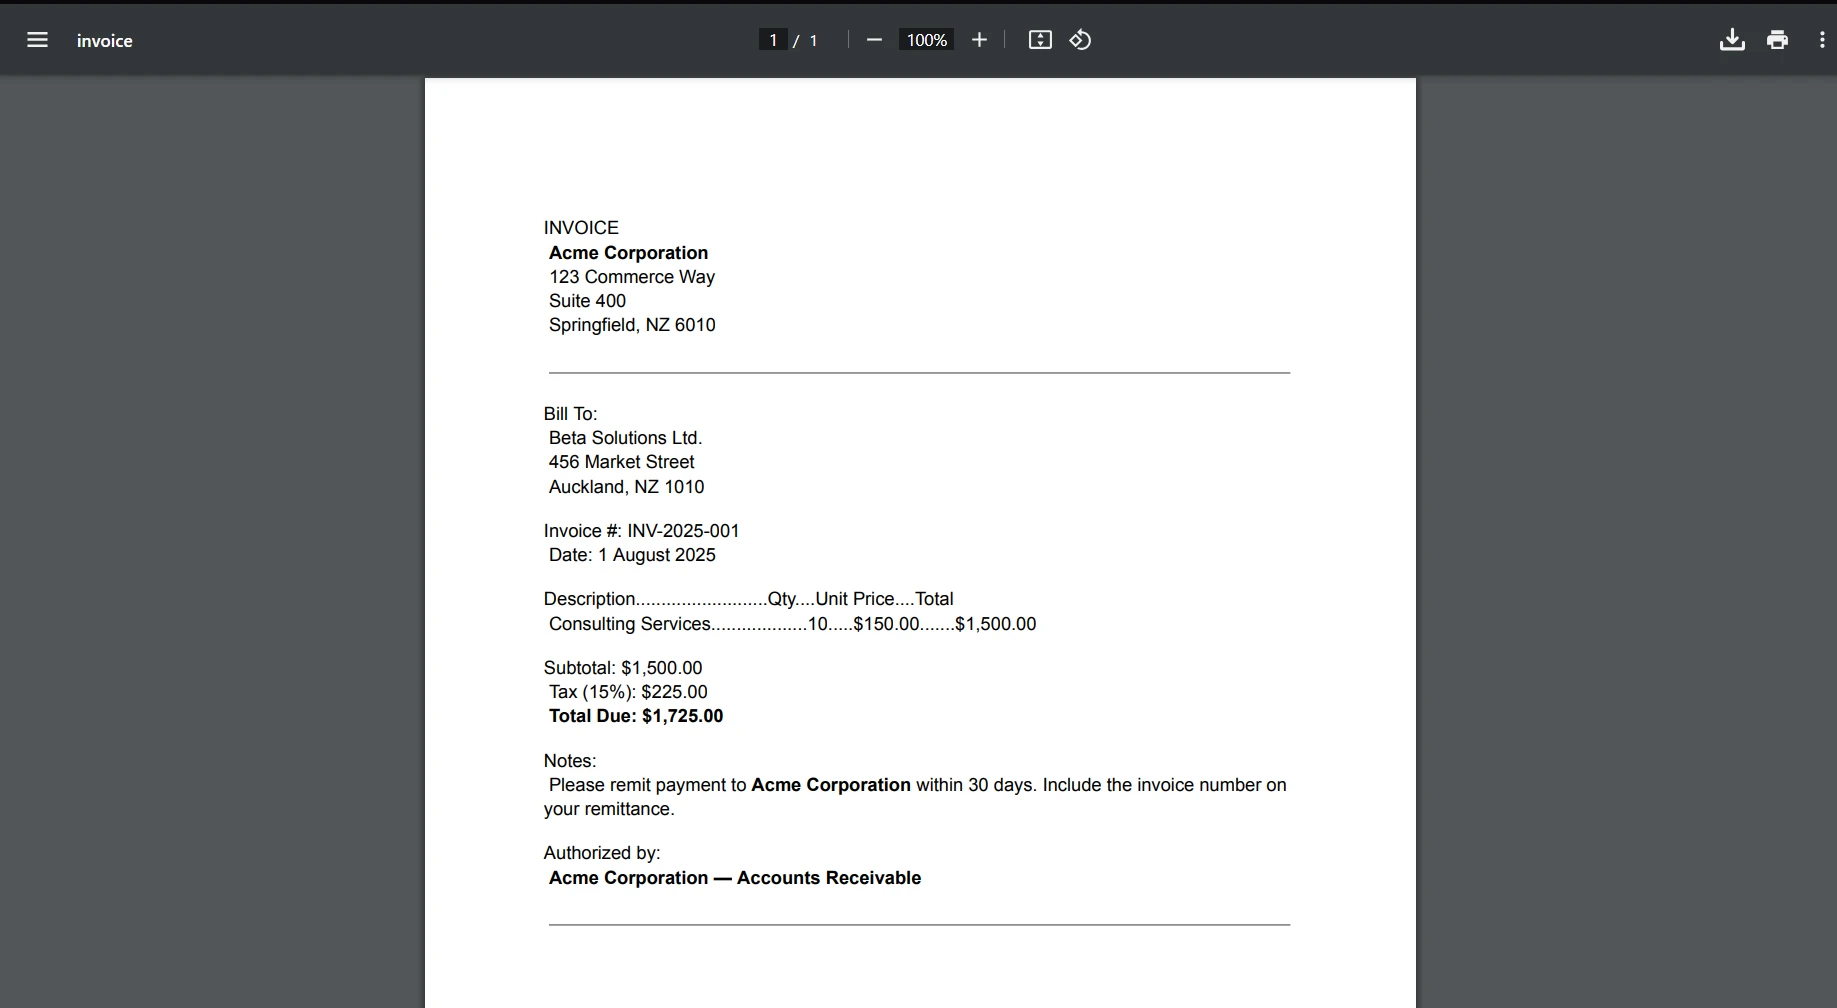
var PdfDocument = Renderer.RenderHtmlAsPdf("<h1>Hello World!</h1>");
// Define the output path for saving the PDF
var OutputPath = "wwwroot/PdfFiles/HelloWorld.pdf";
// Save the generated PDF document
PdfDocument.SaveAs(OutputPath);
// Update the property for the PDF URL
PdfUrl = "/PdfFiles/HelloWorld.pdf";
Changed(nameof(PdfUrl));
}
}using DotNetify;
using IronPdf;
public class PdfViewModel : BaseVM
{
public string PdfUrl { get; set; }
public void GeneratePdf()
{
// Create a new PDF renderer instance
var Renderer = new ChromePdfRenderer();
// Render HTML as a PDF document
var PdfDocument = Renderer.RenderHtmlAsPdf("<h1>Hello World!</h1>");
// Define the output path for saving the PDF
var OutputPath = "wwwroot/PdfFiles/HelloWorld.pdf";
// Save the generated PDF document
PdfDocument.SaveAs(OutputPath);
// Update the property for the PDF URL
PdfUrl = "/PdfFiles/HelloWorld.pdf";
Changed(nameof(PdfUrl));
}
}Imports DotNetify
Imports IronPdf
Public Class PdfViewModel
Inherits BaseVM
Public Property PdfUrl() As String
Public Sub GeneratePdf()
' Create a new PDF renderer instance
Dim Renderer = New ChromePdfRenderer()
' Render HTML as a PDF document
Dim PdfDocument = Renderer.RenderHtmlAsPdf("<h1>Hello World!</h1>")
' Define the output path for saving the PDF
Dim OutputPath = "wwwroot/PdfFiles/HelloWorld.pdf"
' Save the generated PDF document
PdfDocument.SaveAs(OutputPath)
' Update the property for the PDF URL
PdfUrl = "/PdfFiles/HelloWorld.pdf"
Changed(NameOf(PdfUrl))
End Sub
End ClassCreate a Blazor component by adding a new component (e.g., GeneratePdf.razor) and binding it to the ViewModel.
@page "/"

@using DotNetify
@using DotNetify.Blazor
@inject IDotNetifyService DotNetify

<PageTitle>Generate PDF</PageTitle>
<h3>Generate PDF</h3>

<button @onclick="GeneratePdf">Generate PDF</button>

@if (!string.IsNullOrEmpty(pdfUrl))
{
    <a href="@pdfUrl" target="_blank">Download PDF</a>
}

@code {
    private string pdfUrl;

    protected override async Task OnInitializedAsync()
    {
        var vm = await DotNetify.ConnectAsync<PdfViewModel>(this);
        pdfUrl = vm.PdfUrl;

        vm.PropertyChanged += (sender, args) =>
        {
            if (args.PropertyName == nameof(vm.PdfUrl))
            {
                pdfUrl = vm.PdfUrl;
                StateHasChanged();
            }
        };
    }

    private void GeneratePdf()
    {
        DotNetify.CallMethod("GeneratePdf");
    }
}
By integrating DotNetify and IronPDF in a C# ASP.NET Core Blazor application, real-time data handling and dynamic PDF production are made possible. The setup begins with configuring the project in Startup.cs, where services for Razor Pages, Blazor Server, SignalR, and DotNetify are registered to enable server-side Blazor and real-time features.
In PdfViewModel.cs, IronPDF's PDF generation logic is defined. The PDF file can be generated with just a few lines of code. The GeneratePdf function converts HTML content into a PDF and updates the PdfUrl property, informing the client of the new file's location. Communication with the GeneratePdf.razor Blazor component is handled by this ViewModel.
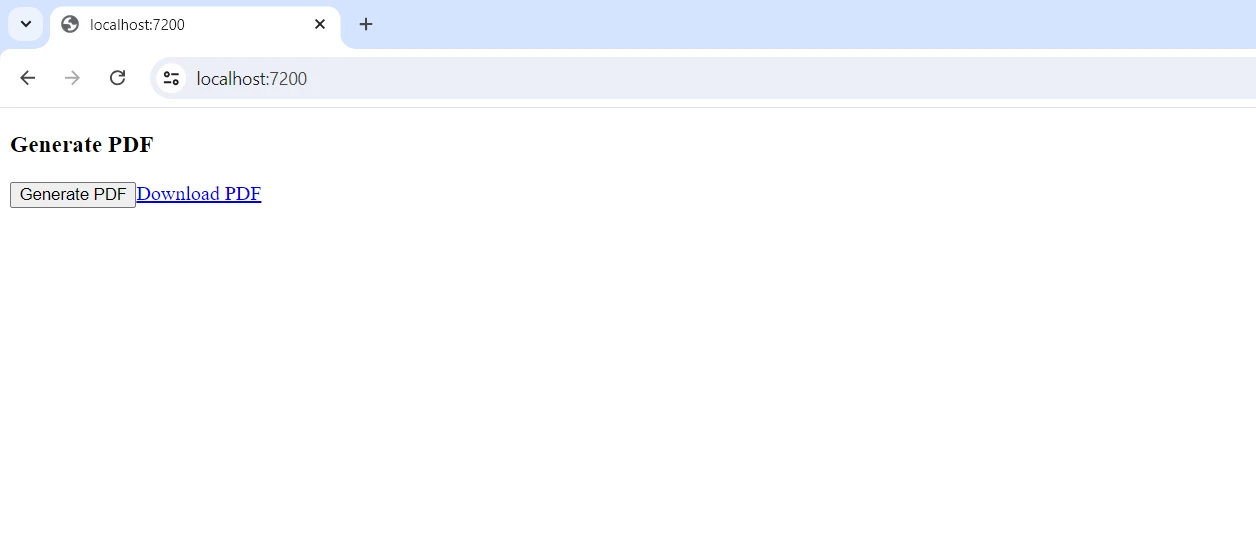
The component connects to the PdfViewModel via the IDotNetifyService and binds to its properties, enabling the client to call the GeneratePdf function and respond to property changes. When users click the "Generate PDF" button, the ViewModel's method is invoked, creating the PDF and dynamically updating the download URL. With this configuration, the web application delivers a responsive and engaging user experience by combining IronPDF's powerful document-generating capabilities with DotNetify's real-time data synchronization.
Conclusion
Integrating DotNetify with IronPDF combines real-time data synchronization and dynamic PDF production in a C# ASP.NET Core Blazor application. DotNetify enables seamless communication between client-side Blazor components and server-side ViewModels, leading to interactive and responsive applications. This is complemented by IronPDF, which provides robust tools for creating and modifying PDFs directly from server-side logic. This powerful combination permits the development of applications capable of creating and distributing customized documents, as well as real-time updates.
This integration leverages real-time data handling and document generation technologies to enhance user experience, whether for reporting, invoicing, or any other document-related task. By following the outlined steps, developers can efficiently set up and utilize these tools, unlocking new possibilities in modern web application development.
With IronPDF and Iron Software Developer Tools, developers eager to explore its extensive features can utilize functionalities like OCR, barcode scanning, PDF production, and more. Provided license alternatives related to the project are specified in detail, allowing developers to choose the best model that fits their needs. The listed advantages contribute to developers delivering timely, coordinated, and effective solutions for a multitude of challenges.
Frequently Asked Questions
What is DotNetify and how does it function?
DotNetify is an open-source framework built with .NET and Blazor, designed for developing real-time web applications. It uses SignalR to enable real-time communication between the client and server, facilitating the creation of dynamic, interactive web applications.
How can I integrate real-time web applications with PDF generation in C#?
By combining DotNetify for real-time web applications and IronPDF for PDF generation, developers can create interactive applications that dynamically generate and distribute PDF documents based on real-time data inputs.
What capabilities does IronPDF offer for PDF document manipulation?
IronPDF provides capabilities for creating, editing, and converting PDF documents programmatically. It allows conversion from HTML, CSS, and JavaScript into PDFs and supports various PDF manipulations, making it ideal for generating reports and dynamic documents.
How does DotNetify enhance real-time application development?
DotNetify enhances real-time application development by offering a programming model that synchronizes client-side views with server-side data, enabling the creation of responsive and interactive web interfaces. It supports both JavaScript and Blazor for a flexible development environment.
What are the benefits of using SignalR in DotNetify?
SignalR in DotNetify enables real-time client-server communication, which is essential for creating interactive and responsive web applications. This facilitates instant updates and dynamic interactions within the application.
How can IronPDF assist in generating dynamic reports in a .NET application?
IronPDF can generate dynamic reports by converting HTML content, including CSS and JavaScript, into high-quality PDF documents. This can be particularly useful for applications that require the generation of data-driven reports and invoices.
What is the role of ViewModels in DotNetify?
In DotNetify, ViewModels are used to handle data synchronization between the client and server. They facilitate the development of applications with responsive user interfaces by maintaining a consistent data flow.
How does combining DotNetify and IronPDF improve user experience?
Combining DotNetify with IronPDF improves user experience by allowing real-time data updates and dynamic PDF generation within a single application. This integration enables seamless document generation and distribution, enhancing the application's functionality.