Razor Components : How it Works for Developers
Web development has come a long way over the years, and with the advent of modern frameworks and libraries, developers have access to powerful tools for building dynamic and interactive web pages. One such technology that has gained significant popularity in recent years is Razor Components, which is part of the Blazor framework in ASP.NET Core. Razor Components allow developers to build rich, client-side web applications using C# and HTML, without having to write JavaScript. In this article, we will look at Razor Components and how they can be used to create modular, reusable, and dynamic web pages.
What are Razor Components
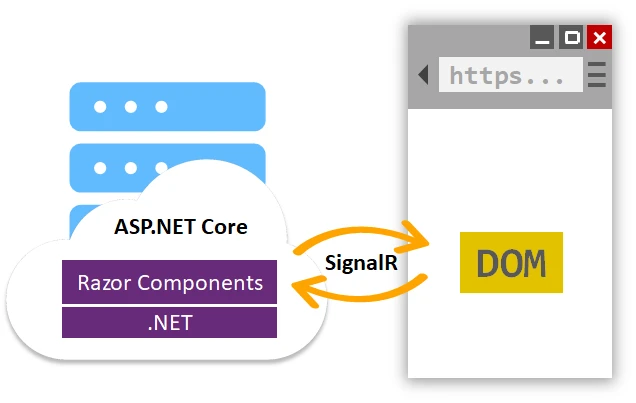
Razor Components are a UI framework in ASP.NET Core that allows developers to build web pages using a combination of C# and HTML, with the ability to write server-side logic that can be executed on the client side. Razor Components are part of the Blazor framework, which is a client-side web UI framework that runs C# code in the browser using WebAssembly (Wasm) or SignalR. Razor Components provide a component-based architecture for building modern web applications, where the UI is broken down into smaller, self-contained components that can be composed together to create a complete web page.
Razor Components use a markup language called Razor syntax, which is a combination of C# and HTML that allows for seamless integration of server-side and client-side code. Razor Components are similar to other component-based UI frameworks, such as React, Angular, and Vue, but with the key difference that they are written in C# and run on the server or client side, depending on the hosting model (WebAssembly or SignalR).
Benefits of Razor Components
Razor Components offer several benefits for web developers, including:
Reusability
Razor Components are self-contained elements that can be easily reused in multiple places within a web application or across different projects. This promotes code reusability and reduces code duplication, resulting in more maintainable and scalable web applications.
Modularity
Razor Components follow a component-based architecture, where the UI is broken down into smaller components that can be composed together to create complex web pages. This promotes modularity, allowing developers to encapsulate UI and logic within individual components, making it easier to manage and maintain the codebase.
Seamless Integration with C#
Since Razor Components are written in C#, developers can leverage their existing C# skills and knowledge to build web applications. This eliminates the need to learn and write JavaScript, which can be a significant advantage for developers who are already familiar with C#.
Server-Side and Client-Side Execution
Razor Components can be executed either on the server or client side, depending on the hosting model. This gives developers flexibility in choosing the most appropriate execution model for their application, depending on factors such as performance, security, and user experience.
Real-time Communication
Razor Components can use SignalR, a real-time communication library, to establish bi-directional communication between the client and server. This enables real-time updates and notifications in web applications, providing a responsive and interactive user experience.
Extensibility
Razor Components are highly extensible, allowing developers to create their custom components, libraries, and templates. This enables developers to build tailored solutions that meet the specific requirements of their web applications.
Getting Started with Razor Component
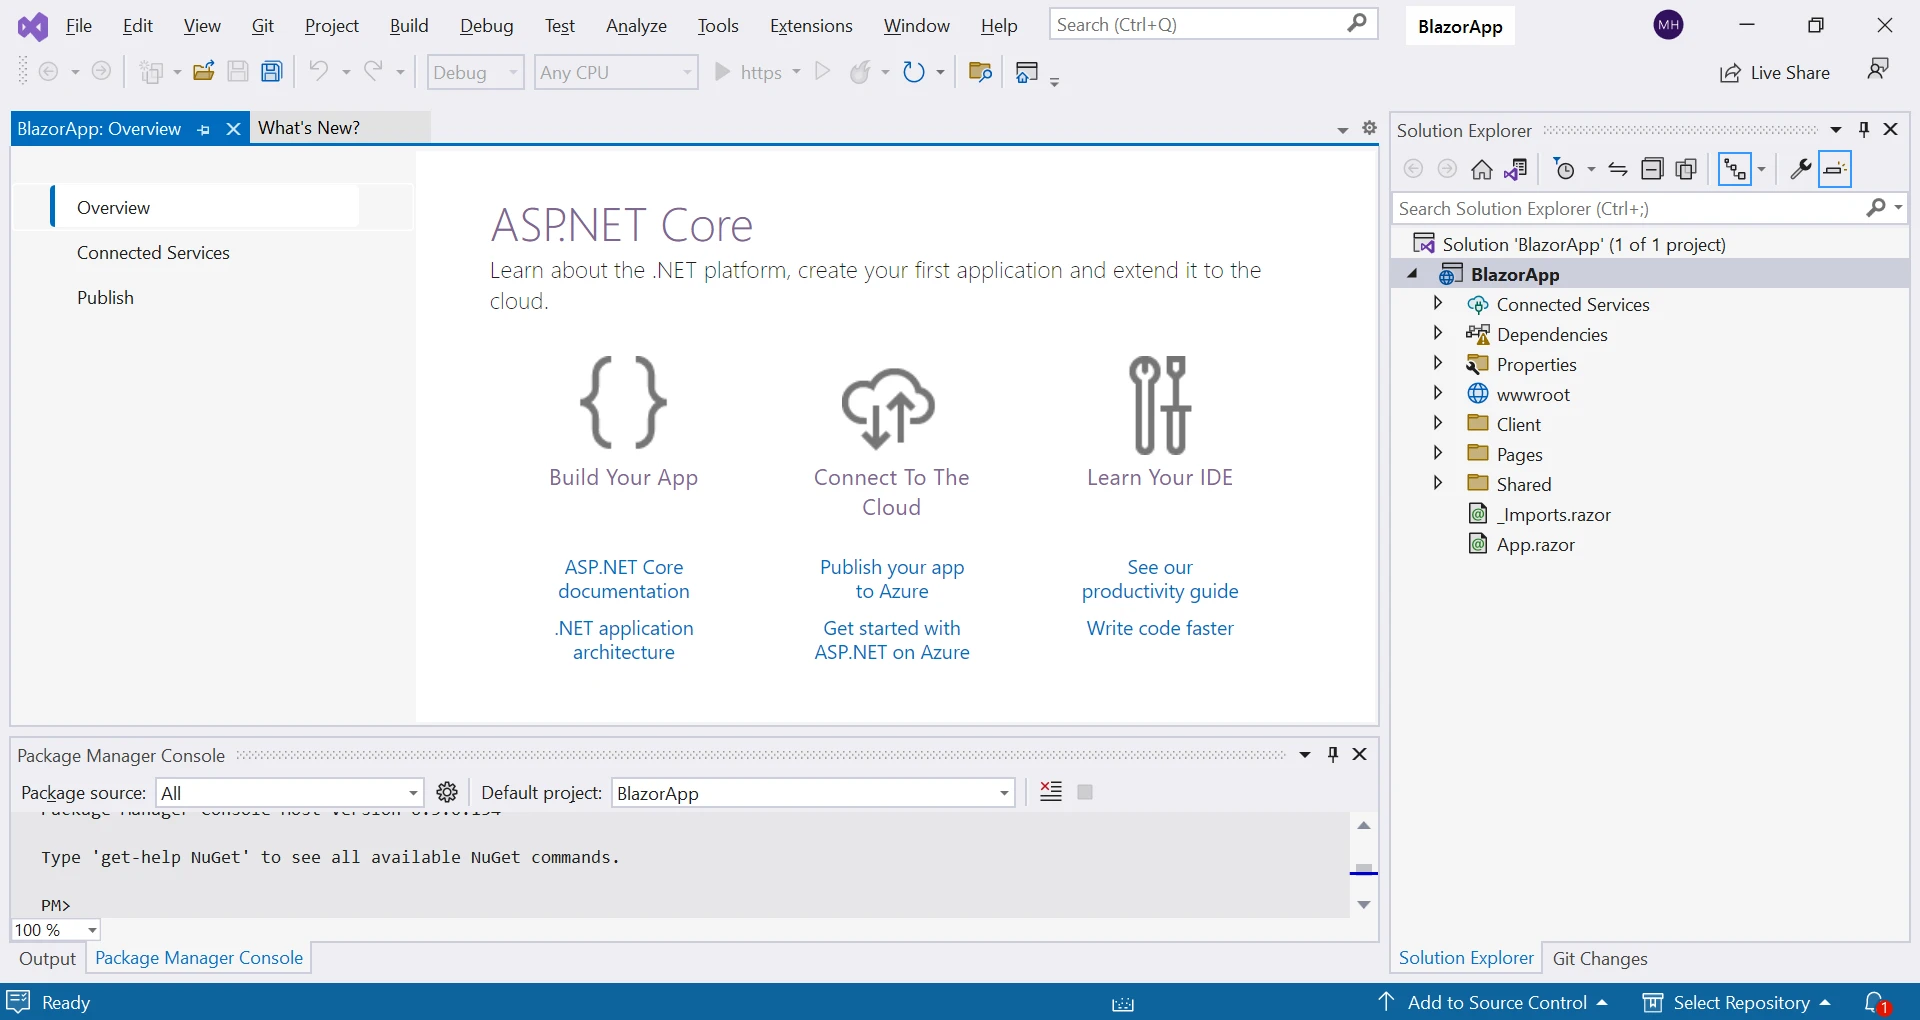
To get started with Razor Components, you will need to have .NET Core 3.0 or later installed on your system. Create a new ASP.NET Core project using the Blazor template in Visual Studio or the .NET Core CLI.
dotnet new blazorserver
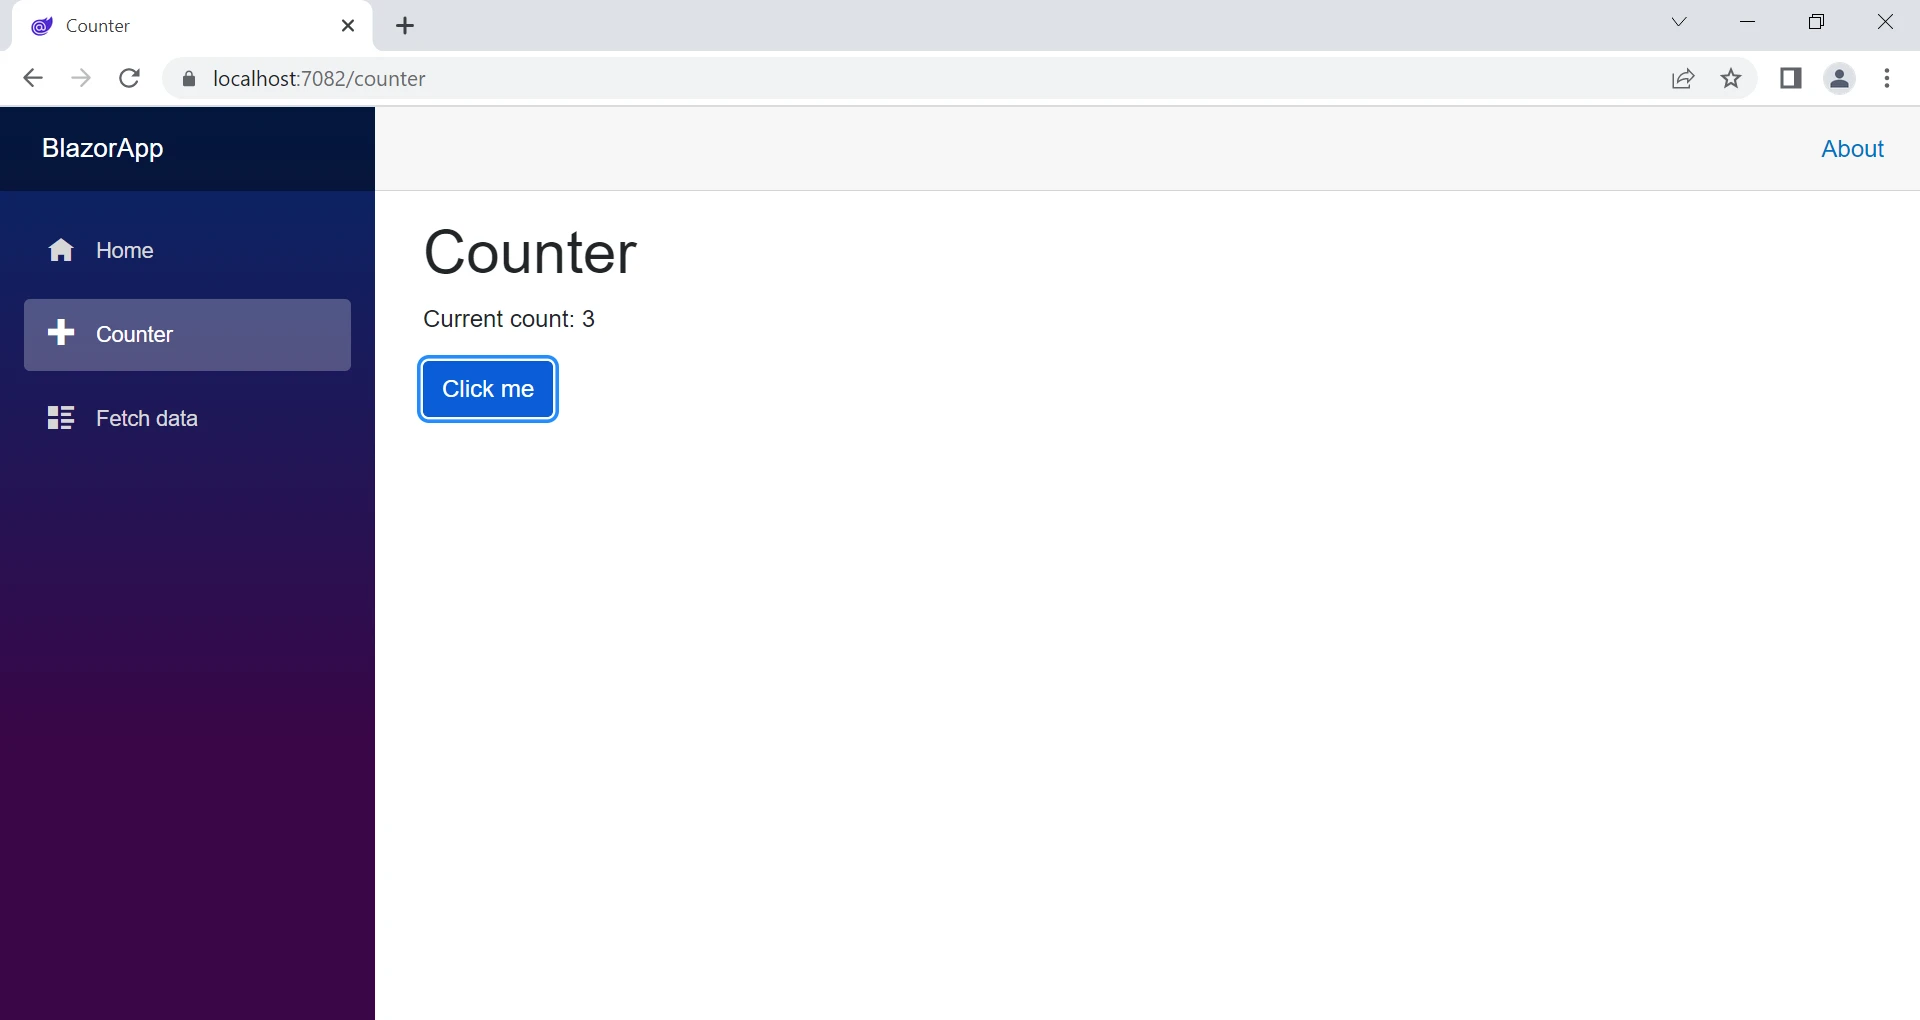
@page "/counter"

<h1>Counter</h1>

<p role="status">Current count: @currentCount</p>
<button @onclick="IncrementCount">Click me</button>

@code {
    private int currentCount = 0;

    private void IncrementCount()
    {
        currentCount++;
    }
}
In this example, we have a Razor component called "Counter" with a button that increments the currentCount variable when clicked. The @code block is used to define the C# code for the component.
Create a Custom Razor Component
In the project, create a new folder called "Components" to store your Razor Components.
Inside the "Components" folder, add a new Razor Component file with the ".razor" extension. This file will contain the C# and HTML code for your component.
Open the Razor Component file and define your component using Razor syntax. Razor syntax allows you to combine C# and HTML code in a single file, making it easy to create dynamic web pages. For example, you can define a simple Razor Component like this:
<h1>Hello, World!</h1>
<p>This is a Razor Component.</p>

@code {
    // C# code for the component can be added here
}
You can now use your Razor Component in other parts of your web application by including it in your HTML markup using the component's tag name. For example, you can use the component in your main Razor page like this:
<MyComponent />You can also pass data to your Razor Component using component parameters. Component parameters allow you to pass data from a parent component to a child component, enabling communication between components. For example, you can define a parameter in your Razor Component like this:
@code {
    [Parameter]
    public string Message { get; set; }
}
And then use the component parameter in your Razor Component class like this:
<p>@Message</p>And pass data to the component from a parent component like this:
<MyComponent Message="Hello from parent component!" />Razor Components can also contain server-side logic that can be executed on the client side. For example, you can write processing logic, make HTTP requests, handle user events, and perform other server-side operations directly from your Razor Components using C# code. This allows you to create dynamic and interactive web pages without writing any JavaScript code.
Creating Reusable Razor Components
One of the benefits of Razor Components is the ability to create reusable UI components that can be used across multiple pages or applications. To create a reusable component, you can create a new ".razor" file in the "Shared" folder of your project.
For example, let's say we want to create a component that displays a list of books. We can create a new BookList.razor file in the "Shared" folder such as:
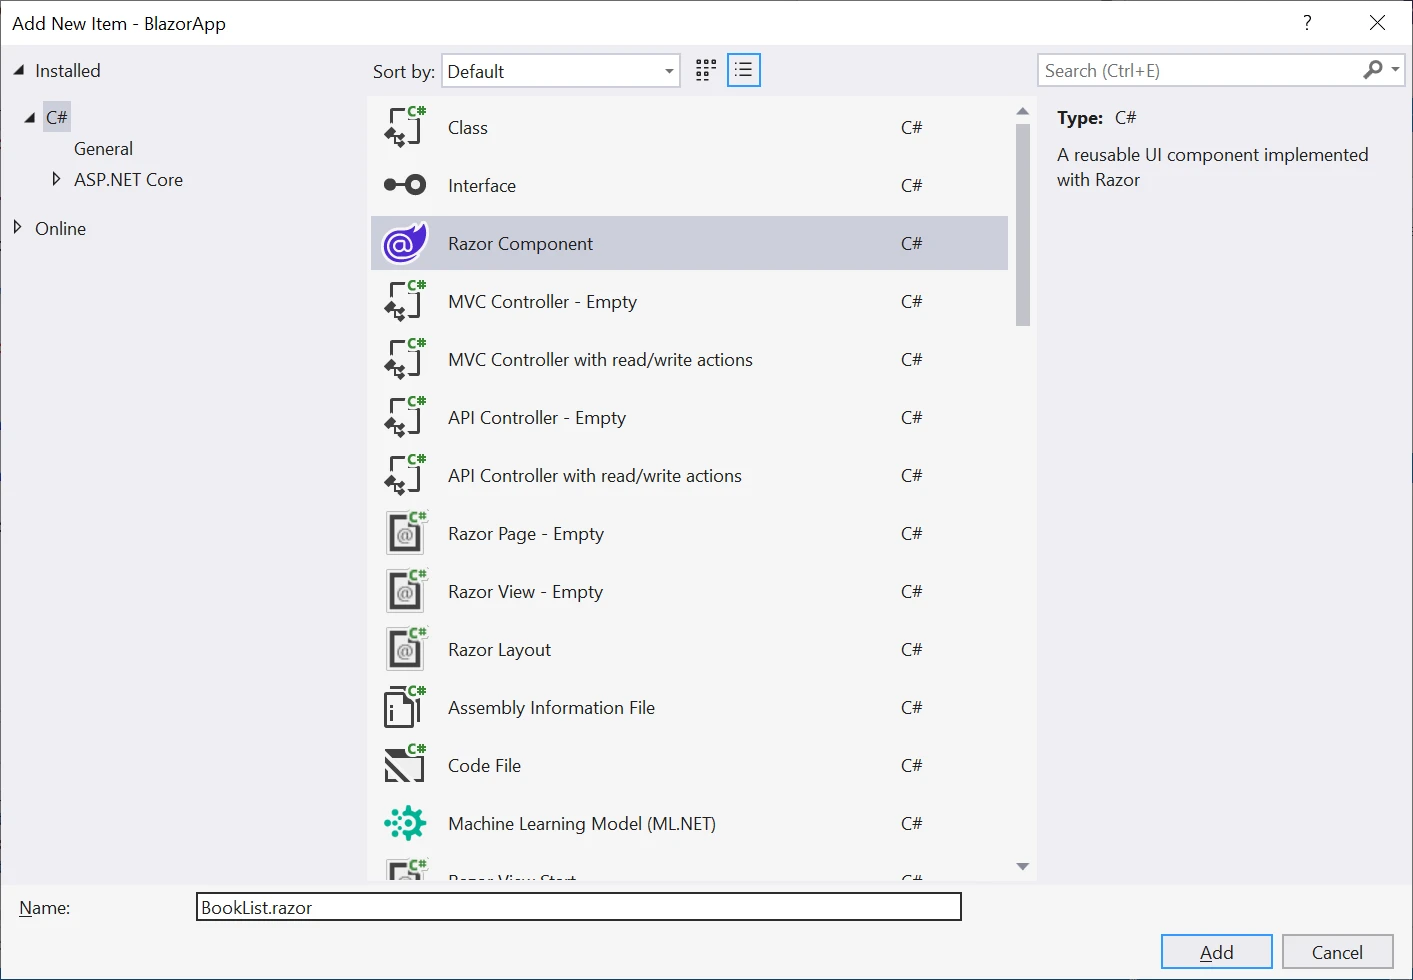
We can define the razor component like this:
@typeparam TItem

@foreach (var book in Books)
{
    <p>@book.Title by @book.Author</p>
}

@code {
    [Parameter]
    public List<TItem> Books { get; set; }
}
In this example, we have a component called BookList that takes a list of "Book" objects as a razor parameter. The @foreach loop is used to iterate through the list and display each book title and author.
In the next section, we will explore how to use IronPDF with Razor Components to create PDF files from web applications.
Using IronPDF with Razor Components
IronPDF is a C# library that allows developers to create PDF files from HTML, CSS, and JavaScript. It is built on top of Chromium, the open-source browser that powers Google Chrome. With IronPDF, developers can easily convert Razor Components to HTML and create PDF files from them.
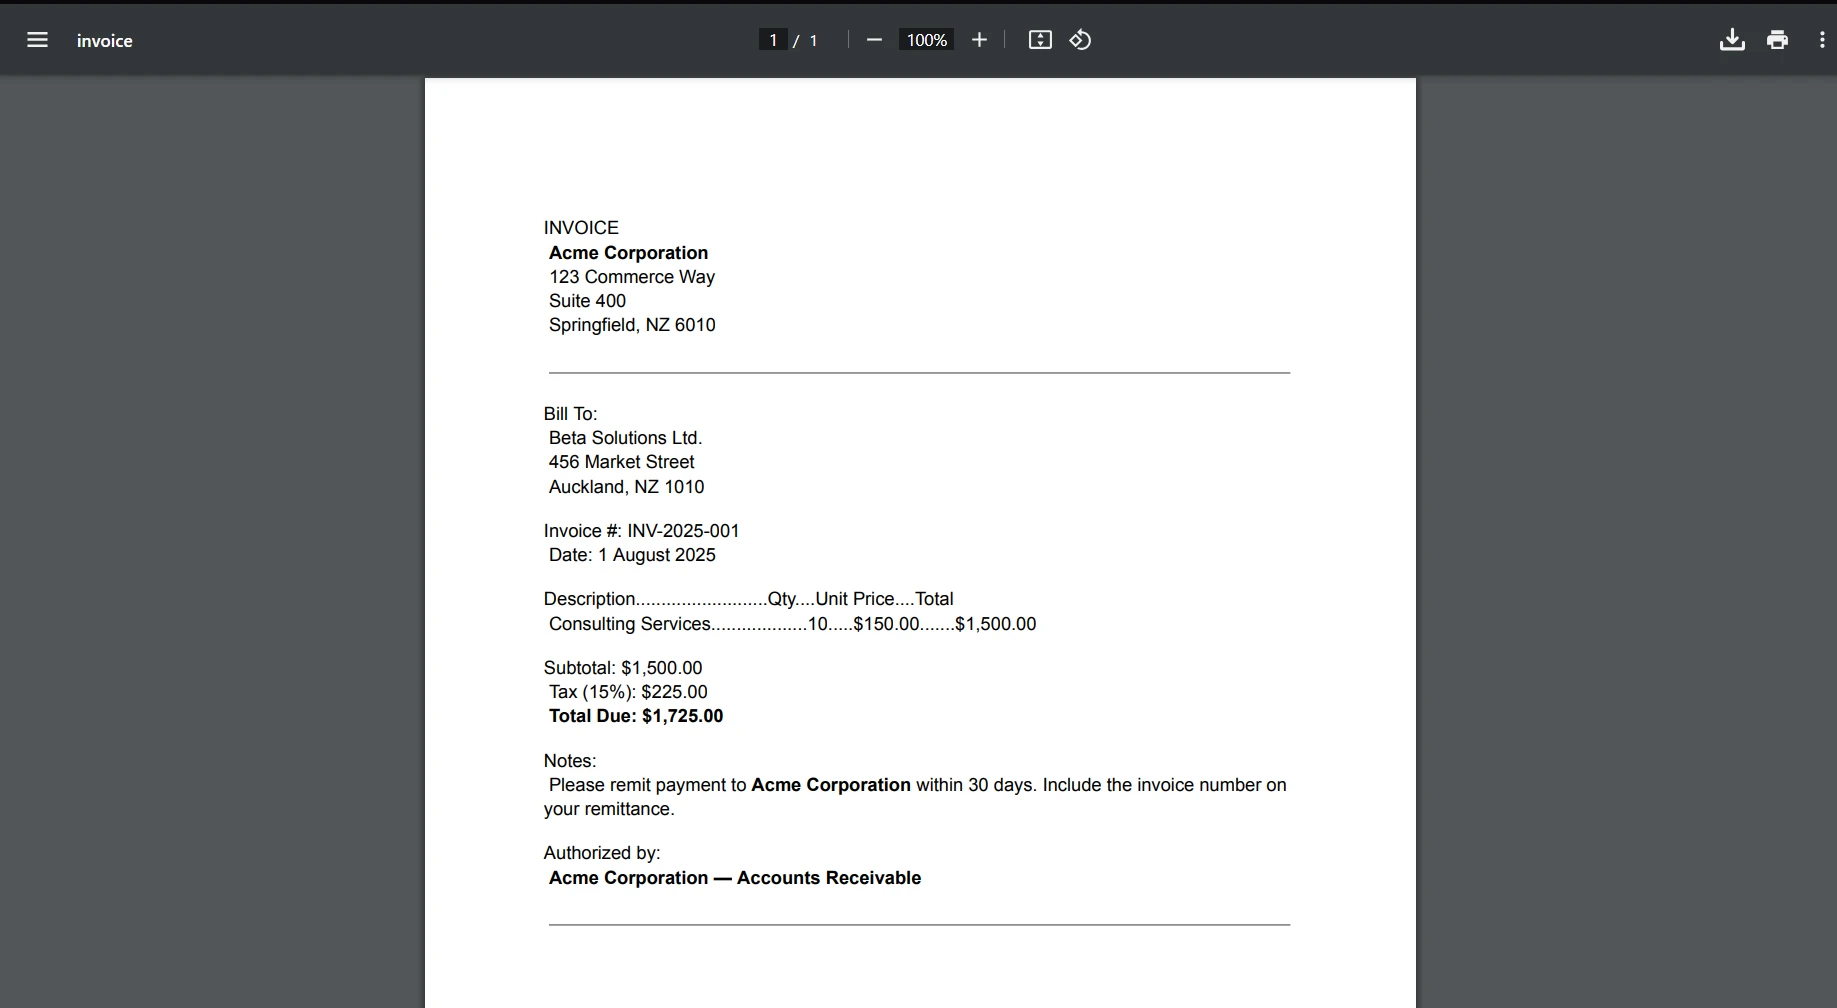
IronPDF excels at converting HTML to PDF, ensuring that the layout and style remain intact. This is particularly useful for generating PDFs from web-based content like reports, invoices, and documentation. HTML files, URLs, and HTML strings can be easily converted into PDF files.
using IronPdf;

class Program
{
    static void Main(string[] args)
    {
        var renderer = new ChromePdfRenderer();

        // 1. Convert HTML String to PDF
        var htmlContent = "<h1>Hello, IronPDF!</h1><p>This is a PDF from an HTML string.</p>";
        var pdfFromHtmlString = renderer.RenderHtmlAsPdf(htmlContent);
        pdfFromHtmlString.SaveAs("HTMLStringToPDF.pdf");

        // 2. Convert HTML File to PDF
        var htmlFilePath = "path_to_your_html_file.html"; // Specify the path to your HTML file
        var pdfFromHtmlFile = renderer.RenderHtmlFileAsPdf(htmlFilePath);
        pdfFromHtmlFile.SaveAs("HTMLFileToPDF.pdf");

        // 3. Convert URL to PDF
        var url = "http://ironpdf.com"; // Specify the URL
        var pdfFromUrl = renderer.RenderUrlAsPdf(url);
        pdfFromUrl.SaveAs("URLToPDF.pdf");
    }
}
using IronPdf;
class Program
{
static void Main(string[] args)
{
var renderer = new ChromePdfRenderer();
// 1. Convert HTML String to PDF
var htmlContent = "<h1>Hello, IronPDF!</h1><p>This is a PDF from an HTML string.</p>";
var pdfFromHtmlString = renderer.RenderHtmlAsPdf(htmlContent);
pdfFromHtmlString.SaveAs("HTMLStringToPDF.pdf");
// 2. Convert HTML File to PDF
var htmlFilePath = "path_to_your_html_file.html"; // Specify the path to your HTML file
var pdfFromHtmlFile = renderer.RenderHtmlFileAsPdf(htmlFilePath);
pdfFromHtmlFile.SaveAs("HTMLFileToPDF.pdf");
// 3. Convert URL to PDF
var url = "http://ironpdf.com"; // Specify the URL
var pdfFromUrl = renderer.RenderUrlAsPdf(url);
pdfFromUrl.SaveAs("URLToPDF.pdf");
}
}Imports IronPdf
Friend Class Program
Shared Sub Main(ByVal args() As String)
Dim renderer = New ChromePdfRenderer()
' 1. Convert HTML String to PDF
Dim htmlContent = "<h1>Hello, IronPDF!</h1><p>This is a PDF from an HTML string.</p>"
Dim pdfFromHtmlString = renderer.RenderHtmlAsPdf(htmlContent)
pdfFromHtmlString.SaveAs("HTMLStringToPDF.pdf")
' 2. Convert HTML File to PDF
Dim htmlFilePath = "path_to_your_html_file.html" ' Specify the path to your HTML file
Dim pdfFromHtmlFile = renderer.RenderHtmlFileAsPdf(htmlFilePath)
pdfFromHtmlFile.SaveAs("HTMLFileToPDF.pdf")
' 3. Convert URL to PDF
Dim url = "http://ironpdf.com" ' Specify the URL
Dim pdfFromUrl = renderer.RenderUrlAsPdf(url)
pdfFromUrl.SaveAs("URLToPDF.pdf")
End Sub
End ClassInstalling IronPDF
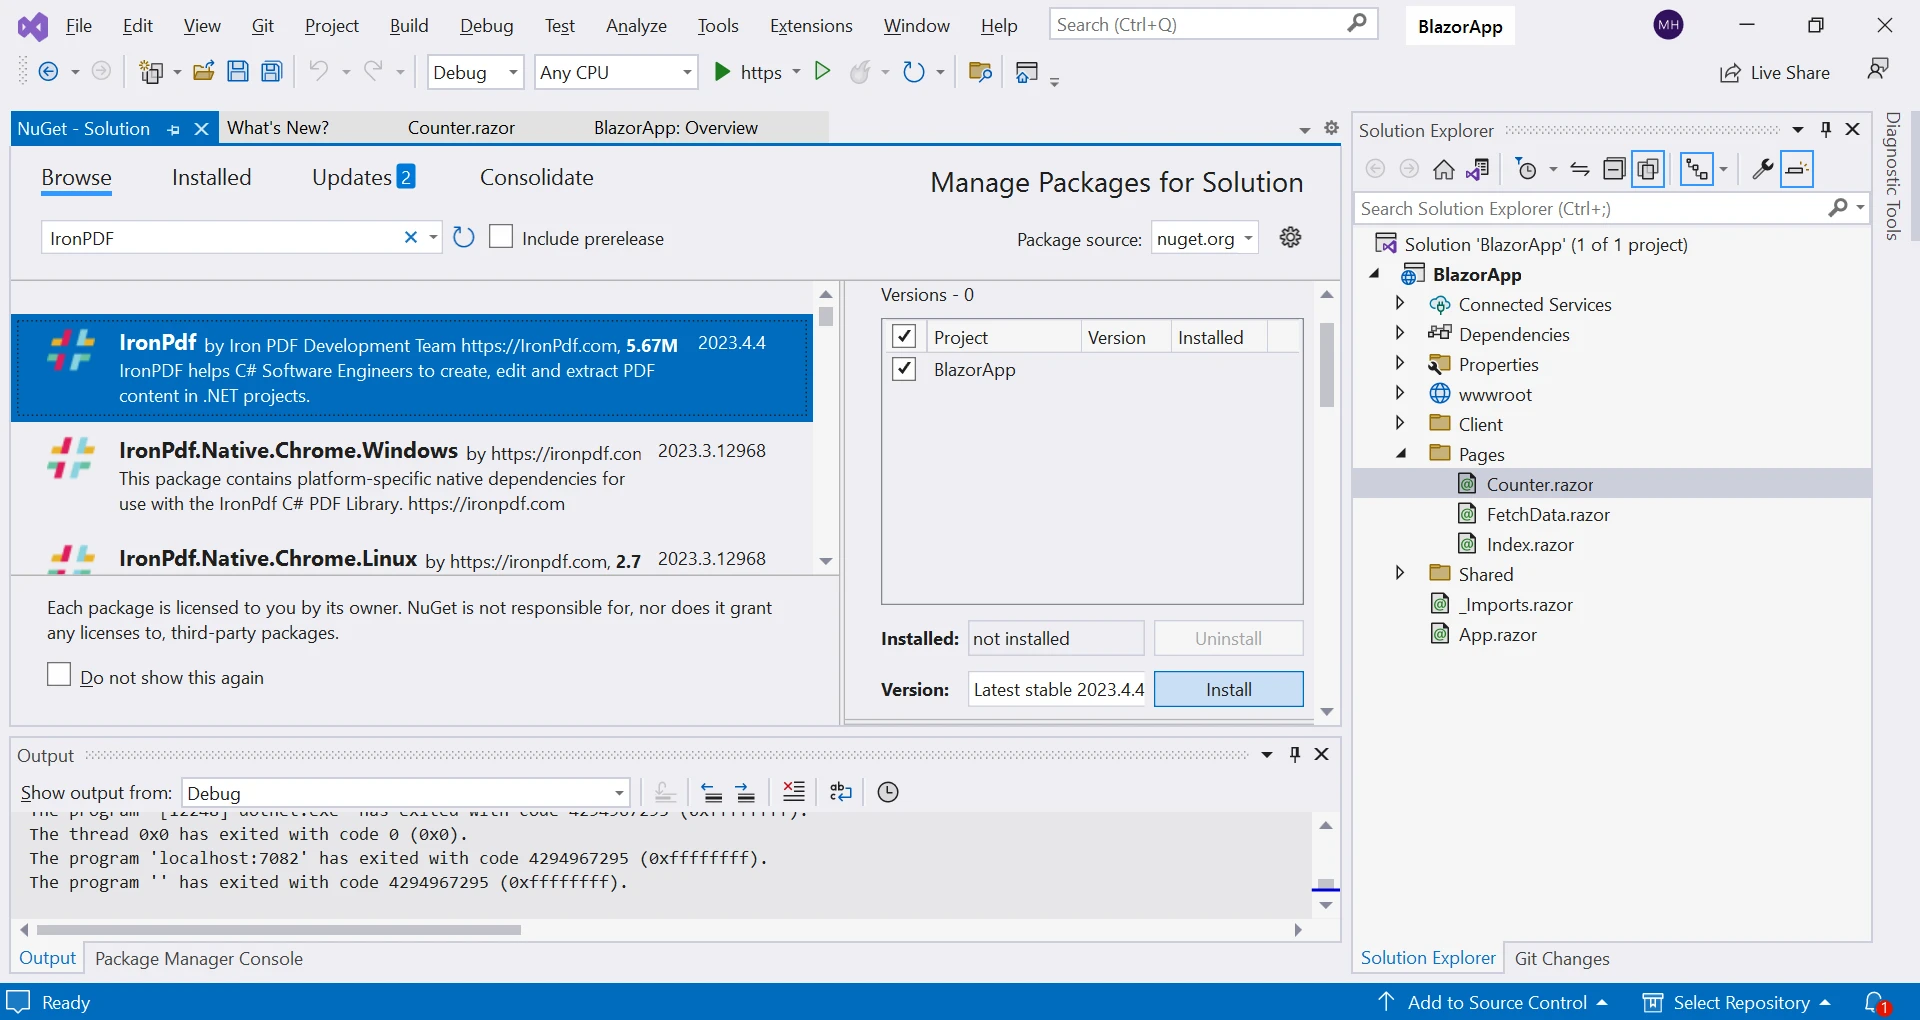
To use IronPDF with Razor Components, we first need to install the IronPDF NuGet package. To do this, follow these steps:
- Open your project in Visual Studio.
- Right-click on the project and select "Manage NuGet Packages".
- Search for "IronPDF" and select the "IronPDF package".
- Click on "Install" to install the package.
After installing the IronPDF NuGet package, we can use it in our Razor Components application.
Once the package is installed, you can create a new PDF file from a Razor Component by using the IronPdf.ChromePdfRenderer class.
To create a PDF file in ASP.NET Core Razor Components, you can pass the HTML syntax string, HTML File, or URL to the IronPdf.ChromePdfRenderer method. For example, let's say we want to create a PDF file with the increment of a counter.
var renderer = new IronPdf.ChromePdfRenderer();
var pdf = renderer.RenderHtmlAsPdf("<h1>My PDF #" + currentCount + "</h1>");
pdf.SaveAs("myPdf" + currentCount + ".pdf");
var renderer = new IronPdf.ChromePdfRenderer();
var pdf = renderer.RenderHtmlAsPdf("<h1>My PDF #" + currentCount + "</h1>");
pdf.SaveAs("myPdf" + currentCount + ".pdf");Dim renderer = New IronPdf.ChromePdfRenderer()
Dim pdf = renderer.RenderHtmlAsPdf("<h1>My PDF #" & currentCount & "</h1>")
pdf.SaveAs("myPdf" & currentCount & ".pdf")In this example, we create a new instance of the ChromePdfRenderer. We then create a new instance of the PdfDocument class and pass a string to the RenderHtmlAsPdf method. Finally, we save the resulting PDF file to disk using the PdfDocument.SaveAs method.
In this example, we have modified our counter component. We have modified the onClick function of a counter button that, when clicked, will create a PDF containing the count of the Counter.
Conclusion
In this article, we have explored how to use Razor Components with IronPDF to create PDF files from web applications. We have covered the basics of Razor Components, how to install and use IronPDF, and provided code examples to help you get started.
Razor Components and IronPDF are powerful tools that can be used to create robust and feature-rich web applications. By combining these technologies, developers can create web applications that are both highly functional and visually appealing.
IronPDF can also be used to convert razor pages and URLs to PDFs, as well as to read, create and manipulate PDF documents. IronPDF even allows for more granular PDF control such as adding headers, footers, page numbers, digital signatures, passwords, and advanced PDF manipulation features to existing or newly generated PDF documents. It is free for development but requires a free trial license or commercial license for production.
Frequently Asked Questions
What are Razor Components?
Razor Components are a UI framework in ASP.NET Core that allows developers to build web pages using a combination of C# and HTML, with server-side logic that can also execute on the client side. They are part of the Blazor framework and support component-based architecture.
How do Razor Components enhance web development?
Razor Components simplify web development by enabling developers to use C# and HTML to create dynamic and interactive web applications without relying on JavaScript. This results in a more seamless integration of server-side logic and client-side interactivity.
How can I generate a PDF from Razor Components?
To generate PDFs from Razor Components, you can use IronPDF, which allows the conversion of HTML output from components into PDF format. This is achieved using the IronPdf.ChromePdfRenderer class to render the components into a PDF file.
What are the benefits of using Razor Components?
Razor Components offer several benefits, including reusability, modularity, seamless integration with C#, server-side and client-side execution, real-time communication with SignalR, and high extensibility.
How do I install IronPDF in my project?
To add IronPDF to your project, use the NuGet Package Manager in Visual Studio. Search for the IronPDF package and install it, enabling PDF generation capabilities within your Razor Components.
Can Razor Components execute both server-side and client-side?
Yes, Razor Components can execute on both server-side and client-side, depending on the chosen hosting model. This flexibility allows developers to optimize application performance and security based on specific project needs.
How do Razor Components promote reusability?
Razor Components promote reusability by being self-contained, which allows them to be used in multiple places within an application or across different projects. This reduces code duplication and enhances maintainability and scalability.
What are some use cases for generating PDFs from web content?
Generating PDFs from web content using IronPDF is beneficial for creating standardized documents such as reports, invoices, and documentation, ensuring that the content retains its layout and style across different platforms.
How can I create custom UI elements with Razor Components?
You can create custom UI elements by defining them in '.razor' files using Razor syntax. This allows developers to blend C# and HTML, creating dynamic and reusable components tailored to specific application needs.
How do parameters work in Razor Components?
In Razor Components, parameters are used to pass data from parent components to child components. This is facilitated through the [Parameter] attribute, enabling communication and data sharing between different parts of an application.