.NETソフトウェア開発(開発者向けの動作方法)
.NET Frameworkソフトウェア開発は、Microsoftがサポートする強力で多用途なフレームワークであり、さまざまなプラットフォーム、オペレーティングシステム、デバイスにわたる堅牢で高品質なアプリケーションの作成を.NET開発者に可能にします。 このソフトウェア開発フレームワークは、包括的に設計されており、ソフトウェア開発者が.NETプラットフォームで効率的にウェブ、デスクトップ、モバイルアプリケーションを構築するためのツール、ライブラリ、APIを提供します。
C#、Visual Basic、F#を含む複数のプログラミング言語をサポートしており、.NET開発は開発者の柔軟性を拡張し、.NET Coreエコシステムの豊富な機能から恩恵を受けつつ、好みの言語で作業を行えるように保証します。 このチュートリアルでは、IronPDFが.NET開発をどのように強化するかを見て、実際の問題を解決します。
.NETソフトウェア開発エコシステムの理解
.NETエコシステムは、異なるオペレーティングシステム全体のアプリケーション開発を容易にするように設計されたさまざまなコンポーネントと技術を含む広範なプラットフォームであり、.NETの重要な実装です。 その核心には、.NET Frameworkと.NET Coreが主なエンジンとして機能しており、コードの実行を管理し、メモリ管理、型の安全性、例外処理などのサービスを提供する共通言語ランタイム(CLR)を提供しています。
共通言語ランタイム(CLR)
CLRは.NETのアーキテクチャの重要な要素であり、異なるオペレーティングシステム間で.NETコードを実行することを可能にします。 CIL(共通中間言語)をネイティブな機械コードにコンパイルし、ホストマシンが直接実行できるようにします。 このプロセスは、主要なモバイルオペレーティングシステムからWindowsのWebサーバーまで、さまざまなプラットフォームで.NETアプリケーションがシームレスに動作することを保証します。
クロスプラットフォームフレームワーク
.NET Coreはクロスプラットフォームフレームワークとして登場し、.NETアプリケーションがLinux、macOS、Windowsで動作することを可能にします。 この適応性により、.NETは異なるデバイスやプラットフォームでより広いオーディエンスに到達しようとする開発者にとって魅力的な選択となります。 .NET Coreを使用すると、アプリケーションはサポートされている任意のオペレーティングシステムで開発およびデプロイでき、広範な.NETコミュニティに支えられた.NETソフトウェア開発の到達範囲と柔軟性を高めます。
統合開発環境(IDE)
Visual Studioは.NET開発のための主要な統合開発環境(IDE)として際立っています。 コードの記述、デバッグ、および.NETアプリケーションのデプロイのための強力なツールを開発者に提供します。 Visual Studioはさまざまなプログラミング言語をサポートし、Web、デスクトップ、およびモバイルアプリケーションを構築するための広範な機能を提供し、.NET開発者にとって不可欠なツールとなっています。
.NETでのアプリケーション構築
.NETプラットフォームでアプリケーションを作成することは、Visual Basicなどのフレームワークが提供する幅広いツール、ライブラリ、およびプログラミング言語を活用することを含み、その包括的なエコシステムを示しています。 この柔軟性により、ソフトウェア開発者は、ウェブアプリケーションやデスクトップアプリケーションからクラウドベースおよびモバイルソリューションまで、さまざまな種類の.NETアプリを構築することができます。
ASP.NETでのウェブ開発
.NETフレームワークの重要な部分であるASP.NETは、動的なウェブページやアプリケーションを構築するために特別に設計されています。 開発者は、大量のトラフィックを処理できるレスポンシブでスケーラブルなウェブアプリケーションを作成できます。 オープンソースバージョンであるASP.NET Coreは、クロスプラットフォームのウェブアプリケーションを構築するための追加機能を提供し、Windows、Linux、macOSでウェブアプリを開発およびデプロイすることを可能にします。
デスクトップアプリケーション開発
.NETは、デスクトップアプリケーションを作成するための2つの主要なアプローチを提供します: Windows FormsとWindows Presentation Foundation(WPF)。 Windows Formsは、リッチなグラフィカルユーザインタフェースを備えたデスクトップアプリを簡単に作成する方法を提供しますが、WPFはXAML(Extensible Application Markup Language)を使用して、高度なグラフィックスやアニメーションを持つ視覚的に魅力的なユーザインタフェースを開発することを可能にします。
モバイルアプリケーション開発
モバイル開発において、.NETはXamarinフレームワークを通じて主要なモバイルオペレーティングシステムにその範囲を広げ、現在は.NET MAUI(マルチプラットフォームアプリUI)に統合されています。 このアプローチにより、iOS、Android、Windows間でコードを再利用し、ネイティブのパフォーマンスとユーザー体験を提供するモバイルアプリケーションの作成プロセスを簡素化します。
クラウドとマイクロサービス
.NETは、クラウドで動作するアプリケーションの開発にも適しています。 Azureや他のクラウドプラットフォームをサポートしており、クラウドコンピューティングリソースを活用するスケーラブルで分散型のアプリケーションを構築できます。 ASP.NET Coreは、軽量でモジュラーで独立してデプロイ可能なサービスを提供し、クラウド環境内でスケールできるマイクロサービス開発において重要な役割を果たします。
機械学習とAI
.NETエコシステムはML.NETを取り込んでおり、開発者が.NETアプリケーションにカスタムの機械学習モデルを組み込むことを可能にします。 この統合により、予測分析や自然言語処理などのAIの力を活用したインテリジェントなアプリケーションの作成が可能になり、.NETフレームワーク内でのAI活用の可能性が広がります。
IronPDFで.NETソフトウェア開発を促進
.NETソフトウェア開発の活発なエコシステム内で、アプリケーション内でPDFドキュメントを生成、操作、および管理できる能力は大きな利点となります。 IronPDFは.NET開発者向けに設計された強力なライブラリで、この環境にシームレスに統合され、Windows Formsで構築されたものを含む.NETアプリケーションからPDFを作成する効率的な方法を提供します。
.NETアプリケーションにおけるIronPDFの役割
IronPDFは、HTML、画像、テキスト、さらにはASP.NETウェブページからPDFドキュメントを生成するための直感的なAPIを提供し、.NETエコシステムの柔軟性と強力さを証明しています。 この機能は特に請求書、レポート、またはデスクトップアプリケーションでのパーソナライズドドキュメントの動的作成が必要なシナリオで役立ちます。
IronPDFを使用したWindowsフォーム請求書ジェネレーターの構築
請求書を生成するWindowsフォームアプリケーションは、IronPDFとの統合された.NETソフトウェア開発の実用的な応用例を示しています。 このアプリケーションは、ユーザーが顧客情報、購入品目、価格などの詳細を入力し、ワンクリックでプロフェッショナルなPDF請求書を生成できるようにします。
Windows FormsプロジェクトのセットアップとUIの設計
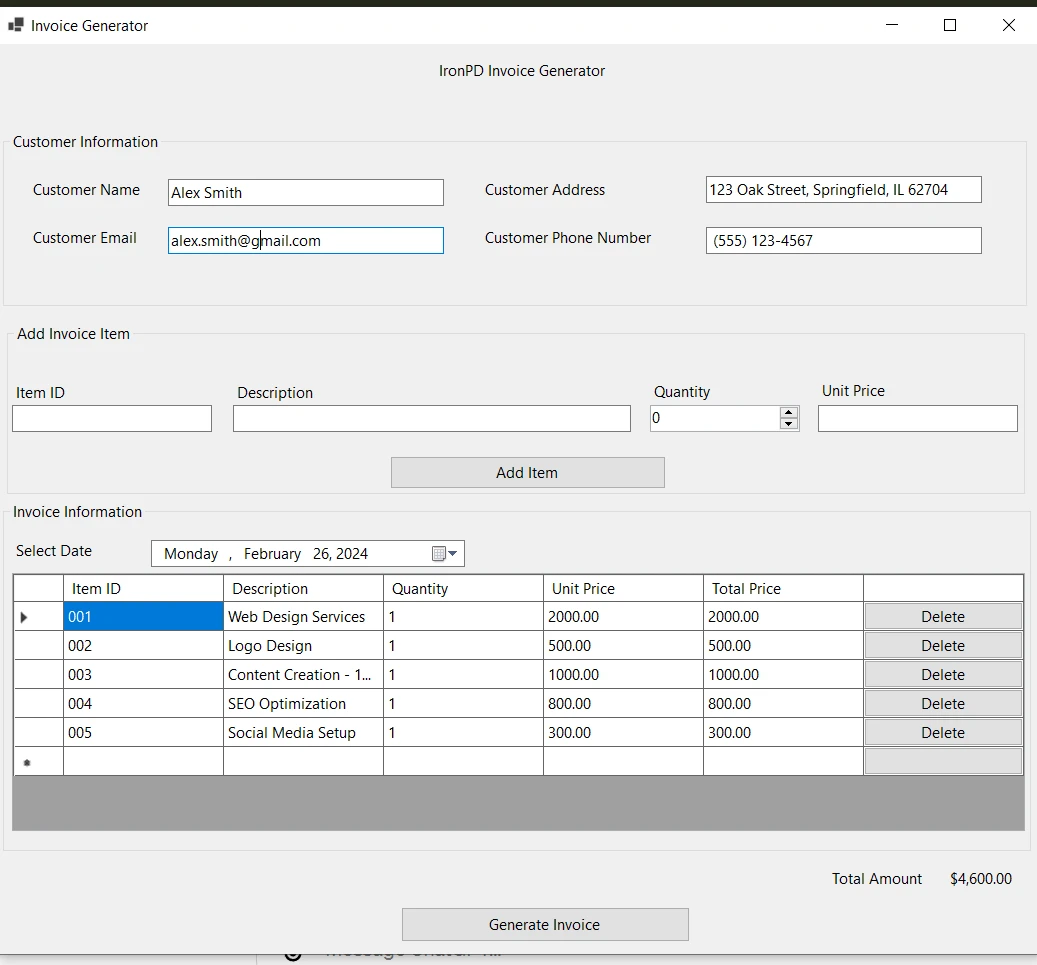
Visual Studioで新しいWindows Formsプロジェクトを作成することから始めます。 これが請求書ジェネレーターのユーザーインターフェイスを作成するための基礎です。 顧客と商品詳細の必要な入力フィールドを含め、PDFを生成するためのボタンを含むフォームを設計します。 これが私たちの請求書ジェネレーターUIです:
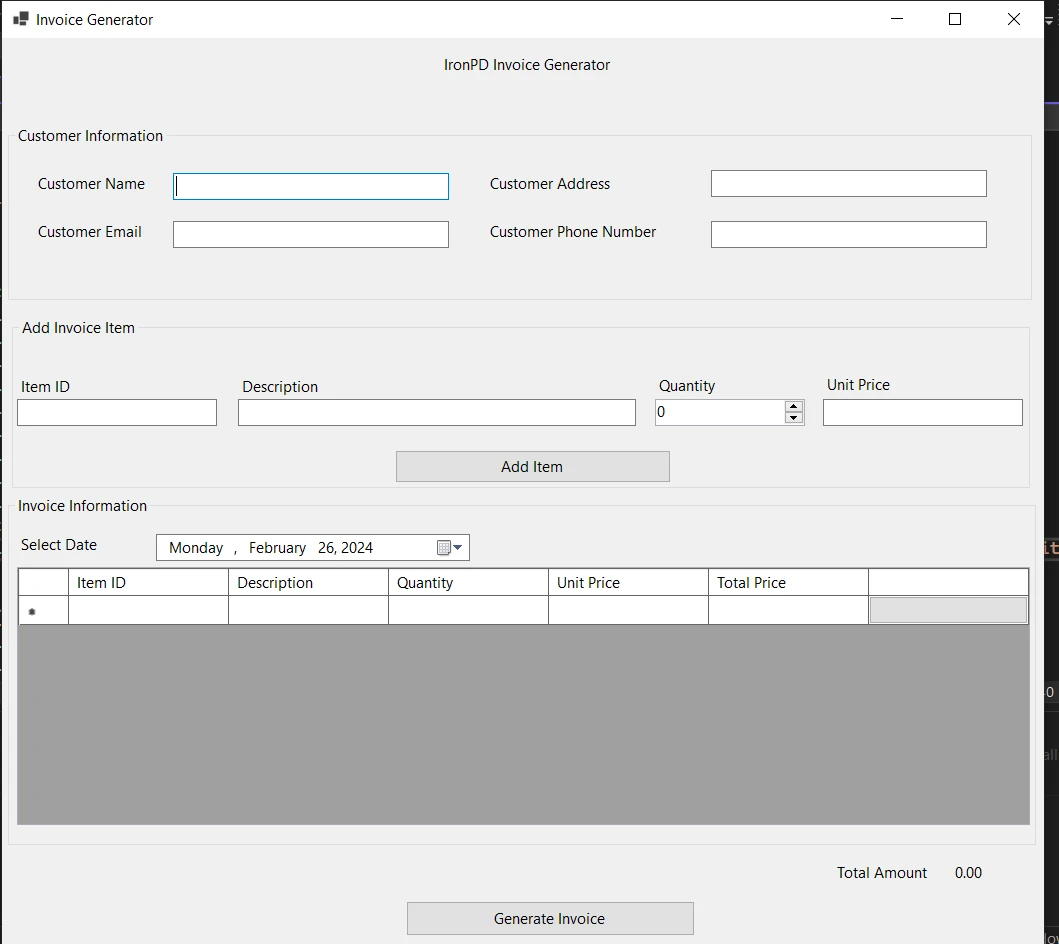
Windowsフォームアプリケーションのユーザーインターフェイスは、使いやすさと機能性を確保するために入念に設計されています。 "請求書ジェネレーター"と題したメインウィンドウは、シームレスなユーザー体験を提供するために異なるセクションに分割されています。
顧客情報セクション
上部には、"顧客名"、"顧客住所"、"顧客メールアドレス"、"顧客電話番号"を入力するフィールドが含まれています。このエリアは、生成される請求書に目立つように表示される重要な顧客情報をキャプチャするために設計されています。
請求書アイテムの追加
顧客情報のすぐ下には、"請求書アイテムの追加"とラベル付けされたエリアがあります。ここでは、"アイテムID"、"説明"、"数量"、"単価"などの各アイテムの詳細を入力できます。これらのフィールドの隣には"アイテムを追加]ボタンがあり、ユーザーは入力したアイテムを下の請求書リストに追加することができます。
請求書アイテム一覧
フォームの中央には"請求書情報"セクションがあり、入力されたアイテムが追加されるテーブルが表示されます。 テーブルの列には"アイテムID"、"説明"、"数量"、"単価"、"合計金額"が含まれており、最後の列は数量と単価に基づいて自動計算されます。 '選択日'という日付セレクターがあり、ユーザーが請求書の日付を指定し、ドキュメントに具体性を追加できます。
請求書の操作
フォームの下部には"合計金額"というラベルがあり、アイテムの追加または削除につれて動的に更新されます。 これにより、ユーザーは請求書の合計値をリアルタイムで確認できます。 さらに、"請求書を生成"ボタンを押すと、アプリケーションがIronPDFライブラリを使用して、入力されたデータを基に請求書のPDFバージョンを作成します。
このユーザーインターフェースは機能的であるだけでなく直感的であり、急な学習曲線なしにユーザーがアプリケーションと簡単に対話できるように設計されています。 請求書生成に必要な情報をすべて収容し、データ入力からPDF作成までの明確で簡潔な道筋を提供するように設計されています。
プロジェクトにIronPDFを追加する
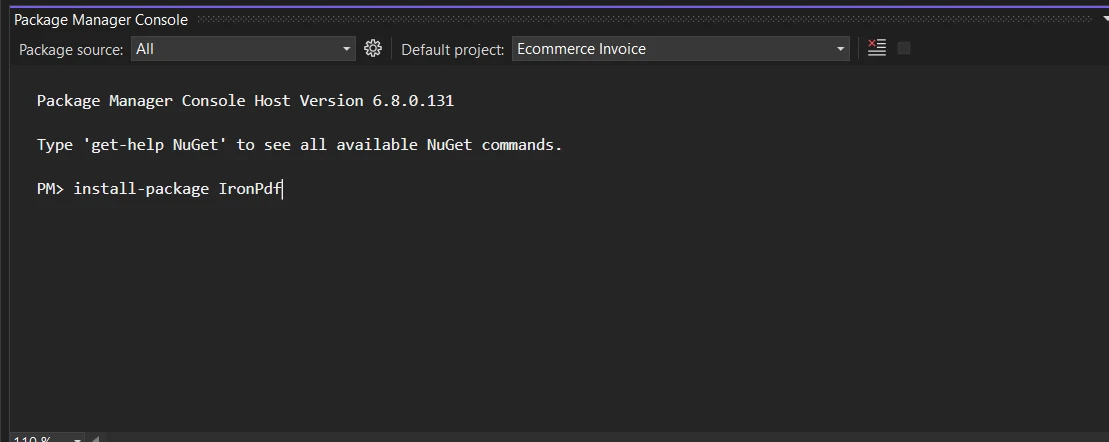
プロジェクトが設定されたら、次はIronPDFを追加する段階です。 これをNuGet、Visual Studioの統合されたNuGetパッケージマネージャを通じて行います。NuGetパッケージマネージャを使用すると、IronPDFをプロジェクトに手間なく追加できます。 パッケージ マネージャー コンソールで次のコマンドを実行します。
Install-Package IronPdf
このコマンドでIronPDFをインストールし、プロジェクトで使用できるようにします。
請求書生成の実装
Windowsフォームアプリケーションの中心は、ユーザー入力を処理し、データを構造化された形式に整理し、実体的なドキュメントを生成する能力です。ここでは、PDF形式の請求書を指しています。 この機能は、アプリケーションのコードベース内の一連の体系的なステップに基づいて構築されています。
データグリッドビューのセットアップ
フォームを初期化すると、アプリケーションは SetupDataGridViewColumns を呼び出して、請求書アイテムが表示されるデータ構造を確立します。 アイテムID、説明、数量、単価、合計金額のための列が作成され、合計金額は自動的に計算されるため読み取り専用のフィールドとして設定されます。 さらに、アイテムを削除するためのボタン列が追加され、ユーザーが請求書の内容をより制御できるようにしています。
private void SetupDataGridViewColumns()
{
    invoiceDataGridView.Columns.Clear(); // Clear existing columns if any
    // Add columns specifying the details to be displayed in the invoice
    invoiceDataGridView.Columns.Add("itemIdColumn", "Item ID");
    invoiceDataGridView.Columns.Add("descriptionColumn", "Description");
    invoiceDataGridView.Columns.Add("quantityColumn", "Quantity");
    invoiceDataGridView.Columns.Add("unitPriceColumn", "Unit Price");
    invoiceDataGridView.Columns.Add("totalPriceColumn", "Total Price");
    // Set the Total Price column to read-only as it will be calculated automatically
    invoiceDataGridView.Columns["totalPriceColumn"].ReadOnly = true;
    // Add a button column for delete action
    DataGridViewButtonColumn deleteButtonColumn = new DataGridViewButtonColumn();
    deleteButtonColumn.HeaderText = "";
    deleteButtonColumn.Name = "deleteButtonColumn";
    deleteButtonColumn.Text = "Delete";
    deleteButtonColumn.UseColumnTextForButtonValue = true; // Set the button text to "Delete"
    // Add the delete button column to the DataGridView
    invoiceDataGridView.Columns.Add(deleteButtonColumn);
}

public Form1()
{
    InitializeComponent();
    SetupDataGridViewColumns();
    // Wire up the CellClick event to a handler to manage deletion of items
    invoiceDataGridView.CellClick += invoiceDataGridView_CellClick;
}

private void invoiceDataGridView_CellClick(object sender, DataGridViewCellEventArgs e)
{
    // If the clicked cell is part of the button column and not the header row
    if (e.ColumnIndex == invoiceDataGridView.Columns["deleteButtonColumn"].Index && e.RowIndex >= 0)
    {
        // Confirm delete operation
        if (MessageBox.Show("Are you sure you want to delete this item?", "Confirm Delete", MessageBoxButtons.YesNo, MessageBoxIcon.Question) == DialogResult.Yes)
        {
            // Remove the row from the DataGridView
            invoiceDataGridView.Rows.RemoveAt(e.RowIndex);
        }
    }
}
private void SetupDataGridViewColumns()
{
invoiceDataGridView.Columns.Clear(); // Clear existing columns if any
// Add columns specifying the details to be displayed in the invoice
invoiceDataGridView.Columns.Add("itemIdColumn", "Item ID");
invoiceDataGridView.Columns.Add("descriptionColumn", "Description");
invoiceDataGridView.Columns.Add("quantityColumn", "Quantity");
invoiceDataGridView.Columns.Add("unitPriceColumn", "Unit Price");
invoiceDataGridView.Columns.Add("totalPriceColumn", "Total Price");
// Set the Total Price column to read-only as it will be calculated automatically
invoiceDataGridView.Columns["totalPriceColumn"].ReadOnly = true;
// Add a button column for delete action
DataGridViewButtonColumn deleteButtonColumn = new DataGridViewButtonColumn();
deleteButtonColumn.HeaderText = "";
deleteButtonColumn.Name = "deleteButtonColumn";
deleteButtonColumn.Text = "Delete";
deleteButtonColumn.UseColumnTextForButtonValue = true; // Set the button text to "Delete"
// Add the delete button column to the DataGridView
invoiceDataGridView.Columns.Add(deleteButtonColumn);
}
public Form1()
{
InitializeComponent();
SetupDataGridViewColumns();
// Wire up the CellClick event to a handler to manage deletion of items
invoiceDataGridView.CellClick += invoiceDataGridView_CellClick;
}
private void invoiceDataGridView_CellClick(object sender, DataGridViewCellEventArgs e)
{
// If the clicked cell is part of the button column and not the header row
if (e.ColumnIndex == invoiceDataGridView.Columns["deleteButtonColumn"].Index && e.RowIndex >= 0)
{
// Confirm delete operation
if (MessageBox.Show("Are you sure you want to delete this item?", "Confirm Delete", MessageBoxButtons.YesNo, MessageBoxIcon.Question) == DialogResult.Yes)
{
// Remove the row from the DataGridView
invoiceDataGridView.Rows.RemoveAt(e.RowIndex);
}
}
}請求書アイテムの追加
ユーザーがアイテムの詳細を入力し"アイテムを追加"をクリックすると、btnAddItem_Click イベントが入力データを収集し、それを検証してから AddItemToInvoice を呼び出します。 このメソッドは、入力された値を持つ新しい行をDataGridViewに追加し、アイテムの合計金額を計算し、フォーム下部に表示される請求書の合計金額を更新します。
public void AddItemToInvoice(string itemId, string description, int quantity, decimal unitPrice)
{
    decimal totalPrice = quantity * unitPrice;
    invoiceDataGridView.Rows.Add(itemId, description, quantity, unitPrice, totalPrice);
}

private void CalculateTotalAmount()
{
    decimal totalAmount = 0m;
    foreach (DataGridViewRow row in invoiceDataGridView.Rows)
    {
        totalAmount += Convert.ToDecimal(row.Cells["totalPriceColumn"].Value ?? 0);
    }
    // Display the total amount accumulated
    lblTotalAmount.Text = $"{totalAmount:C2}";
}

private void btnAddItem_Click(object sender, EventArgs e)
{
    // Collect data from input controls
    string itemId = txtItemID.Text;
    string description = txtDescription.Text;
    int quantity = (int)numericUpDownQuantity.Value;
    decimal unitPrice;
    // Validate the collected data
    bool isUnitPriceValid = decimal.TryParse(txtUnitPrice.Text, out unitPrice);
    if (string.IsNullOrEmpty(itemId) || string.IsNullOrEmpty(description) || quantity <= 0 || !isUnitPriceValid || unitPrice <= 0)
    {
        MessageBox.Show("Please enter valid data for all fields.", "Invalid Data", MessageBoxButtons.OK, MessageBoxIcon.Warning);
        return;
    }
    // Add data to the DataGridView
    AddItemToInvoice(itemId, description, quantity, unitPrice);
    // Clear the input fields after adding the item to the grid
    txtItemID.Clear();
    txtDescription.Clear();
    txtUnitPrice.Clear();
    numericUpDownQuantity.Value = 0;
    CalculateTotalAmount();
}
public void AddItemToInvoice(string itemId, string description, int quantity, decimal unitPrice)
{
decimal totalPrice = quantity * unitPrice;
invoiceDataGridView.Rows.Add(itemId, description, quantity, unitPrice, totalPrice);
}
private void CalculateTotalAmount()
{
decimal totalAmount = 0m;
foreach (DataGridViewRow row in invoiceDataGridView.Rows)
{
totalAmount += Convert.ToDecimal(row.Cells["totalPriceColumn"].Value ?? 0);
}
// Display the total amount accumulated
lblTotalAmount.Text = $"{totalAmount:C2}";
}
private void btnAddItem_Click(object sender, EventArgs e)
{
// Collect data from input controls
string itemId = txtItemID.Text;
string description = txtDescription.Text;
int quantity = (int)numericUpDownQuantity.Value;
decimal unitPrice;
// Validate the collected data
bool isUnitPriceValid = decimal.TryParse(txtUnitPrice.Text, out unitPrice);
if (string.IsNullOrEmpty(itemId) || string.IsNullOrEmpty(description) || quantity <= 0 || !isUnitPriceValid || unitPrice <= 0)
{
MessageBox.Show("Please enter valid data for all fields.", "Invalid Data", MessageBoxButtons.OK, MessageBoxIcon.Warning);
return;
}
// Add data to the DataGridView
AddItemToInvoice(itemId, description, quantity, unitPrice);
// Clear the input fields after adding the item to the grid
txtItemID.Clear();
txtDescription.Clear();
txtUnitPrice.Clear();
numericUpDownQuantity.Value = 0;
CalculateTotalAmount();
}PDF請求書の生成
'請求書を生成'をクリックすると、アプリケーションは btnInvoice_Click イベントハンドラーを実行し、StringBuilderを使用してHTML文字列を構築します。 この文字列には、顧客の詳細と、DataGridViewからの請求書アイテムで満たされたスタイル付けされたHTMLテーブルが含まれます。 IronPDFのレンダラーがこのHTMLをPDFドキュメントに変換し、指定されたパスに保存します。 アプリケーションは、請求書の作成が成功したことをユーザーにメッセージで確認します。
private void btnInvoice_Click(object sender, EventArgs e)
{
    IronPdf.License.LicenseKey = "your-license-key"; // Replace with your IronPDF license key
    var customerName = txtName.Text;
    var customerEmail = txtEmail.Text;
    var customerAddress = txtAddress.Text;
    var customerPhone = txtPhone.Text;
    var htmlStringBuilder = new StringBuilder();
    htmlStringBuilder.Append("<html>");
    htmlStringBuilder.Append("<head>");
    htmlStringBuilder.Append("<title>Invoice</title>");
    htmlStringBuilder.Append(@"
        <style>
            body { font-family: 'Arial', sans-serif; }
            h1 { color: #333; text-align: center; }
            table { width: 100%; border-collapse: collapse; margin-top: 20px; }
            th, td { border: 1px solid #999; padding: 8px; text-align: left; }
            th { background-color: #f2f2f2; }
            tr:nth-child(even) { background-color: #f9f9f9; }
            h2 { text-align: right; margin-top: 20px; }
            .customer-info { line-height: 1.6; margin-bottom: 20px; }
            .customer-info p { margin: 0 0 10px 0; color: #333; }
            .customer-info label { font-weight: bold; }
        </style>");
    htmlStringBuilder.Append("</head>");
    htmlStringBuilder.Append("<body>");
    htmlStringBuilder.Append("<h1>Invoice</h1>");
    htmlStringBuilder.Append("<div class='customer-info'>");
    htmlStringBuilder.Append($"<p><strong>Customer Name:</strong> {customerName}</p>");
    htmlStringBuilder.Append($"<p><strong>Customer Email:</strong> {customerEmail}</p>");
    htmlStringBuilder.Append($"<p><strong>Customer Address:</strong> {customerAddress}</p>");
    htmlStringBuilder.Append($"<p><strong>Customer Phone:</strong> {customerPhone}</p>");
    htmlStringBuilder.Append("</div>");
    htmlStringBuilder.Append("<table><tr><th>Item ID</th><th>Description</th><th>Quantity</th><th>Unit Price</th><th>Total Price</th></tr>");
    foreach (DataGridViewRow row in invoiceDataGridView.Rows)
    {
        if (row.IsNewRow) continue;
        htmlStringBuilder.Append("<tr>");
        htmlStringBuilder.Append($"<td>{row.Cells["itemIdColumn"].Value}</td>");
        htmlStringBuilder.Append($"<td>{row.Cells["descriptionColumn"].Value}</td>");
        htmlStringBuilder.Append($"<td>{row.Cells["quantityColumn"].Value}</td>");
        htmlStringBuilder.Append($"<td>{row.Cells["unitPriceColumn"].Value:C2}</td>");
        htmlStringBuilder.Append($"<td>{row.Cells["totalPriceColumn"].Value:C2}</td>");
        htmlStringBuilder.Append("</tr>");
    }
    htmlStringBuilder.Append("</table>");
    htmlStringBuilder.Append($"<h2>Total Amount: {lblTotalAmount.Text}</h2>");
    htmlStringBuilder.Append("</body></html>");
    var renderer = new IronPdf.ChromePdfRenderer();
    var pdfDocument = renderer.RenderHtmlAsPdf(htmlStringBuilder.ToString());
    string savePath = Path.Combine($"F:\\Invoice_{DateTime.Now:yyyyMMddHHmmss}.pdf");
    pdfDocument.SaveAs(savePath);
    MessageBox.Show("The invoice has been successfully saved to your desktop.", "Invoice Saved", MessageBoxButtons.OK, MessageBoxIcon.Information);
}
private void btnInvoice_Click(object sender, EventArgs e)
{
IronPdf.License.LicenseKey = "your-license-key"; // Replace with your IronPDF license key
var customerName = txtName.Text;
var customerEmail = txtEmail.Text;
var customerAddress = txtAddress.Text;
var customerPhone = txtPhone.Text;
var htmlStringBuilder = new StringBuilder();
htmlStringBuilder.Append("<html>");
htmlStringBuilder.Append("<head>");
htmlStringBuilder.Append("<title>Invoice</title>");
htmlStringBuilder.Append(@"
<style>
body { font-family: 'Arial', sans-serif; }
h1 { color: #333; text-align: center; }
table { width: 100%; border-collapse: collapse; margin-top: 20px; }
th, td { border: 1px solid #999; padding: 8px; text-align: left; }
th { background-color: #f2f2f2; }
tr:nth-child(even) { background-color: #f9f9f9; }
h2 { text-align: right; margin-top: 20px; }
.customer-info { line-height: 1.6; margin-bottom: 20px; }
.customer-info p { margin: 0 0 10px 0; color: #333; }
.customer-info label { font-weight: bold; }
</style>");
htmlStringBuilder.Append("</head>");
htmlStringBuilder.Append("<body>");
htmlStringBuilder.Append("<h1>Invoice</h1>");
htmlStringBuilder.Append("<div class='customer-info'>");
htmlStringBuilder.Append($"<p><strong>Customer Name:</strong> {customerName}</p>");
htmlStringBuilder.Append($"<p><strong>Customer Email:</strong> {customerEmail}</p>");
htmlStringBuilder.Append($"<p><strong>Customer Address:</strong> {customerAddress}</p>");
htmlStringBuilder.Append($"<p><strong>Customer Phone:</strong> {customerPhone}</p>");
htmlStringBuilder.Append("</div>");
htmlStringBuilder.Append("<table><tr><th>Item ID</th><th>Description</th><th>Quantity</th><th>Unit Price</th><th>Total Price</th></tr>");
foreach (DataGridViewRow row in invoiceDataGridView.Rows)
{
if (row.IsNewRow) continue;
htmlStringBuilder.Append("<tr>");
htmlStringBuilder.Append($"<td>{row.Cells["itemIdColumn"].Value}</td>");
htmlStringBuilder.Append($"<td>{row.Cells["descriptionColumn"].Value}</td>");
htmlStringBuilder.Append($"<td>{row.Cells["quantityColumn"].Value}</td>");
htmlStringBuilder.Append($"<td>{row.Cells["unitPriceColumn"].Value:C2}</td>");
htmlStringBuilder.Append($"<td>{row.Cells["totalPriceColumn"].Value:C2}</td>");
htmlStringBuilder.Append("</tr>");
}
htmlStringBuilder.Append("</table>");
htmlStringBuilder.Append($"<h2>Total Amount: {lblTotalAmount.Text}</h2>");
htmlStringBuilder.Append("</body></html>");
var renderer = new IronPdf.ChromePdfRenderer();
var pdfDocument = renderer.RenderHtmlAsPdf(htmlStringBuilder.ToString());
string savePath = Path.Combine($"F:\\Invoice_{DateTime.Now:yyyyMMddHHmmss}.pdf");
pdfDocument.SaveAs(savePath);
MessageBox.Show("The invoice has been successfully saved to your desktop.", "Invoice Saved", MessageBoxButtons.OK, MessageBoxIcon.Information);
}アプリケーションの実行と請求書の生成
Windowsフォームアプリケーションが開発され、IronPDFライブラリが統合された後、アプリケーションを実行しPDF請求書を生成するのは簡単なプロセスです。 ユーザーはアプリケーションのユーザーインターフェースを操作してデータを入力し、希望の出力を生成します。 通常、このプロセスは次のように進行します:
アプリケーションの起動
Visual Studio内でアプリケーションを実行するか、Windows環境からコンパイルされた実行可能ファイル(.exe)を直接実行してアプリケーションを開始します。 アプリケーションのフォームが表示され、ユーザーのインタラクションを待っています。
請求書データの入力
顧客の詳細を入力し、フォームの上部にある指定されたテキストボックスに、顧客の名前、住所、メールアドレス、電話番号を含めます。 フォームの"請求書アイテムの追加"セクションにある"アイテムID"、"説明"、"数量"、"単価"フィールドに入力して請求書アイテムを追加します。
'アイテムを追加' をクリックして、アイテムを請求書リストに含めます。DataGridViewが新しいアイテム、その詳細、および計算された合計金額を表示するように更新されます。リストする必要があるすべてのアイテムを請求書に追加するために、プロセスを繰り返します。 '合計金額'ラベルは、リストされたアイテムの累積合計を反映するために動的に更新されます。
PDF請求書の生成
すべてのアイテムが追加され、顧客情報が完全になったら、'請求書を生成'をクリックします。 アプリケーションはデータをHTML形式にコンパイルし、CSSでスタイル付けされます。 IronPDFがHTML文字列をPDFドキュメントに変換します。 それはChromeエンジンでレンダリングされ、現代のWeb標準に高忠実度を保ちます。
生成された請求書の表示
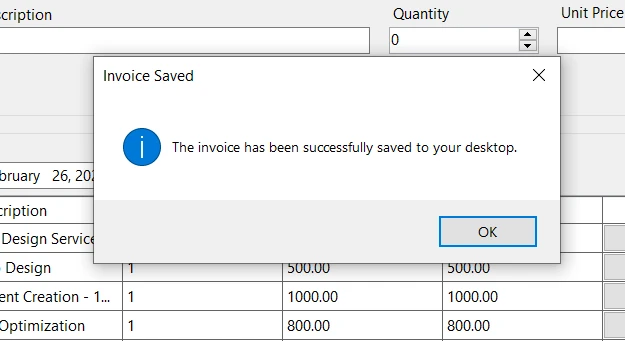
PDF生成後、アプリケーションはPDFファイルを特定の場所に保存し、通常はアプリケーションと同じディレクトリ内またはユーザー定義のパスに保存します。 PDF請求書が正常に保存されたことを通知する成功メッセージが表示されます。 ユーザーは保存された場所に移動して請求書を表示または配布することができます。
出力PDF
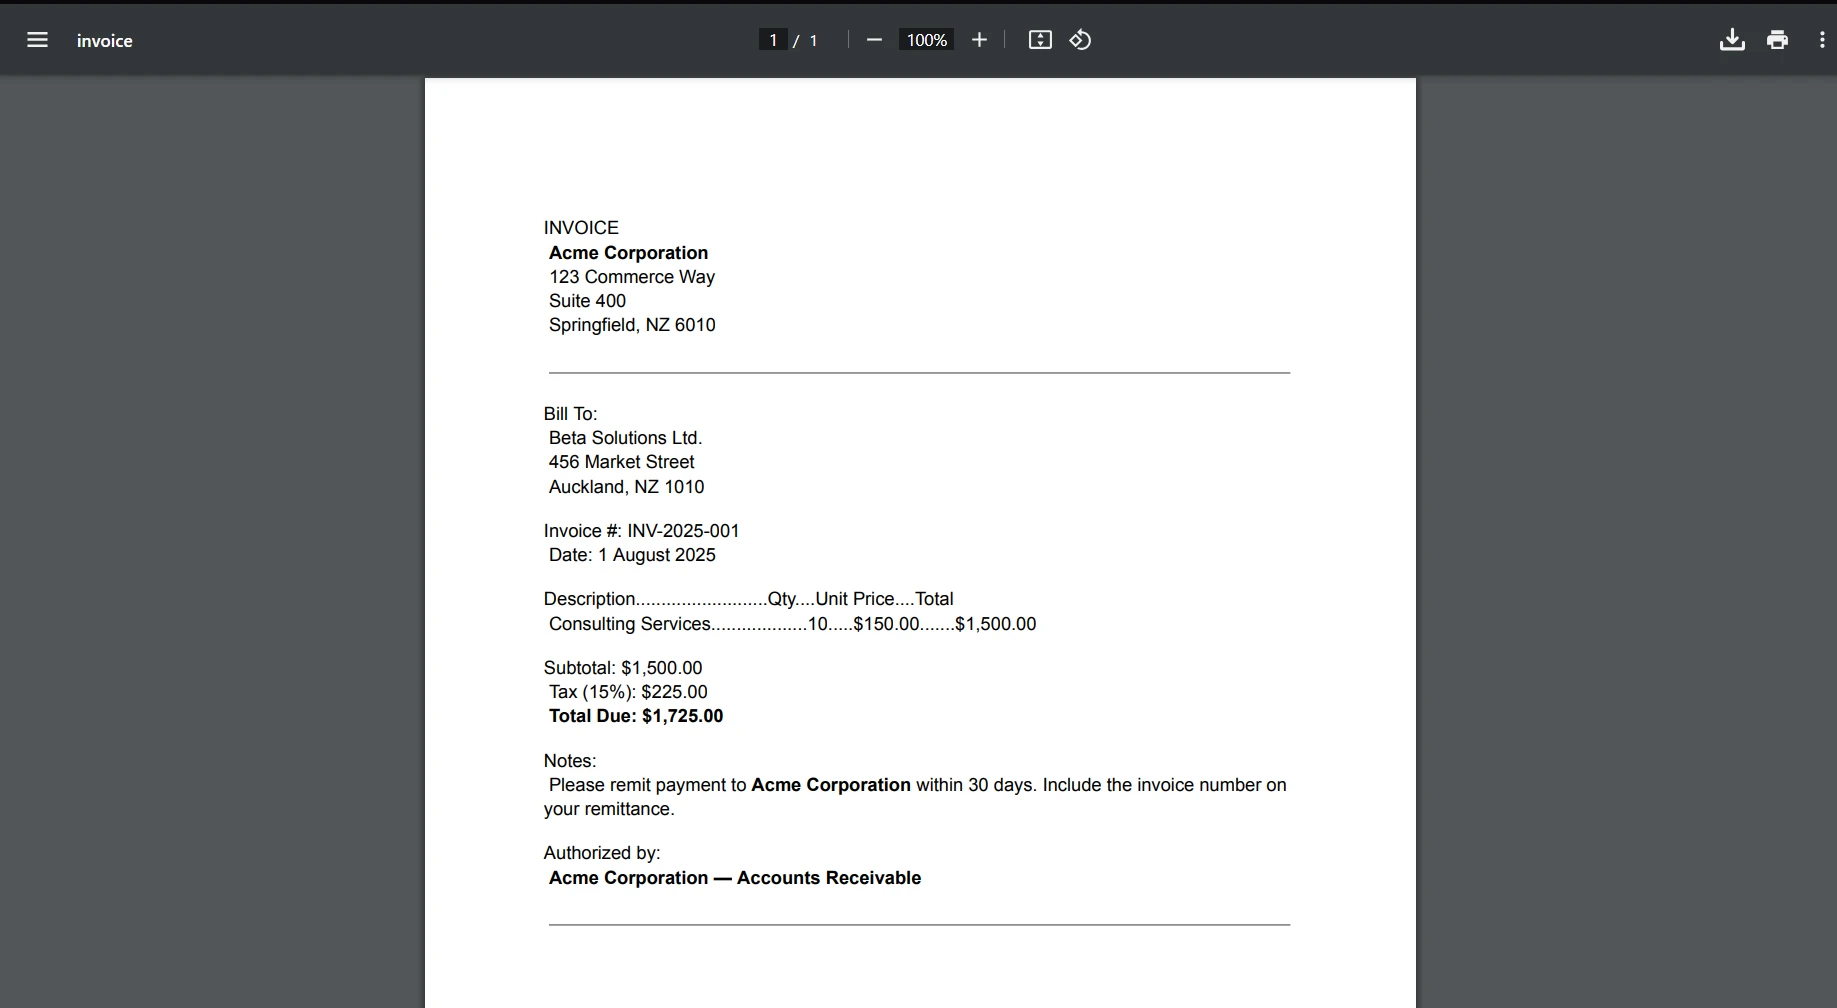
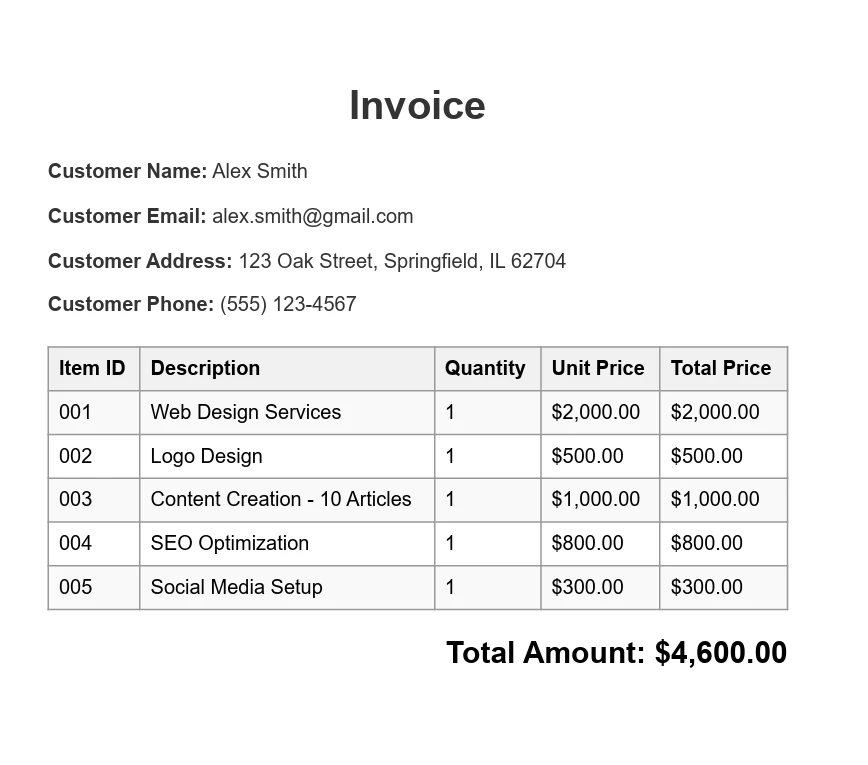
出力PDFは、上部に顧客情報が表示され、購入したアイテムの詳細なテーブルが続き、説明、数量、価格が記されています。 請求書の合計金額はドキュメントの最後に表示され、顧客が支払う必要がある金額を明確に示しています。 PDFは、コード内で定義されたCSSを使用してスタイリングされており、機能的であるだけでなく視覚的にも魅力的です。
Windowsフォームプロジェクトを実行可能ファイルに変換する
Windows Formsアプリケーションを徹底的にテストし、データ入力やPDF生成、出力などすべての機能がスムーズに動作することを確認したら、次のフェーズはプロジェクトを実行可能ファイル(.exe)にパッケージ化することです。対応プロセスは.NETフレームワーク内で合理化されており、アプリケーションがWindowsマシンでインストールおよび使用できる準備が整っていることを保証します。
以下は、実行可能ファイルを作成するためのステップバイステップのアプローチです:
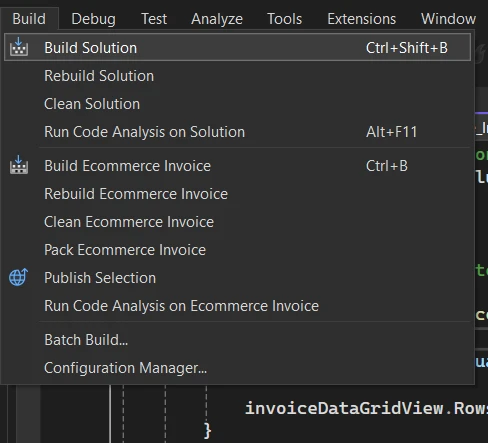
- アプリケーションをビルドする:"ビルド"メニューに移動して"ビルド ソリューション"を選択します。これにより、コードがアセンブリにコンパイルされ、必要な最適化が行われます。
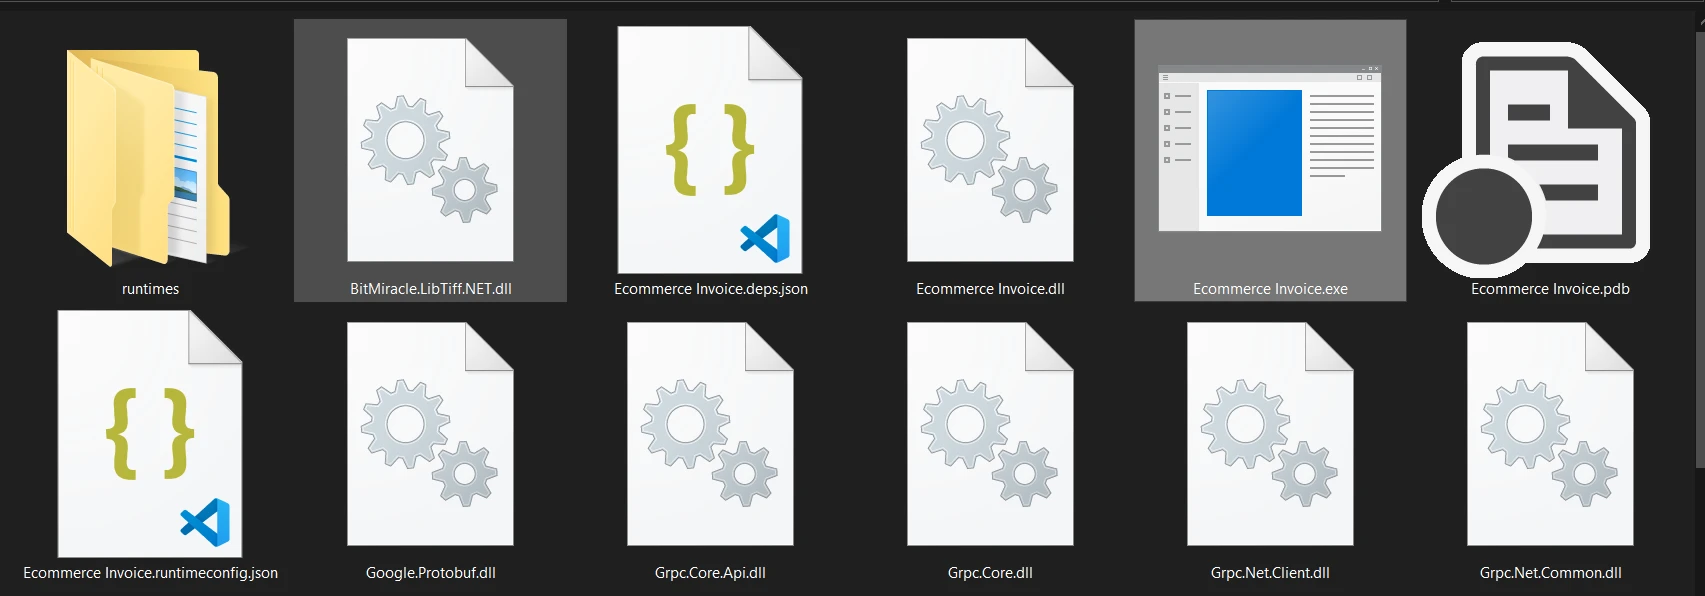
- 実行可能ファイルを見つける:ビルドが完了したら、プロジェクトディレクトリ内の"bin\Debug\net8.0"フォルダに移動します。 ここには、.exeファイルとアプリケーションを実行するのに必要な他の依存関係が見つかります。
- 実行可能ファイルのテスト:開発環境外で正しく動作することを確認するために、別のマシンで.exeファイルを実行するのが良い方法です。
- 配布の準備:特に追加の依存関係が必要ない場合は、直接.exeファイルを共有することができます。 ただし、より専門的なアプローチとしてVisual StudioのセットアッププロジェクトやInno SetupやWiX Toolsetなどのサードパーティのインストーラーパッケージを使用してインストーラーを作成することを検討してください。 インストーラーは、インストールプロセスを管理し、ショートカットを作成し、必要に応じてWindowsレジストリに登録するなど、他の複雑さを処理することができます。
これらのステップに従うことにより、Windows Formsアプリケーションは1つの実行可能ファイルに凝縮され、簡単に共有され、使用される準備が整います。 この変換は、開発機のプロジェクトから配布可能なソフトウェアへと移行し、多数のWindows環境に効率的に配布およびインストールできるようになる開発プロセスのクライマックスを象徴します。
結論
結論として、IronPDFと.NET Frameworkを使用したPDF請求書を生成するWindows Formsアプリケーションの開発は、ソフトウェア開発原則の実用的な応用例を示しています。 このプロジェクトは.NETエコシステムの多様性と力を示すだけでなく、IronPDFのようなサードパーティライブラリを統合して機能を拡張し、特定のビジネスニーズを満たす方法を示しています。
ユーザーインターフェイスのセットアップからPDF生成の実装、アプリケーションを実行可能ファイルにパッケージ化するまでの手順に従うことで、開発者は機能的でユーザーフレンドリーなアプリケーションを作成できます。 このプロセスは、強力なプログラミングフレームワークと革新的なライブラリを組み合わせて実際の問題を解決し、効果的かつ効率的な製品を提供することの重要性を強調しています。
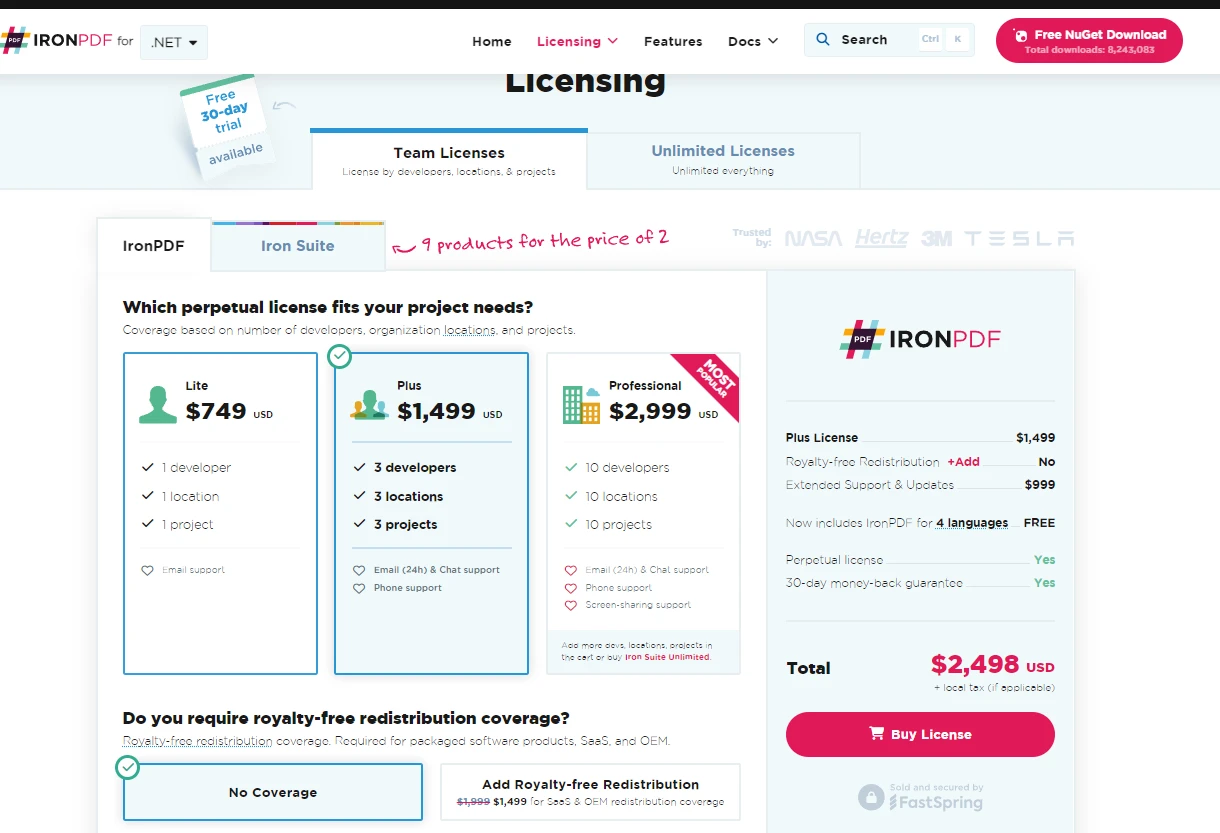
IronPDFは審査のためにPDF生成機能の無料トライアルを提供し、開発者がその機能を探求し、自分のニーズに最も合った方法を決定できるようにします。 利点を体験し、IronPDFを本番環境に統合する準備ができたら、ライセンスは手頃な価格からスタートします。
よくある質問
C# で HTML を PDF に変換するにはどうすればいいですか?
IronPDF の RenderHtmlAsPdf メソッドを使用して、HTML 文字列を PDF に変換できます。RenderHtmlFileAsPdf を使用して HTML ファイルを PDF に変換することもできます。
.NET Core を使用することのクロスプラットフォーム開発における利点は何ですか?
.NET Core は、Linux、macOS、Windows などの複数のプラットフォームでアプリケーションを実行できるため、1つのコードベースで広範なオーディエンスにリーチしたい開発者にとって多用途な選択となります。
Windows Form アプリケーションから PDF を生成するにはどうすればよいですか?
IronPDF を使用すると、ライブラリをプロジェクトに統合し、フォームデータや HTML コンテンツを PDF ドキュメントに変換するメソッドを利用することで、Windows Form アプリケーションから PDF を生成できます。
.NET が Web アプリケーションを構築するための理想的なフレームワークである理由は何ですか?
.NET、特に ASP.NET は、動的でスケーラブルな Web アプリケーションを構築するための強力なフレームワークを提供します。サーバーサイドスクリプティング、認証、データ処理などの組み込みツールを提供します。
.NET アプリケーションのドキュメント生成機能をどのように強化できますか?
IronPDF のようなライブラリを .NET アプリケーションに統合すると、PDF ファイルを作成、操作、管理する機能がアプリ内で直接向上し、ドキュメント生成機能を大幅に強化できます。
.NET をモバイルアプリケーション開発に使用することはできますか?
はい、.NET は現在 .NET MAUI の一部である Xamarin フレームワークを通じてモバイルアプリケーション開発をサポートしています。これにより、iOS、Android、Windows でネイティブのパフォーマンスを持つクロスプラットフォームモバイルアプリを作成できます。
.NET における共通言語ランタイム (CLR) の重要性は何ですか?
共通言語ランタイム (CLR) は、プログラムの実行を管理し、コンパイルされたコードをネイティブマシンコードに変換することで異なるオペレーティングシステム間の互換性を保証するため、.NET において非常に重要です。
NuGet を使用して .NET プロジェクトに PDF 生成を統合するにはどうすればいいですか?
NuGet を使用して IronPDF のようなライブラリをインストールすることで、.NET プロジェクトに PDF 生成を統合できます。これにより、Visual Studio 内で PDF 機能を追加することが便利で簡単になります。
Windows Forms を使用して PDF 請求書生成器を作成する手順は何ですか?
手順には、Windows Forms プロジェクトのセットアップ、インターフェイスの設計、NuGet を通じた必要なライブラリの追加、データ入力および請求書生成のロジックの実装、そして IronPDF を使用して請求書の詳細を PDF に変換することが含まれます。


