

已更新 2026年4月23日
简化 .NET 与 Microsoft.Extensions.AI 的 LLM 集成
AI正在改变软件开发,但将大型语言模型(LLM)集成到.NET中直到现在一直很复杂。通过IronPdf.AI,将AI集成更进一步,该产品为.NET应用程序带来了OpenAI驱动的PDF解析、数据提取和内容摘要。
阅读更多

.NET Framework软件开发 代表着一个由Microsoft支持的强大且多功能的框架,使.NET开发人员能够创建跨各种平台、操作系统和设备的稳健、高质量应用程序。 这个软件开发框架被设计为全面的,提供软件开发人员可以用来高效构建.NET平台的Web、桌面和移动应用程序的工具、库和API。
凭借对多种编程语言的支持,包括C#、Visual Basic和F#,.NET开发延展了其对开发人员的灵活性,确保他们可以用自己喜欢的语言工作,同时受益于.NET Core生态系统的丰富功能。 在本教程中,我们将看到IronPDF如何增强.NET开发,以解决现实世界的问题。
.NET生态系统,作为.NET实现的关键部分,是一个广泛包含各种组件和技术的平台,旨在促进跨不同操作系统的应用程序开发。 其核心是.NET Framework和.NET Core,它们作为运行.NET应用程序的主要引擎,提供了一个通用语言运行时(CLR),管理代码的执行并提供内存管理、类型安全、异常处理等服务。
CLR是.NET架构的一个关键要素,使.NET代码跨不同操作系统执行。 它将通用中间语言(CIL)编译为主机机器可以直接执行的本机机器代码。 这个过程确保了.NET应用程序可以无缝运行在从主要移动操作系统到Windows网络服务器的各种平台上。
.NET Core作为一个跨平台框架出现,使.NET应用程序能够在Linux、macOS和Windows上运行。 这种适应性使.NET成为开发者希望在不同设备和平台上达成更广泛受众的理想选择。 借助.NET Core,应用程序可以在任何受支持的操作系统上开发和部署,增强.NET软件开发的覆盖范围和灵活性,并受到广泛的.NET社区的支持。
Visual Studio 作为.NET开发的首选集成开发环境(IDE)脱颖而出。 它为开发者提供了强大的代码编写、调试和部署.NET应用程序的工具。 Visual Studio支持各种编程语言,并提供多种构建Web、桌面和移动应用程序的功能,使其成为.NET开发人员不可或缺的工具。
在.NET平台上创建应用程序涉及利用框架提供的广泛工具、库和编程语言,如Visual Basic,展示了其全面的生态系统。 这种多功能性使软件开发人员能够构建各种类型的.NET应用程序,从Web和桌面应用程序到基于云和移动解决方案。
ASP.NET是.NET框架的一个关键部分,特别设计用于构建动态网页和应用程序。 它允许开发者创建响应式和可扩展的Web应用程序,以处理大量流量。 ASP.NET Core是ASP.NET的开源版本,为构建跨平台Web应用程序带来了附加功能,使得在Windows、Linux和macOS上开发和部署Web应用程序成为可能。
.NET为创建桌面应用程序提供了两种主要的方法:Windows Forms和Windows Presentation Foundation(WPF)。 Windows Forms 提供了一种简单的方法来创建具有丰富图形用户界面的桌面应用程序,而WPF使用XAML(可扩展应用程序标记语言)来实现具有高级图形和动画的视觉上吸引人的用户界面开发。
对于移动开发,.NET通过Xamarin框架将其影响扩大到主要的移动操作系统,现在已集成到.NET中作为.NET MAUI(跨平台应用界面)。 这种方法允许开发人员在iOS、Android和Windows之间重用代码,简化了创建具有本机性能和用户体验的移动应用程序的过程。
.NET也非常适合开发在云中运行的应用程序。 凭借对Azure及其他云平台的支持,开发者可以构建可扩展的分布式应用程序来利用云计算资源。 ASP.NET Core在开发微服务中发挥了重要作用,提供轻量级、模块化和可独立部署的服务,可以在云环境中扩展。
.NET生态系统包含了ML.NET,这是一种机器学习框架,使开发者能够将自定义的机器学习模型整合到他们的.NET应用程序中。 这种集成开辟了创建智能应用程序的可能性,这些应用程序能够进行预测分析、自然语言处理等,利用AI在.NET框架中的力量。
在丰富的.NET软件开发生态系统中,能够在应用程序中直接生成、操作和管理PDF文档是一项重要的优势。 IronPDF为.NET开发人员设计了一个强大的库,可以无缝地集成到此环境中,提供了一种高效的方法来从.NET应用程序(包括使用Windows Forms构建的应用程序)创建PDF。
IronPDF 作为.NET生态系统灵活性和力量的证明,提供开发者一个直观的API,从HTML、图像、文本,甚至ASP.NET网页生成PDF文档。 这个功能在需要动态文档创建的场景中特别有用,例如在桌面应用程序中生成发票、报告或个性化文档。
一个用于生成发票的Windows Form应用程序展示了.NET软件开发与IronPDF结合的实际应用。 这个应用程序允许用户输入客户信息、购买商品和价格等详情,然后一键生成专业的PDF发票。
首先在Visual Studio中创建一个新的Windows Forms项目。 这是您的基础,您将在这里设计您的发票生成器的用户界面。 设计您的表单,以包含客户和项目详细信息的必要输入字段,以及一个用于生成PDF的按钮。 这是我们的发票生成器UI:
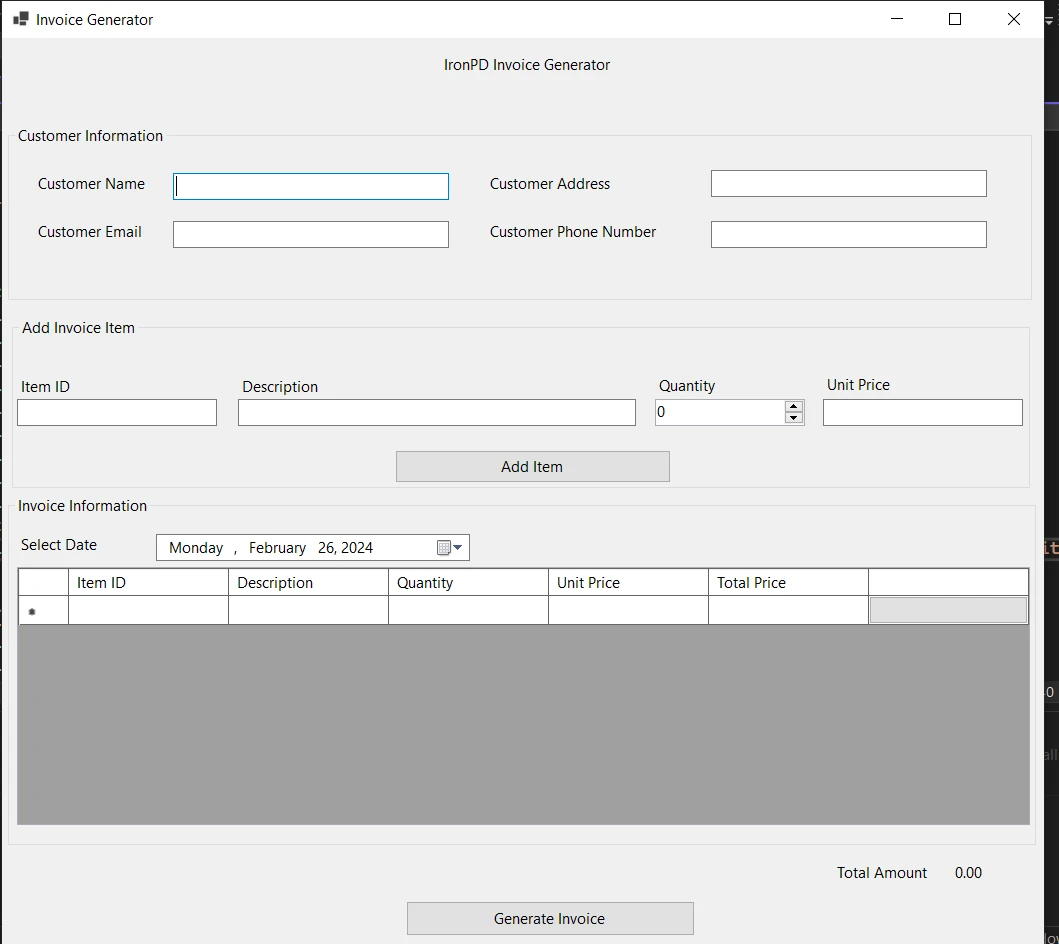
Windows Forms应用程序的用户界面经过精心设计,以确保易用性和功能性。 主窗口标题为"发票生成器",分为不同的部分,以提供无缝的用户体验。
在顶部,表单包括"客户姓名"、"客户地址"、"客户邮箱"和"客户电话号码"字段。这个区域专注于捕获将在生成的发票上显著显示的基本客户详细信息。
就在客户信息下方,有一个标记为"添加发票项目"的区域。这里,用户可以输入每个项目的详细信息,如"项目ID"、"描述"、"数量"和"单价"。一个"添加项目"按钮位于这些字段旁边,允许用户将输入的项目追加到下面的发票列表中。
表单的中央部分是"发票信息"部分,显示一个表格,输入的项目在添加后会显示在这里。 表格列包括"项目ID"、"描述"、"数量"、"单价"和"总价",最后一列是根据数量和单价自动计算的。一个标记为"选择日期"的日期选择器允许用户指定发票日期,为文档的特异性增加规范。
表单的底部,一个标签显示"总金额",随着条目的添加或移除动态更新。 这确保用户能实时看到发票的总价值。 此外,一个"生成发票"按钮提示应用程序使用IronPDF库,基于输入的数据创建发票的PDF版本。
这个用户界面不仅功能强大,而且直观,可以让用户轻松与应用程序交互,无需陡峭的学习曲线。 它旨在容纳所有必要的发票生成信息,同时提供从数据输入到PDF创建的明确而简单的路径。
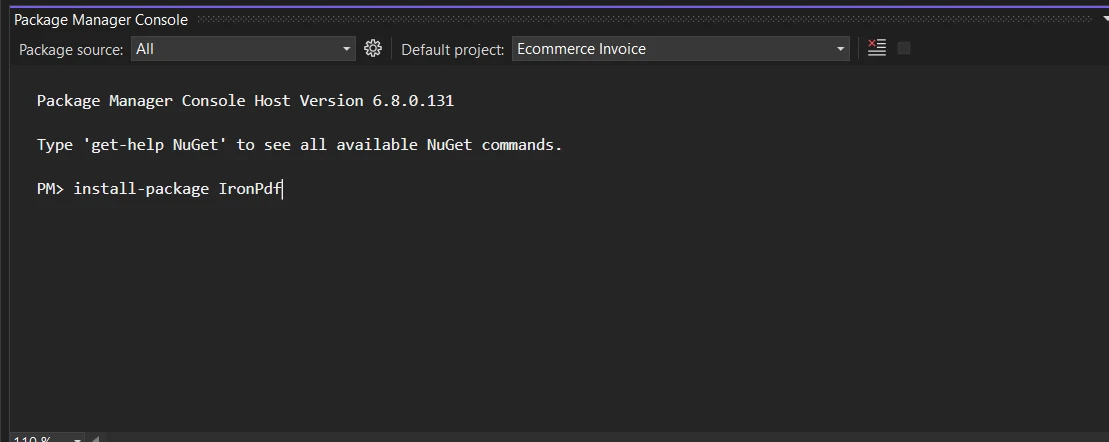
完成项目设置后,下一步是将IronPDF引入其中。 这通过NuGet实现,Visual Studio的集成NuGet包管理器,它允许您轻松将IronPDF添加到您的项目中。 在Package Manager Console中运行以下命令:
此命令将安装IronPDF,并使其可用于您的项目。
Windows Forms应用程序的核心在于它可以处理用户输入,将数据组织成结构化格式,并生成一个有形的文档——在这种情况下为PDF格式的发票。 该功能建立在应用程序代码库内的一系列方法步骤之上。
在表单初始化时,应用程序调用SetupDataGridViewColumns来建立发票项目将显示的数据结构。 为项目ID、描述、数量、单价和总价创建列,总价格作为只读字段,因为它是自动计算的。 此外,添加了一个用于删除项目的按钮列,增强了用户对发票内容的控制。
private void SetupDataGridViewColumns()
{
    invoiceDataGridView.Columns.Clear(); // Clear existing columns if any
    // Add columns specifying the details to be displayed in the invoice
    invoiceDataGridView.Columns.Add("itemIdColumn", "Item ID");
    invoiceDataGridView.Columns.Add("descriptionColumn", "Description");
    invoiceDataGridView.Columns.Add("quantityColumn", "Quantity");
    invoiceDataGridView.Columns.Add("unitPriceColumn", "Unit Price");
    invoiceDataGridView.Columns.Add("totalPriceColumn", "Total Price");
    // Set the Total Price column to read-only as it will be calculated automatically
    invoiceDataGridView.Columns["totalPriceColumn"].ReadOnly = true;
    // Add a button column for delete action
    DataGridViewButtonColumn deleteButtonColumn = new DataGridViewButtonColumn();
    deleteButtonColumn.HeaderText = "";
    deleteButtonColumn.Name = "deleteButtonColumn";
    deleteButtonColumn.Text = "Delete";
    deleteButtonColumn.UseColumnTextForButtonValue = true; // Set the button text to "Delete"
    // Add the delete button column to the DataGridView
    invoiceDataGridView.Columns.Add(deleteButtonColumn);
}

public Form1()
{
    InitializeComponent();
    SetupDataGridViewColumns();
    // Wire up the CellClick event to a handler to manage deletion of items
    invoiceDataGridView.CellClick += invoiceDataGridView_CellClick;
}

private void invoiceDataGridView_CellClick(object sender, DataGridViewCellEventArgs e)
{
    // If the clicked cell is part of the button column and not the header row
    if (e.ColumnIndex == invoiceDataGridView.Columns["deleteButtonColumn"].Index && e.RowIndex >= 0)
    {
        // Confirm delete operation
        if (MessageBox.Show("Are you sure you want to delete this item?", "Confirm Delete", MessageBoxButtons.YesNo, MessageBoxIcon.Question) == DialogResult.Yes)
        {
            // Remove the row from the DataGridView
            invoiceDataGridView.Rows.RemoveAt(e.RowIndex);
        }
    }
}Private Sub SetupDataGridViewColumns()
invoiceDataGridView.Columns.Clear() ' Clear existing columns if any
' Add columns specifying the details to be displayed in the invoice
invoiceDataGridView.Columns.Add("itemIdColumn", "Item ID")
invoiceDataGridView.Columns.Add("descriptionColumn", "Description")
invoiceDataGridView.Columns.Add("quantityColumn", "Quantity")
invoiceDataGridView.Columns.Add("unitPriceColumn", "Unit Price")
invoiceDataGridView.Columns.Add("totalPriceColumn", "Total Price")
' Set the Total Price column to read-only as it will be calculated automatically
invoiceDataGridView.Columns("totalPriceColumn").ReadOnly = True
' Add a button column for delete action
Dim deleteButtonColumn As New DataGridViewButtonColumn()
deleteButtonColumn.HeaderText = ""
deleteButtonColumn.Name = "deleteButtonColumn"
deleteButtonColumn.Text = "Delete"
deleteButtonColumn.UseColumnTextForButtonValue = True ' Set the button text to "Delete"
' Add the delete button column to the DataGridView
invoiceDataGridView.Columns.Add(deleteButtonColumn)
End Sub
'INSTANT VB WARNING: The following constructor is declared outside of its associated class:
'ORIGINAL LINE: public Form1()
Public Sub New()
InitializeComponent()
SetupDataGridViewColumns()
' Wire up the CellClick event to a handler to manage deletion of items
AddHandler invoiceDataGridView.CellClick, AddressOf invoiceDataGridView_CellClick
End Sub
Private Sub invoiceDataGridView_CellClick(ByVal sender As Object, ByVal e As DataGridViewCellEventArgs)
' If the clicked cell is part of the button column and not the header row
If e.ColumnIndex = invoiceDataGridView.Columns("deleteButtonColumn").Index AndAlso e.RowIndex >= 0 Then
' Confirm delete operation
If MessageBox.Show("Are you sure you want to delete this item?", "Confirm Delete", MessageBoxButtons.YesNo, MessageBoxIcon.Question) = DialogResult.Yes Then
' Remove the row from the DataGridView
invoiceDataGridView.Rows.RemoveAt(e.RowIndex)
End If
End If
End Sub当用户输入项目的详细信息并点击"添加项目"时,btnAddItem_Click事件会收集输入数据,验证输入数据,然后调用AddItemToInvoice。 此方法使用输入的值添加新行到DataGridView中,计算项目的总价并更新表单底部显示的总发票金额。
public void AddItemToInvoice(string itemId, string description, int quantity, decimal unitPrice)
{
    decimal totalPrice = quantity * unitPrice;
    invoiceDataGridView.Rows.Add(itemId, description, quantity, unitPrice, totalPrice);
}

private void CalculateTotalAmount()
{
    decimal totalAmount = 0m;
    foreach (DataGridViewRow row in invoiceDataGridView.Rows)
    {
        totalAmount += Convert.ToDecimal(row.Cells["totalPriceColumn"].Value ?? 0);
    }
    // Display the total amount accumulated
    lblTotalAmount.Text = $"{totalAmount:C2}";
}

private void btnAddItem_Click(object sender, EventArgs e)
{
    // Collect data from input controls
    string itemId = txtItemID.Text;
    string description = txtDescription.Text;
    int quantity = (int)numericUpDownQuantity.Value;
    decimal unitPrice;
    // Validate the collected data
    bool isUnitPriceValid = decimal.TryParse(txtUnitPrice.Text, out unitPrice);
    if (string.IsNullOrEmpty(itemId) || string.IsNullOrEmpty(description) || quantity <= 0 || !isUnitPriceValid || unitPrice <= 0)
    {
        MessageBox.Show("Please enter valid data for all fields.", "Invalid Data", MessageBoxButtons.OK, MessageBoxIcon.Warning);
        return;
    }
    // Add data to the DataGridView
    AddItemToInvoice(itemId, description, quantity, unitPrice);
    // Clear the input fields after adding the item to the grid
    txtItemID.Clear();
    txtDescription.Clear();
    txtUnitPrice.Clear();
    numericUpDownQuantity.Value = 0;
    CalculateTotalAmount();
}Imports System
Public Sub AddItemToInvoice(ByVal itemId As String, ByVal description As String, ByVal quantity As Integer, ByVal unitPrice As Decimal)
Dim totalPrice As Decimal = quantity * unitPrice
invoiceDataGridView.Rows.Add(itemId, description, quantity, unitPrice, totalPrice)
End Sub
Private Sub CalculateTotalAmount()
Dim totalAmount As Decimal = 0D
For Each row As DataGridViewRow In invoiceDataGridView.Rows
totalAmount += Convert.ToDecimal(If(row.Cells("totalPriceColumn").Value, 0))
Next row
' Display the total amount accumulated
lblTotalAmount.Text = $"{totalAmount:C2}"
End Sub
Private Sub btnAddItem_Click(ByVal sender As Object, ByVal e As EventArgs)
' Collect data from input controls
Dim itemId As String = txtItemID.Text
Dim description As String = txtDescription.Text
Dim quantity As Integer = CInt(Math.Truncate(numericUpDownQuantity.Value))
Dim unitPrice As Decimal = Nothing
' Validate the collected data
Dim isUnitPriceValid As Boolean = Decimal.TryParse(txtUnitPrice.Text, unitPrice)
If String.IsNullOrEmpty(itemId) OrElse String.IsNullOrEmpty(description) OrElse quantity <= 0 OrElse Not isUnitPriceValid OrElse unitPrice <= 0 Then
MessageBox.Show("Please enter valid data for all fields.", "Invalid Data", MessageBoxButtons.OK, MessageBoxIcon.Warning)
Return
End If
' Add data to the DataGridView
AddItemToInvoice(itemId, description, quantity, unitPrice)
' Clear the input fields after adding the item to the grid
txtItemID.Clear()
txtDescription.Clear()
txtUnitPrice.Clear()
numericUpDownQuantity.Value = 0
CalculateTotalAmount()
End Sub点击"生成发票"后,应用程序执行btnInvoice_Click事件处理程序,在该事件处理中使用StringBuilder构建HTML字符串。 此字符串包括客户的详细信息和一个使用发票项目填充的带有样式的HTML表格。 然后IronPDF的渲染器将此HTML转化为PDF文档,并将其保存到指定路径。 应用程序通过消息确认发票成功创建。
private void btnInvoice_Click(object sender, EventArgs e)
{
    IronPdf.License.LicenseKey = "your-license-key"; // Replace with your IronPDF license key
    var customerName = txtName.Text;
    var customerEmail = txtEmail.Text;
    var customerAddress = txtAddress.Text;
    var customerPhone = txtPhone.Text;
    var htmlStringBuilder = new StringBuilder();
    htmlStringBuilder.Append("<html>");
    htmlStringBuilder.Append("<head>");
    htmlStringBuilder.Append("<title>Invoice</title>");
    htmlStringBuilder.Append(@"
        <style>
            body { font-family: 'Arial', sans-serif; }
            h1 { color: #333; text-align: center; }
            table { width: 100%; border-collapse: collapse; margin-top: 20px; }
            th, td { border: 1px solid #999; padding: 8px; text-align: left; }
            th { background-color: #f2f2f2; }
            tr:nth-child(even) { background-color: #f9f9f9; }
            h2 { text-align: right; margin-top: 20px; }
            .customer-info { line-height: 1.6; margin-bottom: 20px; }
            .customer-info p { margin: 0 0 10px 0; color: #333; }
            .customer-info label { font-weight: bold; }
        </style>");
    htmlStringBuilder.Append("</head>");
    htmlStringBuilder.Append("<body>");
    htmlStringBuilder.Append("<h1>Invoice</h1>");
    htmlStringBuilder.Append("<div class='customer-info'>");
    htmlStringBuilder.Append($"<p><strong>Customer Name:</strong> {customerName}</p>");
    htmlStringBuilder.Append($"<p><strong>Customer Email:</strong> {customerEmail}</p>");
    htmlStringBuilder.Append($"<p><strong>Customer Address:</strong> {customerAddress}</p>");
    htmlStringBuilder.Append($"<p><strong>Customer Phone:</strong> {customerPhone}</p>");
    htmlStringBuilder.Append("</div>");
    htmlStringBuilder.Append("<table><tr><th>Item ID</th><th>Description</th><th>Quantity</th><th>Unit Price</th><th>Total Price</th></tr>");
    foreach (DataGridViewRow row in invoiceDataGridView.Rows)
    {
        if (row.IsNewRow) continue;
        htmlStringBuilder.Append("<tr>");
        htmlStringBuilder.Append($"<td>{row.Cells["itemIdColumn"].Value}</td>");
        htmlStringBuilder.Append($"<td>{row.Cells["descriptionColumn"].Value}</td>");
        htmlStringBuilder.Append($"<td>{row.Cells["quantityColumn"].Value}</td>");
        htmlStringBuilder.Append($"<td>{row.Cells["unitPriceColumn"].Value:C2}</td>");
        htmlStringBuilder.Append($"<td>{row.Cells["totalPriceColumn"].Value:C2}</td>");
        htmlStringBuilder.Append("</tr>");
    }
    htmlStringBuilder.Append("</table>");
    htmlStringBuilder.Append($"<h2>Total Amount: {lblTotalAmount.Text}</h2>");
    htmlStringBuilder.Append("</body></html>");
    var renderer = new IronPdf.ChromePdfRenderer();
    var pdfDocument = renderer.RenderHtmlAsPdf(htmlStringBuilder.ToString());
    string savePath = Path.Combine($"F:\\Invoice_{DateTime.Now:yyyyMMddHHmmss}.pdf");
    pdfDocument.SaveAs(savePath);
    MessageBox.Show("The invoice has been successfully saved to your desktop.", "Invoice Saved", MessageBoxButtons.OK, MessageBoxIcon.Information);
}Private Sub btnInvoice_Click(ByVal sender As Object, ByVal e As EventArgs)
IronPdf.License.LicenseKey = "your-license-key" ' Replace with your IronPDF license key
Dim customerName = txtName.Text
Dim customerEmail = txtEmail.Text
Dim customerAddress = txtAddress.Text
Dim customerPhone = txtPhone.Text
Dim htmlStringBuilder = New StringBuilder()
htmlStringBuilder.Append("<html>")
htmlStringBuilder.Append("<head>")
htmlStringBuilder.Append("<title>Invoice</title>")
htmlStringBuilder.Append("
<style>
body { font-family: 'Arial', sans-serif; }
h1 { color: #333; text-align: center; }
table { width: 100%; border-collapse: collapse; margin-top: 20px; }
th, td { border: 1px solid #999; padding: 8px; text-align: left; }
th { background-color: #f2f2f2; }
tr:nth-child(even) { background-color: #f9f9f9; }
h2 { text-align: right; margin-top: 20px; }
.customer-info { line-height: 1.6; margin-bottom: 20px; }
.customer-info p { margin: 0 0 10px 0; color: #333; }
.customer-info label { font-weight: bold; }
</style>")
htmlStringBuilder.Append("</head>")
htmlStringBuilder.Append("<body>")
htmlStringBuilder.Append("<h1>Invoice</h1>")
htmlStringBuilder.Append("<div class='customer-info'>")
htmlStringBuilder.Append($"<p><strong>Customer Name:</strong> {customerName}</p>")
htmlStringBuilder.Append($"<p><strong>Customer Email:</strong> {customerEmail}</p>")
htmlStringBuilder.Append($"<p><strong>Customer Address:</strong> {customerAddress}</p>")
htmlStringBuilder.Append($"<p><strong>Customer Phone:</strong> {customerPhone}</p>")
htmlStringBuilder.Append("</div>")
htmlStringBuilder.Append("<table><tr><th>Item ID</th><th>Description</th><th>Quantity</th><th>Unit Price</th><th>Total Price</th></tr>")
For Each row As DataGridViewRow In invoiceDataGridView.Rows
If row.IsNewRow Then
Continue For
End If
htmlStringBuilder.Append("<tr>")
htmlStringBuilder.Append($"<td>{row.Cells("itemIdColumn").Value}</td>")
htmlStringBuilder.Append($"<td>{row.Cells("descriptionColumn").Value}</td>")
htmlStringBuilder.Append($"<td>{row.Cells("quantityColumn").Value}</td>")
htmlStringBuilder.Append($"<td>{row.Cells("unitPriceColumn").Value:C2}</td>")
htmlStringBuilder.Append($"<td>{row.Cells("totalPriceColumn").Value:C2}</td>")
htmlStringBuilder.Append("</tr>")
Next row
htmlStringBuilder.Append("</table>")
htmlStringBuilder.Append($"<h2>Total Amount: {lblTotalAmount.Text}</h2>")
htmlStringBuilder.Append("</body></html>")
Dim renderer = New IronPdf.ChromePdfRenderer()
Dim pdfDocument = renderer.RenderHtmlAsPdf(htmlStringBuilder.ToString())
Dim savePath As String = Path.Combine($"F:\Invoice_{DateTime.Now:yyyyMMddHHmmss}.pdf")
pdfDocument.SaveAs(savePath)
MessageBox.Show("The invoice has been successfully saved to your desktop.", "Invoice Saved", MessageBoxButtons.OK, MessageBoxIcon.Information)
End Sub一旦Windows Forms应用程序开发完成且集成了IronPDF库,运行应用程序和生成PDF发票就是一个简单的过程。 用户通过应用程序的用户界面进行数据输入,并生成所需的输出。 以下是该过程通常是如何进行的:
通过在Visual Studio中运行应用程序或直接从Windows环境中执行已编译的可执行文件(.exe)来启动应用程序。 应用程序的表单显示,准备好供用户交互。
在表单顶部的指定文字框中输入客户详细信息,包括客户的姓名、地址、邮箱和电话号码。 通过填写表单"添加发票项目"部分中的"项目ID"、"描述"、"数量"和"单价"字段来添加发票项目。
**点击"添加项目"**将项目包括在发票列表中。DataGridView会更新并列出新项目,其详细信息和计算的总价格。重复此过程以将所有必要项目添加到发票中。"总金额"标签将动态更新以反映列出的项目的累积总数。
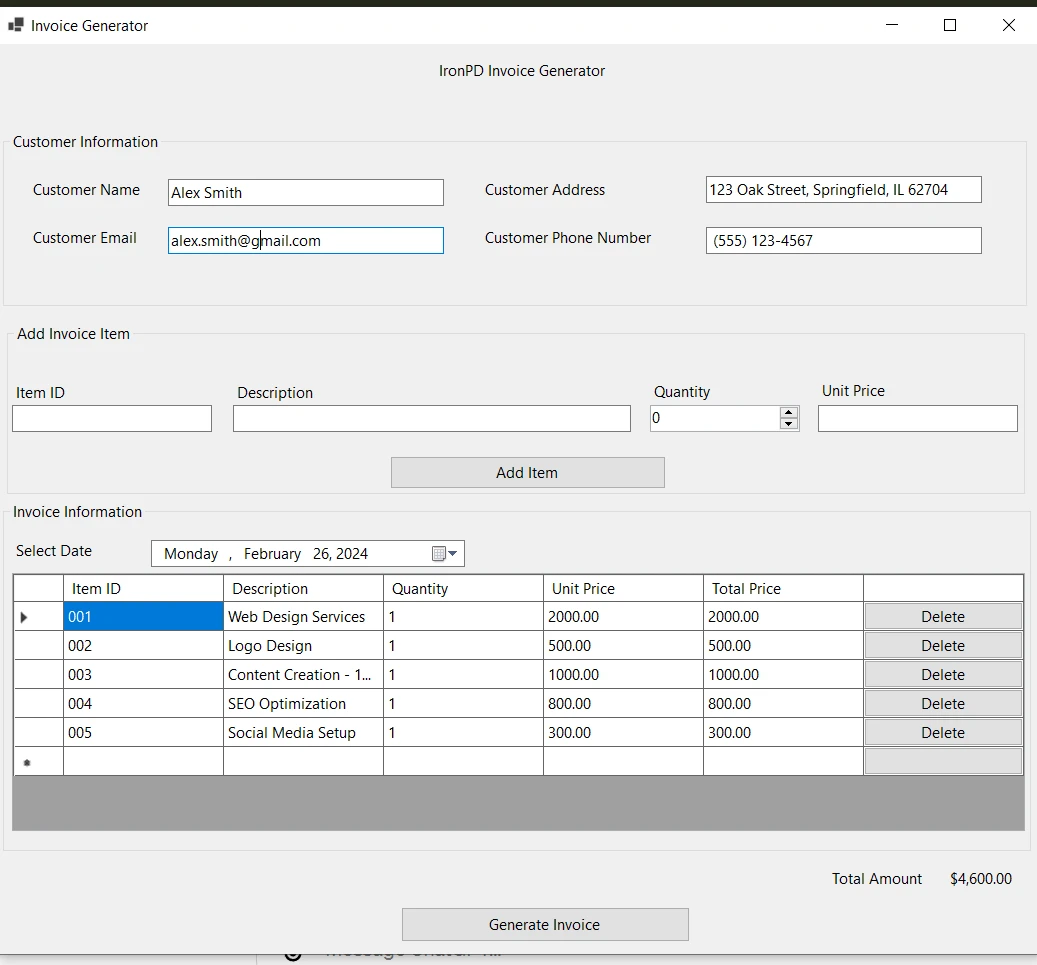
一旦所有项目都已添加且客户信息完成后,点击"生成发票"。 应用程序会将数据编译为HTML格式,并使用CSS进行了样式化。 IronPDF接手将HTML字符串转换为PDF文档。 它通过Chrome引擎渲染,确保高保真的现代Web标准。
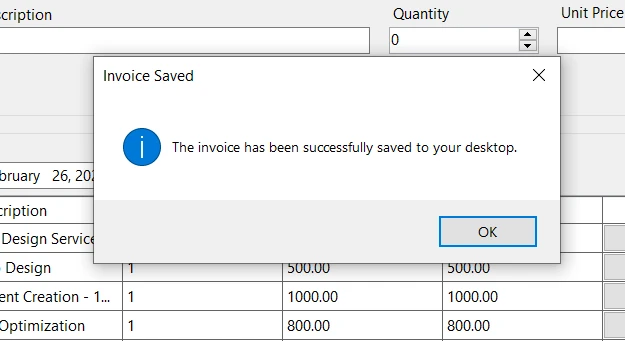
PDF生成后,应用程序将PDF文件保存到指定位置,通常与应用程序相同的目录或用户定义的路径。 一个成功消息会显示,通知用户PDF发票已成功保存。 用户可以导航到保存的位置来查看或分发发票。
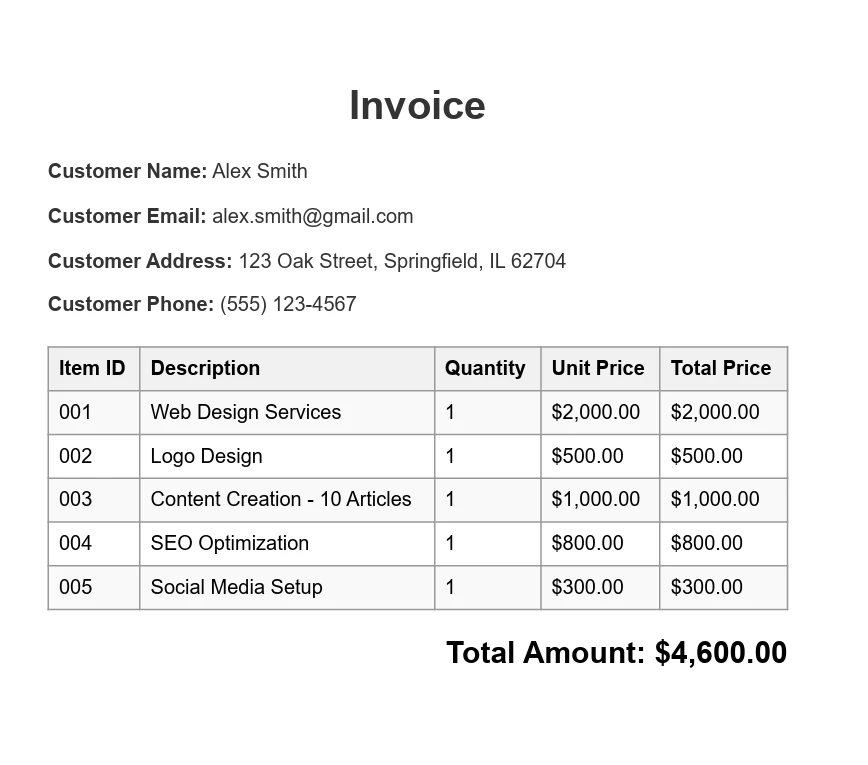
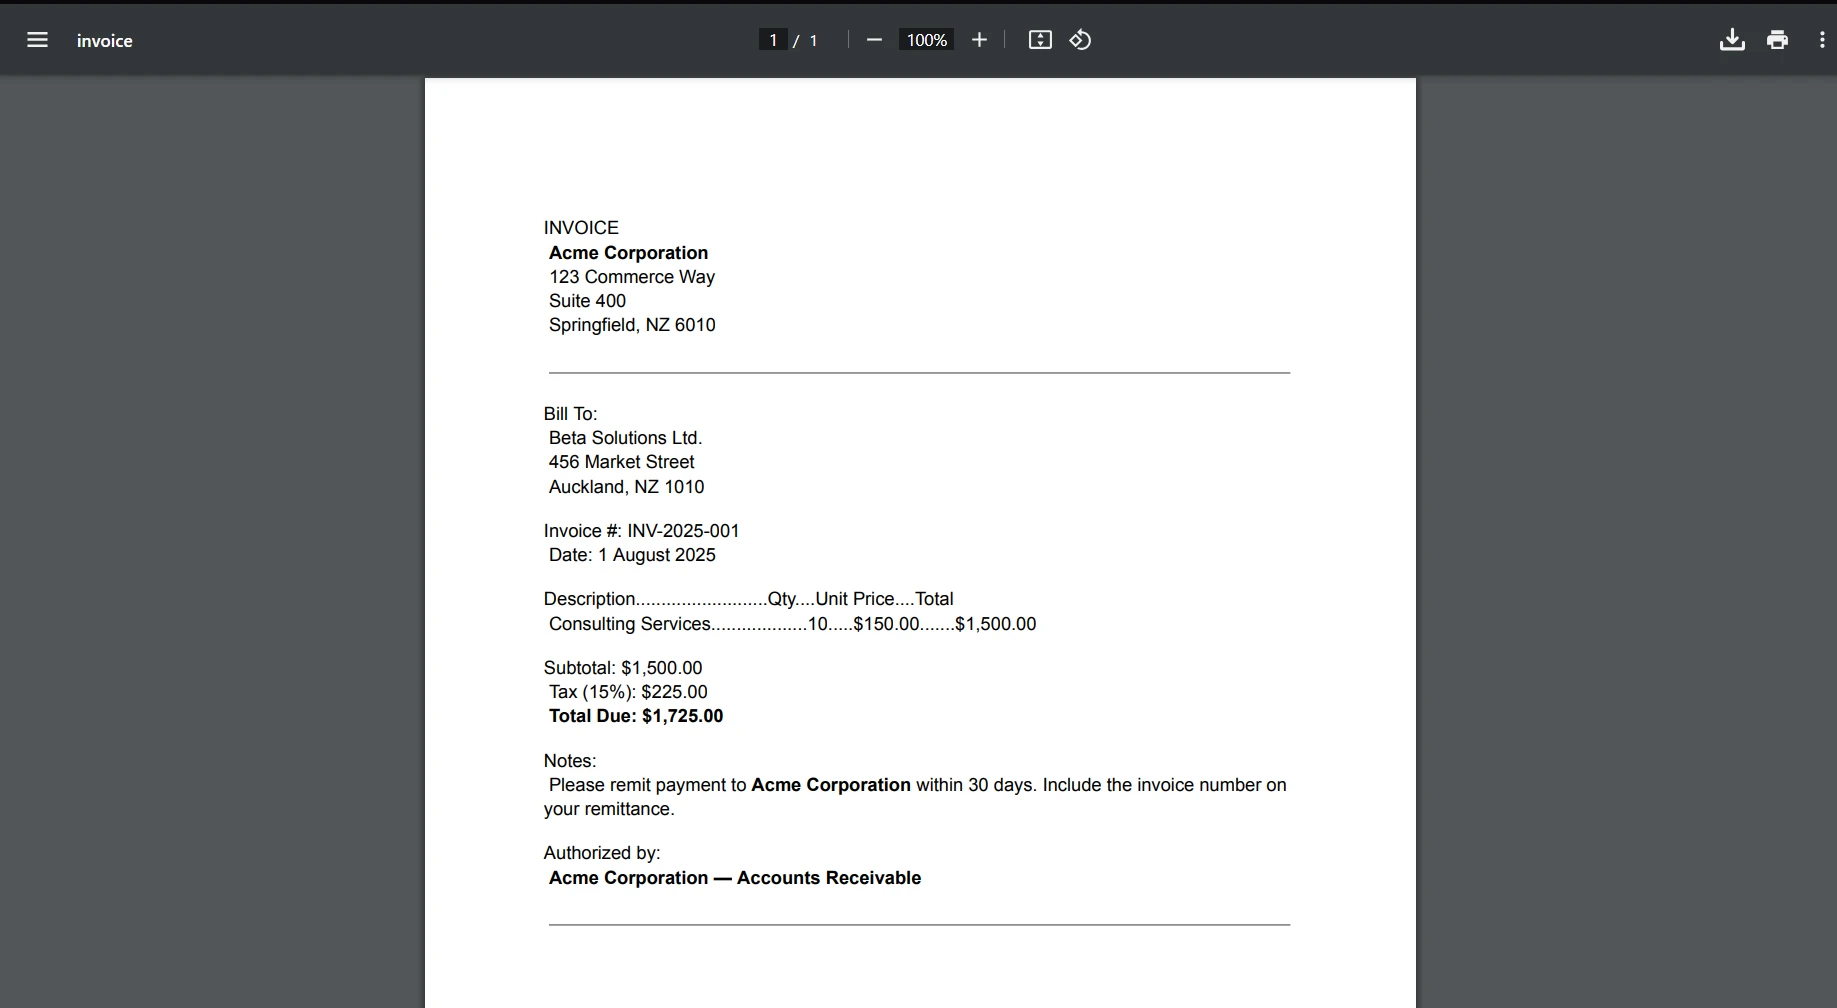
输出PDF在顶部显示客户信息,紧接着是购买项目的明细表,包括描述、数量和价格。 发票的总金额在文档结束处列出,清楚地显示了客户需要支付的金额。 该PDF被设计为简洁和专业,利用CSS在代码中定义,确保发票不仅功能齐全,而且美观。
在彻底测试您的Windows Forms应用程序并确保所有功能如数据输入、PDF生成和输出都工作顺利后,下一阶段是将您的项目打包为可执行文件(.exe)。这种转换过程在.NET框架中是简化的,确保您的应用程序已准备好用于Windows机器安装和使用。
以下是一种创建可执行文件的逐步方法:
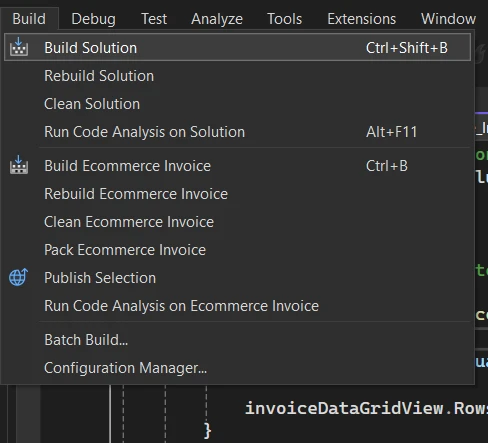
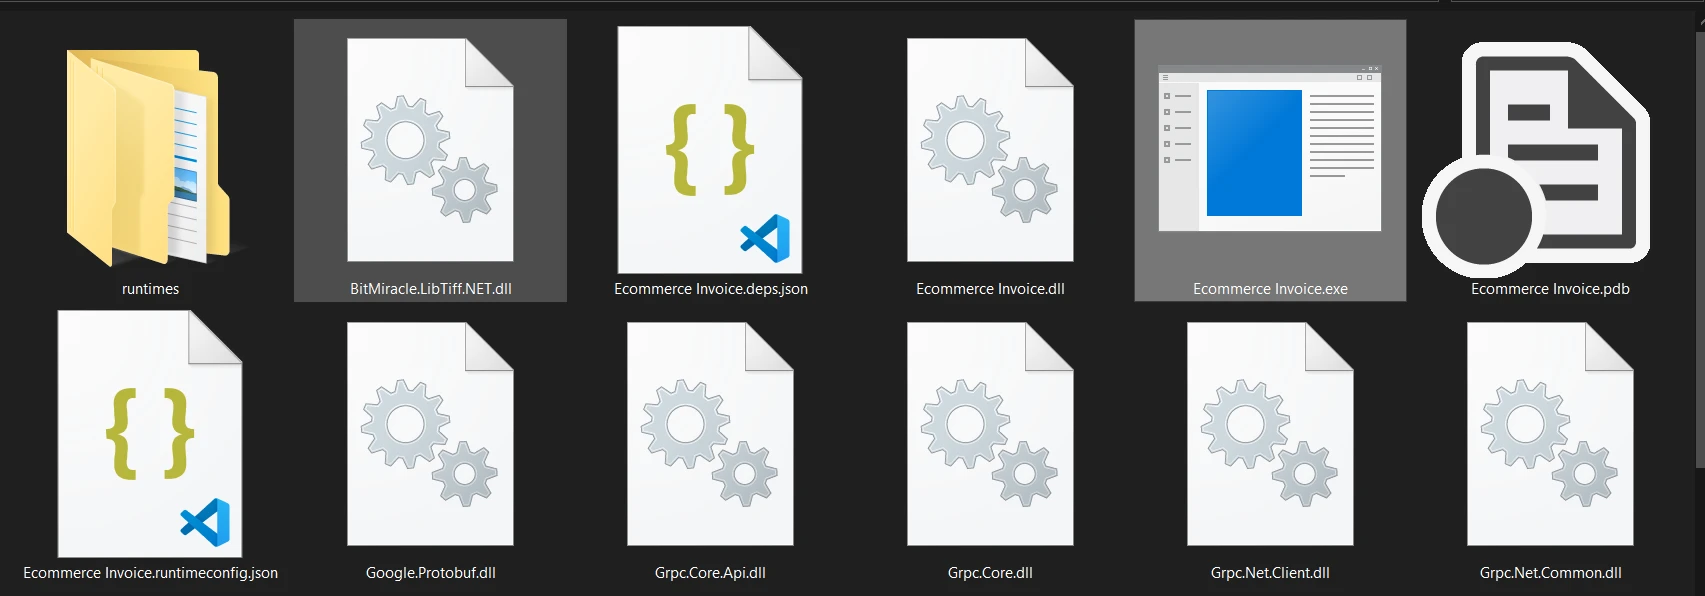
通过遵循这些步骤,你的Windows Forms应用程序被压缩成一个单一的可执行文件,准备分享和使用。 这种转换标志着开发过程的高潮,从开发机上的项目过渡为可有效分发和安装的可部署软件,适用于多种Windows环境。
总的来说,使用IronPDF和.NET Framework开发 Windows Forms 发票生成应用程序是软件开发原则的实际应用。 该项目不仅展示了.NET生态系统的多功能性和力量,还展示了开发人员如何整合如IronPDF的第三方库以扩展功能和满足具体业务需求。
通过完成从设置用户界面到实现PDF生成和将应用程序打包为可执行文件的步骤,开发人员可以创建一个功能强大、易于使用的应用程序。 这种过程强调了结合强大编程框架和创新库解决现实问题的重要性,最终提供有效且高效的产品。
IronPDF慷慨提供PDF生成功能的免费试用,供开发者探索其功能并确定其对需求的最佳契合。 一旦您体验到了好处,并准备将IronPDF整合到您的生产环境中,许可证起价提供实惠的定价选择。

Jacob Mellor 是 Iron Software 的首席技术官,也是一位开创 C# PDF 技术的有远见的工程师。作为 Iron Software 核心代码库的原始开发者,他从公司成立之初就开始塑造公司的产品架构,与首席执行官 Cameron Rimington 一起将公司转变为一家拥有 50 多名员工的公司,为 NASA、特斯拉和全球政府机构提供服务。

当您需要PDF看起来像HTML时,速度快。