next-auth NPM (How It Works For Developers)
Authentication is crucial to modern web applications, ensuring users can securely access their data and features and providing infrastructure support. NextAuth.js is a powerful and flexible authentication library designed to work seamlessly with Next.js. This article will explore how you can set up and use NextAuth.js in a Next.js project so you can be safeguarding user data with ease. We will also show you how this npm can be incorporated with other libraries such as the IronPDF library for intuitive stateless authentication for your projects.
What is NextAuth.js?
NextAuth.js is an open-source authentication library for Next.js applications that provides a flexible and secure way to implement authentication in web apps. With NextAuth.js, developers can easily integrate authentication into their Next.js projects without having to manage the complexities of user authentication and session management.
The package is highly configurable, allowing developers to customize authentication flows, secure API routes, and handle user sessions seamlessly. With enhanced features that enable you to create your procedures for managing access to accounts, encrypting and decoding JSON Web Tokens, and establishing custom cookie security policies and session attributes, which allows you to regulate access to accounts and the frequency of session verification.
Why Choose NextAuth.js?
NextAuth.js offers several benefits:
- Ease of Use: Simple setup with minimal configuration.
- Flexibility: Supports various authentication providers, including OAuth, email/password, and more.
- Security: Built-in security features to protect user data for your own database.
- Extensibility: Easily extendable to fit custom authentication needs.
Getting Started with the NextAuth.js npm
First, let’s create a new Next.js project. Open your terminal and run:
npx create-next-app@latest my-next-auth-app
cd my-next-auth-app
npx create-next-app@latest my-next-auth-app
cd my-next-auth-appNext, install NextAuth.js:
npm install next-authnpm install next-authSetting Up NextAuth.js
Create a new file for your API route to handle authentication. In the pages/api/auth directory, create the following [...nextauth].js file:
// pages/api/auth/[...nextauth].js
import NextAuth from 'next-auth';
import GitHubProvider from 'next-auth/providers/github';
import GoogleProvider from 'next-auth/providers/google';

// Configuring NextAuth to use GitHub and Google providers for authentication
export default NextAuth({
  providers: [
    GitHubProvider({
      clientId: process.env.GITHUB_ID,
      clientSecret: process.env.GITHUB_SECRET,
    }),
    GoogleProvider({
      clientId: process.env.GOOGLE_CLIENT_ID,
      clientSecret: process.env.GOOGLE_CLIENT_SECRET,
    }),
  ],
  secret: process.env.NEXTAUTH_SECRET, // Secret for encrypting tokens if needed
});
// pages/api/auth/[...nextauth].js
import NextAuth from 'next-auth';
import GitHubProvider from 'next-auth/providers/github';
import GoogleProvider from 'next-auth/providers/google';
// Configuring NextAuth to use GitHub and Google providers for authentication
export default NextAuth({
providers: [
GitHubProvider({
clientId: process.env.GITHUB_ID,
clientSecret: process.env.GITHUB_SECRET,
}),
GoogleProvider({
clientId: process.env.GOOGLE_CLIENT_ID,
clientSecret: process.env.GOOGLE_CLIENT_SECRET,
}),
],
secret: process.env.NEXTAUTH_SECRET, // Secret for encrypting tokens if needed
});Environment Variables
Create a .env.local file in the root of your project to store your environment variables:
# Just make sure to fill out the variables with your actual information!
GITHUB_ID=your_github_client_id
GITHUB_SECRET=your_github_client_secret
GOOGLE_CLIENT_ID=your_google_client_id
GOOGLE_CLIENT_SECRET=your_google_client_secret
NEXTAUTH_SECRET=your_nextauth_secret
Adding Authentication to Your App
Now, let’s add authentication to your application. Create a login button and a profile component to display user information.
// components/LoginButton.js
import { signIn, signOut, useSession } from 'next-auth/react';

const LoginButton = () => {
  const { data: session, status } = useSession();
  const loading = status === "loading"; // Used to determine loading state
  return (
    <div>
      {!session && ( // Render sign-in buttons when session is not active
        <>
          <button onClick={() => signIn('github')}>Sign in with GitHub</button>
          <button onClick={() => signIn('google')}>Sign in with Google</button>
        </>
      )}
      {session && ( // Display user info and sign-out option when session is active
        <>
          <p>Signed in as {session.user.email}</p>
          <button onClick={() => signOut()}>Sign out</button>
        </>
      )}
    </div>
  );
};

export default LoginButton;
// components/LoginButton.js
import { signIn, signOut, useSession } from 'next-auth/react';
const LoginButton = () => {
const { data: session, status } = useSession();
const loading = status === "loading"; // Used to determine loading state
return (
<div>
{!session && ( // Render sign-in buttons when session is not active
<>
<button onClick={() => signIn('github')}>Sign in with GitHub</button>
<button onClick={() => signIn('google')}>Sign in with Google</button>
</>
)}
{session && ( // Display user info and sign-out option when session is active
<>
<p>Signed in as {session.user.email}</p>
<button onClick={() => signOut()}>Sign out</button>
</>
)}
</div>
);
};
export default LoginButton;Code explanation
The LoginButton component handles user authentication in a Next.js application using NextAuth.js. It uses the useSession hook to determine if a user is logged in. If the user is not authenticated, it displays buttons allowing them to sign in using GitHub or Google. If the user is authenticated, it shows a message with their email and a button to sign out. This component provides a simple interface for managing user login and logout actions through manipulating a session object.
Protecting Routes
To protect routes and ensure only authenticated users can access certain pages, use the getSession function from NextAuth.js.
// pages/protected.js
import { getSession } from 'next-auth/react';

const ProtectedPage = ({ session }) => {
  if (!session) {
    return <p>You need to be authenticated to view this page.</p>;
  }
  return <p>Welcome, {session.user.email}!</p>;
};

export async function getServerSideProps(context) {
  const session = await getSession(context); // Fetch session data server-side
  return {
    props: { session },
  };
}

export default ProtectedPage;
// pages/protected.js
import { getSession } from 'next-auth/react';
const ProtectedPage = ({ session }) => {
if (!session) {
return <p>You need to be authenticated to view this page.</p>;
}
return <p>Welcome, {session.user.email}!</p>;
};
export async function getServerSideProps(context) {
const session = await getSession(context); // Fetch session data server-side
return {
props: { session },
};
}
export default ProtectedPage;Code explanation
The ProtectedPage component in a Next.js application uses NextAuth.js to restrict access to authenticated users only. It retrieves the user's session properties on the server side using getServerSideProps and passes it as a prop to the component. If the user is not authenticated, the page displays a message indicating that authentication is required. If the user is authenticated, it welcomes them by displaying their email address. This setup ensures that only logged-in users can access the content of the page.
Introducing IronPDF
IronPDF is a powerful node.js PDF library that allows developers to generate and edit PDFs in their node.js projects. Whether you need to create PDFs from HTML, manipulate existing PDFs, or convert web pages to PDF format, IronPDF has got you covered.

Key Features
HTML to PDF Conversion
Convert HTML content into PDF documents effortlessly. This feature is particularly useful for generating dynamic PDFs from web content.
URL to PDF Conversion
Generate PDFs directly from URLs, allowing you to capture the content of web pages and save them as PDF files programmatically.
PDF Manipulation
Merge, split, and manipulate existing PDF documents with ease. IronPDF provides functionalities such as appending pages, splitting documents, and more.
PDF Security
Secure your PDF documents by encrypting them with passwords or applying digital signatures. IronPDF offers options to protect your sensitive documents from unauthorized access.
High-Quality Output
Produce high-quality PDF documents with precise rendering of text, images, and formatting. IronPDF ensures that your generated PDFs maintain fidelity to the original content.
Cross-Platform Compatibility
IronPDF is compatible with various platforms, including Windows, Linux, and macOS, making it suitable for a wide range of development environments.
Simple Integration
Easily integrate IronPDF into your Node.js applications using its npm package. The API is well-documented, making it straightforward to incorporate PDF generation capabilities into your projects.
Installation
To install the IronPDF package, use the following command:
yarn add @ironsoftware/ironpdf @ironsoftware/ironpdf-engine-windows-x64yarn add @ironsoftware/ironpdf @ironsoftware/ironpdf-engine-windows-x64Generate PDF Documents using IronPDF and NextAuth.js
Install Dependencies: First, create a new Next.js project (if you haven’t already) using the following command:
npx create-next-app@latest nextauth-pdf --use-npm --example "https://github.com/vercel/next-learn/tree/main/basics/learn-starter"npx create-next-app@latest nextauth-pdf --use-npm --example "https://github.com/vercel/next-learn/tree/main/basics/learn-starter"Next, navigate to your project directory:
cd nextauthcd nextauthInstall the required packages:
yarn add @ironsoftware/ironpdf @ironsoftware/ironpdf-engine-windows-x64
yarn add next-auth
yarn add @ironsoftware/ironpdf @ironsoftware/ironpdf-engine-windows-x64
yarn add next-authCreate a PDF Generator
PDF Generation API: The first step is to create a backend API to generate the PDF document. Since IronPDF only runs server-side, we need to create an API to call when a user wants to generate a PDF. Create a file in path pages/api/pdf.js and add the below contents:
// pages/api/pdf.js
import { IronPdf } from "@ironsoftware/ironpdf";
import { format } from 'date-fns'; // Import the format function for date formatting

// Apply your IronPDF license key
IronPdf.GlobalSettings.LicenseKey = "Your license key goes here";

export default async function handler(req, res) {
  try {
    const currentDate = new Date();
    const formattedDate = format(currentDate, 'MMMM do, yyyy');
    // Defining the HTML content for the PDF
    let content = "<h1>Demo React Hook Form and Generate PDF Using IronPDF</h1>";
    content += `<p>Date: ${currentDate}</p>`;
    content += `<p>Formatted Date: ${formattedDate}</p>`;
    // Convert HTML content to PDF
    const pdf = await IronPdf.HtmlToPdfDocument({ htmlContent: content });
    const data = await pdf.toBuffer(); // Convert the PDF to a buffer for response
    res.setHeader("Content-Type", "application/pdf");
    res.setHeader(
      "Content-Disposition",
      "attachment; filename=awesomeIron.pdf"
    );
    res.send(data); // Send the PDF file as a response
  } catch (error) {
    console.error("Error generating PDF:", error);
    res.status(500).end();
  }
}
// pages/api/pdf.js
import { IronPdf } from "@ironsoftware/ironpdf";
import { format } from 'date-fns'; // Import the format function for date formatting
// Apply your IronPDF license key
IronPdf.GlobalSettings.LicenseKey = "Your license key goes here";
export default async function handler(req, res) {
try {
const currentDate = new Date();
const formattedDate = format(currentDate, 'MMMM do, yyyy');
// Defining the HTML content for the PDF
let content = "<h1>Demo React Hook Form and Generate PDF Using IronPDF</h1>";
content += `<p>Date: ${currentDate}</p>`;
content += `<p>Formatted Date: ${formattedDate}</p>`;
// Convert HTML content to PDF
const pdf = await IronPdf.HtmlToPdfDocument({ htmlContent: content });
const data = await pdf.toBuffer(); // Convert the PDF to a buffer for response
res.setHeader("Content-Type", "application/pdf");
res.setHeader(
"Content-Disposition",
"attachment; filename=awesomeIron.pdf"
);
res.send(data); // Send the PDF file as a response
} catch (error) {
console.error("Error generating PDF:", error);
res.status(500).end();
}
}This creates a Next.js API route that generates a PDF file using the IronPDF library. It creates an HTML string containing a header and the current date, formats the date using date-fns, and converts the HTML into a PDF. The generated PDF is then returned as a downloadable file in the response. This approach allows dynamic PDF generation in a server-side environment, making it useful for creating reports, invoices, or other documents on the fly.
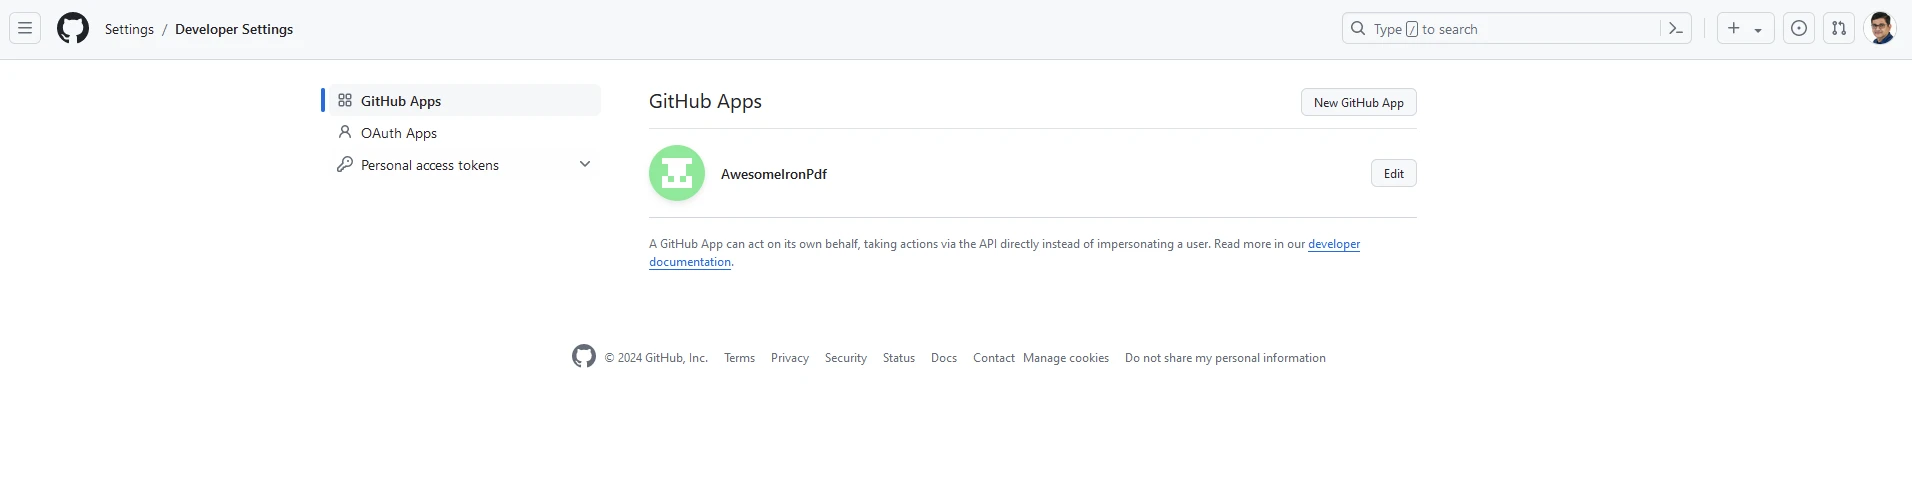
Now let us add a GIT Login to our front-end website using Next-Auth. For this, we need to get the user's GitID and secret. Login to your Git account and navigate to Developer settings as below:
Click New GitHub App and add your website details:
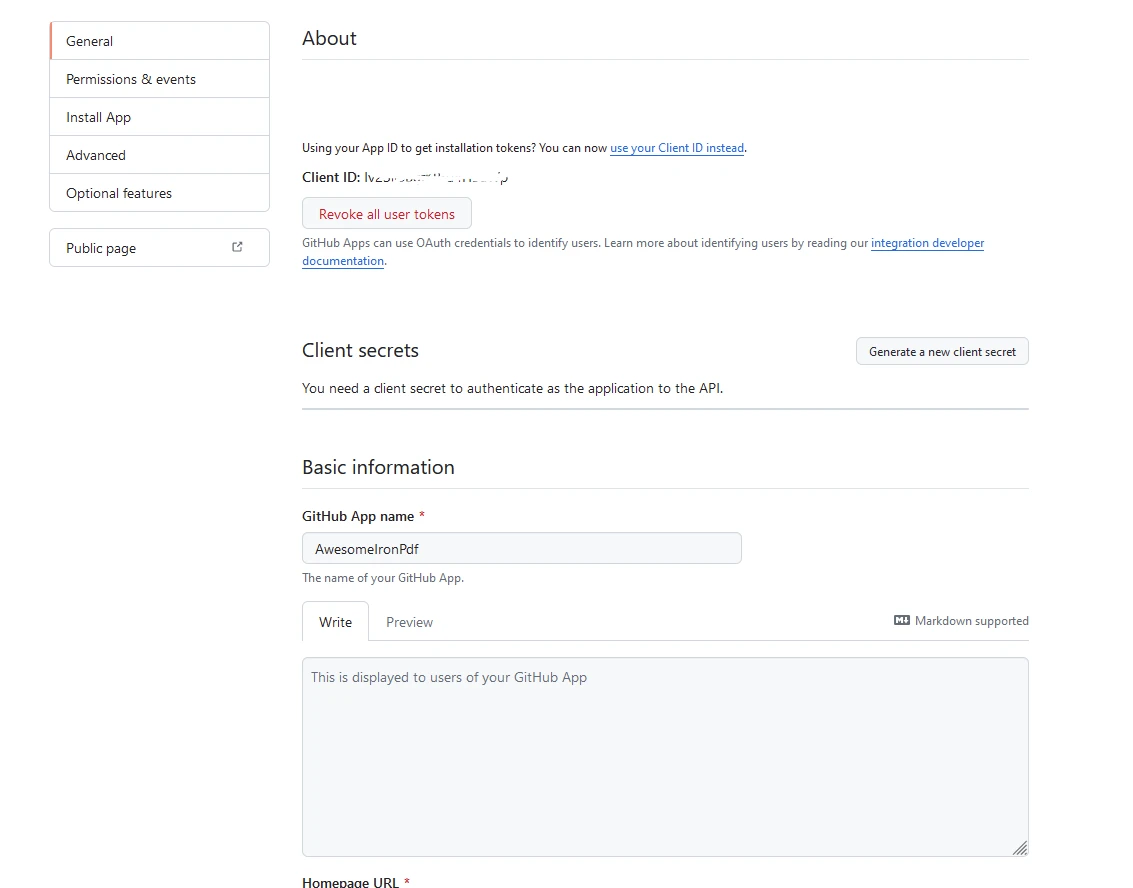
Store the App ID and Client ID somewhere safe. Then create a .env.local file in the root of your project to store your environment variables:
# Here you can use the App and Client ID you just got from GitHub
GITHUB_ID=your_github_client_id
GITHUB_SECRET=your_github_client_secret
NEXTAUTH_SECRET=secret
Create a new file for your API route to handle authentication. In the pages/api/auth directory, create a [...nextauth].js file as such:
// pages/api/auth/[...nextauth].js
import NextAuth from 'next-auth';
import GitHubProvider from 'next-auth/providers/github';

// Setting up NextAuth with GitHub provider
export default NextAuth({
  providers: [
    GitHubProvider({
      clientId: process.env.GITHUB_ID,
      clientSecret: process.env.GITHUB_SECRET,
    }),
  ],
  secret: process.env.NEXTAUTH_SECRET,
});
// pages/api/auth/[...nextauth].js
import NextAuth from 'next-auth';
import GitHubProvider from 'next-auth/providers/github';
// Setting up NextAuth with GitHub provider
export default NextAuth({
providers: [
GitHubProvider({
clientId: process.env.GITHUB_ID,
clientSecret: process.env.GITHUB_SECRET,
}),
],
secret: process.env.NEXTAUTH_SECRET,
});And add a component called LoginButton.js. Which will contain the following:
// components/LoginButton.js
import { useSession, signIn, signOut } from "next-auth/react"

export default function Component() {
  const { data: session } = useSession()
  if (session) { // Display sign-out button and user info when session is active
    return (
      <>
        Signed in as {session.user.email} <br />
        <button onClick={() => signOut()}>Sign out</button>
      </>
    )
  }
  return ( // Display sign-in button when not signed in
    <>
      Not signed in <br />
      <button onClick={() => signIn()}>Sign in</button>
    </>
  )
}
// components/LoginButton.js
import { useSession, signIn, signOut } from "next-auth/react"
export default function Component() {
const { data: session } = useSession()
if (session) { // Display sign-out button and user info when session is active
return (
<>
Signed in as {session.user.email} <br />
<button onClick={() => signOut()}>Sign out</button>
</>
)
}
return ( // Display sign-in button when not signed in
<>
Not signed in <br />
<button onClick={() => signIn()}>Sign in</button>
</>
)
}Modify your index.js as below:
// pages/index.js
import Head from "next/head";
import styles from "../styles/Home.module.css";
import React, { useState, useEffect } from "react";
import { format } from "date-fns";
import LoginButton from "../components/LoginButton";
import { useSession } from "next-auth/react";
export default function Home() {
const [text, setText] = useState("");
const { data: session } = useSession();
useEffect(() => {
const currentDate = new Date();
const formattedDate = format(currentDate, "MMMM do, yyyy");
setText(formattedDate); // Set initial text state to formatted current date
}, []);
const generatePdf = async () => {
try {
const response = await fetch("/api/pdf-datefns?f=" + text);
const blob = await response.blob();
const url = window.URL.createObjectURL(new Blob([blob]));
const link = document.createElement("a");
link.href = url;
link.setAttribute("download", "awesomeIron.pdf");
document.body.appendChild(link);
link.click();
link.parentNode.removeChild(link); // Clean up after downloading
} catch (error) {
console.error("Error generating PDF:", error);
}
};
const handleChange = (event) => {
setText(event.target.value); // Update the text state with input value
};
return (
<div className={styles.container}>
<Head>
<title>Generate PDF Using IronPDF</title>
<link rel="icon" href="/favicon.ico" />
</Head>
<main>
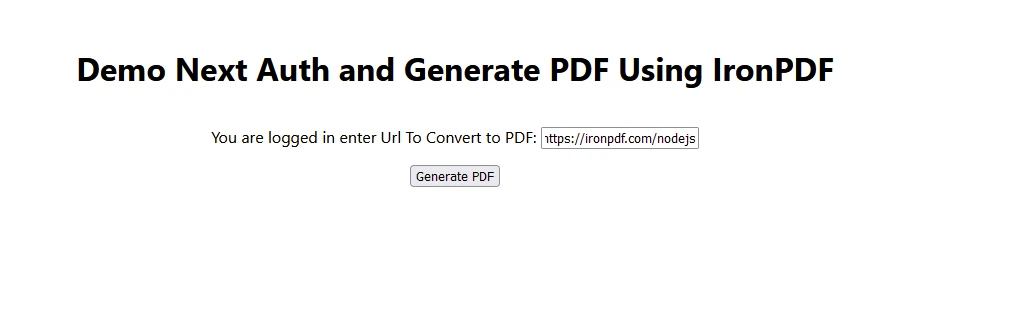
<h1>Demo Next Auth and Generate PDF Using IronPDF</h1>
{!session && <LoginButton />}
{session && (
<>
<p className="w-full text-center">
<span className="px-4 text-xl border-gray-500">
You are logged in enter URL to convert to PDF:
</span>
<input
className="border border-gray-700 w-1/4"
onChange={handleChange}
placeholder="Enter URL here..."
/>
</p>
<button
className="rounded-sm bg-blue-800 p-2 m-12 text-xl text-white"
onClick={generatePdf}
>
Generate PDF
</button>
</>
)}
</main>
<style jsx>{`
main {
padding: 5rem 0;
flex: 1;
display: flex;
flex-direction: column;
justify-content: center;
align-items: center;
}
footer {
width: 100%;
height: 100px;
border-top: 1px solid #eaeaea;
display: flex;
justify-content: center;
align-items: center;
}
footer img {
margin-left: 0.5rem;
}
footer a {
display: flex;
justify-content: center;
align-items: center;
text-decoration: none;
color: inherit;
}
code {
background: #fafafa;
border-radius: 5px;
padding: 0.75rem;
font-size: 1.1rem;
font-family:
Menlo,
Monaco,
Lucida Console,
Liberation Mono,
DejaVu Sans Mono,
Bitstream Vera Sans Mono,
Courier New,
monospace;
}
`}</style>
<style jsx global>{`
html,
body {
padding: 0;
margin: 0;
font-family:
-apple-system,
BlinkMacSystemFont,
Segoe UI,
Roboto,
Oxygen,
Ubuntu,
Cantarell,
Fira Sans,
Droid Sans,
Helvetica Neue,
sans-serif;
}
* {
box-sizing: border-box;
}
`}</style>
</div>
);
}// pages/index.js
import Head from "next/head";
import styles from "../styles/Home.module.css";
import React, { useState, useEffect } from "react";
import { format } from "date-fns";
import LoginButton from "../components/LoginButton";
import { useSession } from "next-auth/react";
export default function Home() {
const [text, setText] = useState("");
const { data: session } = useSession();
useEffect(() => {
const currentDate = new Date();
const formattedDate = format(currentDate, "MMMM do, yyyy");
setText(formattedDate); // Set initial text state to formatted current date
}, []);
const generatePdf = async () => {
try {
const response = await fetch("/api/pdf-datefns?f=" + text);
const blob = await response.blob();
const url = window.URL.createObjectURL(new Blob([blob]));
const link = document.createElement("a");
link.href = url;
link.setAttribute("download", "awesomeIron.pdf");
document.body.appendChild(link);
link.click();
link.parentNode.removeChild(link); // Clean up after downloading
} catch (error) {
console.error("Error generating PDF:", error);
}
};
const handleChange = (event) => {
setText(event.target.value); // Update the text state with input value
};
return (
<div className={styles.container}>
<Head>
<title>Generate PDF Using IronPDF</title>
<link rel="icon" href="/favicon.ico" />
</Head>
<main>
<h1>Demo Next Auth and Generate PDF Using IronPDF</h1>
{!session && <LoginButton />}
{session && (
<>
<p className="w-full text-center">
<span className="px-4 text-xl border-gray-500">
You are logged in enter URL to convert to PDF:
</span>
<input
className="border border-gray-700 w-1/4"
onChange={handleChange}
placeholder="Enter URL here..."
/>
</p>
<button
className="rounded-sm bg-blue-800 p-2 m-12 text-xl text-white"
onClick={generatePdf}
>
Generate PDF
</button>
</>
)}
</main>
<style jsx>{`
main {
padding: 5rem 0;
flex: 1;
display: flex;
flex-direction: column;
justify-content: center;
align-items: center;
}
footer {
width: 100%;
height: 100px;
border-top: 1px solid #eaeaea;
display: flex;
justify-content: center;
align-items: center;
}
footer img {
margin-left: 0.5rem;
}
footer a {
display: flex;
justify-content: center;
align-items: center;
text-decoration: none;
color: inherit;
}
code {
background: #fafafa;
border-radius: 5px;
padding: 0.75rem;
font-size: 1.1rem;
font-family:
Menlo,
Monaco,
Lucida Console,
Liberation Mono,
DejaVu Sans Mono,
Bitstream Vera Sans Mono,
Courier New,
monospace;
}
`}</style>
<style jsx global>{`
html,
body {
padding: 0;
margin: 0;
font-family:
-apple-system,
BlinkMacSystemFont,
Segoe UI,
Roboto,
Oxygen,
Ubuntu,
Cantarell,
Fira Sans,
Droid Sans,
Helvetica Neue,
sans-serif;
}
* {
box-sizing: border-box;
}
`}</style>
</div>
);
}Output for the Code Example
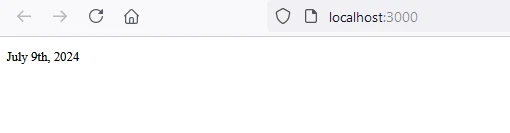
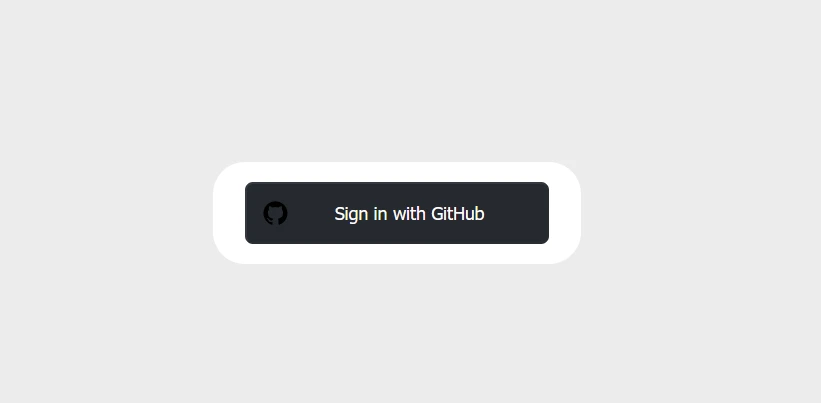
First page
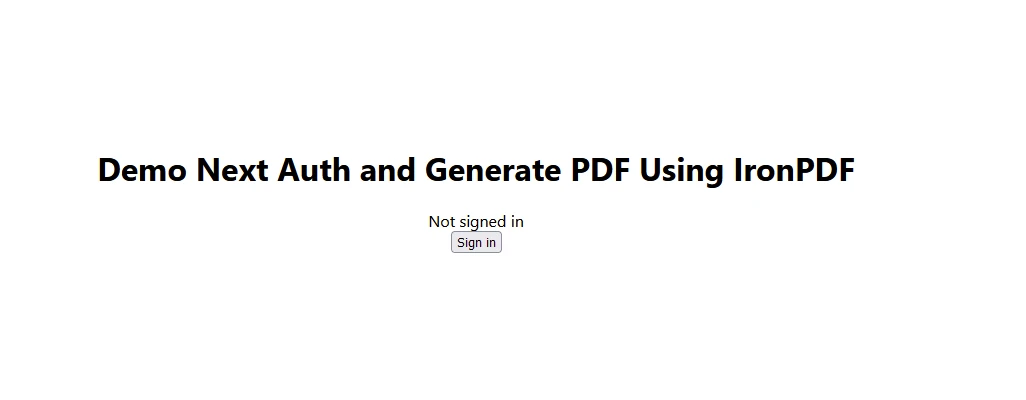
Login page
After Login
Outputted Generated PDF
IronPDF License
Make sure to remember to place the License Key you receive at the start of your code like this:
// Adjust paths as necessary depending on how you import IronPDF
import { IronPdfGlobalConfig, PdfDocument } from "@ironsoftware/ironpdf";

// Apply your IronPDF license key
IronPdfGlobalConfig.getConfig().licenseKey = "Add Your key here";
// Adjust paths as necessary depending on how you import IronPDF
import { IronPdfGlobalConfig, PdfDocument } from "@ironsoftware/ironpdf";
// Apply your IronPDF license key
IronPdfGlobalConfig.getConfig().licenseKey = "Add Your key here";Conclusion
In the end, NextAuth.js simplifies the process of adding authentication to your Next.js applications. With support for multiple providers and robust security features, it’s a great choice for handling user authentication. You can always explore the NextAuth.js documentation for more advanced configurations and features. On top of that, IronPDF Node.js provides robust PDF generation and manipulation capabilities to your application and integrates well with modern application development.