
Hashids NPM(開發者的使用方法)
在現代網頁應用中,確保數據安全和隱私至關重要。 保護諸如數據庫ID或URLs等敏感信息的一種有效方法是使用Hashids,這是一個JavaScript加密程式庫,可以將數字資料轉化為獨特的、可逆和加密的哈希值。 本文探討如何將Hashids無縫整合到您的React應用中,以混淆和解碼識別碼。
什麼是Hashids?
Hashids是一個小而強大的程式庫,它將數字資料轉換為哈希字串。 主要目的是隱藏數字識別碼,以防止敏感信息的暴露。 此轉換是可逆的,在需要時可以恢復原始的數字資料。 Hashids是一個JavaScript程式庫,用於從數字生成YouTube類似的IDs,編碼敏感資料,或以安全方式將您的數據庫IDs暴露給用戶,或僅僅是將IDs從數字中混淆。
在您的React應用中整合Hashids
要將Hashids整合到您的React應用中,請按照以下步驟進行:
步驟1:安裝Hashids npm
首先,在您的React專案中通過npm安裝Hashids:
npm install hashids
# or
yarn add hashids
npm install hashids
# or
yarn add hashids步驟2:初始化Hashids實例
在您的React組件或實用程式文件中,使用salt初始化一個新的Hashids實例,並可選擇設置最小哈希長度:
import { useState, useEffect } from 'react';
import Hashids from 'hashids';

// React component demonstrating Hashids integration
const MyComponent = () => {
  const [hashids, setHashids] = useState(null);

  useEffect(() => {
    // Initialize the Hashids library with a custom salt string and minimum hash length of 8
    const initHashids = new Hashids('your_salt_here', 8); // Replace 'your_salt_here' with your actual salt or configure custom alphabet
    setHashids(initHashids);
  }, []);

  // Other component logic here
  return (
    <div>
      {/* Your JSX content */}
    </div>
  );
};

export default MyComponent;
import { useState, useEffect } from 'react';
import Hashids from 'hashids';
// React component demonstrating Hashids integration
const MyComponent = () => {
const [hashids, setHashids] = useState(null);
useEffect(() => {
// Initialize the Hashids library with a custom salt string and minimum hash length of 8
const initHashids = new Hashids('your_salt_here', 8); // Replace 'your_salt_here' with your actual salt or configure custom alphabet
setHashids(initHashids);
}, []);
// Other component logic here
return (
<div>
{/* Your JSX content */}
</div>
);
};
export default MyComponent;將'your_salt_here'替換為您用於自訂哈希輸出的唯一字串(salt)。
步驟3:編碼和解碼數據
一旦初始化,您可以使用Hashids來編碼和解碼數字數據。 例如,編碼一個數據庫ID:
const encodedId = hashids.encode(12345); // Example: 'B0zGbvA9' non-sequential IDsconst encodedId = hashids.encode(12345); // Example: 'B0zGbvA9' non-sequential IDs然後將其解碼回原始ID:
const decodedIds = hashids.decode('B0zGbvA9'); // Example: [12345]const decodedIds = hashids.decode('B0zGbvA9'); // Example: [12345]步驟4:在組件中使用Hashids
在必要時,將Hashids整合到您的React組件中。 例如,將哈希IDs作為屬性傳遞:
const MyComponent = ({ id }) => {
  // Encode ID using Hashids if the hashids instance is initialized
  const encodedId = hashids ? hashids.encode(id) : '';

  return (
    <div>
      <p>Encoded ID: {encodedId}</p>
      {/* Other JSX content */}
    </div>
  );
};
const MyComponent = ({ id }) => {
// Encode ID using Hashids if the hashids instance is initialized
const encodedId = hashids ? hashids.encode(id) : '';
return (
<div>
<p>Encoded ID: {encodedId}</p>
{/* Other JSX content */}
</div>
);
};在React中使用Hashids的好處
- 安全性: Hashids混淆數字ID,通過防止直接映射到敏感信息來增強數據隱私和安全。
- 易於整合: 簡單的npm安裝和直觀的API使Hashids易於在React應用中實施。
- 靈活性: 可自訂的哈希長度和salt提供了適應您的應用安全需求的靈活性。
介紹IronPDF
IronPDF for Node.js是Iron Software的一個強大的Node.js PDF程式庫,可讓開發人員在他們的.NET專案中生成和編輯PDF文件。 無論您需要從HTML創建PDF,操作現有的PDF,或將網頁轉換為PDF格式,IronPDF都能滿足您的需求。

主要功能
HTML轉PDF
輕鬆將HTML內容轉換為PDF文件。 此功能特別適用於從網頁內容生成動態PDF。
URL轉PDF
直接從URL生成PDF,允許您程式化地捕獲網頁內容並將其儲存為PDF文件。
PDF操作
輕鬆合併、拆分和操作現有的PDF文件。 IronPDF提供如追加頁面、拆分文件等功能。
PDF安全性
通過設置密碼或應用數位簽章來保障您的PDF文件。 IronPDF提供選項來保護您的敏感文件免受未經授權的訪問。
高品質輸出
生成高品質的PDF文件,精確渲染文字、圖像和格式。 IronPDF確保您生成的PDF完整忠於原始內容。
跨平台相容性
IronPDF 與各種平台相容,包括Windows、Linux和macOS,非常適合多種開發環境。
簡單整合
輕鬆將IronPDF整合到您的Node.js應用程式中,使用其npm套件。 API文件齊全,使得將PDF生成能力融入您的專案變得簡單明瞭。
安裝
要安裝IronPDF NPM套件,請使用以下命令:
yarn add @ironsoftware/ironpdf @ironsoftware/ironpdf-engine-windows-x64yarn add @ironsoftware/ironpdf @ironsoftware/ironpdf-engine-windows-x64使用IronPDF生成PDF文件並使用HashIDs NPM套件
安裝依賴項:首先,使用以下命令創建一個新的Next.js專案(如果您尚未創建):參考此處
npx create-next-app@latest hashids-pdf --use-npm --example "https://github.com/vercel/next-learn/tree/main/basics/learn-starter"npx create-next-app@latest hashids-pdf --use-npm --example "https://github.com/vercel/next-learn/tree/main/basics/learn-starter"接下來,導航到項目目錄:
cd hashids-pdfcd hashids-pdf安裝所需的套件:
yarn add @ironsoftware/ironpdf @ironsoftware/ironpdf-engine-windows-x64
yarn add hashids
yarn add @ironsoftware/ironpdf @ironsoftware/ironpdf-engine-windows-x64
yarn add hashids創建PDF
現在,讓我們示範使用IronPDF生成PDF的簡單範例。 在您的Next.js組件中(例如,pages/index.tsx),添加以下代碼:
PDF生成API:第一步是創建一個後端API來生成PDF文件。 由於IronPDF僅在伺服器端運行,我們需要創建一個API來調用,當用戶希望生成PDF時。 在路徑pages/api/pdf.js中創建一個文件並添加以下內容。
IronPDF需要一個授權金鑰,您可以從授權頁面獲取並將其放入下面的代碼中。
// pages/api/pdf.js
import { IronPdfGlobalConfig, PdfDocument } from "@ironsoftware/ironpdf";
import Hashids from 'hashids';
// Apply your IronPDF license key
IronPdfGlobalConfig.getConfig().licenseKey = "Your license key";
export default async function handler(req, res) {
try {
const initHashids = new Hashids('IronPDF Is Awesome and this is the salt', 8);
const f = req.query.f;
const l = initHashids.encode(f);
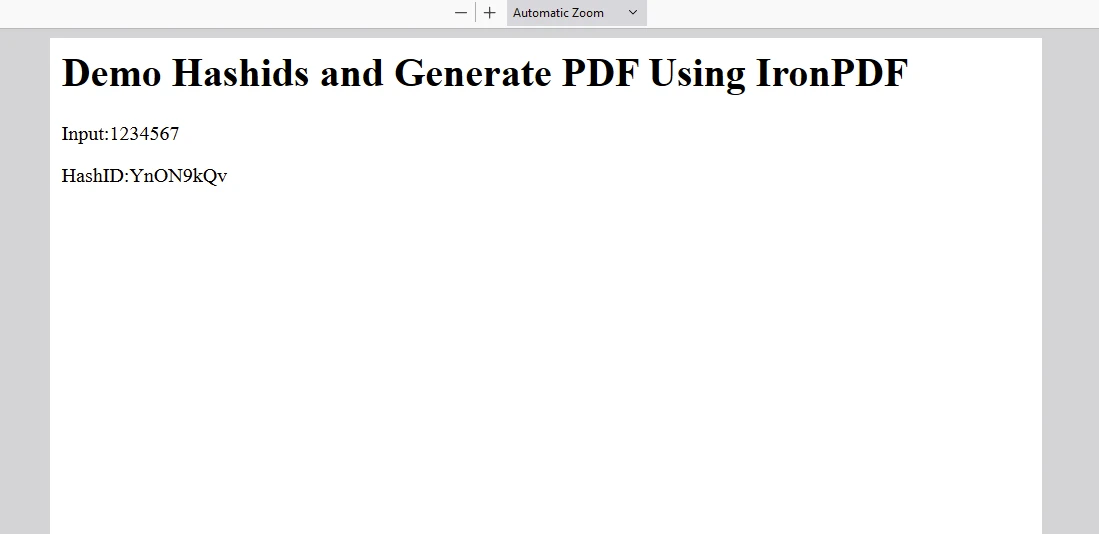
let content = "<h1>Demo Hashids and Generate PDF Using IronPDF</h1>";
content += "<p>Input:" + f + "</p>";
content += "<p>HashID:" + l + "</p>";
const pdf = await PdfDocument.fromHtml(content);
const data = await pdf.saveAsBuffer();
res.setHeader("Content-Type", "application/pdf");
res.setHeader(
"Content-Disposition",
"attachment; filename=awesomeIron.pdf"
);
res.send(data);
} catch (error) {
console.error("Error generating PDF:", error);
res.status(500).end();
}
}// pages/api/pdf.js
import { IronPdfGlobalConfig, PdfDocument } from "@ironsoftware/ironpdf";
import Hashids from 'hashids';
// Apply your IronPDF license key
IronPdfGlobalConfig.getConfig().licenseKey = "Your license key";
export default async function handler(req, res) {
try {
const initHashids = new Hashids('IronPDF Is Awesome and this is the salt', 8);
const f = req.query.f;
const l = initHashids.encode(f);
let content = "<h1>Demo Hashids and Generate PDF Using IronPDF</h1>";
content += "<p>Input:" + f + "</p>";
content += "<p>HashID:" + l + "</p>";
const pdf = await PdfDocument.fromHtml(content);
const data = await pdf.saveAsBuffer();
res.setHeader("Content-Type", "application/pdf");
res.setHeader(
"Content-Disposition",
"attachment; filename=awesomeIron.pdf"
);
res.send(data);
} catch (error) {
console.error("Error generating PDF:", error);
res.status(500).end();
}
}現在修改index.js代碼如下以使用hashID和IronPDF
import Head from "next/head";
import styles from "../styles/Home.module.css";
import React, { useState, useEffect } from "react";
import Hashids from 'hashids';

export default function Home() {
  const [text, setText] = useState("");
  const [etext, seteText] = useState("");
  const [hashids, setHashids] = useState(null);

  // Initialize Hashids on component mount
  useEffect(() => {
    const initHashids = new Hashids('IronPDF Is Awesome and this is the salt', 8);
    setHashids(initHashids);
  }, []);

  // Generate PDF by calling backend API
  const generatePdf = async () => {
    try {
      const response = await fetch("/api/pdf?f=" + text);
      const blob = await response.blob();
      const url = window.URL.createObjectURL(new Blob([blob]));
      const link = document.createElement("a");
      link.href = url;
      link.setAttribute("download", "awesomeIron.pdf");
      document.body.appendChild(link);
      link.click();
      link.parentNode.removeChild(link);
    } catch (error) {
      console.error("Error generating PDF:", error);
    }
  };

  // Handle text change and encode input number
  const handleChange = (event) => {
    seteText(hashids ? hashids.encode(event.target.value) : '');
    setText(event.target.value);
  };

  return (
    <div className={styles.container}>
      <Head>
        <title>Generate PDF Using IronPDF</title>
        <link rel="icon" href="/favicon.ico" />
      </Head>
      <main>
        <h1>Demo Hashids and Generate PDF Using IronPDF</h1>
        <p>
          <span>Enter Url To get Hashids and Convert to PDF:</span>{" "}
        </p>
        <input type="number" value={text} onChange={handleChange} />
        <p>
          HashID of input: {etext}
        </p>
        <button style={{ margin: 20, padding: 5 }} onClick={generatePdf}>
          Generate PDF
        </button>
      </main>
      <style jsx>{`
        main {
          padding: 5rem 0;
          flex: 1;
          display: flex;
          flex-direction: column;
          justify-content: center;
          align-items: center;
        }
        footer {
          width: 100%;
          height: 100px;
          border-top: 1px solid #eaeaea;
          display: flex;
          justify-content: center;
          align-items: center;
        }
        footer img {
          margin-left: 0.5rem;
        }
        footer a {
          display: flex;
          justify-content: center;
          align-items: center;
          text-decoration: none;
          color: inherit;
        }
        code {
          background: #fafafa;
          border-radius: 5px;
          padding: 0.75rem;
          font-size: 1.1rem;
          font-family:
            Menlo,
            Monaco,
            Lucida Console,
            Liberation Mono,
            DejaVu Sans Mono,
            Bitstream Vera Sans Mono,
            Courier New,
            monospace;
        }
      `}</style>
      <style jsx global>{`
        html,
        body {
          padding: 0;
          margin: 0;
          font-family:
            -apple-system,
            BlinkMacSystemFont,
            Segoe UI,
            Roboto,
            Oxygen,
            Ubuntu,
            Cantarell,
            Fira Sans,
            Droid Sans,
            Helvetica Neue,
            sans-serif;
        }
        * {
          box-sizing: border-box;
        }
      `}</style>
    </div>
  );
}
import Head from "next/head";
import styles from "../styles/Home.module.css";
import React, { useState, useEffect } from "react";
import Hashids from 'hashids';
export default function Home() {
const [text, setText] = useState("");
const [etext, seteText] = useState("");
const [hashids, setHashids] = useState(null);
// Initialize Hashids on component mount
useEffect(() => {
const initHashids = new Hashids('IronPDF Is Awesome and this is the salt', 8);
setHashids(initHashids);
}, []);
// Generate PDF by calling backend API
const generatePdf = async () => {
try {
const response = await fetch("/api/pdf?f=" + text);
const blob = await response.blob();
const url = window.URL.createObjectURL(new Blob([blob]));
const link = document.createElement("a");
link.href = url;
link.setAttribute("download", "awesomeIron.pdf");
document.body.appendChild(link);
link.click();
link.parentNode.removeChild(link);
} catch (error) {
console.error("Error generating PDF:", error);
}
};
// Handle text change and encode input number
const handleChange = (event) => {
seteText(hashids ? hashids.encode(event.target.value) : '');
setText(event.target.value);
};
return (
<div className={styles.container}>
<Head>
<title>Generate PDF Using IronPDF</title>
<link rel="icon" href="/favicon.ico" />
</Head>
<main>
<h1>Demo Hashids and Generate PDF Using IronPDF</h1>
<p>
<span>Enter Url To get Hashids and Convert to PDF:</span>{" "}
</p>
<input type="number" value={text} onChange={handleChange} />
<p>
HashID of input: {etext}
</p>
<button style={{ margin: 20, padding: 5 }} onClick={generatePdf}>
Generate PDF
</button>
</main>
<style jsx>{`
main {
padding: 5rem 0;
flex: 1;
display: flex;
flex-direction: column;
justify-content: center;
align-items: center;
}
footer {
width: 100%;
height: 100px;
border-top: 1px solid #eaeaea;
display: flex;
justify-content: center;
align-items: center;
}
footer img {
margin-left: 0.5rem;
}
footer a {
display: flex;
justify-content: center;
align-items: center;
text-decoration: none;
color: inherit;
}
code {
background: #fafafa;
border-radius: 5px;
padding: 0.75rem;
font-size: 1.1rem;
font-family:
Menlo,
Monaco,
Lucida Console,
Liberation Mono,
DejaVu Sans Mono,
Bitstream Vera Sans Mono,
Courier New,
monospace;
}
`}</style>
<style jsx global>{`
html,
body {
padding: 0;
margin: 0;
font-family:
-apple-system,
BlinkMacSystemFont,
Segoe UI,
Roboto,
Oxygen,
Ubuntu,
Cantarell,
Fira Sans,
Droid Sans,
Helvetica Neue,
sans-serif;
}
* {
box-sizing: border-box;
}
`}</style>
</div>
);
}代碼說明
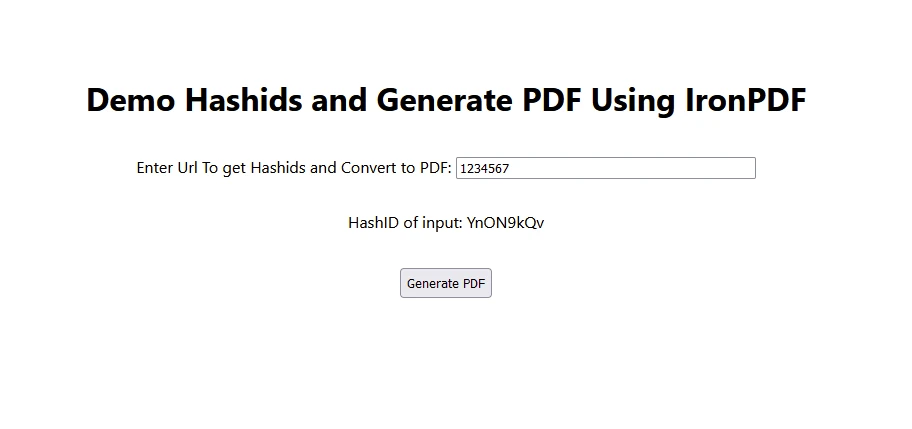
- 用戶通過輸入文本框輸入數字。
- 使用HashID編碼輸入數字並顯示。
- 當用戶點擊"生成PDF"時,輸入文本被發送到一個後端API來編碼並生成PDF文件。
輸出
IronPDF授權
在這裡放置授權金鑰:
import { IronPdfGlobalConfig, PdfDocument } from "@ironsoftware/ironpdf";
// Apply your IronPDF license key
IronPdfGlobalConfig.getConfig().licenseKey = "Add Your key here";
import { IronPdfGlobalConfig, PdfDocument } from "@ironsoftware/ironpdf";
// Apply your IronPDF license key
IronPdfGlobalConfig.getConfig().licenseKey = "Add Your key here";結論
在您的React應用中整合Hashids是保護諸如數據庫ID或URLs等敏感數據的實用方法。 通過使用Hashids,您可以確保識別碼保持安全,同時保留在需要時檢索原始數據的能力。
無論您正在構建一個小型應用程序或一個複雜的企業系統,Hashids都提供了一個可靠的解決方案來增強您的React專案中的數據隱私和安全,並且在將遞增數字編碼成獨特的哈希方面表現出色。 Hashids確保即使輸入數字中的重複模式也能產生獨特的非重複哈希,保持應用中的數據完整性和安全性。
IronPDF是Node.js開發人員尋求全面的PDF生成、操縱和管理功能的堅固且多功能的程式庫。 無論您正在構建網頁應用、桌面軟體,或將PDF功能整合到企業解決方案中。


