Jquery Datatable (How It Works For Developers)
Data presentation is a critical aspect of web development, and when dealing with tabular data, having an interactive and feature-rich table is essential. jQuery DataTables is a powerful JavaScript library that provides advanced functionality for creating dynamic and responsive tables. In this article, we'll explore how to integrate and use jQuery DataTables in an ASP.NET web application to enhance the presentation of tabular data.
How to Use jQuery DataTables in an ASP.NET Web App?
- Create or Open a Web Application.
- Install Entity Framework Packages.
- Add Model, DB Context, and Controller.
- Add DB Connection String and Set Up Configuration.
- Add Migration and Update Database.
- Add Client-Side Library of jQuery DataTables.
- Add HTML table and JavaScript code.
- Build and Run the Application.
- Export Data into Excel using IronXL for Excel Manipulation.
What is jQuery DataTables?
jQuery DataTables is a lightweight, flexible, and feature-rich jQuery plugin for handling tabular data. It offers a wide range of functionalities, such as sorting, searching, and pagination, making it an ideal choice for presenting large datasets in a user-friendly manner.
Client-Side Processing
In client-side processing, the browser is empowered to handle the dataset locally. jQuery DataTables, through its powerful features, allows for dynamic interaction and manipulation of the data directly within the user's browser. While this approach works seamlessly for smaller datasets, it may face challenges when handling extensive datasets due to potential performance bottlenecks and increased resource consumption.
In this article, we will explore client-side processing in an ASP.NET Razor Page application, highlighting the advantages it offers for smaller datasets and providing insights into potential considerations and optimizations to ensure a smooth and responsive user experience.
Getting started with jQuery DataTables in an ASP.NET Web Application
This article will use an ASP.NET Razor Page Web Application targeting .NET Framework 4.8. You may use Blazor, MVC, or Web Forms, as per your requirement.
The Code-First Approach will be used in this article. You may use the Database First Approach as per your preference. We need to install the following packages for using the Code First Approach.
- Microsoft.EntityFrameworkCore
- Microsoft.EntityFrameworkCore.Design
- Microsoft.EntityFrameworkCore.SqlServer
- Microsoft.EntityFrameworkCore.Tools
Install the above packages by using the Install-Package command from the NuGet Package Manager Console or install them from the NuGet Package Manager solution by searching for them.
Let's set up our project by adding the Model class, ApplicationDbContext Class, Controller, Connection String, and services configuration in the Program.cs.
Add Model Class
I am using the Employee model class for this example. You may use it as per your requirement.
public class Employee
{
    public int Id { get; set; }
    public string FirstName { get; set; } = string.Empty;
    public string LastName { get; set; } = string.Empty;
    public string Email { get; set; } = string.Empty;
    public string PhoneNumber { get; set; } = string.Empty;
    public string Gender { get; set; } = string.Empty;
    public string Designation { get; set; } = string.Empty;
}
public class Employee
{
public int Id { get; set; }
public string FirstName { get; set; } = string.Empty;
public string LastName { get; set; } = string.Empty;
public string Email { get; set; } = string.Empty;
public string PhoneNumber { get; set; } = string.Empty;
public string Gender { get; set; } = string.Empty;
public string Designation { get; set; } = string.Empty;
}Public Class Employee
Public Property Id() As Integer
Public Property FirstName() As String = String.Empty
Public Property LastName() As String = String.Empty
Public Property Email() As String = String.Empty
Public Property PhoneNumber() As String = String.Empty
Public Property Gender() As String = String.Empty
Public Property Designation() As String = String.Empty
End ClassAdd ApplicationDbContext Class
We need to add the ApplicationDbContext class to set up Entity Framework.
public class ApplicationDbContext : DbContext
{
    public ApplicationDbContext(DbContextOptions<ApplicationDbContext> options) : base(options)
    {
    }

    public DbSet<Employee> Employees { get; set; }
}
public class ApplicationDbContext : DbContext
{
public ApplicationDbContext(DbContextOptions<ApplicationDbContext> options) : base(options)
{
}
public DbSet<Employee> Employees { get; set; }
}Public Class ApplicationDbContext
Inherits DbContext
Public Sub New(ByVal options As DbContextOptions(Of ApplicationDbContext))
MyBase.New(options)
End Sub
Public Property Employees() As DbSet(Of Employee)
End ClassAdd Employee Controller
Add the EmployeeController for creating the endpoint.
[Route("api/[controller]")]
[ApiController]
public class EmployeeController : ControllerBase
{
    private readonly ApplicationDbContext _context;

    public EmployeeController(ApplicationDbContext context)
    {
        _context = context;
    }

    [HttpGet]
    public IActionResult GetEmployees()
    {
        try
        {
            var employeeData = _context.Employees.ToList();
            var jsonData = new { data = employeeData };
            return Ok(jsonData);
        }
        catch (Exception ex)
        {
            // Log exception here
            throw;
        }
    }
}
[Route("api/[controller]")]
[ApiController]
public class EmployeeController : ControllerBase
{
private readonly ApplicationDbContext _context;
public EmployeeController(ApplicationDbContext context)
{
_context = context;
}
[HttpGet]
public IActionResult GetEmployees()
{
try
{
var employeeData = _context.Employees.ToList();
var jsonData = new { data = employeeData };
return Ok(jsonData);
}
catch (Exception ex)
{
// Log exception here
throw;
}
}
}<Route("api/[controller]")>
<ApiController>
Public Class EmployeeController
Inherits ControllerBase
Private ReadOnly _context As ApplicationDbContext
Public Sub New(ByVal context As ApplicationDbContext)
_context = context
End Sub
<HttpGet>
Public Function GetEmployees() As IActionResult
Try
Dim employeeData = _context.Employees.ToList()
Dim jsonData = New With {Key .data = employeeData}
Return Ok(jsonData)
Catch ex As Exception
' Log exception here
Throw
End Try
End Function
End ClassHere, we are using the HttpGet method, as we will be retrieving the complete data from the server on the client side, and implementing pagination, searching, and sorting on the client side. We are returning a JSON array that will be rendered on the client side.
Add Connection String
Add the following connection string in the appsettings.json file.
"ConnectionStrings": {
  "EmployeeDB": "Server=localserver\\SQLEXPRESS;Database=EmployeeDB;Trusted_Connection=True;MultipleActiveResultSets=true;TrustServerCertificate=True;"
}
Add the following line in the Program.cs class under the webApplication.CreateBuilder() line to connect with SQL Server.
builder.Services.AddDbContext<ApplicationDbContext>(options =>
{
    options.UseSqlServer(builder.Configuration.GetConnectionString("EmployeeDB"));
});
builder.Services.AddDbContext<ApplicationDbContext>(options =>
{
options.UseSqlServer(builder.Configuration.GetConnectionString("EmployeeDB"));
});builder.Services.AddDbContext(Of ApplicationDbContext)(Sub(options)
options.UseSqlServer(builder.Configuration.GetConnectionString("EmployeeDB"))
End Sub)Run Migration
The next step is to run the migration as we are using the Code First Approach. Run the following command in the Package Manager Console.
Add-Migration initAdd-Migration initThis command will create a migration. Now, run the following command to apply this migration to the database.
update-databaseupdate-databaseNow that our project is set and the database is ready, we just need to add the jQuery library and HTML tables to make our UI ready. We have used SQL Server as the data source in this example, but you may use any other database.
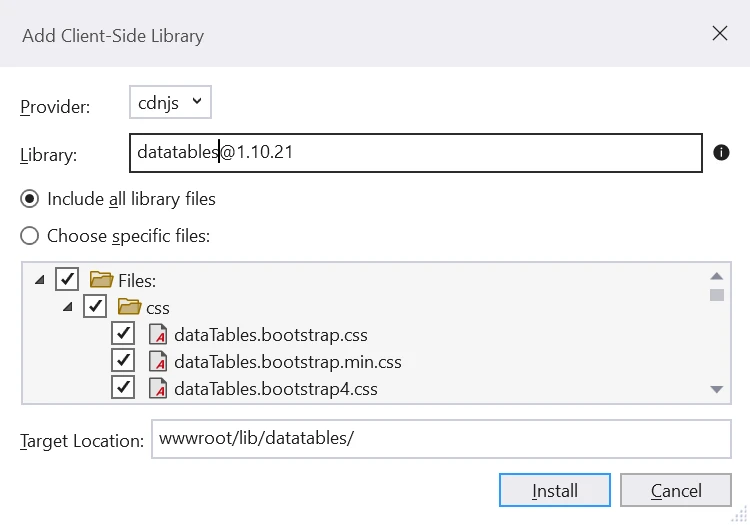
Add jQuery DataTables Library
We need to add the jQuery DataTables library, which is a table-enhancing plugin for the jQuery JavaScript library, in our project. We can add it by right-clicking on the project, selecting "Add", and then selecting "Add Client-Side Library". A small window will appear, where we can search for "jquery datatables" and install it, as shown below:
Add HTML Table
Let's add an HTML table with an empty table body. We will add the required column headings while setting up the jQuery DataTable. Add the following code to the Index.cshtml file.
@page
@model IndexModel
@{
    ViewData["Title"] = "Home page";
}
<link href="~/lib/datatables/css/dataTables.bootstrap4.min.css" rel="stylesheet" />
<div class="container">
    <br />
    <div style="width:90%; margin:0 auto;">
        <table id="employeeDatatable" class="table table-striped table-bordered dt-responsive nowrap" width="100%" cellspacing="0">
        </table>
    </div>
</div>
@section Scripts
{
    <script src="~/lib/datatables/js/jquery.dataTables.min.js"></script>
    <script src="~/lib/datatables/js/dataTables.bootstrap4.min.js"></script>
    <script src="~/js/EmployeeDatatable.js"></script>
}
We need to add the EmployeeDatatable.js file inside the wwwroot/Js folder. In this file, we will have an Ajax call and advanced features of the jQuery DataTable such as filtration, pagination, searching, sorting, etc.
Create EmployeeDatatable.js File
Create an EmployeeDatatable.js file inside the wwwroot/Js folder. Add the following code.
$(document).ready(function () {
    $("#employeeDatatable").DataTable({
        "processing": true,
        "serverSide": false,
        "filter": true,
        "ajax": {
            "url": "/api/Employee",
            "type": "GET",
            "datatype": "json"
        },
        "columnDefs": [{
            "targets": [0],
            "visible": false,
            "searchable": false
        }],
        "columns": [
            { "data": "id", "title": "Employee ID", "name": "Employee ID", "autoWidth": true },
            { "data": "firstName", "title": "First Name", "name": "First Name", "autoWidth": true },
            { "data": "lastName", "title": "Last Name", "name": "Last Name", "autoWidth": true },
            { "data": "email", "title": "Email", "name": "Email", "autoWidth": true },
            { "data": "phoneNumber", "title": "Phone Number", "name": "Phone Number", "autoWidth": true },
            { "data": "gender", "title": "Gender", "name": "Gender", "autoWidth": true },
            { "data": "designation", "title": "Designation", "name": "Designation", "autoWidth": true }
        ]
    });
});
$(document).ready(function () {
$("#employeeDatatable").DataTable({
"processing": true,
"serverSide": false,
"filter": true,
"ajax": {
"url": "/api/Employee",
"type": "GET",
"datatype": "json"
},
"columnDefs": [{
"targets": [0],
"visible": false,
"searchable": false
}],
"columns": [
{ "data": "id", "title": "Employee ID", "name": "Employee ID", "autoWidth": true },
{ "data": "firstName", "title": "First Name", "name": "First Name", "autoWidth": true },
{ "data": "lastName", "title": "Last Name", "name": "Last Name", "autoWidth": true },
{ "data": "email", "title": "Email", "name": "Email", "autoWidth": true },
{ "data": "phoneNumber", "title": "Phone Number", "name": "Phone Number", "autoWidth": true },
{ "data": "gender", "title": "Gender", "name": "Gender", "autoWidth": true },
{ "data": "designation", "title": "Designation", "name": "Designation", "autoWidth": true }
]
});
});We have utilized the feature-rich jQuery DataTables library. This powerful jQuery plugin enables us to implement advanced features on the client side with minimal effort.
Now, build and run this application.
Output
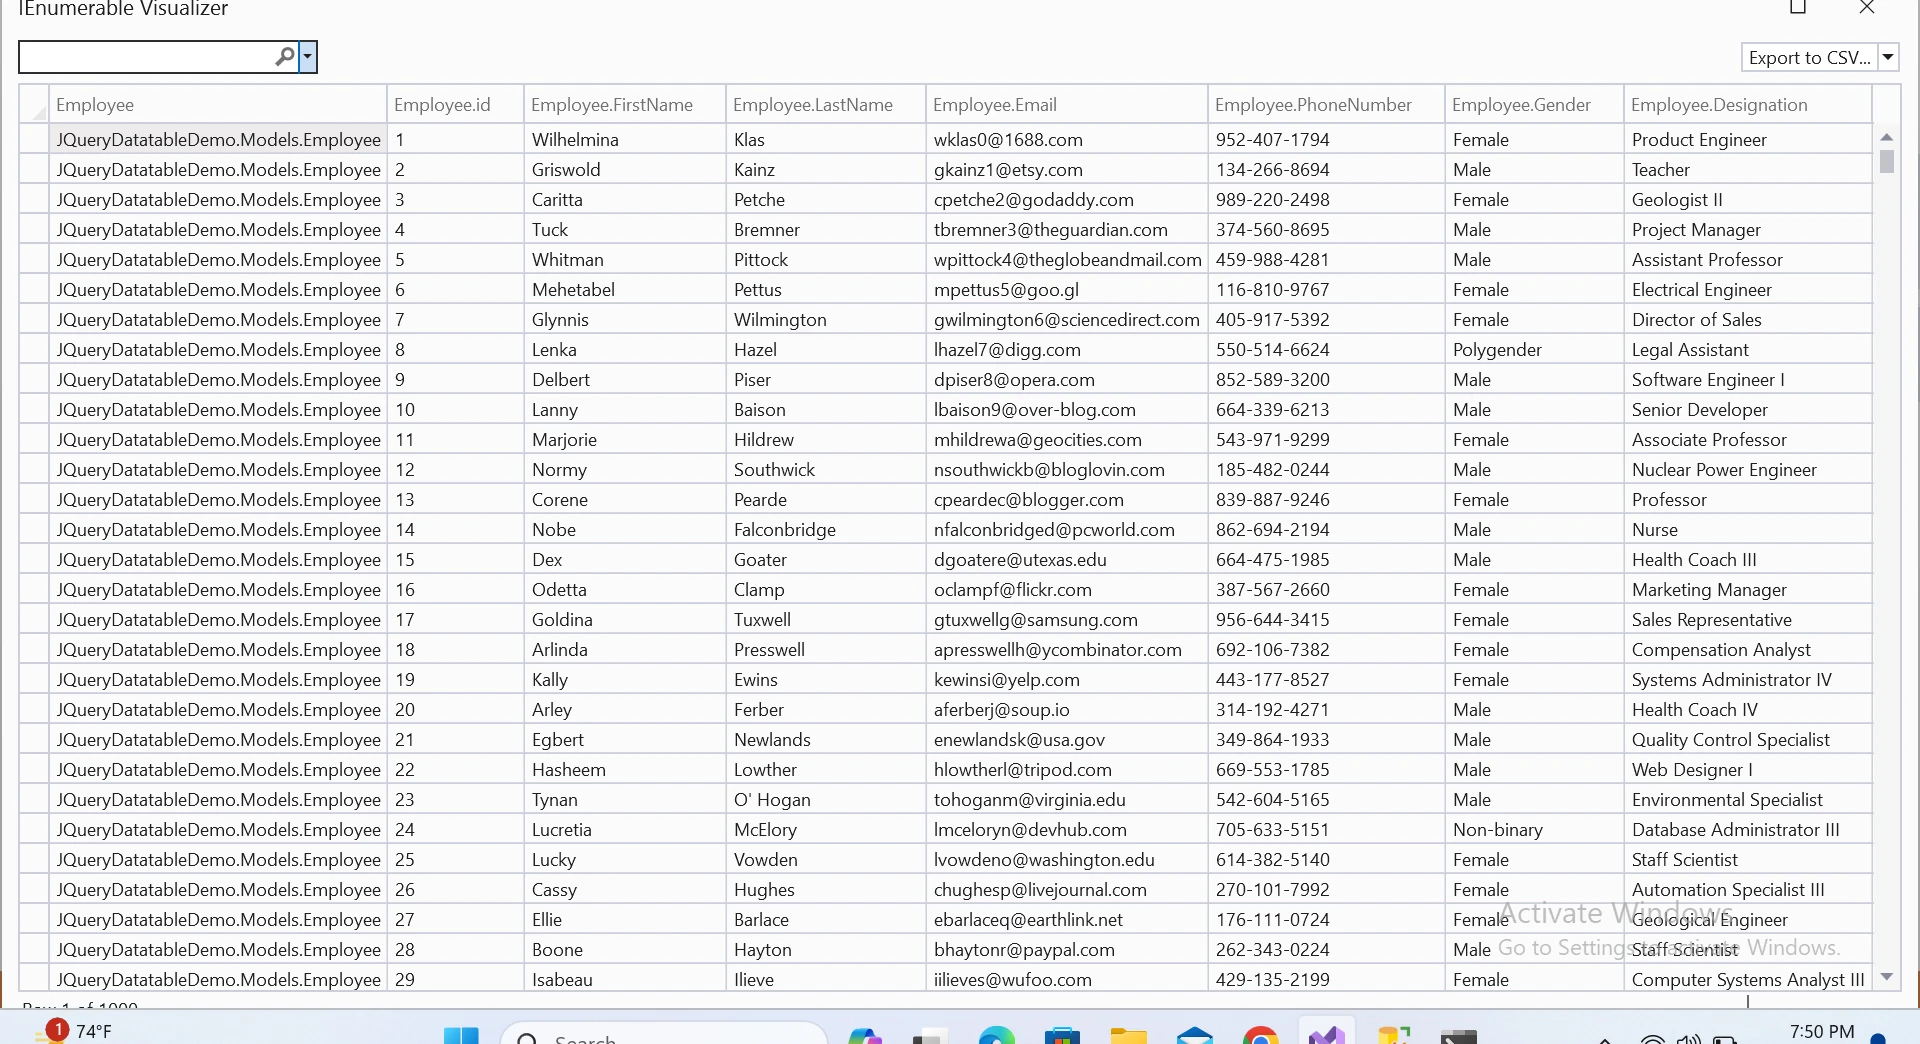
We can see that we have a very interactive UI ready with the help of jQuery in ASP.NET. The data displayed is as follows:
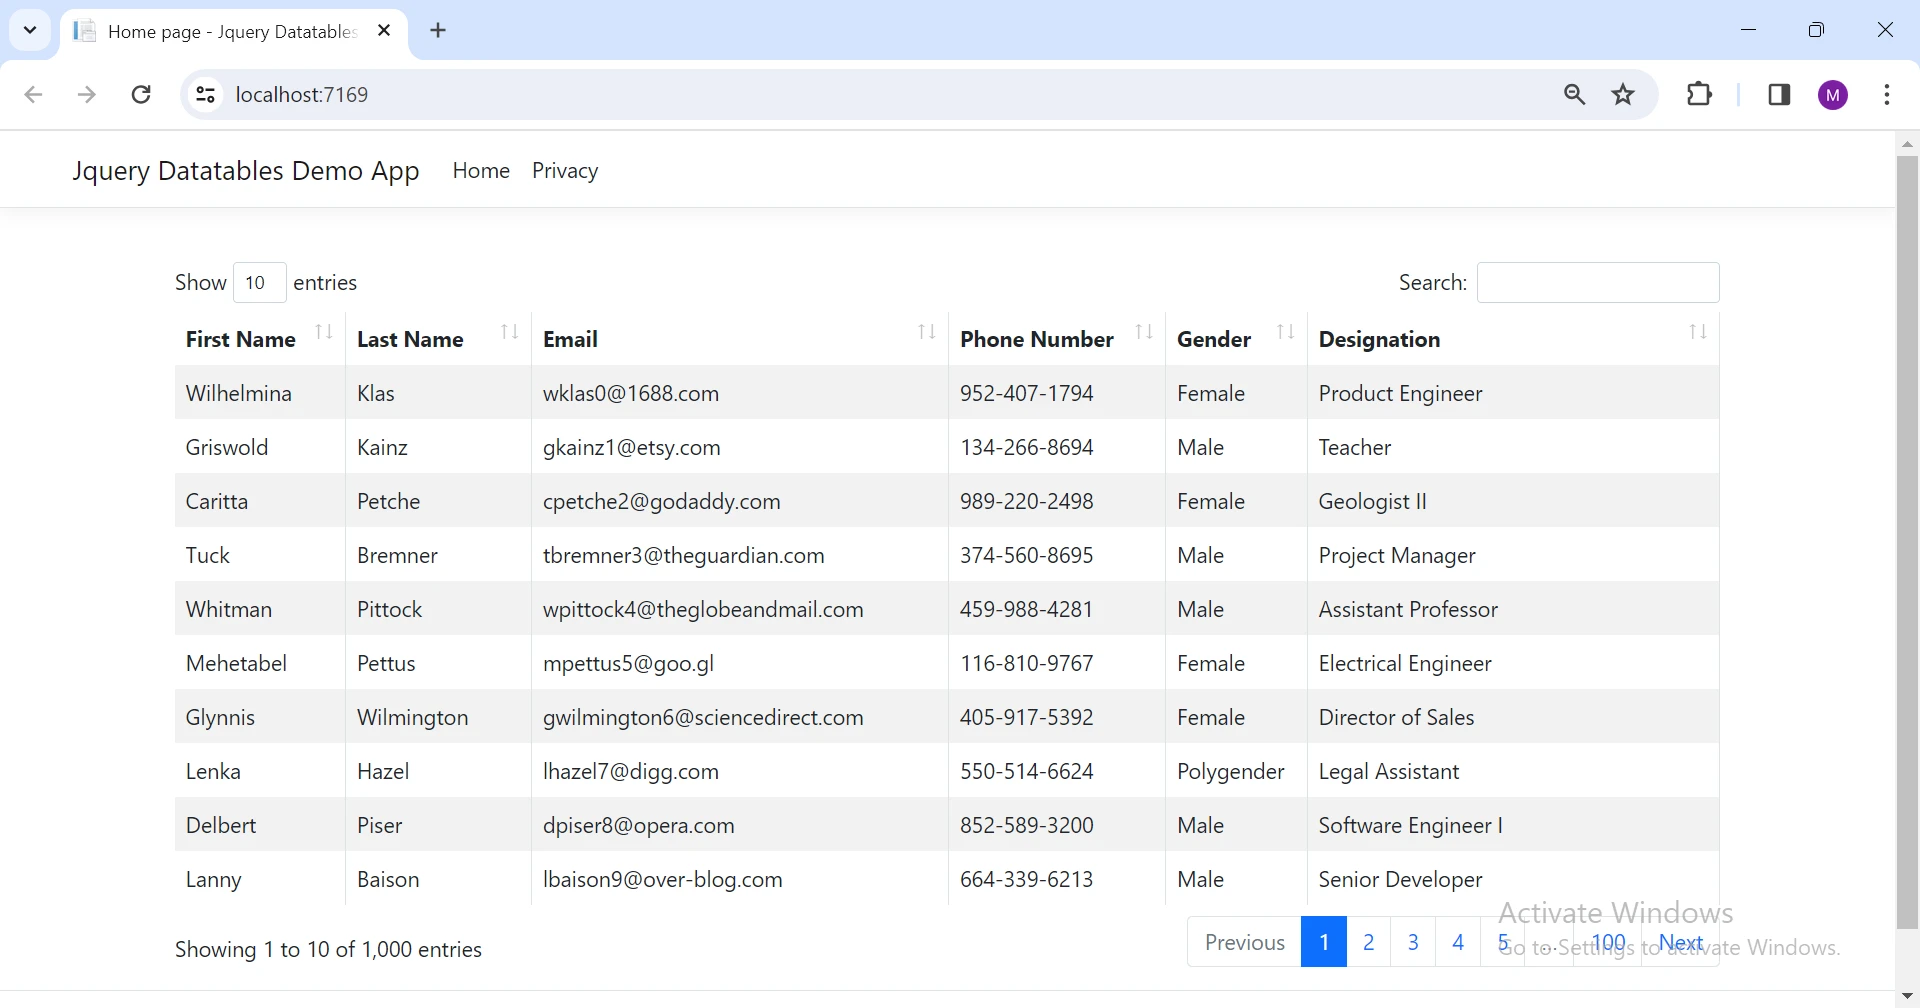
Now, pagination is implemented on the client side, therefore complete data is sent from the server as shown below:
Output UI
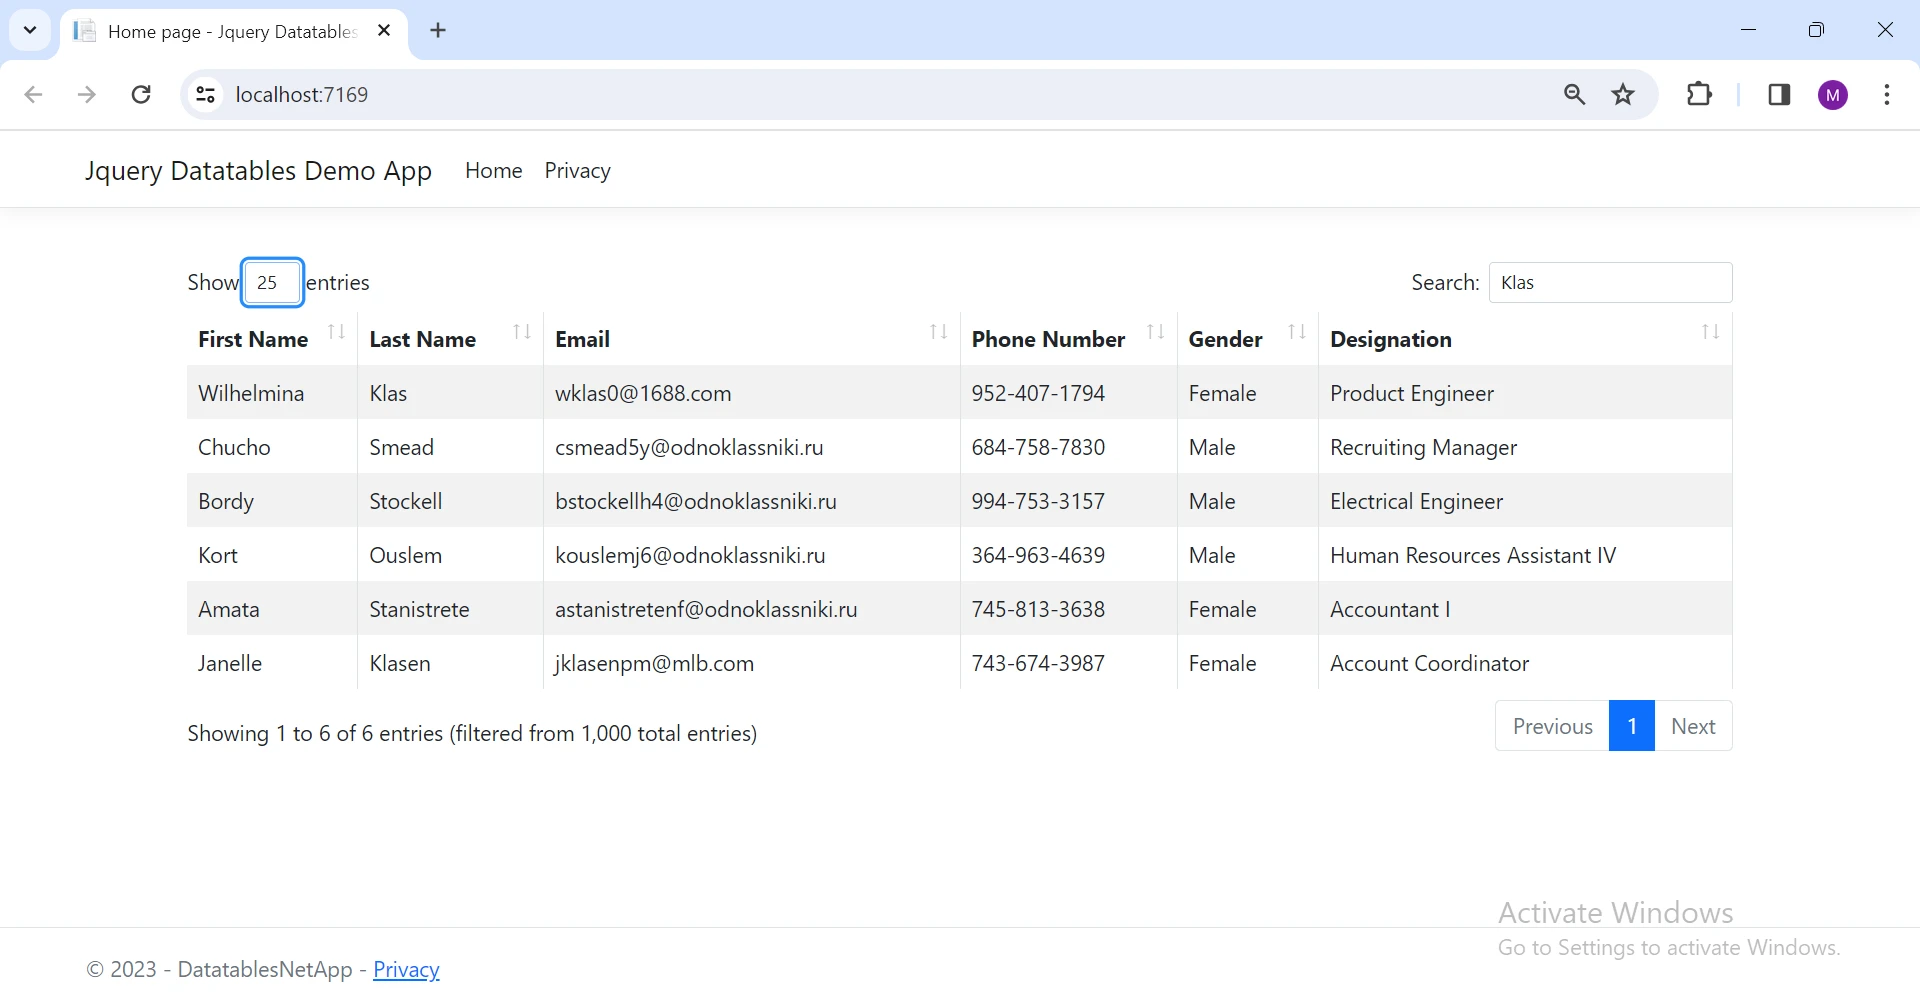
We can search, sort, and change the page, all will be performed on the client side as shown below:
Introduction to IronXL
IronXL for .NET Excel File Manipulation is a library that allows you to work with Excel files in .NET applications. It can create, read, edit, and save Excel documents in various formats such as XLS, XLSX, CSV, and TSV. It does not require Microsoft Office or Excel Interop to be installed. It supports .NET 5, Core, Framework, and Azure.
We often have a requirement to export data into Excel or CSV files. IronXL is the best choice in this case. Now, we will write code to export our data into an Excel file.
Install IronXL
Install the IronXL library in your project by entering the following command in the Package Manager Console.
Install-Package IronPdf
This will install IronXL and the required dependencies in our project. You may also directly download it from IronXL NuGet Package.
Export Data to Excel
Let's write code to convert our Employee List into an Excel file.
public void ExportToExcel(List<Employee> employeeList)
{
    // Create a new workbook instance
    WorkBook wb = WorkBook.Create(ExcelFileFormat.XLSX);
    // Get the default worksheet
    WorkSheet ws = wb.DefaultWorkSheet;

    // Add Header Row
    ws["A1"].Value = "Employee ID";
    ws["B1"].Value = "First Name";
    ws["C1"].Value = "Last Name";
    ws["D1"].Value = "Designation";
    ws["E1"].Value = "Gender";
    ws["F1"].Value = "Phone Number";
    ws["G1"].Value = "Email";

    int rowCount = 2;

    // Add Data Rows
    foreach (Employee employee in employeeList)
    {
        ws["A" + rowCount].Value = employee.Id.ToString();
        ws["B" + rowCount].Value = employee.FirstName;
        ws["C" + rowCount].Value = employee.LastName;
        ws["D" + rowCount].Value = employee.Designation;
        ws["E" + rowCount].Value = employee.Gender;
        ws["F" + rowCount].Value = employee.PhoneNumber;
        ws["G" + rowCount].Value = employee.Email;

        rowCount++;
    }

    // Save the workbook as an Excel file
    wb.SaveAs("Employee.xlsx");
}
public void ExportToExcel(List<Employee> employeeList)
{
// Create a new workbook instance
WorkBook wb = WorkBook.Create(ExcelFileFormat.XLSX);
// Get the default worksheet
WorkSheet ws = wb.DefaultWorkSheet;
// Add Header Row
ws["A1"].Value = "Employee ID";
ws["B1"].Value = "First Name";
ws["C1"].Value = "Last Name";
ws["D1"].Value = "Designation";
ws["E1"].Value = "Gender";
ws["F1"].Value = "Phone Number";
ws["G1"].Value = "Email";
int rowCount = 2;
// Add Data Rows
foreach (Employee employee in employeeList)
{
ws["A" + rowCount].Value = employee.Id.ToString();
ws["B" + rowCount].Value = employee.FirstName;
ws["C" + rowCount].Value = employee.LastName;
ws["D" + rowCount].Value = employee.Designation;
ws["E" + rowCount].Value = employee.Gender;
ws["F" + rowCount].Value = employee.PhoneNumber;
ws["G" + rowCount].Value = employee.Email;
rowCount++;
}
// Save the workbook as an Excel file
wb.SaveAs("Employee.xlsx");
}Public Sub ExportToExcel(ByVal employeeList As List(Of Employee))
' Create a new workbook instance
Dim wb As WorkBook = WorkBook.Create(ExcelFileFormat.XLSX)
' Get the default worksheet
Dim ws As WorkSheet = wb.DefaultWorkSheet
' Add Header Row
ws("A1").Value = "Employee ID"
ws("B1").Value = "First Name"
ws("C1").Value = "Last Name"
ws("D1").Value = "Designation"
ws("E1").Value = "Gender"
ws("F1").Value = "Phone Number"
ws("G1").Value = "Email"
Dim rowCount As Integer = 2
' Add Data Rows
For Each employee As Employee In employeeList
ws("A" & rowCount).Value = employee.Id.ToString()
ws("B" & rowCount).Value = employee.FirstName
ws("C" & rowCount).Value = employee.LastName
ws("D" & rowCount).Value = employee.Designation
ws("E" & rowCount).Value = employee.Gender
ws("F" & rowCount).Value = employee.PhoneNumber
ws("G" & rowCount).Value = employee.Email
rowCount += 1
Next employee
' Save the workbook as an Excel file
wb.SaveAs("Employee.xlsx")
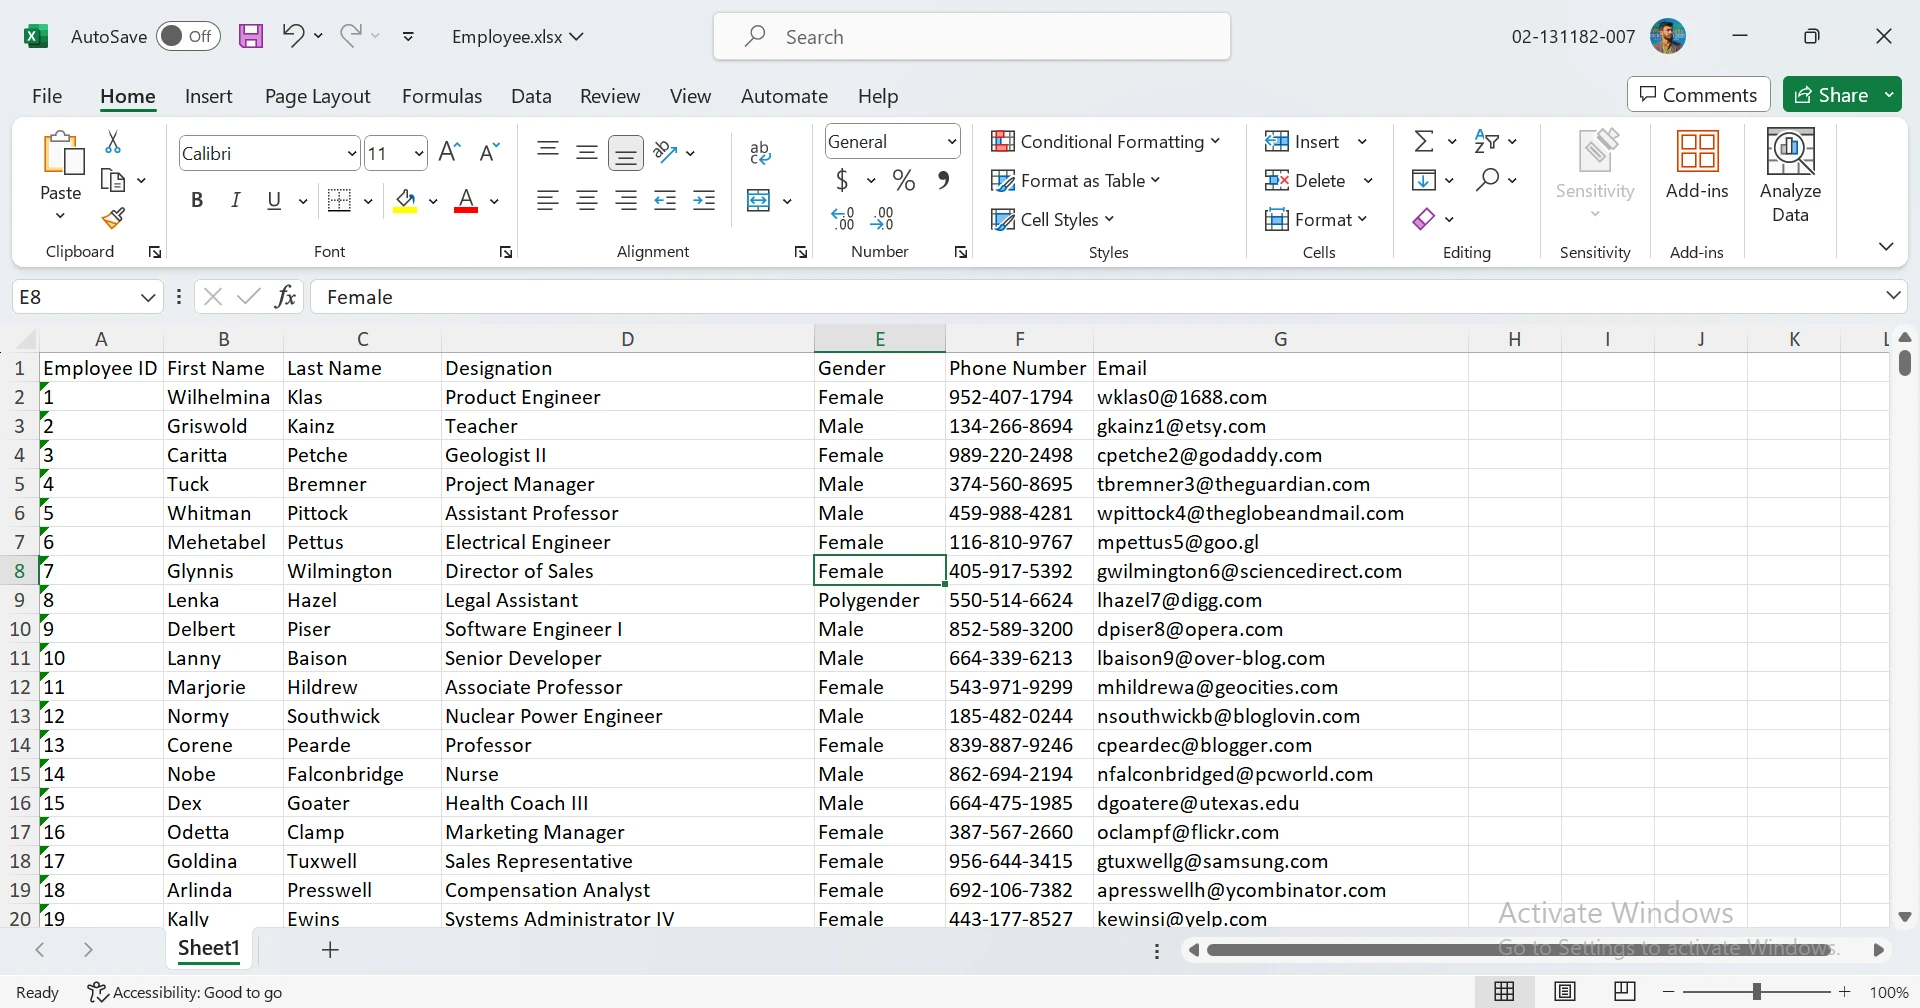
End SubWe have created an Excel file from a list in a simple and easy way.
IronXL provides comprehensive tutorials on creating XLSX files, code examples for reading Excel files, and detailed documentation to help you utilize its comprehensive API in the best way possible.
Conclusion
In conclusion, jQuery DataTables has emerged as a powerful asset for transforming the presentation of tabular data in ASP.NET web applications. Its lightweight yet feature-rich nature facilitates the creation of interactive tables, bringing sorting, searching, and pagination to the forefront. We explored the nuances of client-side processing, leveraging the browser's capabilities for smaller datasets while acknowledging potential challenges with larger data volumes. The step-by-step guide on setting up an ASP.NET Razor Page application and integrating jQuery DataTables provides developers with practical insights. Additionally, the introduction of IronXL as a seamless solution for Excel-related tasks adds a valuable layer to the toolkit, enabling efficient data export. Armed with these tools, developers can elevate the user experience by presenting data in a compelling and accessible manner.
IronXL offers various licensing options, depending on the number of developers, projects, and redistribution needs. The licenses are perpetual and include free support and updates.
Frequently Asked Questions
How can jQuery DataTables enhance data presentation in ASP.NET web applications?
jQuery DataTables enhances data presentation by providing features such as sorting, searching, and pagination, which make it easier for users to interact with large datasets in a responsive and user-friendly manner.
What are the basic steps to integrate jQuery DataTables in an ASP.NET Razor Page application?
To integrate jQuery DataTables in an ASP.NET Razor Page application, you start by setting up the model, DbContext, and controller, configure the database connection, and implement client-side processing to manage data efficiently using the Code-First approach with Entity Framework.
How does server-side processing benefit jQuery DataTables when managing large datasets?
Server-side processing benefits jQuery DataTables by offloading data operations to the server, which enhances performance and efficiency when dealing with large datasets, as opposed to client-side processing that may slow down with large volumes of data.
What role does IronXL play in exporting data to Excel from an ASP.NET application?
IronXL allows developers to export data to Excel by creating a new workbook, populating it with data rows from the dataset, and saving it as an Excel file. It simplifies Excel file manipulation without needing Microsoft Office.
Is it possible to work with Excel files in .NET applications without Microsoft Office?
Yes, IronXL enables .NET applications to work with Excel files independently of Microsoft Office, supporting various formats such as XLS, XLSX, CSV, and TSV.
What are the licensing options for using IronXL in .NET projects?
IronXL offers various licensing options based on the number of developers, projects, and distribution requirements. Licenses are perpetual and include free support and updates.
What are the advantages of using the Code-First approach in ASP.NET with jQuery DataTables?
The Code-First approach in ASP.NET with jQuery DataTables supports easy setup and configuration of the database model and context, allowing for dynamic data management and integration with the front-end DataTables for enhanced interactivity.
How can you troubleshoot common issues with jQuery DataTables in an ASP.NET application?
Common issues with jQuery DataTables can be troubleshot by ensuring correct inclusion of scripts and stylesheets, verifying data source paths, checking console errors for JavaScript issues, and confirming proper server-side processing setup.