NLog C# (How it Works for Developers)
Logging is an essential aspect of software development. It helps developers track the behavior of their applications, troubleshoot issues, and gain insights into how their code is performing in various environments. NLog is a popular logging framework for C# that makes it easy to implement robust and flexible logging in your applications. In this comprehensive guide and tutorial, we will explore the world of NLog in C#.
What is NLog?
NLog is a free, open-source logging library for .NET and .NET Core applications. It provides a flexible and highly configurable way to log messages in your application. NLog is a widely used free logging platform in the .NET ecosystem due to its performance, extensibility, and ease of use.
Getting Started with NLog
We can use NLog in ASP.NET Web Applications, ASP.NET WEB APIs, Windows Form Applications, ASP.NET MVC Applications, or any kind according to our needs. We will use the Console Application to demonstrate all the use cases.
Install NLog NuGet Package
To get started with NLog, you'll need to install the NLog NuGet package in your project. You can do this via the NuGet Package Manager in Visual Studio by following the steps:
- In the "Tools" menu select "NuGet Package Manager," then choose "Manage NuGet Packages for Solution."
- Or, right-click on your project in the Solution Explorer, select "Manage NuGet Packages," and choose "Browse."
- In the NuGet Package Manager window, click on the "Browse" tab, and in the search box, type "NLog."
- You should see the NLog package in the search results. Click on it to select it.
- On the right side of the NuGet Package Manager window, there is a list of projects in your solution. Select the project(s) where you want to install NLog.
- Choose the desired version of the NLog package from the version dropdown. You can select the latest stable version or a specific version if needed.
- After selecting the project(s) and the version, click the "Install" button to start the installation process.
The NuGet Package Manager will download and install NLog and any dependencies. You will see the progress in the output window.
NLog is now successfully installed in your project, and you can start using it for logging within your C# code.
Create NLog Configuration file
To create an NLog configuration file (typically named nlog.config), you can follow these steps. This configuration file will specify how NLog should behave in your application, including log targets, layout renderers, and rules.
In your project, right-click on the project or the desired folder where you want to create the configuration file.
- Choose "Add" > "New Item..."
- In the "Add New Item" dialog, search for "XML File" or "XML" and select it.
-
Name the file nlog.config and click the "Add" button.

- Open the newly created nlog.config file in a text editor or XML editor.
- Add the following configuration in the NLog.XML file. Below is a basic example of an NLog configuration that logs messages to a Console target. You can customize this Config File to suit your needs:
Config file
<?xml version="1.0" encoding="utf-8" ?>
<nlog xmlns="http://www.nlog-project.org/schemas/NLog.xsd"
xmlns:xsi="http://www.w3.org/2001/XMLSchema-instance">
<targets>
<target name="console" xsi:type="Console" layout="${longdate}|${message}"/>
</targets>
<rules>
<logger name="*" minlevel="Debug" writeTo="console" />
</rules>
</nlog><?xml version="1.0" encoding="utf-8" ?>
<nlog xmlns="http://www.nlog-project.org/schemas/NLog.xsd"
xmlns:xsi="http://www.w3.org/2001/XMLSchema-instance">
<targets>
<target name="console" xsi:type="Console" layout="${longdate}|${message}"/>
</targets>
<rules>
<logger name="*" minlevel="Debug" writeTo="console" />
</rules>
</nlog>In your C# code, make sure you load the NLog configuration from the nlog.config file. You typically do this in the application's startup code, such as in an ASP.NET Core Startup.cs (for .NET Version same or older than .NET 5), program.cs file (for .NET 6 or later version), or a console application's Main method:
using NLog;
internal class Program
{
// Create an instance of the Logger
private static Logger logger = LogManager.GetCurrentClassLogger();
static void Main(string[] args)
{
// Log a debug message
logger.Debug("This is a Debug Message");
// Pause the console for viewing output
Console.Read();
}
}using NLog;
internal class Program
{
// Create an instance of the Logger
private static Logger logger = LogManager.GetCurrentClassLogger();
static void Main(string[] args)
{
// Log a debug message
logger.Debug("This is a Debug Message");
// Pause the console for viewing output
Console.Read();
}
}Imports NLog
Friend Class Program
' Create an instance of the Logger
Private Shared logger As Logger = LogManager.GetCurrentClassLogger()
Shared Sub Main(ByVal args() As String)
' Log a debug message
logger.Debug("This is a Debug Message")
' Pause the console for viewing output
Console.Read()
End Sub
End ClassThe output of the above program is as shown:

In this example, we create an instance of the Logger class and use it to log messages at the Debug Level. Let's explore the tracing level supported by NLog.
Logging Levels
NLog supports several logging levels, each with its own significance:
- Trace: The most detailed level, typically used for diagnostic purposes.
- Debug: Used for debugging information that can be helpful during development.
- Info: General information about the application's operation.
- Warn: Indicates a potential issue that does not disrupt the application.
- Error: Indicates a failure that should be investigated but doesn't necessarily crash the application.
- Fatal: Indicates a critical failure that should be addressed immediately.
By categorizing log messages into these levels, you can easily filter and prioritize them based on their severity.
Set minlevel="Trace" in the rules tag in your nLog.Config file as shown below.
<rules>
<logger name="*" minlevel="Trace" writeTo="console" />
</rules><rules>
<logger name="*" minlevel="Trace" writeTo="console" />
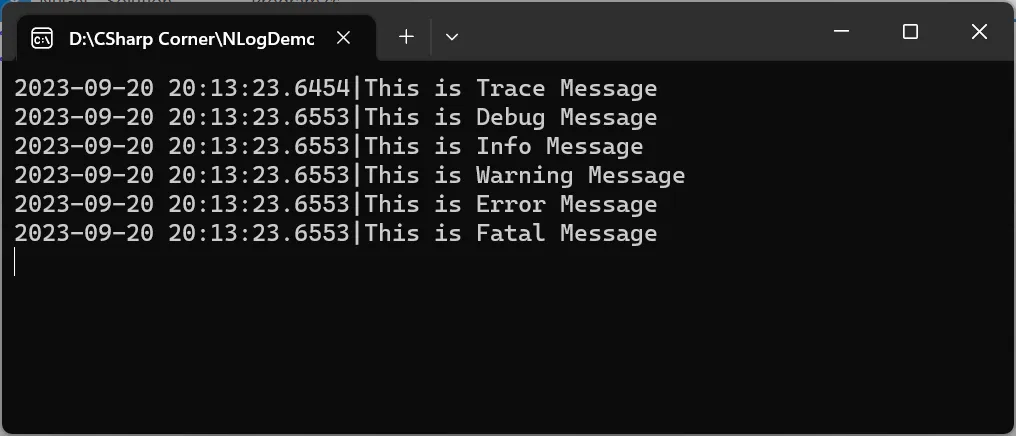
</rules>Let's write code to log messages of all tracing levels.
using NLog;
internal class Program
{
// Create an instance of the Logger
private static Logger logger = LogManager.GetCurrentClassLogger();
static void Main(string[] args)
{
// Log messages of different tracking levels
logger.Trace("This is a Trace Message");
logger.Debug("This is a Debug Message");
logger.Info("This is an Info Message");
logger.Warn("This is a Warning Message");
logger.Error("This is an Error Message");
logger.Fatal("This is a Fatal Message");
// Pause the console for viewing output
Console.Read();
}
}using NLog;
internal class Program
{
// Create an instance of the Logger
private static Logger logger = LogManager.GetCurrentClassLogger();
static void Main(string[] args)
{
// Log messages of different tracking levels
logger.Trace("This is a Trace Message");
logger.Debug("This is a Debug Message");
logger.Info("This is an Info Message");
logger.Warn("This is a Warning Message");
logger.Error("This is an Error Message");
logger.Fatal("This is a Fatal Message");
// Pause the console for viewing output
Console.Read();
}
}Imports NLog
Friend Class Program
' Create an instance of the Logger
Private Shared logger As Logger = LogManager.GetCurrentClassLogger()
Shared Sub Main(ByVal args() As String)
' Log messages of different tracking levels
logger.Trace("This is a Trace Message")
logger.Debug("This is a Debug Message")
logger.Info("This is an Info Message")
logger.Warn("This is a Warning Message")
logger.Error("This is an Error Message")
logger.Fatal("This is a Fatal Message")
' Pause the console for viewing output
Console.Read()
End Sub
End ClassOur Program has logged messages in the Console as shown below.
Now, We have demonstrated the example of logging messages in the Console. Now we will configure an NLog target to log messages in the file.
Log Message in File
We need to set a file target instead of a Console target in our config file for file logging.
<targets>
<target xsi:type="File" name="fileTarget" fileName="D:\Logs\mylog.txt" layout="${longdate} ${level:uppercase=true} ${message}" />
</targets>
<rules>
<logger name="*" minlevel="Trace" writeTo="fileTarget" />
</rules><targets>
<target xsi:type="File" name="fileTarget" fileName="D:\Logs\mylog.txt" layout="${longdate} ${level:uppercase=true} ${message}" />
</targets>
<rules>
<logger name="*" minlevel="Trace" writeTo="fileTarget" />
</rules>Now, run the program to log messages in a file.

Logging targets
NLog supports various log output targets, allowing you to choose where your log messages should be stored. Some common targets include:
- File: Logs messages to one or more files.
- Console: Logs messages to the console.
- Database: Logs messages to a database (SQL Server, MySQL, Oracle, PostgreSQL, etc.) table.
- Email: Sends log messages as emails.
- Event Log: Logs messages to the Windows Event Log.
- Custom Targets: You can create custom log targets to fit your specific needs.
You can configure NLog to use one or more targets simultaneously.
Introducing IronPDF
Explore Further about IronPDF is a powerful .NET library that simplifies PDF handling in C# and VB.NET applications. It provides robust capabilities for creating, editing, and manipulating PDF documents, as well as converting HTML content to PDF format, making it an essential tool for developers across a wide range of industries, including web development, reporting, and document management.
IronPDF’s standout feature is its HTML to PDF Conversion function, which keeps your layouts and styles preserved. It generates PDFs from web content, making it ideal for reports, invoices, and documentation. HTML files, URLs, and HTML strings can be easily converted to PDFs.
using IronPdf;
class Program
{
static void Main(string[] args)
{
var renderer = new ChromePdfRenderer();
// 1. Convert HTML String to PDF
var htmlContent = "<h1>Hello, IronPDF!</h1><p>This is a PDF from an HTML string.</p>";
var pdfFromHtmlString = renderer.RenderHtmlAsPdf(htmlContent);
pdfFromHtmlString.SaveAs("HTMLStringToPDF.pdf");
// 2. Convert HTML File to PDF
var htmlFilePath = "path_to_your_html_file.html"; // Specify the path to your HTML file
var pdfFromHtmlFile = renderer.RenderHtmlFileAsPdf(htmlFilePath);
pdfFromHtmlFile.SaveAs("HTMLFileToPDF.pdf");
// 3. Convert URL to PDF
var url = "http://ironpdf.com"; // Specify the URL
var pdfFromUrl = renderer.RenderUrlAsPdf(url);
pdfFromUrl.SaveAs("URLToPDF.pdf");
}
}using IronPdf;
class Program
{
static void Main(string[] args)
{
var renderer = new ChromePdfRenderer();
// 1. Convert HTML String to PDF
var htmlContent = "<h1>Hello, IronPDF!</h1><p>This is a PDF from an HTML string.</p>";
var pdfFromHtmlString = renderer.RenderHtmlAsPdf(htmlContent);
pdfFromHtmlString.SaveAs("HTMLStringToPDF.pdf");
// 2. Convert HTML File to PDF
var htmlFilePath = "path_to_your_html_file.html"; // Specify the path to your HTML file
var pdfFromHtmlFile = renderer.RenderHtmlFileAsPdf(htmlFilePath);
pdfFromHtmlFile.SaveAs("HTMLFileToPDF.pdf");
// 3. Convert URL to PDF
var url = "http://ironpdf.com"; // Specify the URL
var pdfFromUrl = renderer.RenderUrlAsPdf(url);
pdfFromUrl.SaveAs("URLToPDF.pdf");
}
}Imports IronPdf
Friend Class Program
Shared Sub Main(ByVal args() As String)
Dim renderer = New ChromePdfRenderer()
' 1. Convert HTML String to PDF
Dim htmlContent = "<h1>Hello, IronPDF!</h1><p>This is a PDF from an HTML string.</p>"
Dim pdfFromHtmlString = renderer.RenderHtmlAsPdf(htmlContent)
pdfFromHtmlString.SaveAs("HTMLStringToPDF.pdf")
' 2. Convert HTML File to PDF
Dim htmlFilePath = "path_to_your_html_file.html" ' Specify the path to your HTML file
Dim pdfFromHtmlFile = renderer.RenderHtmlFileAsPdf(htmlFilePath)
pdfFromHtmlFile.SaveAs("HTMLFileToPDF.pdf")
' 3. Convert URL to PDF
Dim url = "http://ironpdf.com" ' Specify the URL
Dim pdfFromUrl = renderer.RenderUrlAsPdf(url)
pdfFromUrl.SaveAs("URLToPDF.pdf")
End Sub
End ClassLet's generate a PDF with logging.
PDF Generation with Logging
The first step is to install the IronPDF library into our project. We can do this using the NuGet Package Manager in Visual Studio or via the NuGet CLI. Open your project and write the following command in the Package Manager Console.
Install-Package IronPdf
This command will install IronPDF with all required dependencies in our project.
Write the following code to generate a PDF File from HTML with logging.
using NLog;
using IronPdf;
internal class Program
{
// Create an instance of the Logger
private static Logger logger = LogManager.GetCurrentClassLogger();

static void Main(string[] args)
{
    logger.Info("Initializing Chrome PDF Renderer");
    ChromePdfRenderer renderer = new ChromePdfRenderer();
    logger.Info("Creating PDF From HTML String");
    var pdf = renderer.RenderHtmlAsPdf("<h1>This is my Sample PDF<h1>");
    logger.Info("Saving PDF File");
    pdf.SaveAs(@"D:\myPDF.pdf");
}
}using NLog;
using IronPdf;
internal class Program
{
// Create an instance of the Logger
private static Logger logger = LogManager.GetCurrentClassLogger();
static void Main(string[] args)
{
logger.Info("Initializing Chrome PDF Renderer");
ChromePdfRenderer renderer = new ChromePdfRenderer();
logger.Info("Creating PDF From HTML String");
var pdf = renderer.RenderHtmlAsPdf("<h1>This is my Sample PDF<h1>");
logger.Info("Saving PDF File");
pdf.SaveAs(@"D:\myPDF.pdf");
}
}Imports NLog
Imports IronPdf
Friend Class Program
' Create an instance of the Logger
Private Shared logger As Logger = LogManager.GetCurrentClassLogger()
Shared Sub Main(ByVal args() As String)
logger.Info("Initializing Chrome PDF Renderer")
Dim renderer As New ChromePdfRenderer()
logger.Info("Creating PDF From HTML String")
Dim pdf = renderer.RenderHtmlAsPdf("<h1>This is my Sample PDF<h1>")
logger.Info("Saving PDF File")
pdf.SaveAs("D:\myPDF.pdf")
End Sub
End ClassThe above code snippet will create a PDF file with a logged message in the file as shown below.
Log and PDF File

Conclusion
In conclusion, NLog has emerged as an essential tool for effective logging in C# applications, offering developers a robust framework for capturing, categorizing, and managing log data. Its flexibility and ease of use make it a go-to choice for logging needs across various domains. Furthermore, when combined with complementary libraries like IronPDF, which simplifies PDF generation and manipulation in .NET applications, developers can extend their management capabilities to encompass the creation of PDF-based logs and reports. It's worth mentioning that IronPDF offers a free trial of IronPDF for testing its features. If it meets your requirements, you can opt for a commercial license for IronPDF, providing continued access to IronPDF's capabilities with added benefits and support for seamless integration into your projects, especially for PDF-related functionalities.
By employing the power of NLog and IronPDF together, developers can not only gain insights into their application's behavior but also enhance their reporting and document management processes, ensuring that their software remains efficient, maintainable, and well-documented structured logging.
Frequently Asked Questions
How does NLog enhance logging in C# applications?
NLog provides a robust and flexible logging framework for C# applications. It allows developers to easily implement logging by defining log targets and rules in a configuration file, supporting various logging levels such as Trace, Debug, Info, Warn, Error, and Fatal.
What is the process for setting up NLog in a .NET application?
To set up NLog in a .NET application, you need to install the NLog NuGet package and configure the logging targets and rules in the nlog.config file. This setup allows you to specify where the logs should be directed, such as files, consoles, databases, or emails.
How can I log messages to a database using NLog?
To log messages to a database using NLog, you need to set up a database target in the nlog.config file. You will specify the connection string and the necessary table or stored procedure details for log entries.
Can NLog be used to send log messages via email?
Yes, NLog can send log messages via email by configuring an email target in the nlog.config file. You will need to provide the SMTP server details, recipient email addresses, and other email settings.
What are the benefits of using IronPDF for PDF generation in .NET?
IronPDF is a powerful .NET library that simplifies PDF generation, editing, and conversion. It supports HTML to PDF conversion, allowing developers to generate PDFs from HTML strings, files, or URLs, enhancing reporting and document management processes.
How can I integrate logging with PDF generation in a C# application?
You can integrate NLog with IronPDF in a C# application by using NLog to log application events and IronPDF to generate PDFs. This combination allows you to create detailed PDF reports that include log information.
What are some common troubleshooting steps for NLog configuration issues?
Common troubleshooting steps for NLog configuration issues include verifying the nlog.config file for syntax errors, ensuring the correct file paths and permissions for log targets, and checking for exceptions in the application that might affect logging.
How can I test IronPDF's capabilities before purchasing?
IronPDF offers a free trial that allows developers to test its features. This trial period provides an opportunity to evaluate IronPDF's capabilities for PDF generation, editing, and conversion before opting for a commercial license.