Create PDF in C#: (Beginner Guide) Using VS Code in 2026
Creating PDFs in C# is an essential skill for modern .NET developers, whether you're building financial reports, generating healthcare documents, or producing e-commerce receipts. With the right .NET PDF library, you can transform HTML content into professional PDF documents with just a few lines of code, giving you complete control over document structure and appearance.
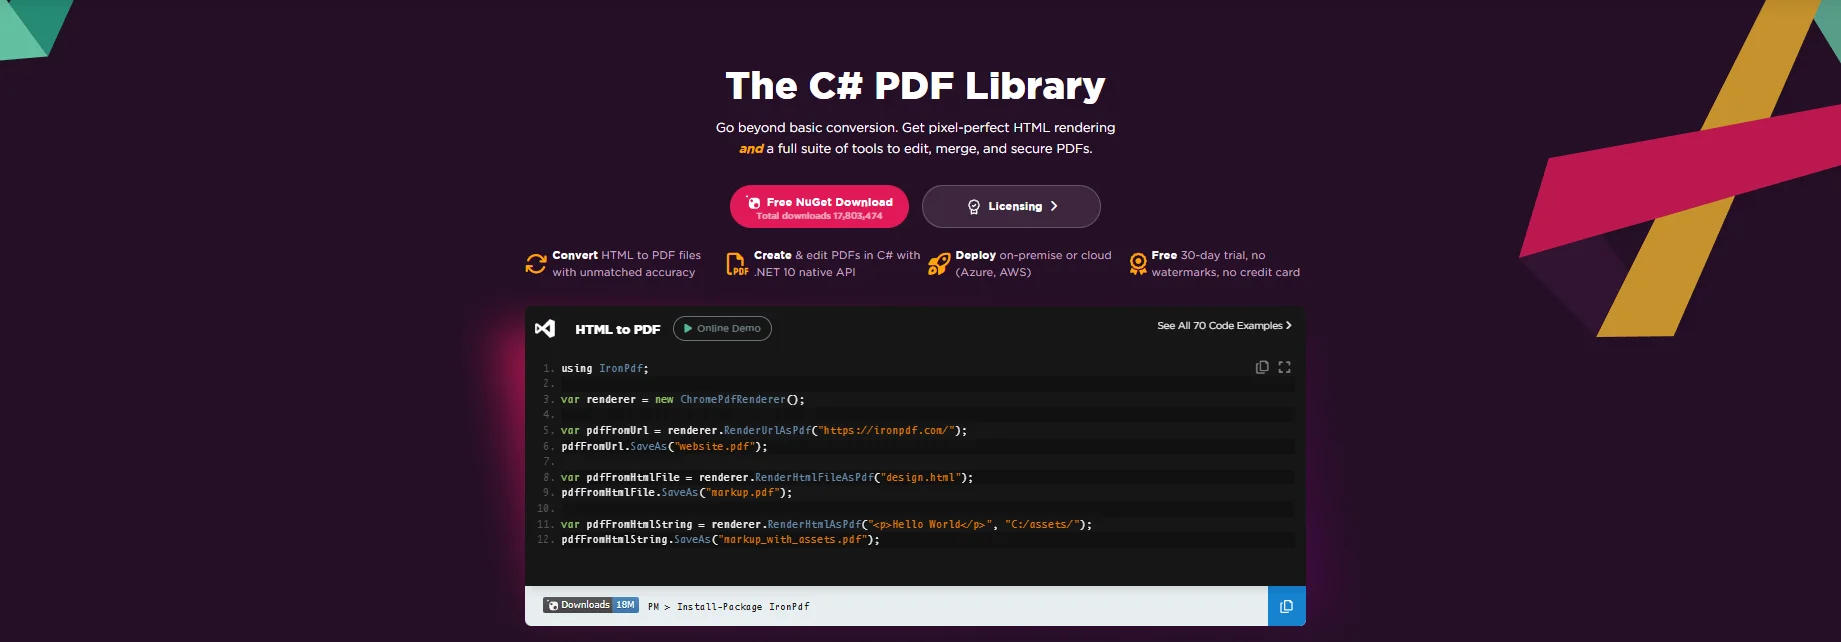
IronPDF is the simplest, most usable .NET PDF creation library by a long way - with an incredibly easy learning curve that gets you generating PDFs in minutes, not hours. This comprehensive guide will show you exactly how to create PDF documents in C# using IronPDF - a powerful C# PDF generator that produces pixel-perfect results and supports every modern .NET platform, including the upcoming .NET 10 release in November 2025. While this tutorial covers everything from the simplest use cases to the most advanced PDF generation scenarios, don't get intimidated - start from the beginning and work forwards. You'll learn multiple ways to generate PDFs, from simple HTML strings to complex multi-page reports, plus how to troubleshoot common issues and optimize performance for various PDF generation tasks.
What You'll Learn
- Quick Start: Create Your First PDF in Under 2 Minutes
- Why Would Developers Need to Create PDFs in C#?
- Setting Up IronPDF in Your C# Project
- Different Ways to Generate PDFs in C#?
- How to Make PDFs Look Professional?
Quick Start: Create Your First PDF in C# (Under 2 Minutes)
Want to generate a PDF right now? Let's create a simple but functional PDF document that demonstrates the power of modern PDF generation in .NET. First, install IronPDF via NuGet Package Manager - this single package contains everything you need to start creating PDFs immediately. IronPDF is free for development, so you can experiment with all features before deciding on a license.
Install-Package IronPdf
Now let's create PDF content using C#:
using IronPdf;

// Instantiate the PDF generator - this is your gateway to PDF creation
var renderer = new ChromePdfRenderer();

// Create a PDF from HTML string - yes, it's really this simple!
var pdf = renderer.RenderHtmlAsPdf("<h1>Hello World</h1><p>PDF generated successfully!</p>");

// Save your newly created PDF document
pdf.SaveAs("my-first-pdf.pdf");

Console.WriteLine("PDF generated successfully!");
using IronPdf;
// Instantiate the PDF generator - this is your gateway to PDF creation
var renderer = new ChromePdfRenderer();
// Create a PDF from HTML string - yes, it's really this simple!
var pdf = renderer.RenderHtmlAsPdf("<h1>Hello World</h1><p>PDF generated successfully!</p>");
// Save your newly created PDF document
pdf.SaveAs("my-first-pdf.pdf");
Console.WriteLine("PDF generated successfully!");Imports IronPdf
' Instantiate the PDF generator - this is your gateway to PDF creation
Private renderer = New ChromePdfRenderer()
' Create a PDF from HTML string - yes, it's really this simple!
Private pdf = renderer.RenderHtmlAsPdf("<h1>Hello World</h1><p>PDF generated successfully!</p>")
' Save your newly created PDF document
pdf.SaveAs("my-first-pdf.pdf")
Console.WriteLine("PDF generated successfully!")That's it! You just created your first PDF document in C#. No need to learn complex PDF APIs, no server dependencies to install, no low-level PDF commands to master. Just HTML in, PDF out - the way PDF generation should be. But this is just the beginning - let's explore why this approach is so powerful and how you can create more sophisticated PDF documents.
How to Create a PDF in C#: A Quick Overview
To create a PDF in C#, you can utilize third-party libraries like IronPDF, QuestPDF, or PDFSharp. These libraries offer various functionalities, including creating PDFs from scratch, converting HTML to PDF, and more.
Here's a general outline of the process:
- Install a PDF library: Use NuGet Package Manager in Visual Studio to install a suitable library.
- Create a new PDF document: Instantiate a PDF document object.
- Add content: Add pages, text, images, and other elements to the document.
- Save the document: Specify a file path and save the PDF.
Here's an example using IronPDF:
using IronPdf;

public class Example
{
    public static void CreatePdf()
    {
        // Create a new PDF document
        var pdf = new ChromePdfRenderer();

        // Add some text
        string htmlContent = "<h1>Hello, PDF!</h1><p>This is a dynamically created PDF.</p>";

        // Render HTML to PDF
        var pdfDocument = pdf.RenderHtmlAsPdf(htmlContent);

        // Save the PDF
        pdfDocument.SaveAs("MyDynamicPdf.pdf");
    }
}
using IronPdf;
public class Example
{
public static void CreatePdf()
{
// Create a new PDF document
var pdf = new ChromePdfRenderer();
// Add some text
string htmlContent = "<h1>Hello, PDF!</h1><p>This is a dynamically created PDF.</p>";
// Render HTML to PDF
var pdfDocument = pdf.RenderHtmlAsPdf(htmlContent);
// Save the PDF
pdfDocument.SaveAs("MyDynamicPdf.pdf");
}
}Imports IronPdf
Public Class Example
Public Shared Sub CreatePdf()
' Create a new PDF document
Dim pdf = New ChromePdfRenderer()
' Add some text
Dim htmlContent As String = "<h1>Hello, PDF!</h1><p>This is a dynamically created PDF.</p>"
' Render HTML to PDF
Dim pdfDocument = pdf.RenderHtmlAsPdf(htmlContent)
' Save the PDF
pdfDocument.SaveAs("MyDynamicPdf.pdf")
End Sub
End ClassNow, let's dive deeper into why developers need to create PDFs and explore the many ways IronPDF makes this process simple and powerful.
Why Would Developers Need to Create PDFs in C#?
Creating PDFs programmatically in C# opens up a world of possibilities for automating document generation and streamlining business processes. IronPDF has been trusted by over 14 million installed developers globally to achieve these tasks because it provides unmatched reliability and ease of use for building PDFs in .NET. In finance, developers use C# to create PDF invoices, statements, and regulatory reports that require precise formatting and security features. Healthcare organizations generate patient records, lab results, and insurance forms as PDFs to ensure document integrity and HIPAA compliance. E-commerce platforms produce PDF receipts, shipping labels, and tickets with QR codes (using tools like IronQR) embedded directly in the PDF. The ability to manipulate PDF documents programmatically means you can create, modify, and secure documents at scale without manual intervention.
The beauty of using a modern .NET PDF library like IronPDF is that it seamlessly integrates into your organization's existing workflows. Whether you're converting Word documents from your business users, transforming Markdown documentation from your development team, or generating PDFs from web-based reports, IronPDF handles it all. This organizational flexibility is why companies choose programmatic PDF generation in .NET - it eliminates manual document creation, reduces errors, ensures consistency across all generated PDFs, and saves countless hours of employee time. Instead of learning proprietary PDF syntax or positioning every element manually, you can use HTML and CSS to design your documents. This approach dramatically reduces development time and makes it easy to maintain consistent branding across all your produced PDFs. Whether you're creating a single-page invoice or a complex multi-chapter report, the principles remain the same - design with HTML, generate PDFs with C#.
Setting Up IronPDF in Your C# Project
Before diving into creating PDFs, let's ensure your development environment is properly configured for optimal PDF generation. IronPDF supports all modern .NET versions, including .NET 8, .NET 9, and is already compliant with the upcoming .NET 10 release scheduled for November 2025 (Iron Software works closely with the .NET Foundation and Microsoft to ensure day-one compatibility). The setup process is straightforward, but understanding your options helps you choose the best approach for your specific needs.
Installation Methods
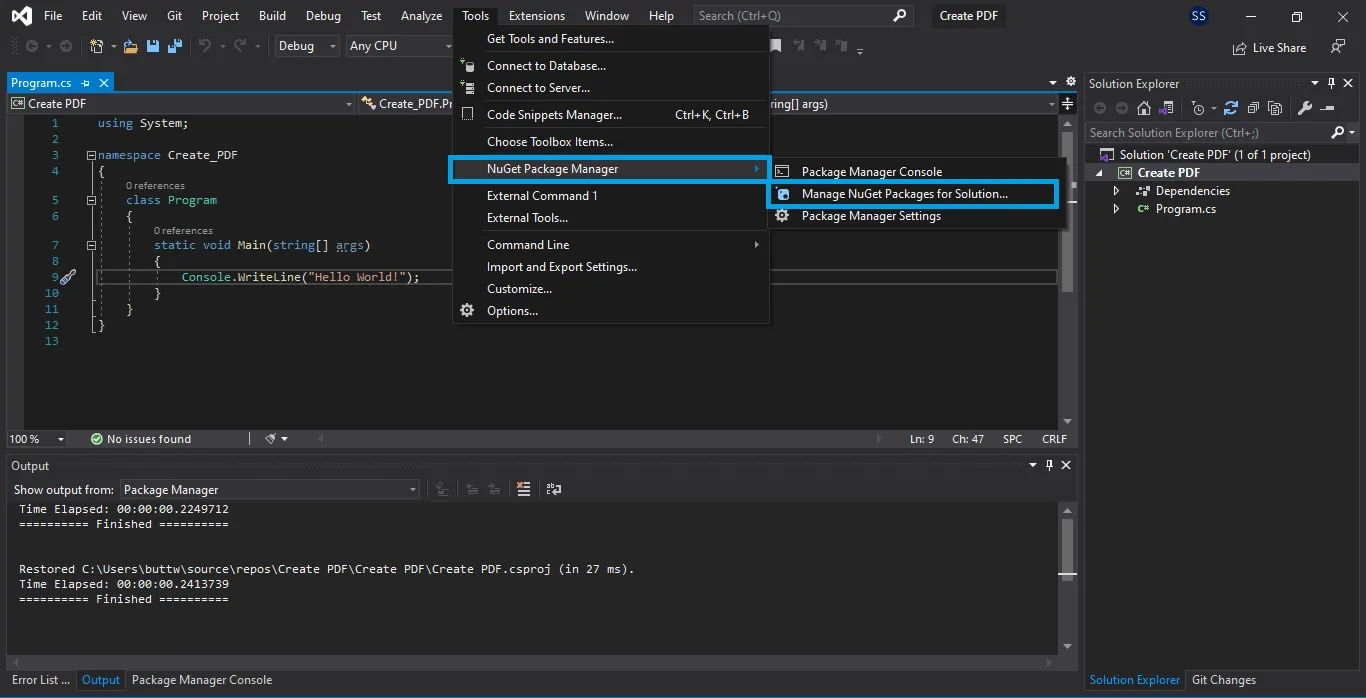
Method 1: Visual Studio Package Manager (Recommended for Beginners)
The easiest way to get started with IronPDF is through Visual Studio's built-in NuGet Package Manager. This graphical interface makes it simple to browse, install, and manage your PDF generation dependencies:
- Right-click your project in Solution Explorer
- Select "Manage NuGet Packages"
- Click "Browse" and search for "IronPDF"
- Select the IronPDF package by Iron Software
- Click Install and accept the license agreement
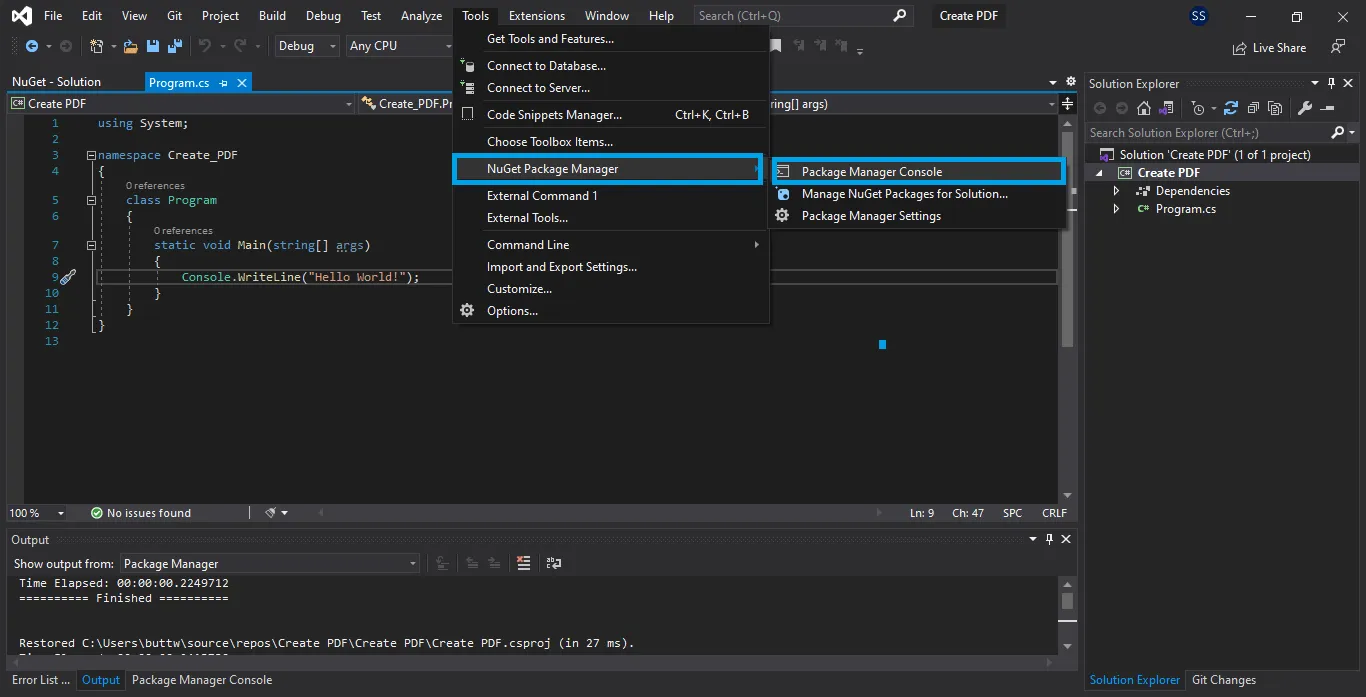
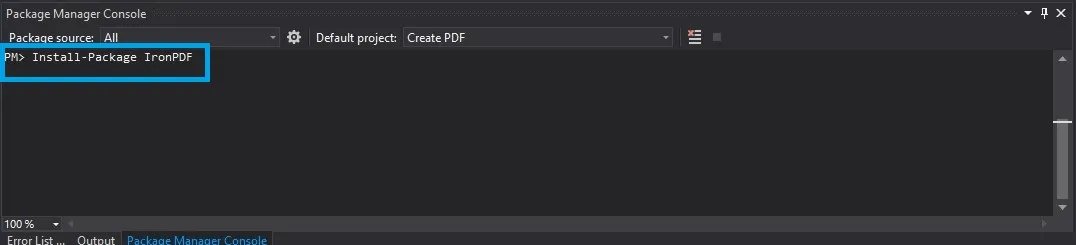
Method 2: Package Manager Console
For developers who prefer command-line tools, the Package Manager Console provides a quick way to install IronPDF:
Install-Package IronPdf
Method 3: .NET CLI (For Cross-Platform Development)
If you're working on macOS, Linux, or prefer the .NET CLI, use this command in your project directory:
dotnet add package IronPdf
Choosing the Right Package
IronPDF offers different NuGet packages optimized for various deployment scenarios. Understanding these options helps you minimize deployment size and optimize performance:
IronPdf: The standard package that includes everything you need for Windows, macOS, and Linux. Perfect for most applications.IronPdf.Slim: A lightweight base package that downloads platform-specific components at runtime. Ideal for cloud deployments where package size matters.IronPdf.Linux: Optimized specifically for Linux deployments with all required dependencies pre-packaged.IronPdf.MacOs: Tailored for macOS environments with native Apple Silicon support.
Verifying Your Installation
After installation, verify everything is working correctly with this simple test that creates a new document:
using IronPdf;
using System.IO;

// Test your IronPDF installation
var renderer = new ChromePdfRenderer();
var testPdf = renderer.RenderHtmlAsPdf("<p>Installation test successful!</p>");
testPdf.SaveAs("test.pdf");

if (File.Exists("test.pdf"))
{
    Console.WriteLine("IronPDF installed and working correctly!");
}
using IronPdf;
using System.IO;
// Test your IronPDF installation
var renderer = new ChromePdfRenderer();
var testPdf = renderer.RenderHtmlAsPdf("<p>Installation test successful!</p>");
testPdf.SaveAs("test.pdf");
if (File.Exists("test.pdf"))
{
Console.WriteLine("IronPDF installed and working correctly!");
}Imports IronPdf
Imports System.IO
' Test your IronPDF installation
Private renderer = New ChromePdfRenderer()
Private testPdf = renderer.RenderHtmlAsPdf("<p>Installation test successful!</p>")
testPdf.SaveAs("test.pdf")
If File.Exists("test.pdf") Then
Console.WriteLine("IronPDF installed and working correctly!")
End IfWhat Are the Different Ways to Generate PDFs in C#?
IronPDF provides multiple approaches to build PDF documents, each suited to different scenarios and requirements. Understanding these methods helps you choose the most efficient approach for your specific use case when you need to produce PDFs in .NET. Whether you're creating PDFs from scratch with HTML strings, converting existing files, or capturing live web content, IronPDF has you covered as a comprehensive C# PDF generator. Let's explore each method in detail with practical examples that demonstrate real-world applications for PDF creation in C#.
1. Create PDF from HTML String (Most Flexible)
Creating PDFs from HTML strings gives you complete control over the content and styling of your final document when you need to convert HTML content to PDF format. This method is perfect for generating dynamic reports, invoices, or any document where the content changes based on data. You can convert HTML content into professional PDFs using modern HTML5 and CSS3 features, including flexbox and grid layouts. The ability to dynamically convert HTML content makes this the most versatile approach for PDF creation in C#:
using IronPdf;
using System;
using System.Linq;

var renderer = new ChromePdfRenderer();

// Build dynamic content with data
var customerName = "Acme Corporation";
var orderDate = DateTime.Now;
var items = new[] {
    new { Name = "Widget Pro", Price = 99.99m },
    new { Name = "Gadget Plus", Price = 149.99m }
};

// Create HTML with embedded data and modern CSS
var html = $@"
    <html>
    <head>
        <style>
            body {{
                font-family: 'Segoe UI', Arial, sans-serif;
                margin: 40px;
                color: #333;
            }}
            .invoice-header {{
                display: flex;
                justify-content: space-between;
                border-bottom: 2px solid #0066cc;
                padding-bottom: 20px;
            }}
            .items-table {{
                width: 100%;
                margin-top: 30px;
                border-collapse: collapse;
            }}
            .items-table th {{
                background: #f0f0f0;
                padding: 10px;
                text-align: left;
            }}
        </style>
    </head>
    <body>
        <div class='invoice-header'>
            <div>
                <h1>Invoice</h1>
                <p>Customer: {customerName}</p>
            </div>
            <div>
                <p>Date: {orderDate:yyyy-MM-dd}</p>
                <p>Invoice #: INV-{orderDate:yyyyMMdd}-001</p>
            </div>
        </div>

        <table class='items-table'>
            <thead>
                <tr>
                    <th>Item</th>
                    <th>Price</th>
                </tr>
            </thead>
            <tbody>";

foreach (var item in items)
{
    html += $@"
                <tr>
                    <td>{item.Name}</td>
                    <td>${item.Price:F2}</td>
                </tr>";
}

html += @"
            </tbody>
        </table>
    </body>
    </html>";

// Generate the PDF document
var pdf = renderer.RenderHtmlAsPdf(html);
pdf.SaveAs($"invoice-{orderDate:yyyyMMdd}.pdf");
using IronPdf;
using System;
using System.Linq;
var renderer = new ChromePdfRenderer();
// Build dynamic content with data
var customerName = "Acme Corporation";
var orderDate = DateTime.Now;
var items = new[] {
new { Name = "Widget Pro", Price = 99.99m },
new { Name = "Gadget Plus", Price = 149.99m }
};
// Create HTML with embedded data and modern CSS
var html = $@"
<html>
<head>
<style>
body {{
font-family: 'Segoe UI', Arial, sans-serif;
margin: 40px;
color: #333;
}}
.invoice-header {{
display: flex;
justify-content: space-between;
border-bottom: 2px solid #0066cc;
padding-bottom: 20px;
}}
.items-table {{
width: 100%;
margin-top: 30px;
border-collapse: collapse;
}}
.items-table th {{
background: #f0f0f0;
padding: 10px;
text-align: left;
}}
</style>
</head>
<body>
<div class='invoice-header'>
<div>
<h1>Invoice</h1>
<p>Customer: {customerName}</p>
</div>
<div>
<p>Date: {orderDate:yyyy-MM-dd}</p>
<p>Invoice #: INV-{orderDate:yyyyMMdd}-001</p>
</div>
</div>
<table class='items-table'>
<thead>
<tr>
<th>Item</th>
<th>Price</th>
</tr>
</thead>
<tbody>";
foreach (var item in items)
{
html += $@"
<tr>
<td>{item.Name}</td>
<td>${item.Price:F2}</td>
</tr>";
}
html += @"
</tbody>
</table>
</body>
</html>";
// Generate the PDF document
var pdf = renderer.RenderHtmlAsPdf(html);
pdf.SaveAs($"invoice-{orderDate:yyyyMMdd}.pdf");Imports IronPdf
Imports System
Imports System.Linq
Private renderer = New ChromePdfRenderer()
' Build dynamic content with data
Private customerName = "Acme Corporation"
Private orderDate = DateTime.Now
Private items = {
New With {
Key .Name = "Widget Pro",
Key .Price = 99.99D
},
New With {
Key .Name = "Gadget Plus",
Key .Price = 149.99D
}
}
' Create HTML with embedded data and modern CSS
Private html = $"
<html>
<head>
<style>
body {{
font-family: 'Segoe UI', Arial, sans-serif;
margin: 40px;
color: #333;
}}
.invoice-header {{
display: flex;
justify-content: space-between;
border-bottom: 2px solid #0066cc;
padding-bottom: 20px;
}}
.items-table {{
width: 100%;
margin-top: 30px;
border-collapse: collapse;
}}
.items-table th {{
background: #f0f0f0;
padding: 10px;
text-align: left;
}}
</style>
</head>
<body>
<div class='invoice-header'>
<div>
<h1>Invoice</h1>
<p>Customer: {customerName}</p>
</div>
<div>
<p>Date: {orderDate:yyyy-MM-dd}</p>
<p>Invoice #: INV-{orderDate:yyyyMMdd}-001</p>
</div>
</div>
<table class='items-table'>
<thead>
<tr>
<th>Item</th>
<th>Price</th>
</tr>
</thead>
<tbody>"
For Each item In items
html += $"
<tr>
<td>{item.Name}</td>
<td>${item.Price:F2}</td>
</tr>"
Next item
html &= "
</tbody>
</table>
</body>
</html>"
' Generate the PDF document
Dim pdf = renderer.RenderHtmlAsPdf(html)
pdf.SaveAs($"invoice-{orderDate:yyyyMMdd}.pdf")2. Generate PDF from URL (Web Page Capture)
Sometimes you need to convert existing web pages into PDF documents - perfect for archiving, reporting, or creating offline versions of online content. IronPDF's URL to PDF conversion uses a real Chromium engine, ensuring that complex JavaScript-heavy sites render correctly. This method is invaluable for creating snapshots of dashboards, saving online receipts, or documenting web-based reports:
using IronPdf;

var renderer = new ChromePdfRenderer();

// Configure rendering options for optimal capture
renderer.RenderingOptions.PaperSize = PdfPaperSize.A4;
renderer.RenderingOptions.MarginTop = 25;
renderer.RenderingOptions.MarginBottom = 25;

// Wait for JavaScript to fully load (important for SPAs)
renderer.RenderingOptions.RenderDelay = 2000; // 2 seconds

// Enable JavaScript execution
renderer.RenderingOptions.EnableJavaScript = true;

// Capture a web page as PDF
var pdf = renderer.RenderUrlAsPdf("https://example.com/dashboard");
pdf.SaveAs("dashboard-capture.pdf");

// For authenticated pages, you can set cookies
var cookieManager = renderer.RenderingOptions.CustomCookies;
cookieManager["session_id"] = "your-session-token";

// Capture authenticated content
var securePdf = renderer.RenderUrlAsPdf("https://app.example.com/private/report");
securePdf.SaveAs("private-report.pdf");
using IronPdf;
var renderer = new ChromePdfRenderer();
// Configure rendering options for optimal capture
renderer.RenderingOptions.PaperSize = PdfPaperSize.A4;
renderer.RenderingOptions.MarginTop = 25;
renderer.RenderingOptions.MarginBottom = 25;
// Wait for JavaScript to fully load (important for SPAs)
renderer.RenderingOptions.RenderDelay = 2000; // 2 seconds
// Enable JavaScript execution
renderer.RenderingOptions.EnableJavaScript = true;
// Capture a web page as PDF
var pdf = renderer.RenderUrlAsPdf("https://example.com/dashboard");
pdf.SaveAs("dashboard-capture.pdf");
// For authenticated pages, you can set cookies
var cookieManager = renderer.RenderingOptions.CustomCookies;
cookieManager["session_id"] = "your-session-token";
// Capture authenticated content
var securePdf = renderer.RenderUrlAsPdf("https://app.example.com/private/report");
securePdf.SaveAs("private-report.pdf");Imports IronPdf
Private renderer = New ChromePdfRenderer()
' Configure rendering options for optimal capture
renderer.RenderingOptions.PaperSize = PdfPaperSize.A4
renderer.RenderingOptions.MarginTop = 25
renderer.RenderingOptions.MarginBottom = 25
' Wait for JavaScript to fully load (important for SPAs)
renderer.RenderingOptions.RenderDelay = 2000 ' 2 seconds
' Enable JavaScript execution
renderer.RenderingOptions.EnableJavaScript = True
' Capture a web page as PDF
Dim pdf = renderer.RenderUrlAsPdf("https://example.com/dashboard")
pdf.SaveAs("dashboard-capture.pdf")
' For authenticated pages, you can set cookies
Dim cookieManager = renderer.RenderingOptions.CustomCookies
cookieManager("session_id") = "your-session-token"
' Capture authenticated content
Dim securePdf = renderer.RenderUrlAsPdf("https://app.example.com/private/report")
securePdf.SaveAs("private-report.pdf")3. Create PDF from HTML File (Template-Based Generation)
Template-based PDF generation is ideal when you have complex layouts that designers can maintain separately from your application code. By storing HTML templates as files, you enable a clean separation between design and logic. This approach works exceptionally well for generating consistent documents like certificates, contracts, or standardized reports:
using IronPdf;
using System.IO;
using System;

var renderer = new ChromePdfRenderer();

// Basic file conversion
var pdf = renderer.RenderHtmlFileAsPdf("Templates/certificate-template.html");
pdf.SaveAs("certificate.pdf");

// Advanced: Using templates with asset directories
// Perfect when your HTML references images, CSS, or JavaScript files
var basePath = Path.Combine(Directory.GetCurrentDirectory(), "Templates", "Assets");
var pdfWithAssets = renderer.RenderHtmlFileAsPdf(
    "Templates/report-template.html",
    basePath  // IronPDF will resolve relative paths from here
);

// Even better: Template with placeholders
var templateHtml = File.ReadAllText("Templates/contract-template.html");
templateHtml = templateHtml
    .Replace("{{ClientName}}", "Tech Innovations Inc.")
    .Replace("{{ContractDate}}", DateTime.Now.ToString("MMMM dd, yyyy"))
    .Replace("{{ContractValue}}", "$50,000");

var contractPdf = renderer.RenderHtmlAsPdf(templateHtml);
contractPdf.SaveAs("contract-final.pdf");
using IronPdf;
using System.IO;
using System;
var renderer = new ChromePdfRenderer();
// Basic file conversion
var pdf = renderer.RenderHtmlFileAsPdf("Templates/certificate-template.html");
pdf.SaveAs("certificate.pdf");
// Advanced: Using templates with asset directories
// Perfect when your HTML references images, CSS, or JavaScript files
var basePath = Path.Combine(Directory.GetCurrentDirectory(), "Templates", "Assets");
var pdfWithAssets = renderer.RenderHtmlFileAsPdf(
"Templates/report-template.html",
basePath // IronPDF will resolve relative paths from here
);
// Even better: Template with placeholders
var templateHtml = File.ReadAllText("Templates/contract-template.html");
templateHtml = templateHtml
.Replace("{{ClientName}}", "Tech Innovations Inc.")
.Replace("{{ContractDate}}", DateTime.Now.ToString("MMMM dd, yyyy"))
.Replace("{{ContractValue}}", "$50,000");
var contractPdf = renderer.RenderHtmlAsPdf(templateHtml);
contractPdf.SaveAs("contract-final.pdf");Imports IronPdf
Imports System.IO
Imports System
Private renderer = New ChromePdfRenderer()
' Basic file conversion
Private pdf = renderer.RenderHtmlFileAsPdf("Templates/certificate-template.html")
pdf.SaveAs("certificate.pdf")
' Advanced: Using templates with asset directories
' Perfect when your HTML references images, CSS, or JavaScript files
Dim basePath = Path.Combine(Directory.GetCurrentDirectory(), "Templates", "Assets")
Dim pdfWithAssets = renderer.RenderHtmlFileAsPdf("Templates/report-template.html", basePath)
' Even better: Template with placeholders
Dim templateHtml = File.ReadAllText("Templates/contract-template.html")
templateHtml = templateHtml.Replace("{{ClientName}}", "Tech Innovations Inc.").Replace("{{ContractDate}}", DateTime.Now.ToString("MMMM dd, yyyy")).Replace("{{ContractValue}}", "$50,000")
Dim contractPdf = renderer.RenderHtmlAsPdf(templateHtml)
contractPdf.SaveAs("contract-final.pdf")4. Convert Markdown to PDF
Markdown has become the standard for technical documentation, README files, and content management systems. IronPDF makes it easy to convert Markdown content directly to PDF, preserving formatting while creating professional-looking documents. This feature is particularly valuable for organizations that maintain their documentation in Markdown format - developers can write documentation in their preferred format, and the system can automatically generate PDFs for distribution to clients or stakeholders.
using IronPdf;

var renderer = new ChromePdfRenderer();

// Convert Markdown string to PDF
string markdownContent = @"
# Project Documentation

## Overview
This project demonstrates **PDF generation** from _Markdown_ content.

### Features
- Easy conversion
- Preserves formatting
- Supports lists and tables

| Feature | Status |
|---------|--------|
| Markdown Support | |
| Table Rendering | |
| Code Blocks | |

```C#
// Code blocks are preserved
var pdf = RenderMarkdownAsPdf(markdown);
\`\`\`
";

// Render Markdown as PDF
var pdfFromMarkdown = renderer.RenderMarkdownStringAsPdf(markdownContent);
pdfFromMarkdown.SaveAs("documentation.pdf");

// Convert Markdown file to PDF
var pdfFromFile = renderer.RenderMarkdownFileAsPdf("README.md");
pdfFromFile.SaveAs("readme-pdf.pdf");
using IronPdf;
var renderer = new ChromePdfRenderer();
// Convert Markdown string to PDF
string markdownContent = @"
# Project Documentation
## Overview
This project demonstrates **PDF generation** from _Markdown_ content.
### Features
- Easy conversion
- Preserves formatting
- Supports lists and tables
| Feature | Status |
|---------|--------|
| Markdown Support | |
| Table Rendering | |
| Code Blocks | |
```C#
// Code blocks are preserved
var pdf = RenderMarkdownAsPdf(markdown);
\`\`\`
";
// Render Markdown as PDF
var pdfFromMarkdown = renderer.RenderMarkdownStringAsPdf(markdownContent);
pdfFromMarkdown.SaveAs("documentation.pdf");
// Convert Markdown file to PDF
var pdfFromFile = renderer.RenderMarkdownFileAsPdf("README.md");
pdfFromFile.SaveAs("readme-pdf.pdf");Imports IronPdf
Dim renderer As New ChromePdfRenderer()
' Convert Markdown string to PDF
Dim markdownContent As String = "
# Project Documentation
## Overview
This project demonstrates **PDF generation** from _Markdown_ content.
### Features
- Easy conversion
- Preserves formatting
- Supports lists and tables
| Feature | Status |
|---------|--------|
| Markdown Support | |
| Table Rendering | |
| Code Blocks | |
```C#
' Code blocks are preserved
Dim pdf = RenderMarkdownAsPdf(markdown)
```
"
' Render Markdown as PDF
Dim pdfFromMarkdown = renderer.RenderMarkdownStringAsPdf(markdownContent)
pdfFromMarkdown.SaveAs("documentation.pdf")
' Convert Markdown file to PDF
Dim pdfFromFile = renderer.RenderMarkdownFileAsPdf("README.md")
pdfFromFile.SaveAs("readme-pdf.pdf")The Markdown to PDF conversion is particularly useful for organizations that use version control systems like Git. Your entire documentation workflow can be automated - developers update Markdown files, CI/CD pipelines automatically generate PDF documents, and stakeholders receive professionally formatted documentation without any manual intervention. This seamless integration into existing workflows is why many development teams choose IronPDF for their documentation needs.
5. Convert Word Documents (DOCX) to PDF
Many businesses have existing Word documents that need to be converted to PDF for distribution or archiving. IronPDF provides seamless DOCX to PDF conversion that preserves formatting, images, and even complex features like mail merge. This capability is transformative for organizations - business users can continue working in familiar Microsoft Word while the system automatically generates PDFs for external distribution. The DOCX to PDF conversion feature bridges the gap between business users who prefer Word and the need for secure, uneditable PDF documents.
```C# using IronPDF; using System.Collections.Generic;
// Simple DOCX to PDF conversion var docxRenderer = new DocxToPdfRenderer(); var pdfFromDocx = docxRenderer.RenderDocxAsPdf("proposal.docx"); pdfFromDocx.SaveAs("proposal.pdf");
// Advanced: Mail merge functionality for mass document generation var recipients = new List<Dictionary<string, string>> { new() { ["Name"] = "John Smith", ["Company"] = "Tech Corp", ["Date"] = "March 15, 2024" }, new() { ["Name"] = "Jane Doe", ["Company"] = "Innovation Inc", ["Date"] = "March 15, 2024" } };
// Configure mail merge options var options = new DocxPdfRenderOptions { MailMergeDataSource = recipients, MailMergePrintAllInOnePdfDocument = false // Creates separate PDFs };
// Generate personalized PDFs from template foreach (var recipient in recipients) { var personalizedPdf = docxRenderer.RenderDocxAsPdf("letter-template.docx", options); personalizedPdf.SaveAs($"letter-{recipient["Name"].Replace(" ", "-")}.pdf"); }
This DOCX conversion feature is *invaluable for automating document workflows* within organizations. Consider a sales team that creates proposals in Word - with IronPDF, these proposals can be automatically converted to PDF with watermarks, security settings, and digital signatures applied programmatically. The mail merge functionality enables mass **generation of personalized PDF documents** - perfect for creating thousands of customized letters, certificates, or contracts without manual intervention. This integration capability is why IronPDF is trusted by enterprises worldwide to handle their document automation needs.

### 6. Convert Images to PDF

Converting images to PDF is essential for creating photo albums, scanned document compilations, or image-based reports. IronPDF supports all major image formats and provides options for controlling layout and quality:

```C#
using IronPDF;
using IronPdf.Imaging; // `Install-Package IronPdf`
using System.IO;

var renderer = new ChromePdfRenderer();

// Convert single image to PDF
var imagePath = "product-photo.jpg";
var imageHtml = @"
    <html>
    <body style='margin: 0; padding: 0;'>
        <img src='{imagePath}' style='width: 100%; height: auto;' />
    </body>
    </html>";

var imagePdf = renderer.RenderHtmlAsPdf(imageHtml, Path.GetDirectoryName(imagePath));
imagePdf.SaveAs("product-catalog-page.pdf");

// Create multi-page PDF from multiple images
var imageFiles = Directory.GetFiles("ProductImages", "*.jpg");
var catalogHtml = "<html><body style='margin: 0;'>";

foreach (var image in imageFiles)
{
    catalogHtml += @"
        <div style='page-break-after: always;'>
            <img src='{Path.GetFileName(image)}' style='width: 100%; height: auto;' />
            <p style='text-align: center;'>{Path.GetFileNameWithoutExtension(image)}</p>
        </div>";
}

catalogHtml += "</body></html>";

var catalogPdf = renderer.RenderHtmlAsPdf(catalogHtml, "ProductImages");
catalogPdf.SaveAs("product-catalog.pdf");
7. Generate PDF from ASP.NET Pages
For web applications, generating PDFs from your existing views provides a seamless way to create downloadable versions of web content. This integration capability is crucial for organizations that need to create PDFs from their web applications - whether it's customer portals generating statements, admin dashboards producing reports, or e-learning platforms creating certificates. IronPDF works with all ASP.NET technologies including MVC, Razor Pages, and Blazor, making it the perfect choice for organizations already invested in the Microsoft ecosystem:
```C# // Namespace: Microsoft.AspNetCore.Mvc using Microsoft.AspNetCore.Mvc; // Namespace: IronPDF using IronPDF; // Namespace: System.Threading.Tasks using System.Threading.Tasks; // Namespace: System.IO using System.IO; // Namespace: System using System;
// ASP.NET Core MVC Controller public class ReportController : Controller { private readonly ChromePdfRenderer _pdfRenderer;
public ReportController()
{
    _pdfRenderer = new ChromePdfRenderer();
}

public async Task<IActionResult> DownloadReport(int reportId)
{
    // Get your report data
    var reportData = await GetReportData(reportId);

    // Render view to HTML string
    var html = await RenderViewToStringAsync("Reports/MonthlyReport", reportData);

    // Convert HTML content to PDF
    var pdf = _pdfRenderer.RenderHtmlAsPdf(html);

    // Return as file download
    return File(
        pdf.BinaryData,
        "application/pdf",
        $"report-{reportId}-{DateTime.Now:yyyy-MM}.pdf"
    );
}

private async Task<string> RenderViewToStringAsync(string viewName, object model)
{
    ViewData.Model = model;
    using var sw = new StringWriter();
    var viewResult = ViewEngines.Engines.FindPartialView(ControllerContext, viewName);
    var viewContext = new ViewContext(
        ControllerContext,
        viewResult.View,
        ViewData,
        TempData,
        sw,
        new HtmlHelperOptions()
    );
    viewResult.View.Render(viewContext, sw);
    return sw.GetStringBuilder().ToString();
}
}
## How Can I Make My PDFs Look Professional?

Creating PDFs is one thing - making them look *professional* is what sets your application apart when you **generate PDFs in .NET**. Professional PDF documents require attention to detail in layout, typography, and branding consistency to create the right impression. With IronPDF's comprehensive styling options and [advanced PDF features](/features/), you can create documents that match your corporate identity perfectly using this powerful **C# PDF generator**. The [HTML to PDF conversion](/tutorials/html-to-pdf/) capabilities ensure your styled documents maintain their visual appeal when produced as PDFs. Let's explore the features that transform basic PDFs into polished, professional documents that impress clients and stakeholders.

### Headers, Footers, and Page Numbers

Professional documents need *consistent headers and footers* that provide context and navigation. IronPDF offers both simple text-based and complex HTML-based options for headers and footers. This flexibility is why organizations choose IronPDF when they need to **create branded PDF documents** at scale. You can include dynamic content like page numbers, dates, and document titles - ensuring every *generated PDF* maintains professional standards:

```C#
using IronPDF;
using System;

var renderer = new ChromePdfRenderer();

// Simple text header and footer with page numbers
renderer.RenderingOptions.TextHeader = new TextHeaderFooter
{
    Text = "Confidential Report - {date}",
    DrawDividerLine = true,
    Font = "Arial",
    FontSize = 12
};

renderer.RenderingOptions.TextFooter = new TextHeaderFooter
{
    Text = "Page {page} of {total-pages}",
    DrawDividerLine = true,
    Font = "Arial",
    FontSize = 10,
    CenterText = true
};

// HTML headers for complex layouts with logos
renderer.RenderingOptions.HtmlHeader = new HtmlHeaderFooter
{
    Html = @"
        <div style='display: flex; justify-content: space-between; align-items: center; padding: 10px 40px;'>
            <img src='logo.png' style='height: 40px;' />
            <div style='text-align: center;'>
                <h2 style='margin: 0; color: #333;'>Annual Report 2024</h2>
                <p style='margin: 0; font-size: 12px; color: #666;'>Confidential</p>
            </div>
            <div style='text-align: right; font-size: 11px; color: #666;'>
                Generated: {date}<br/>
                Department: Finance
            </div>
        </div>",
    Height = 80,
    LoadStylesAndCSSFromMainHtmlDocument = true
};

// Create your PDF with professional headers/footers
var html = @"<h1>Financial Overview</h1><p>Report content here...</p>";
var pdf = renderer.RenderHtmlAsPdf(html);
pdf.SaveAs("professional-report.pdf");
These header and footer options enable organizations to maintain brand consistency across all generated PDFs. Whether you're creating financial reports or technical documentation, professional headers and footers ensure your documents meet corporate standards.
Advanced Page Setup and Layout Control
Control over page layout is crucial for creating documents that print correctly and look professional on all devices. IronPDF provides extensive options for page setup, including custom sizes, orientations, and margins:
```C# var renderer = new ChromePdfRenderer();
// Configure page setup for professional printing renderer.RenderingOptions.PaperSize = PdfPaperSize.A4; renderer.RenderingOptions.PaperOrientation = PdfPaperOrientation.Portrait;
// Set margins in millimeters for precise control renderer.RenderingOptions.MarginTop = 25; renderer.RenderingOptions.MarginBottom = 25; renderer.RenderingOptions.MarginLeft = 20; renderer.RenderingOptions.MarginRight = 20;
// Enable background colors and images (important for branding) renderer.RenderingOptions.PrintHtmlBackgrounds = true;
// Use screen media type for vibrant colors renderer.RenderingOptions.CssMediaType = PdfCssMediaType.Screen;
// Custom page size for special documents renderer.RenderingOptions.SetCustomPaperSizeinMilimeters(210, 297); // A4
// Enable high-quality rendering renderer.RenderingOptions.RenderQuality = 100; // 0-100 scale
### Working with Fonts and Typography

Typography plays a crucial role in document professionalism. IronPDF supports web fonts, custom fonts, and advanced typography features:

```C#
var renderer = new ChromePdfRenderer();

// HTML with custom fonts and typography
var html = @"
    <html>
    <head>
        <link href='https://fonts.googleapis.com/css2?family=Roboto:wght@300;400;700&display=swap' rel='stylesheet'>
        <style>
            @font-face {
                font-family: 'CustomBrand';
                src: url('BrandFont.ttf') format('truetype');
            }

            body {
                font-family: 'Roboto', Arial, sans-serif;
                font-size: 11pt;
                line-height: 1.6;
                color: #333;
            }

            h1 {
                font-family: 'CustomBrand', Georgia, serif;
                font-size: 28pt;
                color: #0066cc;
                letter-spacing: -0.5px;
            }

            .quote {
                font-style: italic;
                font-size: 14pt;
                color: #666;
                border-left: 4px solid #0066cc;
                padding-left: 20px;
                margin: 20px 0;
            }
        </style>
    </head>
    <body>
        <h1>Professional Document</h1>
        <p>This document demonstrates professional typography.</p>
        <div class='quote'>
            "Excellence in typography enhances readability and professionalism."
        </div>
    </body>
    </html>";

var pdf = renderer.RenderHtmlAsPdf(html, "Assets/Fonts");
pdf.SaveAs("typography-demo.pdf");
Real-World Example: How Do I Generate an Invoice PDF?
Let's create a complete, production-ready invoice generator that demonstrates best practices for creating PDF documents in real-world applications. This example showcases why thousands of businesses choose IronPDF as their C# PDF generator for invoice generation needs - it combines data binding, professional styling, and proper document structure in a way that's both powerful and maintainable. Similar implementations are used by e-commerce platforms to generate millions of invoices monthly, demonstrating the scalability of programmatic PDF generation in .NET. You can adapt this code for your own PDF creation tasks:
```C# using IronPDF; using System; using System.Collections.Generic; using System.Globalization; using System.Linq;
public class InvoiceGenerator { private readonly ChromePdfRenderer _renderer;
public InvoiceGenerator()
{
    _renderer = new ChromePdfRenderer();
    ConfigureRenderer();
}

private void ConfigureRenderer()
{
    // Professional page setup
    _renderer.RenderingOptions.PaperSize = PdfPaperSize.A4;
    _renderer.RenderingOptions.MarginTop = 25;
    _renderer.RenderingOptions.MarginBottom = 25;
    _renderer.RenderingOptions.MarginLeft = 25;
    _renderer.RenderingOptions.MarginRight = 25;
    _renderer.RenderingOptions.PrintHtmlBackgrounds = true;

    // Add footer with page numbers
    _renderer.RenderingOptions.TextFooter = new TextHeaderFooter
    {
        Text = "Page {page} of {total-pages} | Invoice generated on {date}",
        FontSize = 9,
        Font = "Arial",
        CenterText = true
    };
}

public void CreateInvoice(Invoice invoice)
{
    var html = GenerateInvoiceHtml(invoice);
    var pdf = _renderer.RenderHtmlAsPdf(html);

    // Add metadata to the final document
    pdf.MetaData.Title = $"Invoice {invoice.Number}";
    pdf.MetaData.Author = "Your Company Name";
    pdf.MetaData.Subject = $"Invoice for {invoice.CustomerName}";
    pdf.MetaData.Keywords = "invoice, billing, payment";
    pdf.MetaData.CreationDate = DateTime.Now;

    // Save the PDF document
    var fileName = $"Invoice-{invoice.Number}.pdf";
    pdf.SaveAs(fileName);

    Console.WriteLine($"PDF generated successfully: {fileName}");
}

private string GenerateInvoiceHtml(Invoice invoice)
{
    var itemsHtml = string.Join("", invoice.Items.Select(item => @"
        <tr>
            <td style='padding: 12px; border-bottom: 1px solid #eee;'>{item.Description}</td>
            <td style='padding: 12px; border-bottom: 1px solid #eee; text-align: center;'>{item.Quantity}</td>
            <td style='padding: 12px; border-bottom: 1px solid #eee; text-align: right;'>${item.UnitPrice:F2}</td>
            <td style='padding: 12px; border-bottom: 1px solid #eee; text-align: right;'>${item.Total:F2}</td>
        </tr>"));

    return @"
        <html>
        <head>
            <style>
                * {{ box-sizing: border-box; }}
                body {{
                    font-family: 'Segoe UI', Arial, sans-serif;
                    line-height: 1.6;
                    color: #333;
                    margin: 0;
                    padding: 0;
                }}
                .invoice-container {{
                    max-width: 800px;
                    margin: 0 auto;
                    padding: 40px;
                }}
                .invoice-header {{
                    display: flex;
                    justify-content: space-between;
                    margin-bottom: 40px;
                    padding-bottom: 20px;
                    border-bottom: 3px solid #0066cc;
                }}
                .company-details {{
                    flex: 1;
                }}
                .company-details h1 {{
                    color: #0066cc;
                    margin: 0 0 10px 0;
                    font-size: 28px;
                }}
                .invoice-details {{
                    flex: 1;
                    text-align: right;
                }}
                .invoice-details h2 {{
                    margin: 0 0 10px 0;
                    color: #666;
                    font-size: 24px;
                }}
                .invoice-number {{
                    font-size: 18px;
                    color: #0066cc;
                    font-weight: bold;
                }}
                .billing-section {{
                    display: flex;
                    justify-content: space-between;
                    margin-bottom: 40px;
                }}
                .billing-box {{
                    flex: 1;
                    padding: 20px;
                    background: #f8f9fa;
                    border-radius: 8px;
                    margin-right: 20px;
                }}
                .billing-box:last-child {{
                    margin-right: 0;
                }}
                .billing-box h3 {{
                    margin: 0 0 15px 0;
                    color: #0066cc;
                    font-size: 16px;
                    text-transform: uppercase;
                    letter-spacing: 1px;
                }}
                .items-table {{
                    width: 100%;
                    border-collapse: collapse;
                    margin-bottom: 40px;
                }}
                .items-table th {{
                    background: #0066cc;
                    color: white;
                    padding: 12px;
                    text-align: left;
                    font-weight: 600;
                }}
                .items-table th:last-child {{
                    text-align: right;
                }}
                .totals-section {{
                    display: flex;
                    justify-content: flex-end;
                    margin-bottom: 40px;
                }}
                .totals-box {{
                    width: 300px;
                }}
                .total-row {{
                    display: flex;
                    justify-content: space-between;
                    padding: 8px 0;
                    border-bottom: 1px solid #eee;
                }}
                .total-row.final {{
                    border-bottom: none;
                    border-top: 2px solid #0066cc;
                    margin-top: 10px;
                    padding-top: 15px;
                    font-size: 20px;
                    font-weight: bold;
                    color: #0066cc;
                }}
                .payment-terms {{
                    background: #f8f9fa;
                    padding: 20px;
                    border-radius: 8px;
                    margin-bottom: 30px;
                }}
                .payment-terms h3 {{
                    margin: 0 0 10px 0;
                    color: #0066cc;
                }}
                .footer-note {{
                    text-align: center;
                    color: #666;
                    font-size: 14px;
                    margin-top: 40px;
                    padding-top: 20px;
                    border-top: 1px solid #eee;
                }}
            </style>
        </head>
        <body>
            <div class='invoice-container'>
                <div class='invoice-header'>
                    <div class='company-details'>
                        <h1>{invoice.CompanyName}</h1>
                        <p>{invoice.CompanyAddress}<br>
                        {invoice.CompanyCity}, {invoice.CompanyState} {invoice.CompanyZip}<br>
                        Phone: {invoice.CompanyPhone}<br>
                        Email: {invoice.CompanyEmail}</p>
                    </div>
                    <div class='invoice-details'>
                        <h2>INVOICE</h2>
                        <p class='invoice-number'>#{invoice.Number}</p>
                        <p><strong>Date:</strong> {invoice.Date:MMMM dd, yyyy}<br>
                        <strong>Due Date:</strong> {invoice.DueDate:MMMM dd, yyyy}</p>
                    </div>
                </div>

                <div class='billing-section'>
                    <div class='billing-box'>
                        <h3>Bill To</h3>
                        <p><strong>{invoice.CustomerName}</strong><br>
                        {invoice.CustomerAddress}<br>
                        {invoice.CustomerCity}, {invoice.CustomerState} {invoice.CustomerZip}<br>
                        {invoice.CustomerEmail}</p>
                    </div>
                    <div class='billing-box'>
                        <h3>Payment Information</h3>
                        <p><strong>Payment Terms:</strong> {invoice.PaymentTerms}<br>
                        <strong>Invoice Status:</strong> <span style='color: #ff6b6b;'>Unpaid</span><br>
                        <strong>Amount Due:</strong> ${invoice.Total:F2}</p>
                    </div>
                </div>

                <table class='items-table'>
                    <thead>
                        <tr>
                            <th>Description</th>
                            <th style='text-align: center;'>Quantity</th>
                            <th style='text-align: right;'>Unit Price</th>
                            <th style='text-align: right;'>Total</th>
                        </tr>
                    </thead>
                    <tbody>
                        {itemsHtml}
                    </tbody>
                </table>

                <div class='totals-section'>
                    <div class='totals-box'>
                        <div class='total-row'>
                            <span>Subtotal:</span>
                            <span>${invoice.Subtotal:F2}</span>
                        </div>
                        <div class='total-row'>
                            <span>Tax ({invoice.TaxRate:F0}%):</span>
                            <span>${invoice.Tax:F2}</span>
                        </div>
                        <div class='total-row final'>
                            <span>Total Due:</span>
                            <span>${invoice.Total:F2}</span>
                        </div>
                    </div>
                </div>

                <div class='payment-terms'>
                    <h3>Payment Terms & Conditions</h3>
                    <p>Payment is due within {invoice.PaymentTerms}. Late payments are subject to a 1.5% monthly service charge.
                    Please make checks payable to {invoice.CompanyName} or pay online at {invoice.CompanyWebsite}.</p>
                </div>

                <div class='footer-note'>
                    <p>Thank you for your business! This invoice was generated automatically using our C# PDF generation system.</p>
                    <p>Questions? Contact us at {invoice.CompanyEmail} or {invoice.CompanyPhone}</p>
                </div>
            </div>
        </body>
        </html>";
}
}
// Invoice model classes
public class Invoice
{
public string Number { get; set; }
public DateTime Date { get; set; }
public DateTime DueDate { get; set; }
public string CompanyName { get; set; }
public string CompanyAddress { get; set; }
public string CompanyCity { get; set; }
public string CompanyState { get; set; }
public string CompanyZip { get; set; }
public string CompanyPhone { get; set; }
public string CompanyEmail { get; set; }
public string CompanyWebsite { get; set; }
public string CustomerName { get; set; }
public string CustomerAddress { get; set; }
public string CustomerCity { get; set; }
public string CustomerState { get; set; }
public string CustomerZip { get; set; }
public string CustomerEmail { get; set; }
public string PaymentTerms { get; set; }
public List
public class InvoiceItem { public string Description { get; set; } public int Quantity { get; set; } public decimal UnitPrice { get; set; } public decimal Total => Quantity * UnitPrice; }
// Usage example
var generator = new InvoiceGenerator();
var invoice = new Invoice
{
Number = "INV-2024-001",
Date = DateTime.Now,
DueDate = DateTime.Now.AddDays(30),
CompanyName = "Your Company Name",
CompanyAddress = "123 Business Street",
CompanyCity = "New York",
CompanyState = "NY",
CompanyZip = "10001",
CompanyPhone = "(555) 123-4567",
CompanyEmail = "billing@yourcompany.com",
CompanyWebsite = "www.yourcompany.com",
CustomerName = "Acme Corporation",
CustomerAddress = "456 Client Avenue",
CustomerCity = "Los Angeles",
CustomerState = "CA",
CustomerZip = "90001",
CustomerEmail = "accounts@acmecorp.com",
PaymentTerms = "Net 30",
TaxRate = 8.5m,
Items = new List
generator.CreateInvoice(invoice);
## What Advanced PDF Features Does IronPDF Offer?

IronPDF goes beyond basic **PDF creation in C#** to offer sophisticated features that enable complex document workflows and enterprise-grade functionality. These advanced capabilities allow you to create interactive forms, secure sensitive documents, and manipulate existing PDFs with precision when you **build PDFs in .NET**. These features are why over 14 million developers worldwide trust IronPDF for their mission-critical **PDF generation** needs. Understanding these features helps you build comprehensive PDF solutions that meet even the most demanding requirements - from [creating fillable forms](/examples/form-data/) to implementing enterprise-grade security in your **C# PDF creation** projects.

### Generate Interactive PDF Forms

Creating *fillable PDF forms* programmatically opens up possibilities for automating data collection and document workflows. IronPDF can transform HTML forms into **interactive PDF forms** that users can fill out in any PDF reader:

```C#
// Namespace: IronPDF
using IronPDF;
// Namespace: System
using System;

var renderer = new ChromePdfRenderer();

// Enable form creation from HTML
renderer.RenderingOptions.CreatePdfFormsFromHtml = true;

// Create an interactive form with various input types
var formHtml = @"
    <html>
    <head>
        <style>
            body { font-family: Arial, sans-serif; padding: 40px; }
            .form-group { margin-bottom: 20px; }
            label { display: block; margin-bottom: 5px; font-weight: bold; }
            input[type='text'], input[type='email'], select, textarea {
                width: 100%;
                padding: 8px;
                border: 1px solid #ccc;
                border-radius: 4px;
                font-size: 14px;
            }
            .checkbox-group { margin: 10px 0; }
            .submit-section {
                margin-top: 30px;
                padding-top: 20px;
                border-top: 2px solid #0066cc;
            }
        </style>
    </head>
    <body>
        <h1>Application Form</h1>
        <form>
            <div class='form-group'>
                <label for='fullName'>Full Name:</label>
                <input type='text' id='fullName' name='fullName' required />
            </div>

            <div class='form-group'>
                <label for='email'>Email Address:</label>
                <input type='email' id='email' name='email' required />
            </div>

            <div class='form-group'>
                <label for='department'>Department:</label>
                <select id='department' name='department'>
                    <option value=''>Select Department</option>
                    <option value='sales'>Sales</option>
                    <option value='marketing'>Marketing</option>
                    <option value='engineering'>Engineering</option>
                    <option value='hr'>Human Resources</option>
                </select>
            </div>

            <div class='form-group'>
                <label>Interests:</label>
                <div class='checkbox-group'>
                    <label><input type='checkbox' name='interests' value='training' /> Professional Training</label>
                    <label><input type='checkbox' name='interests' value='conferences' /> Industry Conferences</label>
                    <label><input type='checkbox' name='interests' value='certification' /> Certification Programs</label>
                </div>
            </div>

            <div class='form-group'>
                <label for='comments'>Additional Comments:</label>
                <textarea id='comments' name='comments' rows='4'></textarea>
            </div>

            <div class='submit-section'>
                <p><em>Please save this form and email to hr@company.com</em></p>
            </div>
        </form>
    </body>
    </html>";

// Create the PDF with form fields
var formPdf = renderer.RenderHtmlAsPdf(formHtml);

// Optionally pre-fill form fields programmatically
formPdf.Form.FindFormField("fullName").Value = "John Smith";
formPdf.Form.FindFormField("email").Value = "john.smith@example.com";
formPdf.Form.FindFormField("department").Value = "engineering";

// Save the interactive form
formPdf.SaveAs("application-form.pdf");

// You can also read and process submitted forms
var submittedPdf = PdfDocument.FromFile("submitted-form.pdf");
var name = submittedPdf.Form.FindFormField("fullName").Value;
var email = submittedPdf.Form.FindFormField("email").Value;
Console.WriteLine($"Form submitted by: {name} ({email})");
Secure Your Generated PDFs
Security is paramount when dealing with sensitive documents. IronPDF provides comprehensive security features to protect your PDFs from unauthorized access or modification:
```C# // Namespace: IronPDF using IronPDF; // Namespace: IronPdf.Editing using IronPdf.Editing;
var renderer = new ChromePdfRenderer(); var pdf = renderer.RenderHtmlAsPdf("
Confidential Document
Sensitive information...
");// Apply password protection pdf.SecuritySettings.UserPassword = "user123"; // Required to open pdf.SecuritySettings.OwnerPassword = "owner456"; // Required to modify
// Set detailed permissions pdf.SecuritySettings.AllowUserCopyPasteContent = false; pdf.SecuritySettings.AllowUserAnnotations = false; pdf.SecuritySettings.AllowUserFormData = true; pdf.SecuritySettings.AllowUserPrinting = PrintPermissions.LowQualityPrint;
// Add digital signature for authenticity pdf.SignWithFile( certificatePath: "certificate.pfx", certificatePassword: "certpass123", signingReason: "Document Approval", signingLocation: "New York, NY", signatureImage: new Signature("signature.png") { Width = 150, Height = 50 } );
// Apply redaction to hide sensitive information pdf.RedactTextOnPage( pageIndex: 0, searchText: "SSN: *--****", replacementText: "[REDACTED]", caseSensitive: false );
// Save the secured PDF pdf.SaveAs("secure-confidential.pdf");
### Merge and Split PDFs

Combining multiple PDFs or extracting specific pages is *essential* for document management workflows:

```C#
// Namespace: IronPDF
using IronPDF;
// Namespace: System
using System;

// Merge multiple PDFs into one document
var coverPage = new ChromePdfRenderer().RenderHtmlAsPdf("<h1>Annual Report 2024</h1>");
var introduction = PdfDocument.FromFile("introduction.pdf");
var financials = PdfDocument.FromFile("financials.pdf");
var appendix = PdfDocument.FromFile("appendix.pdf");

// Merge all documents
var completeReport = PdfDocument.Merge(coverPage, introduction, financials, appendix);

// Add page numbers to the merged document
for (int i = 0; i < completeReport.PageCount; i++)
{
    completeReport.AddTextFooterToPage(i,
        $"Page {i + 1} of {completeReport.PageCount}",
        IronPdf.Font.FontTypes.Arial,
        10);
}

completeReport.SaveAs("annual-report-complete.pdf");

// Extract specific pages
var executiveSummary = completeReport.CopyPages(0, 4); // First 5 pages
executiveSummary.SaveAs("executive-summary.pdf");

// Split a large PDF into chapters
var sourcePdf = PdfDocument.FromFile("large-document.pdf");
var chaptersPerFile = 50;

for (int i = 0; i < sourcePdf.PageCount; i += chaptersPerFile)
{
    var endPage = Math.Min(i + chaptersPerFile - 1, sourcePdf.PageCount - 1);
    var chapter = sourcePdf.CopyPages(i, endPage);
    chapter.SaveAs($"chapter-{(i / chaptersPerFile) + 1}.pdf");
}
Add Watermarks and Stamps
Watermarking PDFs is crucial for document control and branding. IronPDF supports both text and image watermarks:
```C# // Namespace: IronPDF using IronPDF; // Namespace: System using System;
var pdf = PdfDocument.FromFile("document.pdf");
// Add text watermark pdf.ApplyWatermark( html: "
DRAFT
", rotation: 45, opacity: 50, verticalAlignment: VerticalAlignment.Middle, horizontalAlignment: HorizontalAlignment.Center );// Add image watermark (company logo)
pdf.ApplyWatermark(
html: "![]() ",
rotation: 0,
opacity: 30,
verticalAlignment: VerticalAlignment.Bottom,
horizontalAlignment: HorizontalAlignment.Right
);
",
rotation: 0,
opacity: 30,
verticalAlignment: VerticalAlignment.Bottom,
horizontalAlignment: HorizontalAlignment.Right
);
// Add stamps for document status pdf.StampHtml( Html: @"
" + DateTime.Now.ToString("MM/dd/yyyy") + @"
pdf.SaveAs("watermarked-document.pdf");
## How Can I Optimize Performance When Generating PDFs at Scale?

When **generating PDFs at scale**, performance becomes critical. Whether you're creating thousands of invoices or processing large batch jobs, optimizing your **PDF generation** code can dramatically improve throughput and reduce resource consumption. Modern applications require efficient **PDF creation in C#** that doesn't block threads or consume excessive memory. Here are *proven strategies* for maximizing performance in your various PDF generation tasks when you need to **produce PDFs in .NET** efficiently.

### Async PDF Generation

Modern applications require *non-blocking operations* to maintain responsiveness. IronPDF provides async methods for all major operations:

```C#
// Namespace: IronPDF
using IronPDF;
// Namespace: System.Threading.Tasks
using System.Threading.Tasks;
// Namespace: System.Collections.Generic
using System.Collections.Generic;
// Namespace: System.Linq
using System.Linq;
// Namespace: System
using System;
// Namespace: System.Threading
using System.Threading;

public class AsyncPdfService
{
    private readonly ChromePdfRenderer _renderer;

    public AsyncPdfService()
    {
        _renderer = new ChromePdfRenderer();
        // Configure renderer once for reuse
        _renderer.RenderingOptions.PaperSize = PdfPaperSize.A4;
    }

    public async Task<byte[]> GeneratePdfAsync(string html)
    {
        // Non-blocking PDF generation
        var pdf = await _renderer.RenderHtmlAsPdfAsync(html);
        return pdf.BinaryData;
    }

    public async Task GenerateBatchAsync(List<string> htmlDocuments)
    {
        // Process multiple PDFs concurrently
        var tasks = htmlDocuments.Select(async (html, index) =>
        {
            var pdf = await _renderer.RenderHtmlAsPdfAsync(html);
            await pdf.SaveAsAsync($"document-{index}.pdf");
        });

        await Task.WhenAll(tasks);
    }

    // Async with cancellation support
    public async Task<PdfDocument> GenerateWithTimeoutAsync(string html, int timeoutSeconds)
    {
        using var cts = new CancellationTokenSource(TimeSpan.FromSeconds(timeoutSeconds));

        try
        {
            return await _renderer.RenderHtmlAsPdfAsync(html, cts.Token);
        }
        catch (OperationCanceledException)
        {
            throw new TimeoutException("PDF generation exceeded timeout");
        }
    }
}
Batch Processing Best Practices
When processing multiple PDFs, proper resource management and parallel processing can significantly improve performance:
```C# using IronPDF; using System.Threading.Tasks.Dataflow;
public class BatchPdfProcessor
{
private readonly ChromePdfRenderer _renderer;
private readonly ActionBlock
public BatchPdfProcessor(int maxConcurrency = 4)
{
    _renderer = new ChromePdfRenderer();

    // Create a processing pipeline with controlled concurrency
    _processingBlock = new ActionBlock<PdfJob>(
        async job => await ProcessPdfAsync(job),
        new ExecutionDataflowBlockOptions
        {
            MaxDegreeOfParallelism = maxConcurrency,
            BoundedCapacity = maxConcurrency * 2
        });
}

private async Task ProcessPdfAsync(PdfJob job)
{
    try
    {
        var pdf = await _renderer.RenderHtmlAsPdfAsync(job.Html);
        await pdf.SaveAsAsync(job.OutputPath);
        job.OnSuccess?.Invoke();
    }
    catch (Exception ex)
    {
        job.OnError?.Invoke(ex);
    }
}

public async Task<bool> QueuePdfAsync(PdfJob job)
{
    return await _processingBlock.SendAsync(job);
}

public async Task CompleteAsync()
{
    _processingBlock.Complete();
    await _processingBlock.Completion;
}
}
public class PdfJob
{
public string Html { get; set; }
public string OutputPath { get; set; }
public Action OnSuccess { get; set; }
public Action
### Memory Optimization Techniques

For large PDFs or high-volume processing, memory management is crucial:

```C#
using IronPDF;

public class MemoryEfficientPdfGenerator
{
    private readonly ChromePdfRenderer _renderer;

    public MemoryEfficientPdfGenerator()
    {
        _renderer = new ChromePdfRenderer();

        // Optimize for memory usage
        _renderer.RenderingOptions.RenderQuality = 90; // Slightly lower quality for smaller size
        _renderer.RenderingOptions.ImageQuality = 85; // Compress images
    }

    // Stream large PDFs instead of loading into memory
    public async Task GenerateLargePdfToStreamAsync(string html, Stream outputStream)
    {
        var pdf = await _renderer.RenderHtmlAsPdfAsync(html);

        // Write directly to stream without keeping in memory
        using (pdf)
        {
            var bytes = pdf.BinaryData;
            await outputStream.WriteAsync(bytes, 0, bytes.Length);
        }
    }

    // Process large HTML in chunks
    public async Task<PdfDocument> GenerateFromChunksAsync(List<string> htmlChunks)
    {
        var pdfs = new List<PdfDocument>();

        try
        {
            // Generate each chunk separately
            foreach (var chunk in htmlChunks)
            {
                var chunkPdf = await _renderer.RenderHtmlAsPdfAsync(chunk);
                pdfs.Add(chunkPdf);
            }

            // Merge all chunks
            return PdfDocument.Merge(pdfs.ToArray());
        }
        finally
        {
            // Ensure all temporary PDFs are disposed
            foreach (var pdf in pdfs)
            {
                pdf?.Dispose();
            }
        }
    }
}
Caching and Template Optimization
Reduce rendering time by caching common elements and optimizing templates:
```C# using IronPDF; using Microsoft.Extensions.Caching.Memory;
public class CachedPdfService { private readonly ChromePdfRenderer _renderer; private readonly IMemoryCache _cache; private readonly Dictionary<string, string> _compiledTemplates;
public CachedPdfService(IMemoryCache cache)
{
    _renderer = new ChromePdfRenderer();
    _cache = cache;
    _compiledTemplates = new Dictionary<string, string>();

    // Pre-compile common templates
    PrecompileTemplates();
}

private void PrecompileTemplates()
{
    // Load and cache common CSS
    var commonCss = File.ReadAllText("Templates/common.css");
    _compiledTemplates["commonCss"] = commonCss;

    // Cache logo as Base64
    var logoBytes = File.ReadAllBytes("Assets/logo.png");
    var logoBase64 = Convert.ToBase64String(logoBytes);
    _compiledTemplates["logoData"] = $"data:image/png;base64,{logoBase64}";
}

public async Task<byte[]> GenerateInvoicePdfAsync(string invoiceId, InvoiceData data)
{
    // Check cache first
    var cacheKey = $"invoice_{invoiceId}";
    if (_cache.TryGetValue<byte[]>(cacheKey, out var cachedPdf))
    {
        return cachedPdf;
    }

    // Generate PDF with cached templates
    var html = BuildHtmlWithCache(data);
    var pdf = await _renderer.RenderHtmlAsPdfAsync(html);
    var pdfBytes = pdf.BinaryData;

    // Cache for 1 hour
    _cache.Set(cacheKey, pdfBytes, TimeSpan.FromHours(1));

    return pdfBytes;
}

private string BuildHtmlWithCache(InvoiceData data)
{
    return @"
        <html>
        <head>
            <style>{_compiledTemplates["commonCss"]}</style>
        </head>
        <body>
            <img src='{_compiledTemplates["logoData"]}' />

        </body>
        </html>";
}
}
## What Are Common Issues When Creating PDFs and How Do I Fix Them?

Even with a robust **.NET PDF library** like IronPDF, you may encounter challenges during development or deployment when you ***build PDFs in C#***. Understanding **common issues** and their **solutions** helps you quickly resolve problems and maintain smooth ***PDF generation*** operations. The good news is that with **over 14 million developers** using IronPDF as their **C# PDF generator**, most issues have been encountered and solved before. This troubleshooting guide covers the **most frequent issues** developers face when they **create PDFs in .NET** and provides **practical solutions** based on real-world experience. Remember, [24/7 support](#live-chat-support) is always available if you need immediate assistance with your **PDF creation** challenges.

### Issue 1: Failed Rendering or Blank PDFs

One of the most common issues is PDFs that appear **blank** or fail to render properly. This typically occurs when assets don't load in time or when there are **JavaScript timing issues:**

```C#
// Namespace: IronPDF
using IronPDF;
// Namespace: System.IO
using System.IO;
// Namespace: System
using System;

// Problem: PDF is blank or missing content
var renderer = new ChromePdfRenderer();
var pdf = renderer.RenderHtmlAsPdf(complexHtml); // Results in blank PDF

// Solution 1: Add render delay for JavaScript-heavy content
renderer.RenderingOptions.RenderDelay = 3000; // Wait 3 seconds
renderer.RenderingOptions.EnableJavaScript = true;

// Solution 2: Wait for specific elements
renderer.RenderingOptions.WaitFor = new WaitFor()
{
    JavaScriptQuery = "document.querySelector('#chart-loaded') !== null",
    WaitForType = WaitForType.JavaScript,
    Timeout = 30000 // 30 second timeout
};

// Solution 3: Use base path for local assets
var basePath = Path.GetFullPath("Assets");
var pdf = renderer.RenderHtmlAsPdf(htmlWithImages, basePath);

// Solution 4: Embed assets as Base64
var imageBase64 = Convert.ToBase64String(File.ReadAllBytes("logo.png"));
var htmlWithEmbedded = $@"<img src='data:image/png;base64,{imageBase64}' />";
For persistent rendering issues, enable logging to diagnose the problem:
```C# // Enable detailed logging IronPdf.Logging.Logger.EnableDebugging = true; IronPdf.Logging.Logger.LogFilePath = "IronPdf.log"; IronPdf.Logging.Logger.LoggingMode = IronPdf.Logging.Logger.LoggingModes.All;
**[Learn more about troubleshooting rendering issues](/troubleshooting/quick-ironpdf-troubleshooting/)**

### Issue 2: Slow Initial Render

The first PDF generation can be slower due to initialization overhead. IronPDF's initial render may take 2-3 seconds to execute, which is normal start-up time similar to Chrome opening on a desktop environment:

```C#
// Problem: First PDF takes too long to generate
public class PdfService
{
    private ChromePdfRenderer _renderer;

    // Solution 1: Initialize renderer at startup
    public void Initialize()
    {
        _renderer = new ChromePdfRenderer();

        // Warm up the renderer
        _ = _renderer.RenderHtmlAsPdf("<p>Warm up</p>");
    }

    // Solution 2: Use IronPdf.Native packages for faster initialization
    // `Install-Package IronPdf.Native.Windows.X64`
    // This includes pre-loaded binaries for your platform

    // Solution 3: For cloud deployments, use appropriate packages
    // For Linux: `Install-Package IronPdf.Linux`
    // For Docker: Use IronPdf.Linux with proper dependencies
}

// Solution 4: Skip initialization checks in production
IronPdf.Installation.SkipInitialization = true; // Use only with persistent storageIssue 3: Deployment Issues on Linux/Docker
IronPDF requires specific Linux dependencies that may not be present in minimal Docker images. Here's how to resolve common deployment issues:
# Dockerfile for IronPDF on Linux
FROM mcr.microsoft.com/dotnet/aspnet:8.0

# Install required dependencies
RUN apt-get update && apt-get install -y \
    libglib2.0-0 \
    libnss3 \
    libatk1.0-0 \
    libatk-bridge2.0-0 \
    libcups2 \
    libxkbcommon0 \
    libxcomposite1 \
    libxdamage1 \
    libxrandr2 \
    libgbm1 \
    libpango-1.0-0 \
    libcairo2 \
    libasound2 \
    libxshmfence1 \
    libx11-xcb1

# Copy and run your application
WORKDIR /app
COPY . .
ENTRYPOINT [".NET", "YourApp.dll"]
For Google Cloud Run specifically:
```C# // Use 2nd generation execution environment // Deploy with: gcloud run deploy --execution-environment gen2
// In your code, ensure compatibility IronPdf.Installation.LinuxAndDockerDependenciesAutoConfig = true; IronPdf.Installation.ChromeGpuMode = IronPdf.Engines.Chrome.ChromeGpuModes.Disabled;
[Learn more about Docker deployment](/get-started/ironpdf-docker/)

### Issue 4: Memory and Performance Issues

For high-volume PDF generation, optimize memory usage and performance:

```C#
// Problem: High memory usage or slow batch processing
public class OptimizedPdfService
{
    private readonly ChromePdfRenderer _renderer;

    public OptimizedPdfService()
    {
        _renderer = new ChromePdfRenderer();

        // Optimize for performance
        _renderer.RenderingOptions.RenderQuality = 90;
        _renderer.RenderingOptions.ImageQuality = 85;

        // Disable features you don't need
        _renderer.RenderingOptions.EnableJavaScript = false; // If not needed
        _renderer.RenderingOptions.RenderDelay = 0; // If content is static
    }

    // Solution 1: Process large documents in chunks
    public async Task<PdfDocument> GenerateLargeReportAsync(List<ReportSection> sections)
    {
        var pdfs = new List<PdfDocument>();

        foreach (var section in sections)
        {
            var sectionHtml = GenerateSectionHtml(section);
            var sectionPdf = await _renderer.RenderHtmlAsPdfAsync(sectionHtml);
            pdfs.Add(sectionPdf);

            // Force garbage collection after each section
            if (pdfs.Count % 10 == 0)
            {
                GC.Collect();
                GC.WaitForPendingFinalizers();
            }
        }

        return PdfDocument.Merge(pdfs.ToArray());
    }

    // Solution 2: Use streaming for large files
    public async Task StreamLargePdfAsync(string html, HttpResponse response)
    {
        response.ContentType = "application/pdf";
        response.Headers.Add("Content-Disposition", "attachment; filename=report.pdf");

        var pdf = await _renderer.RenderHtmlAsPdfAsync(html);
        var bytes = pdf.BinaryData;

        await response.Body.WriteAsync(bytes, 0, bytes.Length);
        await response.Body.FlushAsync();
    }
}Issue 5: Font and Encoding Issues
When dealing with international content or custom fonts:
```C# // Problem: Fonts not rendering correctly var renderer = new ChromePdfRenderer();
// Solution 1: Install fonts on the server // For Linux/Docker, add to Dockerfile: // RUN apt-get install -y fonts-liberation fonts-noto
// Solution 2: Embed fonts in HTML var html = @"
Content with custom font
"; // Solution 3: Use web fonts var htmlWithWebFont = @"日本語のテキスト
"; // Ensure proper encoding renderer.RenderingOptions.InputEncoding = Encoding.UTF8; ``` ### Getting Help If you encounter issues not covered here, IronPDF provides excellent support resources: 1. **[24/7 Live Chat Support](#live-chat-support)** - Talk to engineers in real-time with 30-second response time 2. **[Comprehensive Documentation](/docs/)** - Detailed API references and guides 3. **[Knowledge Base](/troubleshooting/)** - Solutions to common problems 4. **[Code Examples](/examples/using-html-to-create-a-pdf/)** - Ready-to-use code snippets When requesting support, include: - IronPDF version - .NET version and platform - Minimal code example reproducing the issue - Log files (if available) - Stack trace or error messages ## Which Platforms Support IronPDF for PDF Generation? IronPDF's cross-platform support ensures your ***PDF generation*** code works consistently across different environments. Whether you're deploying to Windows servers, Linux containers, or cloud platforms, IronPDF provides the flexibility and reliability needed for production deployments of your **C# PDF generator**. This universal compatibility is one reason why **organizations across 50+ countries** rely on IronPDF to ***generate millions of PDFs*** daily. From Fortune 500 companies ***creating financial reports*** to startups ***producing customer invoices***, IronPDF scales to meet any demand for **PDF creation in .NET**. Understanding platform-specific considerations helps ensure smooth deployments across your infrastructure - whether that's [on-premise servers](/docs/) or [cloud environments](/get-started/azure/) where you need to **build PDFs with C#**. ### .NET Version Compatibility IronPDF supports all modern .NET versions and is continuously updated to support the latest releases: - **.NET 8** - Full support with all features - **.NET 9** - Fully supported (current latest version) - **.NET 10** - Pre-release support available (IronPDF is already compliant for the November 2025 release) - **.NET 7, 6, 5** - Fully supported - **.NET Core 3.1+** - Supported with all features - **.NET Framework 4.6.2+** - Legacy support maintained ### Operating System Support Deploy your PDF generation solution on any major operating system: #### [Windows](/get-started/windows/) - Windows 11, 10, 8, 7 - Windows Server 2022, 2019, 2016, 2012 #### [Linux](/get-started/linux/) - Ubuntu 20.04, 22.04, 24.04 - Debian 10, 11, 12 - CentOS 7, 8 - Red Hat Enterprise Linux - Alpine Linux (with additional configuration) #### [macOS](/get-started/mac/) - macOS 13 (Ventura) and newer - Apple Silicon (M1/M2/M3) native support - Intel-based Macs fully supported ### Cloud Platform Deployment IronPDF works seamlessly on all major cloud platforms: #### [Microsoft Azure](/get-started/azure/) ```C# // Azure App Service configuration // Use at least B1 tier for optimal performance // Enable 64-bit platform in Configuration settings // For Azure Functions public static class PdfFunction { [FunctionName("GeneratePdf")] public static async TaskWelcome to IronPDF!
This is your first generated PDF document.
Created on: " + DateTime.Now + "
" ); // Save the PDF pdf.SaveAs("my-first-pdf.pdf"); Console.WriteLine("PDF created successfully!"); } } ``` ### Step 3: Explore Examples and Tutorials IronPDF provides extensive resources to help you master PDF generation: 1. **[Code Examples](/examples/using-html-to-create-a-pdf/)** - Ready-to-use code snippets for common scenarios 2. **[Tutorials](/tutorials/html-to-pdf/)** - Step-by-step guides for specific features 3. **[How-To Guides](/how-to/html-string-to-pdf/)** - Practical solutions to real-world problems 4. **[API Reference](/object-reference/api/)** - Comprehensive documentation of all classes and methods ### Step 4: Get Help When Needed IronPDF offers multiple support channels to ensure your success: - **[24/7 Live Chat Support](https://ironpdf.com#live-chat-support)** - Chat with engineers in real-time for immediate assistance - **[Email Support](mailto:support@ironsoftware.com)** - Get detailed responses to complex questions - **[Stack Overflow](https://stackoverflow.com/questions/tagged/ironpdf)** - Community support and solutions ### Step 5: Development and Deployment #### Free Development License IronPDF is free for development and testing. You can explore all features without any limitations during development. Watermarks appear on generated PDFs in development mode but don't affect functionality. #### Production Deployment Options When you're ready to deploy to production, IronPDF offers flexible licensing: 1. **[Free Trial](trial-license)** - Get a 30-day trial license to test in production without watermarks 2. **[Commercial Licenses](/licensing/)** - Starting at $999 for single-project deployment 3. **[Enterprise Solutions](https://ironsoftware.com/enterprise/)** - Custom packages for large organizations To apply a license in your code: ```C# IronPdf.License.LicenseKey = "YOUR-LICENSE-KEY"; ``` ### Step 6: Stay Updated Keep your PDF generation capabilities current: - **[Subscribe to Updates](https://ironsoftware.com/)** - Get notified about new features and improvements - **[Follow the Blog](/blog/)** - Learn about best practices and new techniques - **[Check the Changelog](/product-updates/changelog/)** - See what's new in each release Regular updates ensure compatibility with the latest .NET versions and include performance improvements, new features, and security updates. ## Why Choose IronPDF for PDF Generation in C#? After exploring various approaches to ***create PDFs in C#***, you might wonder what makes IronPDF the **preferred choice** for many developers. It's not just about features - it's about the **entire developer experience**, from initial implementation to long-term maintenance when you need to **generate PDFs in .NET**. With **over 14 million developers** using IronPDF globally as their **C# PDF generator**, it has become the de facto standard for ***PDF generation*** in .NET applications. Let's examine why developers choose IronPDF for their **PDF creation in C#** needs. ### Pixel-Perfect Rendering Unlike other PDF libraries that produce approximations of your HTML designs, IronPDF uses a **real Chromium engine** to ensure your PDFs look **exactly** like they would in a modern web browser. This pixel-perfect rendering capability is why financial institutions trust IronPDF to *generate regulatory reports* where precision matters. Your **CSS Grid layouts**, **flexbox designs**, and **JavaScript-rendered content** all work perfectly. No more fighting with proprietary layout engines or accepting "close enough" results when you ***create PDF documents***. ### Developer-Friendly API IronPDF's API is designed **by developers, for developers**. The simplicity of the API is why startups can get their *PDF generation* working in hours, not days. Instead of learning complex PDF specifications, you work with **familiar concepts:** ```C# using IronPDF; // Other libraries might require this: // document.Add(new Paragraph("Hello World")); // document.Add(new Table(3, 2)); // cell.SetBackgroundColor(ColorConstants.LIGHT_GRAY); // With IronPDF, just use HTML: var renderer = new ChromePdfRenderer(); var pdf = renderer.RenderHtmlAsPdf(@"Hello World
| Simple | Intuitive |
Frequently Asked Questions
How can I create a PDF from HTML content in C#?
You can create a PDF from HTML content in C# by using IronPDF's RenderHtmlAsPdf method. This allows you to convert HTML strings or URLs directly into PDF documents with ease.
What are the advantages of using a commercial PDF library over a free one?
Commercial PDF libraries like IronPDF offer robust features such as full support for JavaScript, CSS3, and responsive layouts. They provide reliable performance, regular updates, comprehensive support, and are optimized for creating high-quality PDFs.
Can IronPDF be used to generate PDFs in ASP.NET MVC applications?
Yes, IronPDF can be used in ASP.NET MVC applications to convert Razor views or HTML templates into PDFs, allowing you to seamlessly integrate PDF generation into your web applications.
How can I integrate images and CSS into my PDF documents using C#?
Using IronPDF, you can easily integrate images and CSS into your PDF documents. This can be achieved by including image tags and CSS styles within your HTML content before converting it to PDF using IronPDF's rendering capabilities.
Is it possible to add headers, footers, and page numbers to PDFs in C#?
Yes, IronPDF provides advanced features that allow you to add headers, footers, and page numbering to your PDF documents. This can be done by configuring the PDF settings before rendering your HTML content.
How can I handle XML data when generating PDFs in C#?
With IronPDF, you can handle XML data by transforming your XML into HTML or using XSLT to style the XML, which can then be converted into a PDF document using IronPDF's RenderHtmlAsPdf method.
What are the common challenges when generating PDFs in C#?
Common challenges include maintaining layout consistency, handling complex CSS and JavaScript, and ensuring accurate rendering of web technologies. IronPDF addresses these challenges with its modern Chromium engine and extensive support for HTML5 and CSS3 standards.
How can I generate large PDFs efficiently with C#?
IronPDF is designed to handle large PDF generation efficiently. It uses a high-performance rendering engine and supports asynchronous operations to manage large documents with ease.
Can I test IronPDF without a commercial license?
Yes, IronPDF offers a free license for development and testing purposes, allowing you to evaluate its features before purchasing a commercial license for production use.
.NET 10 Compatibility: Can I use IronPDF with .NET 10, and are there any special considerations?
Yes, IronPDF is fully compatible with .NET 10. It supports .NET 10 out of the box, including in projects targeting Windows, Linux, containerized environments, and web frameworks. No special configuration is required—just install the latest IronPDF NuGet package and it will work seamlessly with .NET 10.