.NET MAUI Blazor for (PDF, EXCEL, OCR, BARCODE, QR 코드)
.NET 멀티 플랫폼 앱 UI (.NET MAUI)에는 BlazorWebView 컨트롤이 포함되어 있어 개발자가 Visual Studio를 사용하여 .NET MAUI 프로젝트에 MAUI Blazor 서버 앱을 통합할 수 있도록 합니다. 이러한 Blazor 하이브리드 앱인 .NET MAUI Blazor 앱은 플랫폼 특화 기능과 웹 UI (사용자 인터페이스) 컨트롤을 렌더링 할 수 있습니다. 이러한 .NET MAUI Blazor 앱은 .NET MAUI가 플랫폼 간 프레임워크이므로 플랫폼 별 코드를 필요로 하지 않는 플랫폼 간 앱입니다. 우리는 Android 디바이스/Android 에뮬레이터, iOS, macOS, Mac Catalyst 및 Windows 운영 체제 기기에서 .NET MAUI 앱을 사용할 수 있습니다.
BlazorWebView 제어는 .NET MAUI 네이티브 앱의 모든 페이지에 추가할 수 있으며 MAUI Blazor 웹 애플리케이션의 루트로 지정할 수 있습니다. .NET MAUI Blazor 웹 앱의 Razor 구성 요소는 .NET 프로세스 내에서 네이티브로 실행되고 내장된 웹 보기 컨트롤을 통해 웹 UI 구성 요소를 렌더링합니다. MAUI Blazor 하이브리드 앱, 데스크톱 앱 또는 Windows 폼은 .NET MAUI가 지원하는 모든 플랫폼에서 사용할 수 있으며 브라우저 샌드박스도 포함됩니다.
ChromePdfRenderer: .NET PDF 라이브러리

ChromePdfRenderer
C# 개발자로서, 작업에 맞는 올바른 도구의 중요성을 알고 있습니다. 그것이 바로 ChromePdfRenderer가 필요한 이유입니다. 이 강력한 .NET 클래스 라이브러리는 플랫폼 간 API를 사용하여 .NET Core 및 .NET 기술로 PDF 처리 애플리케이션을 쉽게 만들 수 있게 해줍니다. ChromePdfRenderer는 .NET Chromium 엔진을 사용하여 HTML 페이지(코드 또는 URL 형식)를 PDF 파일로 변환하여 복잡한 API 및 수작업 설계 작업의 필요성을 제거합니다. HTML, ASPX, JS, CSS 및 이미지와 같은 표준 웹 문서를 지원합니다.
Blazor 및 .NET MAUI와의 호환성
ChromePdfRenderer는 Blazor 구성 요소 및 .NET MAUI 프레임워크로 빌드된 애플리케이션에 쉽게 통합되어 개발자에게 PDF 문서를 생성하고 조작할 수 있는 다양한 기능을 제공합니다. 이 기능들에는 HTML, XML 및 기타 파일 형식에서 PDF를 생성하는 기능, 기존 PDF를 편집하여 텍스트, 이미지 및 기타 .NET MAUI 작업 부하 요소를 추가하거나 수정하는 기능이 포함되어 있습니다.
.NET MAUI Blazor 앱을 만드는 단계
Visual Studio에서 .NET MAUI 앱을 만들기 위해 다음 단계를 따르십시오.
단계 1: Visual Studio 열기
최신 버전의 Visual Studio를 열고 개발자 모드를 활성화하십시오. 최신 버전의 Visual Studio가 권장됩니다.
단계 2: .NET Blazor 검색
이제 새 프로젝트 만들기 버튼을 클릭하고 .NET MAUI Blazor 템플릿을 검색하십시오. .NET MAUI Blazor App을 검색 결과에서 선택하고 다음 버튼을 클릭하십시오.

Visual Studio .NET MAUI 애플리케이션 생성
단계 3: 프로젝트 이름 설정
프로젝트에 적절한 이름을 지정하고 다음 버튼을 클릭하십시오.
단계 4: .NET Framework
.NET 대상 프레임워크를 선택하십시오. 최신 프레임워크를 사용하면 원활한 작업이 가능합니다. 프레임워크를 선택한 후 만들기 버튼을 클릭하십시오.
위의 단계에 따라 .NET MAUI Blazor 앱이 생성됩니다.

Visual Studio .NET MAUI 애플리케이션 생성
ChromePdfRenderer를 위한 루트 Blazor 컴포넌트 프로젝트를 사용하는 방법을 살펴보겠습니다.
Blazor 컨텐츠를 PDF로 내보내기
다음 코드를 사용하여 Blazor 콘텐츠를 PDF로 매우 쉽게 변환할 수 있습니다.
먼저 Index.razor 파일을 열고 코드를 다음 코드로 교체하십시오:
@page "/"

<input @bind="InputValue" placeholder="Enter HTML content" />
<button @onclick="SubmitHTML">Render HTML</button>

@code {
    // Property to bind input value
    private string InputValue { get; set; }

    // Async method to render HTML as PDF and save
    private async Task SubmitHTML()
    {
        // Create an instance of ChromePdfRenderer
        var renderer = new IronPdf.ChromePdfRenderer();

        // Render the HTML input value as a PDF document
        var doc = renderer.RenderHtmlAsPdf(InputValue);

        // Save the document as 'Test.pdf' on the local file system
        doc.SaveAs("Test.pdf");
    }
}
@page "/"
<input @bind="InputValue" placeholder="Enter HTML content" />
<button @onclick="SubmitHTML">Render HTML</button>
@code {
// Property to bind input value
private string InputValue { get; set; }
// Async method to render HTML as PDF and save
private async Task SubmitHTML()
{
// Create an instance of ChromePdfRenderer
var renderer = new IronPdf.ChromePdfRenderer();
// Render the HTML input value as a PDF document
var doc = renderer.RenderHtmlAsPdf(InputValue);
// Save the document as 'Test.pdf' on the local file system
doc.SaveAs("Test.pdf");
}
}Imports IronPdf
@page "/"
<input @bind="InputValue" placeholder="Enter HTML content" />
<button @onclick="SubmitHTML">Render HTML</button>
@code
' Property to bind input value
Private Property InputValue As String
' Async method to render HTML as PDF and save
Private Async Function SubmitHTML() As Task
' Create an instance of ChromePdfRenderer
Dim renderer As New ChromePdfRenderer()
' Render the HTML input value as a PDF document
Dim doc = renderer.RenderHtmlAsPdf(InputValue)
' Save the document as 'Test.pdf' on the local file system
doc.SaveAs("Test.pdf")
End Function
End Code이 코드는 생성된 PDF 파일을 로컬 머신에 다운로드하는 데 도움이 됩니다. 외부 라이브러리를 사용하지 않고 ChromePdfRenderer를 통해 Blazor 콘텐츠를 PDF 파일로 변환할 수 있습니다.

.NET MAUI Blazor를 사용하여 PDF 생성
텍스트 상자에 다음 HTML을 입력하겠습니다:
<!DOCTYPE html>
<html>
  <head>
    <link href='https://fonts.googleapis.com/css2?family=Popin&display=swap' rel='stylesheet'>
    <style>
      /* Add CSS styles for the invoice here */
      body{
        font-family: 'Popin', cursive;
      }
      .invoice {
        width: 80%;
        margin: 0 auto;
        border: 1px solid #ccc;
        padding: 20px;
        background-color: #f5f5f5;
        color: #333;
      }
      .invoice h1 {
        text-align: center;
      }
      .invoice .invoice-info {
        display: flex;
        justify-content: space-between;
        margin-bottom: 20px;
      }
      .invoice .invoice-info div {
        width: 45%;
      }
      .invoice table {
        width: 100%;
        border-collapse: collapse;
      }
      .invoice table th, .invoice table td {
        border: 1px solid #ccc;
        padding: 10px;
      }
      .invoice table th {
        text-align: left;
        background-color: #f5f5f5;
      }
      .invoice table td {
        text-align: right;
      }
      .invoice table td.total {
        font-weight: bold;
      }
    </style>
  </head>
  <body>
    <div class="invoice">
      <h1>Invoice</h1>
      <div class="invoice-info">
        <div>
          <p><strong>From:</strong></p>
          <p>Your Company Name</p>
          <p>123 Main St</p>
          <p>City, State ZIP</p>
        </div>
        <div>
          <p><strong>To:</strong></p>
          <p>Customer Name</p>
          <p>456 Park Ave</p>
          <p>City, State ZIP</p>
        </div>
      </div>
      <table>
        <thead>
          <tr>
            <th>Product</th>
            <th>Quantity</th>
            <th>Price</th>
            <th>Total</th>
          </tr>
        </thead>
        <tbody>
          <tr>
            <td>Product 1</td>
            <td>1</td>
            <td>$10.00</td>
            <td>$10.00</td>
          </tr>
          <tr>
            <td>Product 2</td>
            <td>2</td>
            <td>$5.00</td>
            <td>$10.00</td>
          </tr>
          <tr>
            <td colspan="3" class="total">Total:</td>
            <td class="total">$20.00</td>
          </tr>
        </tbody>
      </table>
    </div>
  </body>
</html>
<!DOCTYPE html>
<html>
<head>
<link href='https://fonts.googleapis.com/css2?family=Popin&display=swap' rel='stylesheet'>
<style>
/* Add CSS styles for the invoice here */
body{
font-family: 'Popin', cursive;
}
.invoice {
width: 80%;
margin: 0 auto;
border: 1px solid #ccc;
padding: 20px;
background-color: #f5f5f5;
color: #333;
}
.invoice h1 {
text-align: center;
}
.invoice .invoice-info {
display: flex;
justify-content: space-between;
margin-bottom: 20px;
}
.invoice .invoice-info div {
width: 45%;
}
.invoice table {
width: 100%;
border-collapse: collapse;
}
.invoice table th, .invoice table td {
border: 1px solid #ccc;
padding: 10px;
}
.invoice table th {
text-align: left;
background-color: #f5f5f5;
}
.invoice table td {
text-align: right;
}
.invoice table td.total {
font-weight: bold;
}
</style>
</head>
<body>
<div class="invoice">
<h1>Invoice</h1>
<div class="invoice-info">
<div>
<p><strong>From:</strong></p>
<p>Your Company Name</p>
<p>123 Main St</p>
<p>City, State ZIP</p>
</div>
<div>
<p><strong>To:</strong></p>
<p>Customer Name</p>
<p>456 Park Ave</p>
<p>City, State ZIP</p>
</div>
</div>
<table>
<thead>
<tr>
<th>Product</th>
<th>Quantity</th>
<th>Price</th>
<th>Total</th>
</tr>
</thead>
<tbody>
<tr>
<td>Product 1</td>
<td>1</td>
<td>$10.00</td>
<td>$10.00</td>
</tr>
<tr>
<td>Product 2</td>
<td>2</td>
<td>$5.00</td>
<td>$10.00</td>
</tr>
<tr>
<td colspan="3" class="total">Total:</td>
<td class="total">$20.00</td>
</tr>
</tbody>
</table>
</div>
</body>
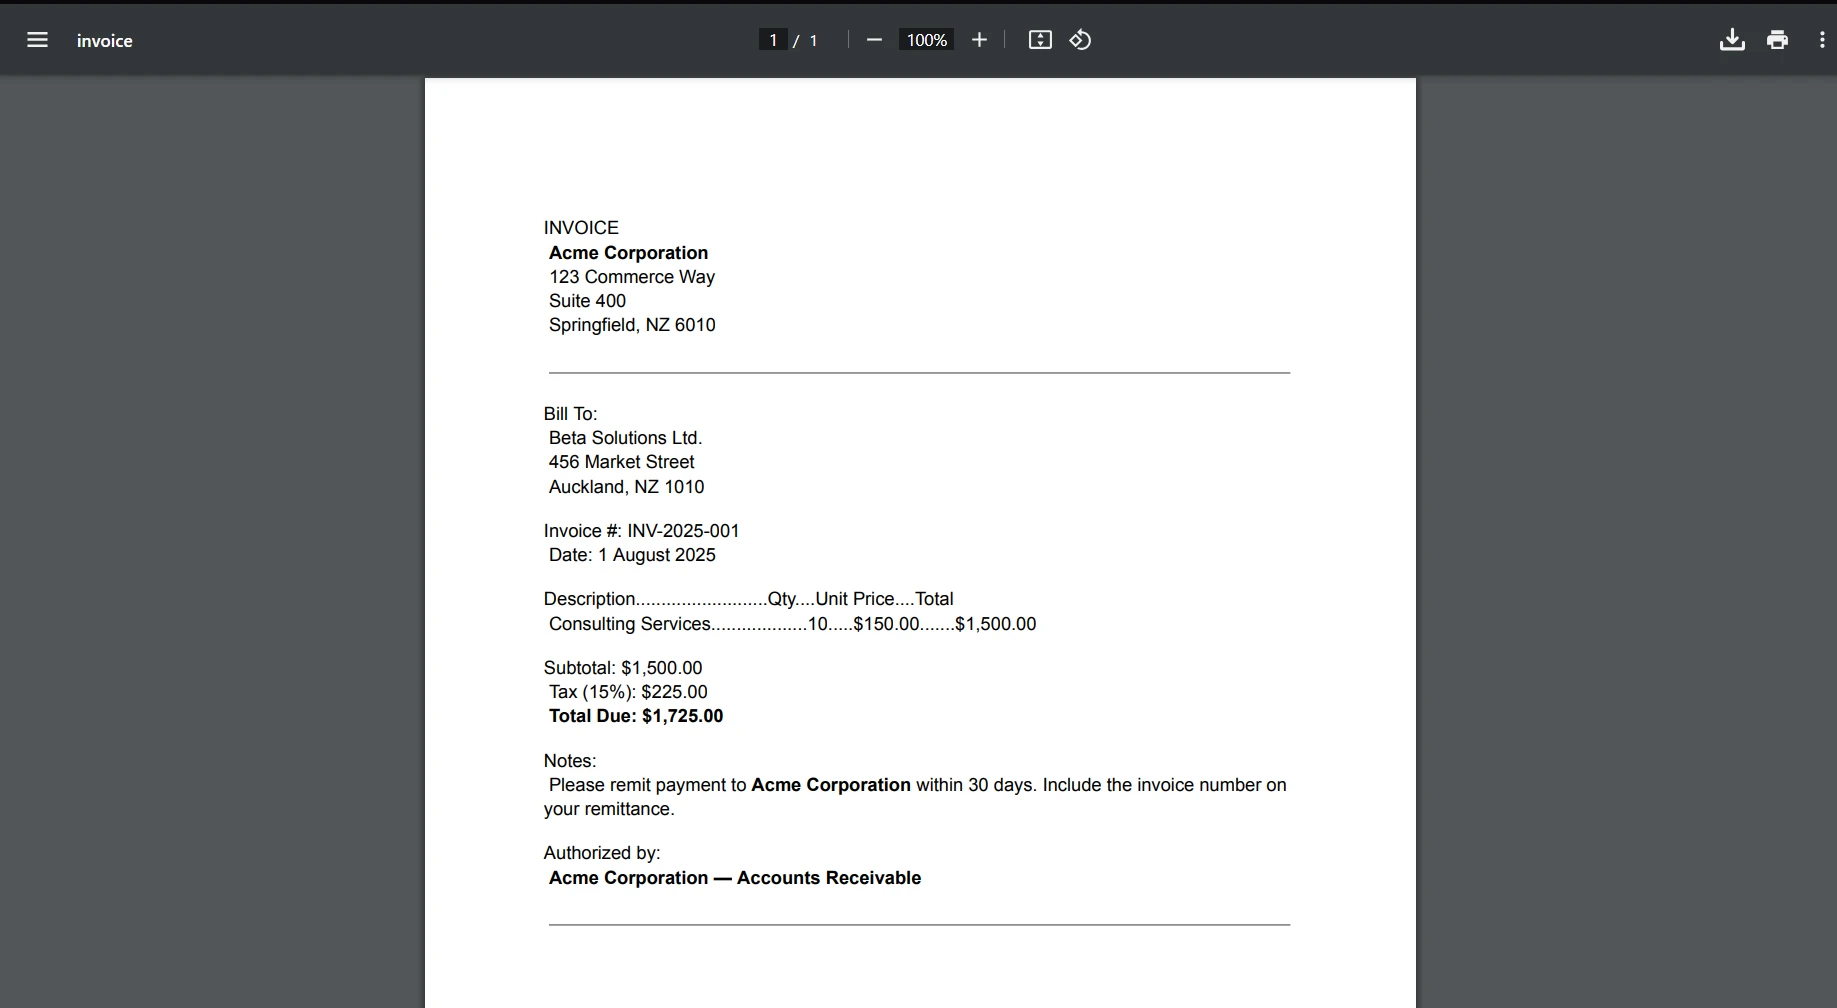
</html>MAUI Blazor App은 아래에 나타나는 출력을 생성합니다.

.NET MAUI Blazor를 사용하여 PDF 생성
Blazor PDF 생성 튜토리얼과 .NET MAUI 애플리케이션에 대한 ChromePdfRenderer의 추가 정보를 얻으십시오.
IronXL

IronXL
IronXL은 C#에서 Excel 스프레드시트를 읽고, 편집하고, 생성할 수 있게 해주는 .NET 라이브러리입니다. Microsoft Excel 설치가 필요하지 않으며 Android, iOS, macOS, Windows 머신, Azure를 포함한 모든 플랫폼을 지원합니다. 다양한 형식에서 데이터를 로드하고 편집하는 기능, 다양한 형식으로 저장 및 내보내기, System.Data 객체와의 작업, 수식 처리, 데이터 정렬 및 셀 스타일링 등을 제공합니다. 또한, NuGet 패키지로 제공되며 웹사이트 및 GitHub 리포지토리에서 문서와 예제를 사용할 수 있습니다.
IronXL은 .NET MAUI와 Blazor를 지원하여 사용자들이 Excel 스프레드시트, 웹 또는 Azure 서비스, 기타 애플리케이션을 포함한 다양한 소스에서 데이터를 액세스하거나 가져올 수 있는 능력을 제공합니다. IronXL의 .NET MAUI와 Blazor 지원으로 개발자들은 iOS, macOS, Windows, Android 기기에서 매력적인 사용자 인터페이스를 개발할 수 있는 가장 강력한 도구를 제공합니다.
IronXL의 샘플 코드를 살펴보겠습니다:
using IronXL;
using IronXL.Formatting;
using IronXL.Formatting.Enums;
using IronXL.Styles;

// Load an existing Excel workbook
WorkBook workbook = WorkBook.Load("test.xlsx");
WorkSheet sheet = workbook.DefaultWorkSheet;

// Create a specific conditional formatting rule for cells with values less than 8
ConditionalFormattingRule rule = sheet.ConditionalFormatting.CreateConditionalFormattingRule(ComparisonOperator.LessThan, "8");

// Set different style options for the rule
rule.FontFormatting.IsBold = true; // Bold text
rule.FontFormatting.FontColor = "#123456"; // Custom font color
rule.BorderFormatting.RightBorderColor = "#ffffff"; // Right border color
rule.BorderFormatting.RightBorderType = BorderType.Thick; // Right border thickness
rule.PatternFormatting.BackgroundColor = "#54bdd9"; // Background color
rule.PatternFormatting.FillPattern = FillPattern.Diamonds; // Fill pattern

// Add the formatting rule to the specified cell range
sheet.ConditionalFormatting.AddConditionalFormatting("A3:A8", rule);

// Create another conditional formatting rule for values between 7 and 10
ConditionalFormattingRule rule1 = sheet.ConditionalFormatting.CreateConditionalFormattingRule(ComparisonOperator.Between, "7", "10");

// Set additional style options for the new rule
rule1.FontFormatting.IsItalic = true; // Italic text
rule1.FontFormatting.UnderlineType = FontUnderlineType.Single; // Single underline

// Add this formatting rule to a different range of cells
sheet.ConditionalFormatting.AddConditionalFormatting("A3:A9", rule1);

// Save the workbook with the applied conditional formatting
workbook.SaveAs("ApplyConditionalFormatting.xlsx");
using IronXL;
using IronXL.Formatting;
using IronXL.Formatting.Enums;
using IronXL.Styles;
// Load an existing Excel workbook
WorkBook workbook = WorkBook.Load("test.xlsx");
WorkSheet sheet = workbook.DefaultWorkSheet;
// Create a specific conditional formatting rule for cells with values less than 8
ConditionalFormattingRule rule = sheet.ConditionalFormatting.CreateConditionalFormattingRule(ComparisonOperator.LessThan, "8");
// Set different style options for the rule
rule.FontFormatting.IsBold = true; // Bold text
rule.FontFormatting.FontColor = "#123456"; // Custom font color
rule.BorderFormatting.RightBorderColor = "#ffffff"; // Right border color
rule.BorderFormatting.RightBorderType = BorderType.Thick; // Right border thickness
rule.PatternFormatting.BackgroundColor = "#54bdd9"; // Background color
rule.PatternFormatting.FillPattern = FillPattern.Diamonds; // Fill pattern
// Add the formatting rule to the specified cell range
sheet.ConditionalFormatting.AddConditionalFormatting("A3:A8", rule);
// Create another conditional formatting rule for values between 7 and 10
ConditionalFormattingRule rule1 = sheet.ConditionalFormatting.CreateConditionalFormattingRule(ComparisonOperator.Between, "7", "10");
// Set additional style options for the new rule
rule1.FontFormatting.IsItalic = true; // Italic text
rule1.FontFormatting.UnderlineType = FontUnderlineType.Single; // Single underline
// Add this formatting rule to a different range of cells
sheet.ConditionalFormatting.AddConditionalFormatting("A3:A9", rule1);
// Save the workbook with the applied conditional formatting
workbook.SaveAs("ApplyConditionalFormatting.xlsx");Imports IronXL
Imports IronXL.Formatting
Imports IronXL.Formatting.Enums
Imports IronXL.Styles
' Load an existing Excel workbook
Private workbook As WorkBook = WorkBook.Load("test.xlsx")
Private sheet As WorkSheet = workbook.DefaultWorkSheet
' Create a specific conditional formatting rule for cells with values less than 8
Private rule As ConditionalFormattingRule = sheet.ConditionalFormatting.CreateConditionalFormattingRule(ComparisonOperator.LessThan, "8")
' Set different style options for the rule
rule.FontFormatting.IsBold = True ' Bold text
rule.FontFormatting.FontColor = "#123456" ' Custom font color
rule.BorderFormatting.RightBorderColor = "#ffffff" ' Right border color
rule.BorderFormatting.RightBorderType = BorderType.Thick ' Right border thickness
rule.PatternFormatting.BackgroundColor = "#54bdd9" ' Background color
rule.PatternFormatting.FillPattern = FillPattern.Diamonds ' Fill pattern
' Add the formatting rule to the specified cell range
sheet.ConditionalFormatting.AddConditionalFormatting("A3:A8", rule)
' Create another conditional formatting rule for values between 7 and 10
Dim rule1 As ConditionalFormattingRule = sheet.ConditionalFormatting.CreateConditionalFormattingRule(ComparisonOperator.Between, "7", "10")
' Set additional style options for the new rule
rule1.FontFormatting.IsItalic = True ' Italic text
rule1.FontFormatting.UnderlineType = FontUnderlineType.Single ' Single underline
' Add this formatting rule to a different range of cells
sheet.ConditionalFormatting.AddConditionalFormatting("A3:A9", rule1)
' Save the workbook with the applied conditional formatting
workbook.SaveAs("ApplyConditionalFormatting.xlsx")위 코드는 이미 존재하는 Excel 파일을 열고 다양한 셀 범위에 조건부 서식을 적용하는 데 도움이 됩니다. 다음 Excel 조건부 서식 튜토리얼을 통해 IronXL에 대한 더 많은 튜토리얼을 얻으십시오.
IronOCR

IronOCR
IronOCR는 C# 개발자들 사이에서 널리 사용되는 OCR 도구로, C# 애플리케이션에 OCR 기능을 통합하기 위한 간단한 API를 제공합니다. 스캔된 문서, PDF, 이미지 등 다양한 소스에서 텍스트를 효과적으로 추출할 수 있으며, 왜곡되거나 읽기 어려운 텍스트조차 정확히 인식할 수 있는 최신 머신 러닝 알고리즘을 사용합니다. IronOCR는 인식된 텍스트의 언어, 서체, 문자 세트, 예측 컬렉션을 조정하고 OCR 정확도를 향상시키기 위한 이미지를 사전 처리할 수 있는 다양한 사용자 정의 옵션을 C# 개발자에게 제공합니다. 이러한 사용자 정의 기능은 개발자가 IronOCR의 성능을 특정 요구에 맞게 최적화할 수 있게 해줍니다.
IronOCR는 .NET MAUI와 Blazor를 지원하는 강력한 OCR 인식 라이브러리입니다. IronOCR를 사용하면 개발자들은 많은 텍스트 데이터를 스캔, 읽기, 쓰는 복잡성에 대해 걱정할 필요 없이 어떤 플랫폼에서든지 애플리케이션을 빠르게 생성할 수 있습니다. 다른 OCR 소프트웨어에서는 이렇게 간단한 통합으로 다양한 개발 도구에 대한 접근을 제공하지 않습니다.
IronOCR를 사용하여 PDF 파일에서 텍스트를 추출하는 방법을 보여주는 IronOCR의 예제를 살펴보십시오.
using IronOcr;

var ocrTesseract = new IronTesseract();

using (var ocrInput = new OcrInput())
{
    // OCR the entire document
    ocrInput.AddPdf("example.pdf", "password");

    // Alternatively OCR selected page numbers
    ocrInput.AddPdfPages("example.pdf", new[] { 1, 2, 3 }, "password");

    var ocrResult = ocrTesseract.Read(ocrInput);
    Console.WriteLine(ocrResult.Text);
}
using IronOcr;
var ocrTesseract = new IronTesseract();
using (var ocrInput = new OcrInput())
{
// OCR the entire document
ocrInput.AddPdf("example.pdf", "password");
// Alternatively OCR selected page numbers
ocrInput.AddPdfPages("example.pdf", new[] { 1, 2, 3 }, "password");
var ocrResult = ocrTesseract.Read(ocrInput);
Console.WriteLine(ocrResult.Text);
}Imports IronOcr
Private ocrTesseract = New IronTesseract()
Using ocrInput As New OcrInput()
' OCR the entire document
ocrInput.AddPdf("example.pdf", "password")
' Alternatively OCR selected page numbers
ocrInput.AddPdfPages("example.pdf", { 1, 2, 3 }, "password")
Dim ocrResult = ocrTesseract.Read(ocrInput)
Console.WriteLine(ocrResult.Text)
End Using이 .NET MAUI 튜토리얼에서 IronOCR를 .NET Maui에서 사용하는 방법에 대한 더 많은 튜토리얼을 읽어보십시오.
다음 PDF OCR 튜토리얼을 사용하여 IronOCR에 대한 더 많은 튜토리얼을 얻으십시오.
IronBarcode

IronBarcode
.NET Maui에서 바코드 스캐너를 생성하는 방법
- Maui에서 바코드 스캐너를 생성하기 위해 C# 라이브러리를 다운로드하십시오
- PDF 및 이미지에서 바코드를 스캔하기 위해
Read메서드를 사용하십시오 - QR 코드, 코드 39, 코드 128 등을 포함한 다양한 바코드 형식을 지원합니다
- C# 라이브러리를 기존의 .NET MAUI 및 Blazor 프로젝트에 쉽게 통합하십시오
- 완벽하지 않은 이미지에 전처리를 적용하십시오
IronBarcode는 개발자가 C# 애플리케이션에 바코드 읽기 및 쓰기 기능을 쉽게 추가할 수 있는 C# 라이브러리입니다. 이 라이브러리는 재고 관리 시스템이나 판매 시점 시스템과 같은 바코드를 스캔하거나 생성하는 프로젝트를 작업하는 사람들에게 특히 유용합니다. IronBarcode의 주요 기능 중 하나는 QR코드, 코드 39, 코드 128 및 기타 여러 바코드 형식을 읽고 쓰는 능력입니다. 이는 개발자가 프로젝트의 요구에 따라 다양한 바코드 유형을 작업할 수 있게 합니다.
IronBarcode는 개발자가 현대적이고, 크로스 플랫폼 애플리케이션을 구축하는 데 사용되는 두 가지 인기 있는 프레임워크인 .NET MAUI와 Blazor를 지원합니다. 이는 개발자에게 .NET MAUI 및 Blazor 프로젝트에 IronBarcode의 강력한 바코드 생성 및 스캔 기능을 쉽게 통합할 수 있는 이점을 제공합니다.
다음 코드 예제는 IronBarcode를 사용하여 여러 유형의 바코드를 읽는 방법을 보여줍니다. 아주 간단하고 이해하기 쉬운 과정입니다.
using IronBarCode;
using IronSoftware.Drawing;

// Reading a barcode is easy with IronBarcode.
// Read from a File, Bitmap, Image, or Stream:

var resultFromFile = BarcodeReader.Read(@"file/barcode.png"); // From a file

var resultFromBitMap = BarcodeReader.Read(new Bitmap("barcode.bmp")); // From a bitmap

var resultFromAnyBitmap = BarcodeReader.Read(new AnyBitmap("barcode.bmp")); // From AnyBitmap

var resultFromImage = BarcodeReader.Read(Image.FromFile("barcode.jpg")); // From an image

var resultFromStream = BarcodeReader.Read(myStream); // From a stream

// PDFs are more intricate and must be read using ReadPdf:
var resultFromPdf = BarcodeReader.ReadPdf(@"file/mydocument.pdf");
using IronBarCode;
using IronSoftware.Drawing;
// Reading a barcode is easy with IronBarcode.
// Read from a File, Bitmap, Image, or Stream:
var resultFromFile = BarcodeReader.Read(@"file/barcode.png"); // From a file
var resultFromBitMap = BarcodeReader.Read(new Bitmap("barcode.bmp")); // From a bitmap
var resultFromAnyBitmap = BarcodeReader.Read(new AnyBitmap("barcode.bmp")); // From AnyBitmap
var resultFromImage = BarcodeReader.Read(Image.FromFile("barcode.jpg")); // From an image
var resultFromStream = BarcodeReader.Read(myStream); // From a stream
// PDFs are more intricate and must be read using ReadPdf:
var resultFromPdf = BarcodeReader.ReadPdf(@"file/mydocument.pdf");Imports IronBarCode
Imports IronSoftware.Drawing
' Reading a barcode is easy with IronBarcode.
' Read from a File, Bitmap, Image, or Stream:
Private resultFromFile = BarcodeReader.Read("file/barcode.png") ' From a file
Private resultFromBitMap = BarcodeReader.Read(New Bitmap("barcode.bmp")) ' From a bitmap
Private resultFromAnyBitmap = BarcodeReader.Read(New AnyBitmap("barcode.bmp")) ' From AnyBitmap
Private resultFromImage = BarcodeReader.Read(Image.FromFile("barcode.jpg")) ' From an image
Private resultFromStream = BarcodeReader.Read(myStream) ' From a stream
' PDFs are more intricate and must be read using ReadPdf:
Private resultFromPdf = BarcodeReader.ReadPdf("file/mydocument.pdf")이 .NET MAUI 튜토리얼에서 IronBarcode를 .NET Maui에서 사용하는 방법에 대한 더 많은 튜토리얼을 읽어보십시오.
다음 바코드 스캐너 리더 튜토리얼을 사용하여 IronBarcode의 더 많은 사용 사례 및 튜토리얼을 얻으십시오.
철을 뽑는 과정

철을 뽑는 과정
철을 뽑는 과정은 그래픽, 이미지, 글꼴을 사용하는 크로스 플랫폼 애플리케이션을 생성해야 하는 .NET 개발자를 위한 솔루션인 무료, 오픈 소스 라이브러리입니다. 이는 다양한 그래픽 라이브러리들 간의 다리 역할을 하여, 개발자들이 선택한 기본 라이브러리를 여전히 사용할 수 있으면서도 코드에서 단일, 일관된 형식을 사용할 수 있게 합니다. 철을 뽑는 과정은 .NET 5, 6, 7을 포함하여 .NET Framework 4.6.2 이상과 호환됩니다.
철을 뽑는 과정은 경험이 풍부한 .NET 개발팀인 Iron Software에 의해 개발 및 유지보수 되고 있으며 .NET의 성장과 성공을 위해 헌신하고 있습니다. 그들은 철을 뽑는 과정을 만들어 클래스 라이브러리와 NuGet 개발을 더욱 쉽게 만들고 NuGet 생태계가 번창할 수 있도록 했습니다.
철을 뽑는 과정 개발 이유
철을 뽑는 과정은 System.Drawing.Common가 Windows 플랫폼에서만 지원된다고 발표한 Microsoft의 큰 변화에 대응하여 개발되었습니다. 이 변경은 Android, iOS와 같은 비-Windows 사용자들을 지원하기 위해 라이브러리를 재구축해야 하는 교차 플랫폼 라이브러리를 유지하는 개발자들에게 문제를 제기했습니다. 철을 뽑는 과정은 다양한 그래픽 라이브러리 간의 변환을 가능하게 하는 중간 형식으로 만들어져, 새로운 그래픽 표준으로의 전환을 쉽게 만듭니다.
철을 뽑는 과정의 기능
철을 뽑는 과정은 개발자들이 일을 돕기 위해 여러 가지 기능을 제공하며, 범용적으로 호환 가능한 Bitmap 클래스로, 다양한 다른 Bitmap 구현으로 캐스트할 수 있는 AnyBitmap을 제공합니다; 범용적으로 호환 가능한 Color 클래스인 Color; 범용적으로 호환 가능한 Rectangle 클래스인 CropRectangle; 그리고 범용적으로 호환 가능한 Font 클래스인 AnyFont. 이 클래스들과 다른 그래픽 라이브러리의 대응되는 것들 간의 암시적 캐스트도 제공하여, 쉽게 변환할 수 있습니다. NuGet 웹사이트에서 가져올 수 있습니다.
철을 뽑는 과정은 .NET MAUI 및 Blazor를 포함한 거의 모든 .NET 템플릿을 지원합니다. 플랫폼 독립적인 특성 덕분에 Windows 데스크톱부터 모바일 또는 웹 기반 프로젝트까지 다양한 응용 프로그램에서 사용하기가 용이합니다.
오픈 소스의 이점
철을 뽑는 과정은 오픈 소스 라이브러리입니다. GitHub 리포지토리에서 코드에 접근할 수 있어, 개별 프로젝트와 요구에 맞게 라이브러리를 쉽게 커스터마이즈하고 수정할 수 있습니다. 게다가, 소스 코드를 공개적으로 제공함으로써 개발자들 간의 협업을 촉진하고 아이디어를 공유하고 빌드할 수 있도록 합니다. 철을 뽑는 과정 C# 라이브러리를 통해 무한한 가능성이 열립니다. GitHub에서 확인하고 탐색을 시작하세요!
여러 파일 형식에서 AnyBitmap을 생성하는 철을 뽑는 과정 코드 예제를 살펴보겠습니다.
using IronSoftware.Drawing;

AnyBitmap bitmap;

// Generate AnyBitmap using filepath
bitmap = AnyBitmap.FromFile(@"FILE_PATH");
bitmap.SaveAs("output.bmp");

// Generate AnyBitmap from bytes
byte[] bytes = File.ReadAllBytes(@"FILE_PATH");
bitmap = AnyBitmap.FromBytes(bytes);
bitmap.SaveAs("result.bmp");

// Generate AnyBitmap from memory stream
byte[] bytes = File.ReadAllBytes(@"FILE_PATH");
MemoryStream ms = new MemoryStream(bytes);
bitmap = AnyBitmap.FromStream(ms);
bitmap.SaveAs("output.bmp");

// Generate AnyBitmap from Uri
Uri uri = new Uri("URI_PATH");
bitmap = AnyBitmap.FromUri(uri);
bitmap.SaveAs("uriImage.bmp");

// Generate AnyBitmap file from SVG file
bitmap = AnyBitmap.FromFile(@"FILE_PATH.svg");
bitmap.SaveAs("result.bmp");
using IronSoftware.Drawing;
AnyBitmap bitmap;
// Generate AnyBitmap using filepath
bitmap = AnyBitmap.FromFile(@"FILE_PATH");
bitmap.SaveAs("output.bmp");
// Generate AnyBitmap from bytes
byte[] bytes = File.ReadAllBytes(@"FILE_PATH");
bitmap = AnyBitmap.FromBytes(bytes);
bitmap.SaveAs("result.bmp");
// Generate AnyBitmap from memory stream
byte[] bytes = File.ReadAllBytes(@"FILE_PATH");
MemoryStream ms = new MemoryStream(bytes);
bitmap = AnyBitmap.FromStream(ms);
bitmap.SaveAs("output.bmp");
// Generate AnyBitmap from Uri
Uri uri = new Uri("URI_PATH");
bitmap = AnyBitmap.FromUri(uri);
bitmap.SaveAs("uriImage.bmp");
// Generate AnyBitmap file from SVG file
bitmap = AnyBitmap.FromFile(@"FILE_PATH.svg");
bitmap.SaveAs("result.bmp"); Imports IronSoftware.Drawing
Private bitmap As AnyBitmap
' Generate AnyBitmap using filepath
bitmap = AnyBitmap.FromFile("FILE_PATH")
bitmap.SaveAs("output.bmp")
' Generate AnyBitmap from bytes
Dim bytes() As Byte = File.ReadAllBytes("FILE_PATH")
bitmap = AnyBitmap.FromBytes(bytes)
bitmap.SaveAs("result.bmp")
' Generate AnyBitmap from memory stream
Dim bytes() As Byte = File.ReadAllBytes("FILE_PATH")
Dim ms As New MemoryStream(bytes)
bitmap = AnyBitmap.FromStream(ms)
bitmap.SaveAs("output.bmp")
' Generate AnyBitmap from Uri
Dim uri As New Uri("URI_PATH")
bitmap = AnyBitmap.FromUri(uri)
bitmap.SaveAs("uriImage.bmp")
' Generate AnyBitmap file from SVG file
bitmap = AnyBitmap.FromFile("FILE_PATH.svg")
bitmap.SaveAs("result.bmp")철을 뽑는 과정은 경로에서 비트맵으로 파일을 변환하는 데 여러 방법을 사용합니다. 철을 뽑는 과정이 메모리 스트림을 사용하여 서버 기반 응용 프로그램에서 매우 유용한 BMP로 파일을 변환하는 것을 볼 수 있습니다. 마찬가지로, SVG 파일을 사용하여 BMP를 생성할 수 있습니다.

철을 뽑는 과정 오픈 소스 라이브러리에서 생성된 비트맵 파일
가격
Iron Software는 Iron Suite라 불리는 다섯 가지 소프트웨어 제품군을 제공합니다. 이 제품군에는 PDF, 스프레드시트, 이미지, 웹 스크래핑 및 바코드에 각각 사용되는 도구인 ChromePdfRenderer, IronXL, IronOCR, IronWebScraper 및 IronBarcode가 포함되어 있습니다.
이 제품들은 개별적으로 라이선스당 $999에서 시작되는 가격으로 제공되지만, Iron Software는 전체 제품 모음을 위한 특별 번들 가격을 제공합니다. 이 가격은 $1498부터 시작합니다. Iron Suite는 여러 파일 유형으로 작업해야 하며, 변환, 분석 및 조작 프로세스를 자동화해야 하는 사람들에게 훌륭한 솔루션입니다.
결론
결론적으로, .NET MAUI는 크로스 플랫폼 데스크톱 및 모바일 애플리케이션을 구축하기 위한 프레임워크입니다. 기사에서는 여러 라이브러리들인 ChromePdfRenderer, IronXL, IronBarcode, IronOCR 및 철을 뽑는 과정을 다루었으며, 이는 PDF 문서 생성 및 조작, Excel 파일 읽기 및 쓰기, 바코드 생성 및 스캔, 광학 문자 인식, 그래픽 그리기 및 조작이라고 하는 다양한 기능을 제공합니다.
이 라이브러리들 중 철을 뽑는 과정은 .NET 응용 프로그램에서 벡터 그래픽을 생성하고 편집하기 위한 강력한 도구로 두드러집니다. 다양한 기능을 제공하고 사용하기 쉬워 .NET MAUI 프레임워크에 가치 있는 추가 요소입니다. 전반적으로 .NET MAUI와 이러한 라이브러리들의 조합은 다양한 플랫폼에서 현대적이고 기능이 풍부한 응용 프로그램을 빌드하는 데 있어 개발자에게 다재다능한 도구를 제공합니다.
자주 묻는 질문
.NET MAUI 애플리케이션에 PDF 기능을 어떻게 통합할 수 있나요?
IronPDF를 사용하여 PDF 기능을 통합할 수 있습니다. .NET Chromium 엔진을 사용하여 HTML을 PDF로 변환할 수 있습니다. 이 통합은 .NET MAUI 애플리케이션 내에서 PDF 문서를 생성 및 조작할 수 있도록 지원합니다.
.NET MAUI 프로젝트에서 Excel 라이브러리를 사용하는 이점은 무엇인가요?
.NET MAUI 프로젝트에서 IronXL을 사용하면 Microsoft Excel 설치 없이도 Excel 스프레드시트를 조작할 수 있습니다. 안드로이드, iOS, macOS 및 Windows와 같은 플랫폼에서 스프레드시트를 읽고, 편집하고, 생성하는 것을 지원합니다.
IronOCR는 .NET MAUI 앱의 텍스트 추출을 어떻게 향상시키나요?
IronOCR는 .NET MAUI 앱에서 고급 OCR 기능을 제공하여 스캔된 문서, PDF 및 이미지에서 정확한 텍스트 추출을 가능하게 합니다. 기계 학습 알고리즘을 사용하며 언어 및 글꼴에 대한 맞춤 설정을 제공합니다.
.NET MAUI 및 Blazor 앱에서 구현할 수 있는 바코드 기능은 무엇인가요?
IronBarcode는 .NET MAUI 및 Blazor 앱에서 바코드 읽기 및 쓰기 기능을 추가할 수 있도록 통합될 수 있습니다. QR 코드와 Code 128을 포함한 여러 바코드 형식을 지원하여 재고 관리와 같은 애플리케이션에 적합합니다.
IronDrawing은 크로스 플랫폼 그래픽 개발에 어떻게 도움이 되나요?
IronDrawing은 .NET에서 크로스 플랫폼 그래픽 애플리케이션을 만드는 무료 오픈 소스 라이브러리입니다. 그래픽의 일관된 형식을 제공하며, Microsoft의 System.Drawing.Common 지원 변화로 인한 공백을 메웁니다.
.NET MAUI 애플리케이션에서 BlazorWebView의 역할은 무엇입니까?
BlazorWebView는 .NET MAUI에서 MAUI Blazor 서버 앱을 .NET MAUI 프로젝트에 통합할 수 있도록 하는 컨트롤입니다. 이는 네이티브 앱 내에 웹 UI 컨트롤을 렌더링하여 크로스 플랫폼 애플리케이션을 생성하는 데 도움을 줍니다.
.NET MAUI를 사용하여 크로스 플랫폼 개발을 어떻게 달성할 수 있습니까?
.NET MAUI에서의 크로스 플랫폼 개발은 Android, iOS, macOS 및 Windows에서 실행되는 애플리케이션을 빌드할 수 있는 프레임워크를 사용하여 달성할 수 있습니다. BlazorWebView와의 통합은 웹 UI 컨트롤을 사용할 수 있게 하여 이를 더욱 향상시킵니다.
현대 애플리케이션 개발 for .NET MAUI의 주요 기능은 무엇입니까?
.NET MAUI는 네이티브 성능을 가진 크로스 플랫폼 애플리케이션을 빌드할 수 있는 프레임워크를 제공합니다. 주요 기능으로는 웹 UI 컨트롤을 위한 BlazorWebView의 통합과 IronPDF, IronXL, IronOCR, IronBarcode, IronDrawing과 같은 라이브러리와의 호환성이 포함됩니다.