
Socket io node.js (How It Works For Developers)
Real-time interactivity and dynamic content creation are now prerequisites in the world of modern web development to provide compelling user experiences. Instantaneous data sharing is made possible by technologies like Socket.IO, which enables bidirectional, real-time communication between clients and servers. Meanwhile, IronPDF provides powerful features for producing PDF documents of excellent quality from HTML text in a Node.js environment.
When Socket.IO and IronPDF are integrated, developers can construct apps that let users interact in real-time and see the effects of their activities right away. Examples of these applications include the ability to generate and download PDF reports, invoices, and other dynamically created documents. This potent combination is best suited for use cases in e-commerce, reporting systems, educational platforms, and other areas where real-time updates and prompt feedback are needed.
To show how these technologies may be combined to produce a smooth and engaging user experience, we will look at how to put up a Node.js application that uses Socket.IO for real-time socket communication and IronPDF for PDF generation.
What is Socket.IO Node.js JS?
Real-time, bidirectional, and event-based communication between clients and servers is made possible by the robust client JavaScript library of Socket.IO. Constructed as an extension of WebSockets, it offers supplementary functionalities and fallback choices to guarantee dependable communication in diverse settings. For creating dynamic web applications that need to share data instantly, such as chat programs, teamwork tools, real-time updates, and gaming platforms, the Socket.IO JavaScript client library is a great option.
Advantages of Socket IO
Real-Time Communication
Allows the HTTP server, the client, the IO app, and the IO server to communicate in both directions instantly. It is perfect for applications that need real-time data updates since it guarantees low-latency message delivery.
Event-Driven Architecture
Enables developers to build and manage custom events with ease thanks to the use of an event-based paradigm, reducing the complexity of managing intricate client-server interactions.
Cross-Browser Compatibility
Functions flawlessly across various systems and browsers. Offers fallback options (such as extended polling) in situations where WebSockets are not supported.
Scalability
Supports the connection of several adapters, including Redis, for horizontal connection scaling, enabling the application to connect and manage many connected clients simultaneously. Due to its efficient resource utilization design, it can be used in high-traffic applications.
Automatic Reconnection
Provides resilience and reliability by automatically attempting to reconnect in the event that a connection is lost. Configurable reconnection logic controls the frequency and nature of reconnection attempts.
Room Support
Enables organizing interconnected clients into "rooms" for easier broadcasting of messages to subsets of sockets or specific clients. Dynamically entering and exiting rooms is supported, making it useful for gaming, chat apps, and collaboration tools.
Middleware
Allows event data processing and message handling by middleware functions before reaching handlers. Useful for tasks such as data validation, message logging, and authentication.
Security
Supports a number of security features, including authorization, authentication, and CORS (Cross-Origin Resource Sharing) settings. Integrates with HTTPS and other security protocols to guarantee secure communication pathways.
Debugging and Logging
Integrated debugging and logging capabilities facilitate problem diagnosis and behavior monitoring of the application. Adjustable logging levels allow management of console log detail.
Create and Configure Socket.io
The Socket.IO library allows clients and servers to communicate in real time, both ways, and based on events. Here's a step-by-step tutorial on configuring a Socket.IO client in a Node.js program.
Install Required Packages
Use npm to install the Socket.IO and Express package:
npm install express
npm install socket.io
npm install express
npm install socket.ioCreate the Server
Establish the foundational Express WebSocket server with Socket.IO integration by creating a file called server.js.
// Import necessary modules
const express = require('express');
const http = require('http');
const socketIo = require('socket.io');
// Create an Express application
const app = express();
const server = http.createServer(app);
const io = socketIo(server);
// Serve static files from the "public" directory
app.use(express.static('public'));
// Handle socket connection
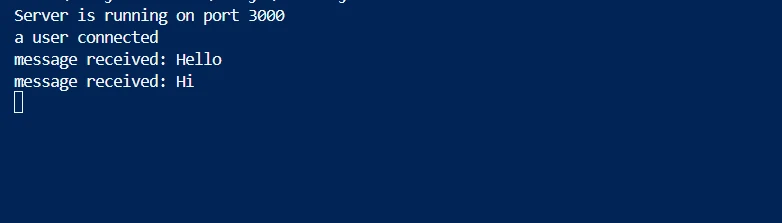
io.on('connection', (socket) => {
console.log('a user connected');
// Handle custom event from client
socket.on('message', (msg) => {
console.log('message received: ' + msg);
// Broadcast the message to all clients
io.emit('message', msg);
});
// Handle disconnection
socket.on('disconnect', () => {
console.log('user disconnected');
});
});
// Start the server on the specified port
const PORT = process.env.PORT || 3000;
server.listen(PORT, () => {
console.log(`Server is running on port ${PORT}`);
});// Import necessary modules
const express = require('express');
const http = require('http');
const socketIo = require('socket.io');
// Create an Express application
const app = express();
const server = http.createServer(app);
const io = socketIo(server);
// Serve static files from the "public" directory
app.use(express.static('public'));
// Handle socket connection
io.on('connection', (socket) => {
console.log('a user connected');
// Handle custom event from client
socket.on('message', (msg) => {
console.log('message received: ' + msg);
// Broadcast the message to all clients
io.emit('message', msg);
});
// Handle disconnection
socket.on('disconnect', () => {
console.log('user disconnected');
});
});
// Start the server on the specified port
const PORT = process.env.PORT || 3000;
server.listen(PORT, () => {
console.log(`Server is running on port ${PORT}`);
});
Create the Client
To act as the client, create a directory called public and a file called index.html inside of it.
<!DOCTYPE html>
<html lang="en">
<head>
    <meta charset="UTF-8">
    <meta name="viewport" content="width=device-width, initial-scale=1.0">
    <title>Socket.IO Demo</title>
    <script src="/socket.io/socket.io.js"></script>
</head>
<body>
    <h1>Socket.IO Demo</h1>

    <input id="messageInput" type="text" placeholder="Type a message" />

    <button onclick="sendMessage()">Send</button>

    <ul id="messages"></ul>

    <script>
        // Initialize Socket.IO client
        const socket = io();

        // Listen for messages from the server
        socket.on('message', (msg) => {
            const li = document.createElement('li');
            li.textContent = msg;
            document.getElementById('messages').appendChild(li);
        });

        // Function to send a message to the server
        function sendMessage() {
            const msg = document.getElementById('messageInput').value;
            socket.emit('message', msg);
            document.getElementById('messageInput').value = '';
        }
    </script>
</body>
</html>
<!DOCTYPE html>
<html lang="en">
<head>
<meta charset="UTF-8">
<meta name="viewport" content="width=device-width, initial-scale=1.0">
<title>Socket.IO Demo</title>
<script src="/socket.io/socket.io.js"></script>
</head>
<body>
<h1>Socket.IO Demo</h1>
<input id="messageInput" type="text" placeholder="Type a message" />
<button onclick="sendMessage()">Send</button>
<ul id="messages"></ul>
<script>
// Initialize Socket.IO client
const socket = io();
// Listen for messages from the server
socket.on('message', (msg) => {
const li = document.createElement('li');
li.textContent = msg;
document.getElementById('messages').appendChild(li);
});
// Function to send a message to the server
function sendMessage() {
const msg = document.getElementById('messageInput').value;
socket.emit('message', msg);
document.getElementById('messageInput').value = '';
}
</script>
</body>
</html>
Getting Started with IronPDF
By combining IronPDF for dynamic PDF generation with Socket.IO to enable real-time communication, we can construct interactive web apps that can generate and serve PDFs quickly. You will learn how to set up a Node.js project that incorporates IronPDF and Socket.IO by following this guide.
What is IronPDF?
Use the robust IronPDF Node.js library to create, modify, and convert PDF files. It enables programmers to deal with existing PDFs, convert HTML to PDFs, and carry out a number of programming-based tasks connected to PDFs. IronPDF offers a flexible and intuitive way to create high-quality PDF documents, making it a good choice for applications that require dynamic PDF generation and processing.

Key features of IronPDF
Some of the key features of IronPDF are as follows:
1. Convert HTML to PDF
Convert your HTML files into PDF documents using IronPDF. This allows web content to be rendered into aesthetically beautiful PDF publications using the latest versions of HTML5, CSS3, and JavaScript.
2. Making and Editing PDFs
Add text, images, tables, and other content to newly created PDF documents programmatically. IronPDF allows you to open and edit existing PDF documents, adding to or modifying content as needed.
3. Sophisticated Layout and Styling
Use CSS to style PDFs when viewed in the user's browser, including support for complex layouts, fonts, colors, and other design elements. Using JavaScript to render HTML content allows for dynamic content addition to PDFs.
IronPDF Installation
Install the required IronPDF package in Node.js by using the node package manager to enable IronPDF functionality. Run the following command:
npm i @ironsoftware/ironpdf
Client Code
<!DOCTYPE html>
<html lang="en">
<head>
  <meta charset="UTF-8">
  <meta name="viewport" content="width=device-width, initial-scale=1.0">
  <script src="https://cdn.socket.io/4.7.5/socket.io.min.js"></script>
  <title>WebSocket Client</title>
</head>
<body>
  <h1>PDF Generation with Socket.IO and IronPDF</h1>

  <input id="Title" type="text" placeholder="Enter PDF Title" />

  <textarea id="content" placeholder="Enter PDF Content"></textarea>

  <button onclick="sendMessage()">Send</button>

  <ul id="messages"></ul>

  <script>
    const socket = io('http://localhost:3000');

    // Listen for messages from the server
    socket.on('message', (msg) => {
        const li = document.createElement('li');
        li.textContent = msg;
        document.getElementById('messages').appendChild(li);
    });

    // Function to send a message to the server and generate a PDF
    function sendMessage() {
      const ITitle = document.getElementById('Title');
      const IContent = document.getElementById('content');
      const message = {
        title: ITitle.value,
        content: IContent.value
      };

      // Emit message event to the server
      socket.emit('generatePDF', message);

      // Clear input fields
      ITitle.value = '';
      IContent.value = '';
    }
  </script>
</body>
</html>
<!DOCTYPE html>
<html lang="en">
<head>
<meta charset="UTF-8">
<meta name="viewport" content="width=device-width, initial-scale=1.0">
<script src="https://cdn.socket.io/4.7.5/socket.io.min.js"></script>
<title>WebSocket Client</title>
</head>
<body>
<h1>PDF Generation with Socket.IO and IronPDF</h1>
<input id="Title" type="text" placeholder="Enter PDF Title" />
<textarea id="content" placeholder="Enter PDF Content"></textarea>
<button onclick="sendMessage()">Send</button>
<ul id="messages"></ul>
<script>
const socket = io('http://localhost:3000');
// Listen for messages from the server
socket.on('message', (msg) => {
const li = document.createElement('li');
li.textContent = msg;
document.getElementById('messages').appendChild(li);
});
// Function to send a message to the server and generate a PDF
function sendMessage() {
const ITitle = document.getElementById('Title');
const IContent = document.getElementById('content');
const message = {
title: ITitle.value,
content: IContent.value
};
// Emit message event to the server
socket.emit('generatePDF', message);
// Clear input fields
ITitle.value = '';
IContent.value = '';
}
</script>
</body>
</html>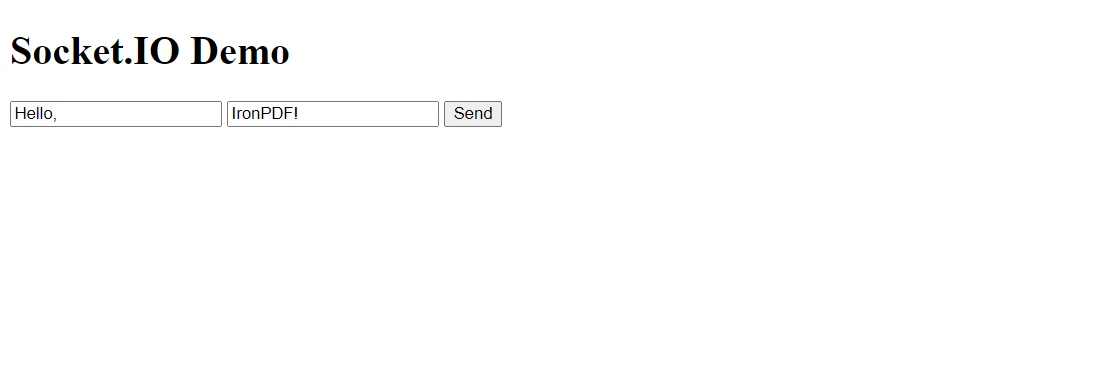
Send a Message and Generate PDF using IronPDF
Let's take a closer look at the code to see how Socket.IO and IronPDF are used to create PDFs instantaneously in a Node.js application.
// Import necessary modules
const express = require('express');
const http = require('http');
const socketIo = require('socket.io');
const IronPdf = require('@ironsoftware/ironpdf');
// Create an Express application
const app = express();
const server = http.createServer(app);
const io = socketIo(server);
const document = IronPdf.PdfDocument;
// Serve static files from the public directory
app.use(express.static('public'));
// Handle socket connection
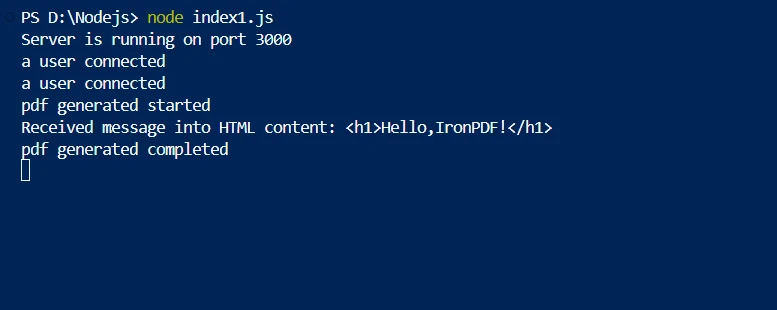
io.on('connection', (socket) => {
console.log('a user connected');
// Handle PDF generation request
socket.on('generatePDF', async (data) => {
try {
const pdfPath = await generatePDF(data);
socket.emit('pdfGenerated', { pdfUrl: pdfPath });
} catch (error) {
socket.emit('error', error.message);
}
});
// Handle disconnection
socket.on('disconnect', () => {
console.log('user disconnected');
});
});
// Function to generate a PDF from provided HTML content
const generatePDF = async (data) => {
console.log('pdf generation started');
const htmlContent = `<h1>${data.title}</h1><p>${data.content}</p>`;
console.log(`Received message into HTML content: ${htmlContent}`);
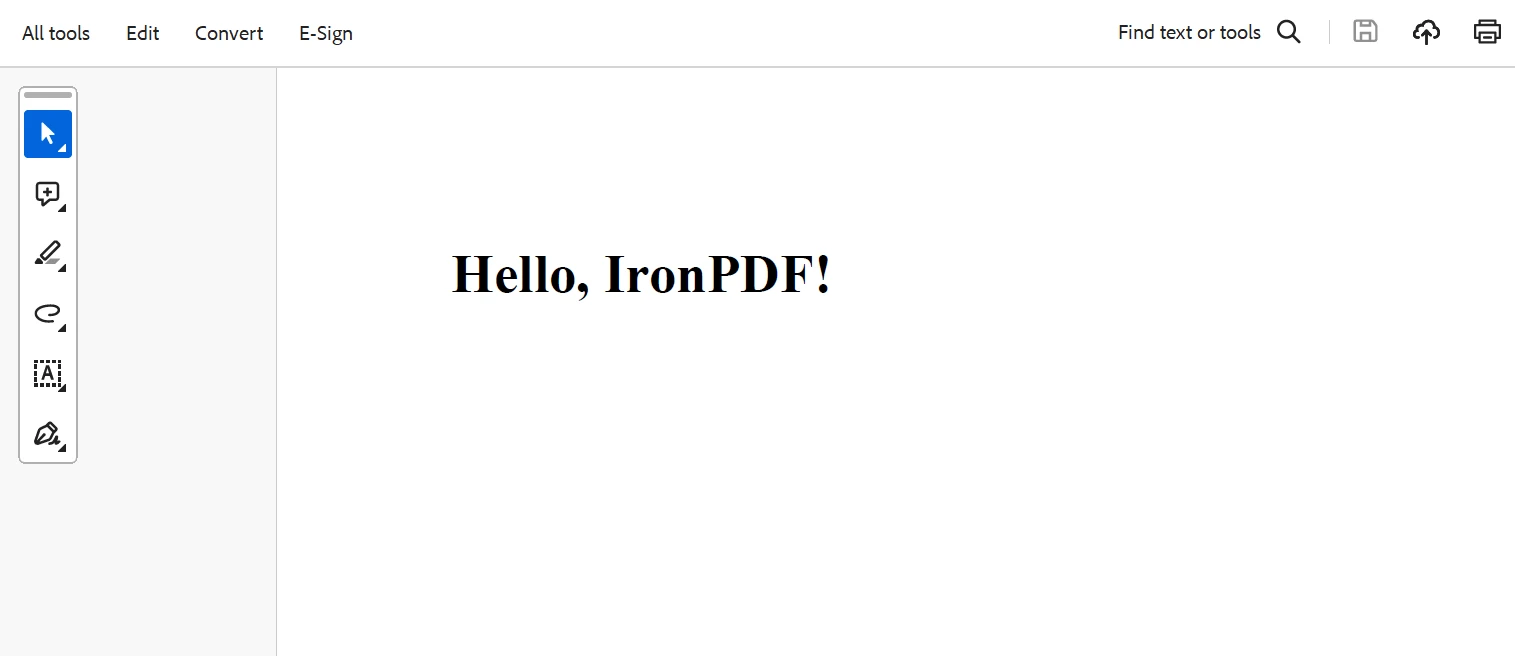
const pdf = await document.fromHtml(htmlContent);
const filePath = `./public/pdfs/${Date.now()}.pdf`;
await pdf.saveAs(filePath);
console.log('pdf generation completed');
return filePath.replace('./public', '');
};
// Start the server on the specified port
const PORT = process.env.PORT || 3000;
server.listen(PORT, () => {
console.log(`Server is running on port ${PORT}`);
});// Import necessary modules
const express = require('express');
const http = require('http');
const socketIo = require('socket.io');
const IronPdf = require('@ironsoftware/ironpdf');
// Create an Express application
const app = express();
const server = http.createServer(app);
const io = socketIo(server);
const document = IronPdf.PdfDocument;
// Serve static files from the public directory
app.use(express.static('public'));
// Handle socket connection
io.on('connection', (socket) => {
console.log('a user connected');
// Handle PDF generation request
socket.on('generatePDF', async (data) => {
try {
const pdfPath = await generatePDF(data);
socket.emit('pdfGenerated', { pdfUrl: pdfPath });
} catch (error) {
socket.emit('error', error.message);
}
});
// Handle disconnection
socket.on('disconnect', () => {
console.log('user disconnected');
});
});
// Function to generate a PDF from provided HTML content
const generatePDF = async (data) => {
console.log('pdf generation started');
const htmlContent = `<h1>${data.title}</h1><p>${data.content}</p>`;
console.log(`Received message into HTML content: ${htmlContent}`);
const pdf = await document.fromHtml(htmlContent);
const filePath = `./public/pdfs/${Date.now()}.pdf`;
await pdf.saveAs(filePath);
console.log('pdf generation completed');
return filePath.replace('./public', '');
};
// Start the server on the specified port
const PORT = process.env.PORT || 3000;
server.listen(PORT, () => {
console.log(`Server is running on port ${PORT}`);
});The above code incorporates IronPDF for dynamic PDF production and Socket.IO for real-time communication in a Node.js application. The required modules, such as socket.io for real-time communication, IronPDF for PDF production, an HTTP server for generating the client-server communication, and Express for building the web server, are imported first in the server-side code. Static files are created in a public directory and served by the Express application. Next, the server handles a custom generatePDF event by listening for Socket.IO connections. The server uses IronPDF to create a PDF from HTML content based on the data supplied by the client when this event is received. The PDF is then saved to the file system, and the client side then receives a PDF-generated event back from the server along with the file path of the created PDF.
A straightforward form is set up on both the server and the client side via an HTML file to collect the title and content. Upon submission, the form stops executing the default submission behavior and sends the form data along with the generatePDF event to the server.
Additionally, the client shows a download link after listening to the pdf-generated event to obtain the URL of the created PDF. Furthermore, the client keeps an ear out for any error events and, in the event that one happens, shows an alert along with the error message. This integration shows how to use Socket.IO and IronPDF to build a responsive web application that lets users create and receive PDFs in real time.
Conclusion
A strong solution for interactive, real-time PDF production in Node.js applications is the integration of the Socket.IO client with IronPDF. Developers can construct responsive applications that give consumers rapid feedback by utilizing the Socket.IO client's real-time communication capabilities, which can greatly improve both the server and user experience. Combining it with IronPDF allows for the dynamic development of high-quality PDF documents from HTML content. This makes it perfect for applications like content management systems, reporting tools, and invoicing systems that need to generate documents quickly.
This configuration exemplifies how dynamic content creation and real-time communication work together. It demonstrates how cutting-edge web technologies may be used seamlessly to provide reliable and effective solutions to challenging problems. With IronPDF handling PDF generation and Socket.IO handling real-time data transmission, developers can concentrate on creating feature-rich web applications that provide users with noticeable and instantaneous results. This method creates new opportunities for interactive and data-driven application development in addition to enhancing the functionality and usability of web applications.
By incorporating IronPDF and Iron Software's products into your development stack, we can ensure that customers and end-users receive feature-rich, high-end software solutions. Additionally, this will support the optimization of projects and processes.
IronPDF offers a free trial starting at $999, making them reliable partners for modern software development projects.


