
Hashids NPM (Geliştiriciler İçin Nasıl Çalışır)
Modern web uygulamalarında veri güvenliği ve gizliliği sağlamak çok önemlidir. Hashids, sayısal verileri benzersiz, geri çevrilebilir ve şifrelenmiş kodlara dönüştüren bir JavaScript şifreleme kütüphanesi kullanarak, veritabanı kimlikleri veya URL'ler gibi hassas bilgileri korumanın etkili bir yolu. Bu makale,'nin React uygulamanıza Hashids'i nasıl sorunsuz bir şekilde entegre edebileceğinizi ve kimlikleri nasıl bulanıklaştırıp çözebileceğinizi incelemektedir.
Hashids Nedir?
Hashids, sayısal verileri bir hash dizgesine dönüştüren küçük fakat güçlü bir kütüphanedir. Ana hedef, hassas bilgilerin açığa çıkmasını önlemek için sayısal kimlikleri gizlemektir. Bu dönüşüm tersine çevrilebilir olduğundan, gerekli olduğunda orijinal sayısal veriler geri alınabilir. Hashids, sayılardan YouTube benzeri Kimlikler oluşturmak, hassas verileri kodlamak veya veritabanı Kimliklerinizi güvenli bir şekilde kullanıcıya göstermek, veya sadece sayılardan Kimlikleri gizlemek için bir JavaScript kütüphanesidir.
Hashids'i React Uygulamanıza Entegre Etme
Hashids'i React uygulamanıza entegre etmek için aşağıdaki adımları takip edin:
Adım 1: Hashids npm Yükleme
İlk olarak, React projenizde npm aracılığıyla Hashids'i yükleyin:
npm install hashids
# or
yarn add hashids
npm install hashids
# or
yarn add hashidsAdım 2: Hashids Örneğini Başlat
React bileşeninizde veya yardımcı dosyanızda, tuz ve isteğe bağlı olarak minimum hash uzunluğu ile yeni bir Hashids örneği başlatın:
import { useState, useEffect } from 'react';
import Hashids from 'hashids';

// React component demonstrating Hashids integration
const MyComponent = () => {
  const [hashids, setHashids] = useState(null);

  useEffect(() => {
    // Initialize the Hashids library with a custom salt string and minimum hash length of 8
    const initHashids = new Hashids('your_salt_here', 8); // Replace 'your_salt_here' with your actual salt or configure custom alphabet
    setHashids(initHashids);
  }, []);

  // Other component logic here
  return (
    <div>
      {/* Your JSX content */}
    </div>
  );
};

export default MyComponent;
import { useState, useEffect } from 'react';
import Hashids from 'hashids';
// React component demonstrating Hashids integration
const MyComponent = () => {
const [hashids, setHashids] = useState(null);
useEffect(() => {
// Initialize the Hashids library with a custom salt string and minimum hash length of 8
const initHashids = new Hashids('your_salt_here', 8); // Replace 'your_salt_here' with your actual salt or configure custom alphabet
setHashids(initHashids);
}, []);
// Other component logic here
return (
<div>
{/* Your JSX content */}
</div>
);
};
export default MyComponent;HASH çıktısını özelleştirmek için kullandığınız benzersiz bir dize (tuz) ile 'your_salt_here' değiştirin.
Adım 3: Veriyi Kodlayın ve Çözün
Başlatıldıktan sonra, Hashids'i sayısal verileri kodlamak ve çözmek için kullanabilirsiniz. Örneğin, bir veritabanı Kimliğini kodlamak:
const encodedId = hashids.encode(12345); // Example: 'B0zGbvA9' non-sequential IDsconst encodedId = hashids.encode(12345); // Example: 'B0zGbvA9' non-sequential IDsVe bunu orijinal Kimliğine geri çözmek:
const decodedIds = hashids.decode('B0zGbvA9'); // Example: [12345]const decodedIds = hashids.decode('B0zGbvA9'); // Example: [12345]Adım 4: Hashids'i Bileşenlerde Kullanın
Gerekli olduğunda Hashids'i React bileşenlerinizde entegre edin. Örneğin, hashlenmiş Kimlikleri props olarak geçirmek:
const MyComponent = ({ id }) => {
  // Encode ID using Hashids if the hashids instance is initialized
  const encodedId = hashids ? hashids.encode(id) : '';

  return (
    <div>
      <p>Encoded ID: {encodedId}</p>
      {/* Other JSX content */}
    </div>
  );
};
const MyComponent = ({ id }) => {
// Encode ID using Hashids if the hashids instance is initialized
const encodedId = hashids ? hashids.encode(id) : '';
return (
<div>
<p>Encoded ID: {encodedId}</p>
{/* Other JSX content */}
</div>
);
};Hashids Kullanımının React'te Avantajları
- Güvenlik: Hashids, sayısal kimlikleri bulanıklaştırır, veri gizliliği ve güvenliği artırarak, hassas bilgiye doğrudan eşleme olasılığını önler.
- Entegrasyon Kolaylığı: Basit npm yüklemesi ve basit API, Hashids'i React uygulamalarına uygulanmasını kolay hale getirir.
- Esneklik: Özelleştirilebilir hash uzunluğu ve tuz, hashleri uygulamanızın güvenlik ihtiyaçlarına uyarlamak için esneklik sağlar.
IronPDF Tanıtımı
IronPDF Node.js için, .NET projelerinde PDF oluşturup düzenleme imkanı sağlayan Iron Software tarafından sunulan güçlü bir Node.js PDF kütüphanesidir. HTML'den PDF oluşturmanız, mevcut PDF'leri manipüle etmeniz veya web sayfalarını PDF formatına dönüştürmeniz gerektiğinde, IronPDF ihtiyaçlarınızı karşılar.

Ana Özellikler
HTML'den PDF'ye Dönüşüm
HTML içeriğini kolayca PDF belgelerine dönüştürün. Bu özellik, web içeriğinden dinamik PDF'ler oluşturmak için özellikle kullanışlıdır.
URL'den PDF'ye Dönüşüm
URL'lerden doğrudan PDF oluşturarak, web sayfalarının içeriğini yakalayabilir ve bunları programatik olarak PDF dosyaları olarak kaydedebilirsiniz.
PDF Manipülasyonu
Mevcut PDF belgelerini birleşik, parçalara ayırın ve kolayca manipüle edin. IronPDF, sayfaların eklenmesi, belgelerin bölünmesi ve daha fazlası gibi işlevler sunar.
PDF Güvenliği
PDF belgelerinizi parolalarla şifreleyerek veya dijital imzalar uygulayarak güvence altına alın. IronPDF, hassas belgelerinizi yetkisiz erişime karşı koruma seçenekleri sunar.
Yüksek Kaliteli Çıktı
Metin, görseller ve biçimlendirmeyi doğru şekilde render ederek yüksek kaliteli PDF belgeler üretilir. IronPDF, oluşturduğunuz PDF'lerin orijinal içeriğe sadık kalmasını sağlar.
Çapraz Platform Uyumluluğu
IronPDF, Windows, Linux ve macOS dahil olmak üzere çeşitli platformlarla uyumludur ve geniş bir geliştirme ortamı yelpazesine uygundur.
Basit Entegrasyon
IronPDF, npm paketi kullanarak Node.js uygulamalarınıza kolayca entegre edilir. API, iyi belgelenmiştir ve projelerinize PDF oluşturma yeteneklerini entegre etmeyi kolaylaştırır.
Kurulum
IronPDF NPM paketini kurmak için aşağıdaki komutu kullanın:
yarn add @ironsoftware/ironpdf @ironsoftware/ironpdf-engine-windows-x64yarn add @ironsoftware/ironpdf @ironsoftware/ironpdf-engine-windows-x64IronPDF Kullanarak PDF Belgeleri Oluşturma ve HashIDs NPM Paketini Kullanma
Bağımlılıkları Kurun: İlk olarak, yeni bir Next.js projesi oluşturun (henüz oluşturmadıysanız) ve aşağıdaki komutu kullanın: Burada belirtildiği gibi
npx create-next-app@latest hashids-pdf --use-npm --example "https://github.com/vercel/next-learn/tree/main/basics/learn-starter"npx create-next-app@latest hashids-pdf --use-npm --example "https://github.com/vercel/next-learn/tree/main/basics/learn-starter"Sonrasında, proje dizinine gidin:
cd hashids-pdfcd hashids-pdfGerekli paketleri kurun:
yarn add @ironsoftware/ironpdf @ironsoftware/ironpdf-engine-windows-x64
yarn add hashids
yarn add @ironsoftware/ironpdf @ironsoftware/ironpdf-engine-windows-x64
yarn add hashidsPDF Oluşturma
Şimdi, IronPDF kullanarak bir PDF oluşturma örneğine bakalım. Next.js bileşeninizde (örneğin, pages/index.tsx), aşağıdaki kodu ekleyin:
PDF Üretim API'si: İlk adım, PDF belgesini oluşturmak için bir backend API oluşturmaktır. IronPDF yalnızca sunucu tarafında çalıştığı için, bir kullanıcının PDF oluşturmak istediğinde çağırabileceği bir API oluşturmamız gerekiyor. pages/api/pdf.js yolunda bir dosya oluşturun ve aşağıdaki içerikleri ekleyin.
IronPDF bir lisans anahtarı gerektirir, bunu lisans sayfasından alabilir ve aşağıdaki koda yerleştirebilirsiniz.
// pages/api/pdf.js
import { IronPdfGlobalConfig, PdfDocument } from "@ironsoftware/ironpdf";
import Hashids from 'hashids';
// Apply your IronPDF license key
IronPdfGlobalConfig.getConfig().licenseKey = "Your license key";
export default async function handler(req, res) {
try {
const initHashids = new Hashids('IronPDF Is Awesome and this is the salt', 8);
const f = req.query.f;
const l = initHashids.encode(f);
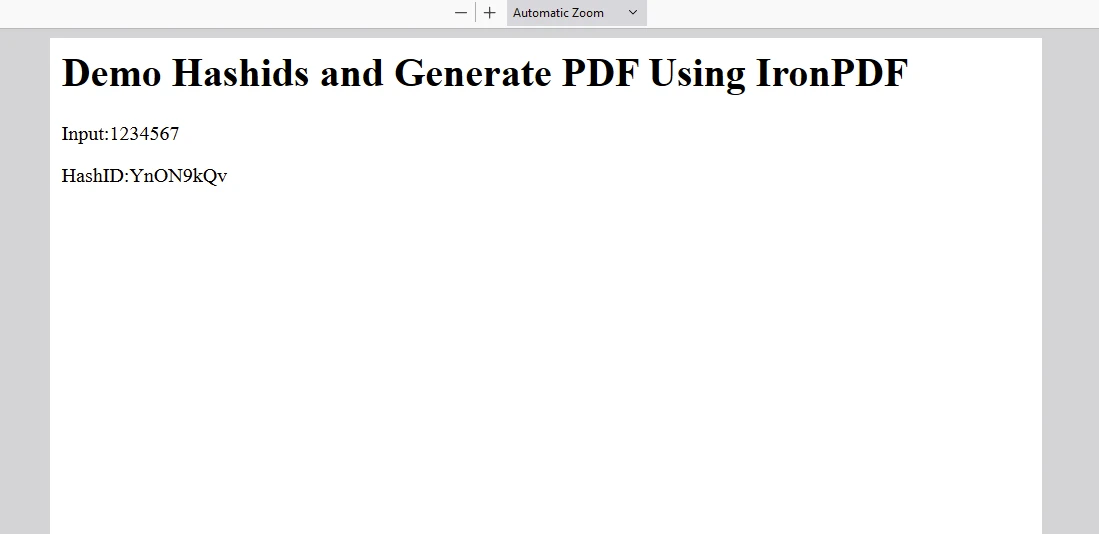
let content = "<h1>Demo Hashids and Generate PDF Using IronPDF</h1>";
content += "<p>Input:" + f + "</p>";
content += "<p>HashID:" + l + "</p>";
const pdf = await PdfDocument.fromHtml(content);
const data = await pdf.saveAsBuffer();
res.setHeader("Content-Type", "application/pdf");
res.setHeader(
"Content-Disposition",
"attachment; filename=awesomeIron.pdf"
);
res.send(data);
} catch (error) {
console.error("Error generating PDF:", error);
res.status(500).end();
}
}// pages/api/pdf.js
import { IronPdfGlobalConfig, PdfDocument } from "@ironsoftware/ironpdf";
import Hashids from 'hashids';
// Apply your IronPDF license key
IronPdfGlobalConfig.getConfig().licenseKey = "Your license key";
export default async function handler(req, res) {
try {
const initHashids = new Hashids('IronPDF Is Awesome and this is the salt', 8);
const f = req.query.f;
const l = initHashids.encode(f);
let content = "<h1>Demo Hashids and Generate PDF Using IronPDF</h1>";
content += "<p>Input:" + f + "</p>";
content += "<p>HashID:" + l + "</p>";
const pdf = await PdfDocument.fromHtml(content);
const data = await pdf.saveAsBuffer();
res.setHeader("Content-Type", "application/pdf");
res.setHeader(
"Content-Disposition",
"attachment; filename=awesomeIron.pdf"
);
res.send(data);
} catch (error) {
console.error("Error generating PDF:", error);
res.status(500).end();
}
}Şimdi hashID ve IronPDF'i kullanmak için index.js kodunu aşağıdaki şekilde değiştirin
import Head from "next/head";
import styles from "../styles/Home.module.css";
import React, { useState, useEffect } from "react";
import Hashids from 'hashids';

export default function Home() {
  const [text, setText] = useState("");
  const [etext, seteText] = useState("");
  const [hashids, setHashids] = useState(null);

  // Initialize Hashids on component mount
  useEffect(() => {
    const initHashids = new Hashids('IronPDF Is Awesome and this is the salt', 8);
    setHashids(initHashids);
  }, []);

  // Generate PDF by calling backend API
  const generatePdf = async () => {
    try {
      const response = await fetch("/api/pdf?f=" + text);
      const blob = await response.blob();
      const url = window.URL.createObjectURL(new Blob([blob]));
      const link = document.createElement("a");
      link.href = url;
      link.setAttribute("download", "awesomeIron.pdf");
      document.body.appendChild(link);
      link.click();
      link.parentNode.removeChild(link);
    } catch (error) {
      console.error("Error generating PDF:", error);
    }
  };

  // Handle text change and encode input number
  const handleChange = (event) => {
    seteText(hashids ? hashids.encode(event.target.value) : '');
    setText(event.target.value);
  };

  return (
    <div className={styles.container}>
      <Head>
        <title>Generate PDF Using IronPDF</title>
        <link rel="icon" href="/favicon.ico" />
      </Head>
      <main>
        <h1>Demo Hashids and Generate PDF Using IronPDF</h1>
        <p>
          <span>Enter Url To get Hashids and Convert to PDF:</span>{" "}
        </p>
        <input type="number" value={text} onChange={handleChange} />
        <p>
          HashID of input: {etext}
        </p>
        <button style={{margin: 20, padding: 5}} onClick={generatePdf}>
          Generate PDF
        </button>
      </main>
      <style jsx>{`
        main {
          padding: 5rem 0;
          flex: 1;
          display: flex;
          flex-direction: column;
          justify-content: center;
          align-items: center;
        }
        footer {
          width: 100%;
          height: 100px;
          border-top: 1px solid #eaeaea;
          display: flex;
          justify-content: center;
          align-items: center;
        }
        footer img {
          margin-left: 0.5rem;
        }
        footer a {
          display: flex;
          justify-content: center;
          align-items: center;
          text-decoration: none;
          color: inherit;
        }
        code {
          background: #fafafa;
          border-radius: 5px;
          padding: 0.75rem;
          font-size: 1.1rem;
          font-family:
            Menlo,
            Monaco,
            Lucida Console,
            Liberation Mono,
            DejaVu Sans Mono,
            Bitstream Vera Sans Mono,
            Courier New,
            monospace;
        }
      `}</style>
      <style jsx global>{`
        html,
        body {
          padding: 0;
          margin: 0;
          font-family:
            -apple-system,
            BlinkMacSystemFont,
            Segoe UI,
            Roboto,
            Oxygen,
            Ubuntu,
            Cantarell,
            Fira Sans,
            Droid Sans,
            Helvetica Neue,
            sans-serif;
        }
        * {
          box-sizing: border-box;
        }
      `}</style>
    </div>
  );
}
import Head from "next/head";
import styles from "../styles/Home.module.css";
import React, { useState, useEffect } from "react";
import Hashids from 'hashids';
export default function Home() {
const [text, setText] = useState("");
const [etext, seteText] = useState("");
const [hashids, setHashids] = useState(null);
// Initialize Hashids on component mount
useEffect(() => {
const initHashids = new Hashids('IronPDF Is Awesome and this is the salt', 8);
setHashids(initHashids);
}, []);
// Generate PDF by calling backend API
const generatePdf = async () => {
try {
const response = await fetch("/api/pdf?f=" + text);
const blob = await response.blob();
const url = window.URL.createObjectURL(new Blob([blob]));
const link = document.createElement("a");
link.href = url;
link.setAttribute("download", "awesomeIron.pdf");
document.body.appendChild(link);
link.click();
link.parentNode.removeChild(link);
} catch (error) {
console.error("Error generating PDF:", error);
}
};
// Handle text change and encode input number
const handleChange = (event) => {
seteText(hashids ? hashids.encode(event.target.value) : '');
setText(event.target.value);
};
return (
<div className={styles.container}>
<Head>
<title>Generate PDF Using IronPDF</title>
<link rel="icon" href="/favicon.ico" />
</Head>
<main>
<h1>Demo Hashids and Generate PDF Using IronPDF</h1>
<p>
<span>Enter Url To get Hashids and Convert to PDF:</span>{" "}
</p>
<input type="number" value={text} onChange={handleChange} />
<p>
HashID of input: {etext}
</p>
<button style={{margin: 20, padding: 5}} onClick={generatePdf}>
Generate PDF
</button>
</main>
<style jsx>{`
main {
padding: 5rem 0;
flex: 1;
display: flex;
flex-direction: column;
justify-content: center;
align-items: center;
}
footer {
width: 100%;
height: 100px;
border-top: 1px solid #eaeaea;
display: flex;
justify-content: center;
align-items: center;
}
footer img {
margin-left: 0.5rem;
}
footer a {
display: flex;
justify-content: center;
align-items: center;
text-decoration: none;
color: inherit;
}
code {
background: #fafafa;
border-radius: 5px;
padding: 0.75rem;
font-size: 1.1rem;
font-family:
Menlo,
Monaco,
Lucida Console,
Liberation Mono,
DejaVu Sans Mono,
Bitstream Vera Sans Mono,
Courier New,
monospace;
}
`}</style>
<style jsx global>{`
html,
body {
padding: 0;
margin: 0;
font-family:
-apple-system,
BlinkMacSystemFont,
Segoe UI,
Roboto,
Oxygen,
Ubuntu,
Cantarell,
Fira Sans,
Droid Sans,
Helvetica Neue,
sans-serif;
}
* {
box-sizing: border-box;
}
`}</style>
</div>
);
}Kod Açıklaması
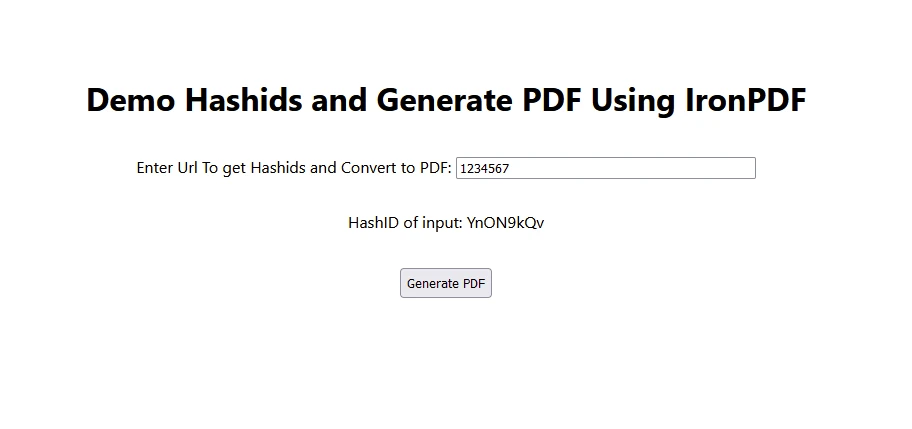
- Kullanıcı, giriş metin kutusu aracılığıyla sayıları girer.
- Girdi numarası HashID kullanılarak kodlanır ve görüntülenir.
- Kullanıcı 'PDF Üret' tıkladığında, girdi metni bir arka uç API'sine gönderilir, bu API kodlar ve bir PDF belgesi oluşturur.
Çıktı
IronPDF Lisansı
Lisans Anahtarını buraya yerleştirin:
import { IronPdfGlobalConfig, PdfDocument } from "@ironsoftware/ironpdf";
// Apply your IronPDF license key
IronPdfGlobalConfig.getConfig().licenseKey = "Add Your key here";
import { IronPdfGlobalConfig, PdfDocument } from "@ironsoftware/ironpdf";
// Apply your IronPDF license key
IronPdfGlobalConfig.getConfig().licenseKey = "Add Your key here";Sonuç
Hashids'i React uygulamanıza entegre etmek, veritabanı ID'leri veya URL'ler gibi hassas verileri korumak için pratik bir yaklaşımdır. Hashids kullanarak, gerektiğinde orijinal verilere erişim sağlarken tanımlayıcıların güvende kalmasını sağlayabilirsiniz.
İster küçük bir uygulama oluşturuyor olun, ister karmaşık bir kurumsal sistem, Hashids, React projelerinizde veri gizliliğini ve güvenliğini artırmak için güvenilir bir çözüm sunar ve artan sayıları benzersiz hash'lere kodlamada mükemmeldir. Hashids, girdideki tekrarlayan kalıpların bile farklı, tekrar etmeyen hash'lerle sonuçlanmasını sağlayarak uygulamalarda veri bütünlüğünü ve güvenliğini korur.
IronPDF, node.js geliştiricileri için uygulamalarında kapsamlı PDF üretimi, manipülasyonu ve yönetim yetenekleri arayanlar için sağlam ve çok yönlü bir kütüphane olarak öne çıkar. İster web uygulamaları, ister masaüstü yazılımı geliştiriyor olun veya kurumsal çözümlerde PDF işlevselliği entegre ediliyor olun.


