toastify npm (How It Works For Developers)
In modern web development, providing timely feedback to users is crucial for a seamless user experience. Toast notifications are an effective way to deliver messages without disrupting the user's workflow. The React-toastify package is a popular choice for implementing toast notifications in React applications due to its simplicity and flexibility. We will also look into the IronPDF NPM package to generate, edit, and manage PDF documents. This article will guide you through the process of integrating React-toastify and IronPDF into your React project.
What is Toastify?
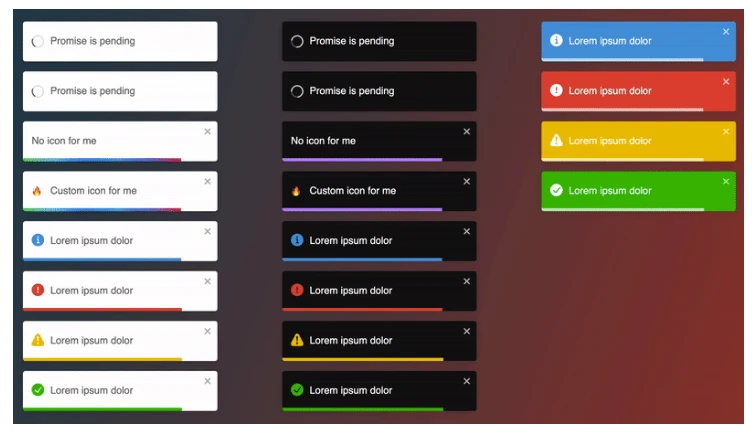
React-toastify is an NPM package that allows you to add customizable toast notifications to your React applications with minimal setup. It provides a variety of features, including different notification types, auto-close functionality, custom styling, and more.
Installation
To get started with react-toastify, you need to install the package via NPM or Yarn. Run the following command in your project's root directory:
npm install react-toastifynpm install react-toastifyor
yarn add react-toastifyyarn add react-toastifyBasic Usage
After installing the package, you can start using react-toastify in your React application. Below is a simple code example to demonstrate how to integrate and use react-toastify.
1. Import Toastify Components
First, you need to import the necessary components from react-toastify:
import React from 'react';
import { ToastContainer, toast } from 'react-toastify';
import 'react-toastify/dist/ReactToastify.css';
import React from 'react';
import { ToastContainer, toast } from 'react-toastify';
import 'react-toastify/dist/ReactToastify.css';2. Configure Toastify
Next, add the ToastContainer component to your application.
function App() {
return (
<div>
<ToastContainer />
</div>
);
}function App() {
return (
<div>
<ToastContainer />
</div>
);
}3. Trigger Toast Notifications
You can trigger a toast notification using the toast function. Here’s a code sample of how to display a success message:
function notify() {
toast.success("Success! This is a success message.", {
position: toast.POSITION.TOP_RIGHT
});
}
function App() {
return (
<div>
<button onClick={notify}>Show Toast</button>
<ToastContainer />
</div>
);
}function notify() {
toast.success("Success! This is a success message.", {
position: toast.POSITION.TOP_RIGHT
});
}
function App() {
return (
<div>
<button onClick={notify}>Show Toast</button>
<ToastContainer />
</div>
);
}Advanced Features
OnOpen and OnClose hooks
React-toastify offers various advanced features that allow you to customize the behavior and appearance of your toasts using onOpen and onClose hooks.
import React from 'react';
import { ToastContainer, toast } from 'react-toastify';
import 'react-toastify/dist/ReactToastify.css';
function App() {
const notify = () => {
toast("Hello there", {
onOpen: () => window.alert('Called when I open'),
onClose: () => window.alert('Called when I close')
});
};
return (
<div>
<button onClick={notify}>Notify</button>
<ToastContainer />
</div>
);
}
export default App;import React from 'react';
import { ToastContainer, toast } from 'react-toastify';
import 'react-toastify/dist/ReactToastify.css';
function App() {
const notify = () => {
toast("Hello there", {
onOpen: () => window.alert('Called when I open'),
onClose: () => window.alert('Called when I close')
});
};
return (
<div>
<button onClick={notify}>Notify</button>
<ToastContainer />
</div>
);
}
export default App;In this example:
- When the toast opens, the onOpen hook triggers, and we display an alert.
- When the toast closes, the onClose hook triggers, and another alert is shown.
Custom Positions
You can display toasts in different positions on the screen using the position option:
toast.info("Information message", {
  position: "top-right"
});
toast.info("Information message", {
position: "top-right"
});Auto-Close Duration
You can set the duration for which a toast is displayed using the autoClose option:
toast.warn("Warning message", {
  autoClose: 5000 // Auto close after 5 seconds
});
toast.warn("Warning message", {
autoClose: 5000 // Auto close after 5 seconds
});Custom Styling
Custom styling can be applied to toasts using the className and style options:
toast.error("Error message", {
  className: 'custom-toast',
  style: { background: 'red', color: 'white' }
});
toast.error("Error message", {
className: 'custom-toast',
style: { background: 'red', color: 'white' }
});Dismissing Toasts
Toasts can be programmatically dismissed using the toast.dismiss method:
const toastId = toast("This toast can be dismissed");
function dismissToast() {
toast.dismiss(toastId);
}const toastId = toast("This toast can be dismissed");
function dismissToast() {
toast.dismiss(toastId);
}Here’s a complete example demonstrating the use of various react-toastify features:
import React from 'react';
import { ToastContainer, toast } from 'react-toastify';
import 'react-toastify/dist/ReactToastify.css';
function App() {
const notify = () => {
toast.success("Success! This is a success message.", {
position: "top-right"
});
toast.info("Information message", {
position: "bottom-left"
});
toast.warn("Warning message", {
autoClose: 5000
});
toast.error("Error message", {
  className: 'custom-toast',
  style: { background: 'red', color: 'white' }
});
};
return (
<div>
<button onClick={notify}>Show Toasts</button>
<ToastContainer />
</div>
);
}
export default App;import React from 'react';
import { ToastContainer, toast } from 'react-toastify';
import 'react-toastify/dist/ReactToastify.css';
function App() {
const notify = () => {
toast.success("Success! This is a success message.", {
position: "top-right"
});
toast.info("Information message", {
position: "bottom-left"
});
toast.warn("Warning message", {
autoClose: 5000
});
toast.error("Error message", {
className: 'custom-toast',
style: { background: 'red', color: 'white' }
});
};
return (
<div>
<button onClick={notify}>Show Toasts</button>
<ToastContainer />
</div>
);
}
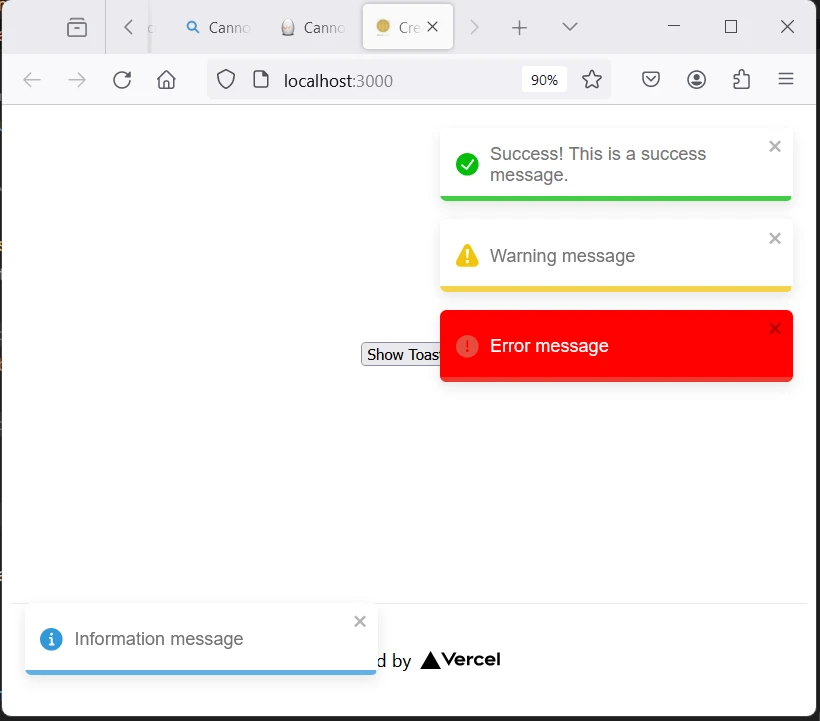
export default App;OUTPUT
Introducing IronPDF
IronPDF is a powerful C# PDF library that allows developers to generate and edit PDFs in their .NET projects. Whether you need to create PDFs from HTML, manipulate existing PDFs, or convert web pages to PDF format, IronPDF has got you covered.
Here are some key features and use cases:
1. HTML to PDF Conversion
IronPDF can convert HTML pages, whether from a URL, HTML file, or HTML string, into PDF. You can also convert local HTML files or HTML strings to PDFs.
2. Cross-Platform Support
IronPDF works seamlessly across various platforms, including:
- .NET Core (8, 7, 6, 5, and 3.1+)
- .NET Standard (2.0+)
- .NET Framework (4.6.2+)
- Web (Blazor & WebForms)
- Desktop (WPF & MAUI)
- Console (App & Library)
- Windows, Linux, and macOS environments.
3. Editing and Manipulating PDFs
IronPDF allows you to:
- Set properties and security (passwords, permissions).
- Add digital signatures.
- Compress PDF files.
- Edit metadata and revision history.
- Add, copy, and delete pages.
4. Customization and Formatting
You can apply page templates, headers, footers, page numbers, and custom margins. IronPDF supports UTF-8 character encoding, base URLs, asset encoding, and more.
5. Standards Compliance
IronPDF adheres to various PDF standards, including PDF versions (1.2 - 1.7), PDF/UA (PDF/UA-1), and PDF/A (PDF/A-3b).
Generate PDF Document Using IronPDF and Toastify NPM package
Install Dependencies: First, create a new Next.js project (if you haven’t already) using the following command. Please refer to the setup page.
npx create-next-app@latest my-pdf-app --use-npm --example "https://github.com/vercel/next-learn/tree/main/basics/learn-starter"npx create-next-app@latest my-pdf-app --use-npm --example "https://github.com/vercel/next-learn/tree/main/basics/learn-starter"Next, navigate to your project directory:
cd my-pdf-appcd my-pdf-appInstall the required packages:
npm install @ironsoftware/ironpdf
npm install react-toastify
npm install @ironsoftware/ironpdf
npm install react-toastifyCreate a PDF: Now, let’s create a simple example of generating a PDF using IronPDF. In your Next.js component (e.g., pages/index.tsx), add the following code:
import Head from 'next/head';
import styles from '../styles/Home.module.css';
import { ToastContainer, toast } from 'react-toastify';
import 'react-toastify/dist/ReactToastify.css';
import { useState } from "react";

export default function Home() {
    const [textInput, setTextInput] = useState('');

    // Function to show toast notifications
    const notify = () => {
        toast.success("Success! This is a success message.", {
            position: "top-right"
        });
        toast.info("Information message", {
            position: "bottom-left"
        });
        toast.warn("Warning message", {
            autoClose: 5000
        });
        toast.error("Error message", {
            className: 'custom-toast',
            style: { background: 'red', color: 'white' }
        });
    };

    // Function to generate a PDF
    const generatePdf = async () => {
        try {
            const response = await fetch('/api/pdf?url=' + textInput);
            const blob = await response.blob();
            const url = window.URL.createObjectURL(new Blob([blob]));
            const link = document.createElement('a');
            link.href = url;
            link.setAttribute('download', 'example.pdf');
            document.body.appendChild(link);
            link.click();
            link.parentNode.removeChild(link);
        } catch (error) {
            console.error('Error generating PDF:', error);
        }
    };

    // Handler for input change
    const handleChange = (event) => {
        setTextInput(event.target.value);
    }

    return (
        <div className={styles.container}>
            <Head>
                <title>Demo Toaster and Generate PDF From IronPDF</title>
                <link rel="icon" href="/favicon.ico"/>
            </Head>
            <main>
                <h1>Demo Toaster and Generate PDF From IronPDF</h1>
                <button style={{margin: 20, padding: 5}} onClick={notify}>Show Toasts</button>
                <p>
                    <span>Enter Url To Convert to PDF:</span>{" "}
                    <input type="text" value={textInput} onChange={handleChange} />
                </p>
                <button style={{margin: 20, padding: 5}} onClick={generatePdf}>Generate PDF</button>
                <ToastContainer />
            </main>
            <style jsx>{`
                main {
                    padding: 5rem 0;
                    flex: 1;
                    display: flex;
                    flex-direction: column;
                    justify-content: center;
                    align-items: center;
                }
                footer {
                    width: 100%;
                    height: 100px;
                    border-top: 1px solid #eaeaea;
                    display: flex;
                    justify-content: center;
                    align-items: center;
                }
                footer img {
                    margin-left: 0.5rem;
                }
                footer a {
                    display: flex;
                    justify-content: center;
                    align-items: center;
                    text-decoration: none;
                    color: inherit;
                }
                code {
                    background: #fafafa;
                    border-radius: 5px;
                    padding: 0.75rem;
                    font-size: 1.1rem;
                    font-family: Menlo,
                    Monaco,
                    Lucida Console,
                    Liberation Mono,
                    DejaVu Sans Mono,
                    Bitstream Vera Sans Mono,
                    Courier New,
                    monospace;
                }
            `}</style>
            <style jsx global>{`
                html,
                body {
                    padding: 0;
                    margin: 0;
                    font-family: -apple-system,
                    BlinkMacSystemFont,
                    Segoe UI,
                    Roboto,
                    Oxygen,
                    Ubuntu,
                    Cantarell,
                    Fira Sans,
                    Droid Sans,
                    Helvetica Neue,
                    sans-serif;
                }
                * {
                    box-sizing: border-box;
                }
            `}</style>
        </div>
    );
}
import Head from 'next/head';
import styles from '../styles/Home.module.css';
import { ToastContainer, toast } from 'react-toastify';
import 'react-toastify/dist/ReactToastify.css';
import { useState } from "react";
export default function Home() {
const [textInput, setTextInput] = useState('');
// Function to show toast notifications
const notify = () => {
toast.success("Success! This is a success message.", {
position: "top-right"
});
toast.info("Information message", {
position: "bottom-left"
});
toast.warn("Warning message", {
autoClose: 5000
});
toast.error("Error message", {
className: 'custom-toast',
style: { background: 'red', color: 'white' }
});
};
// Function to generate a PDF
const generatePdf = async () => {
try {
const response = await fetch('/api/pdf?url=' + textInput);
const blob = await response.blob();
const url = window.URL.createObjectURL(new Blob([blob]));
const link = document.createElement('a');
link.href = url;
link.setAttribute('download', 'example.pdf');
document.body.appendChild(link);
link.click();
link.parentNode.removeChild(link);
} catch (error) {
console.error('Error generating PDF:', error);
}
};
// Handler for input change
const handleChange = (event) => {
setTextInput(event.target.value);
}
return (
<div className={styles.container}>
<Head>
<title>Demo Toaster and Generate PDF From IronPDF</title>
<link rel="icon" href="/favicon.ico"/>
</Head>
<main>
<h1>Demo Toaster and Generate PDF From IronPDF</h1>
<button style={{margin: 20, padding: 5}} onClick={notify}>Show Toasts</button>
<p>
<span>Enter Url To Convert to PDF:</span>{" "}
<input type="text" value={textInput} onChange={handleChange} />
</p>
<button style={{margin: 20, padding: 5}} onClick={generatePdf}>Generate PDF</button>
<ToastContainer />
</main>
<style jsx>{`
main {
padding: 5rem 0;
flex: 1;
display: flex;
flex-direction: column;
justify-content: center;
align-items: center;
}
footer {
width: 100%;
height: 100px;
border-top: 1px solid #eaeaea;
display: flex;
justify-content: center;
align-items: center;
}
footer img {
margin-left: 0.5rem;
}
footer a {
display: flex;
justify-content: center;
align-items: center;
text-decoration: none;
color: inherit;
}
code {
background: #fafafa;
border-radius: 5px;
padding: 0.75rem;
font-size: 1.1rem;
font-family: Menlo,
Monaco,
Lucida Console,
Liberation Mono,
DejaVu Sans Mono,
Bitstream Vera Sans Mono,
Courier New,
monospace;
}
`}</style>
<style jsx global>{`
html,
body {
padding: 0;
margin: 0;
font-family: -apple-system,
BlinkMacSystemFont,
Segoe UI,
Roboto,
Oxygen,
Ubuntu,
Cantarell,
Fira Sans,
Droid Sans,
Helvetica Neue,
sans-serif;
}
* {
box-sizing: border-box;
}
`}</style>
</div>
);
}Since IronPDF only runs on Node.js, next add an API for the app where PDF is generated using Node.js.
Create a file pdf.js in the pages/api folder and add the code below:
// pages/api/pdf.js
import { IronPdfGlobalConfig, PdfDocument } from "@ironsoftware/ironpdf";

// Apply your IronPDF license key
IronPdfGlobalConfig.getConfig().licenseKey = "Add Your Key Here";

export default async function handler(req, res) {
    try {
        const url = req.query.url;
        const pdf = await PdfDocument.fromUrl(url);
        const data = await pdf.saveAsBuffer();
        console.log('data PDF:', data);
        res.setHeader('Content-Type', 'application/pdf');
        res.setHeader('Content-Disposition', 'attachment; filename=awesomeIron.pdf');
        res.send(data);
    } catch (error) {
        console.error('Error generating PDF:', error);
        res.status(500).end();
    }
}
// pages/api/pdf.js
import { IronPdfGlobalConfig, PdfDocument } from "@ironsoftware/ironpdf";
// Apply your IronPDF license key
IronPdfGlobalConfig.getConfig().licenseKey = "Add Your Key Here";
export default async function handler(req, res) {
try {
const url = req.query.url;
const pdf = await PdfDocument.fromUrl(url);
const data = await pdf.saveAsBuffer();
console.log('data PDF:', data);
res.setHeader('Content-Type', 'application/pdf');
res.setHeader('Content-Disposition', 'attachment; filename=awesomeIron.pdf');
res.send(data);
} catch (error) {
console.error('Error generating PDF:', error);
res.status(500).end();
}
}Note: In the above code, add your own license key.
Run Your App: Start your Next.js app:
npm run devnpm run devor
yarn devyarn devOUTPUT
Open your browser and navigate to http://localhost:3000 to see the website below:
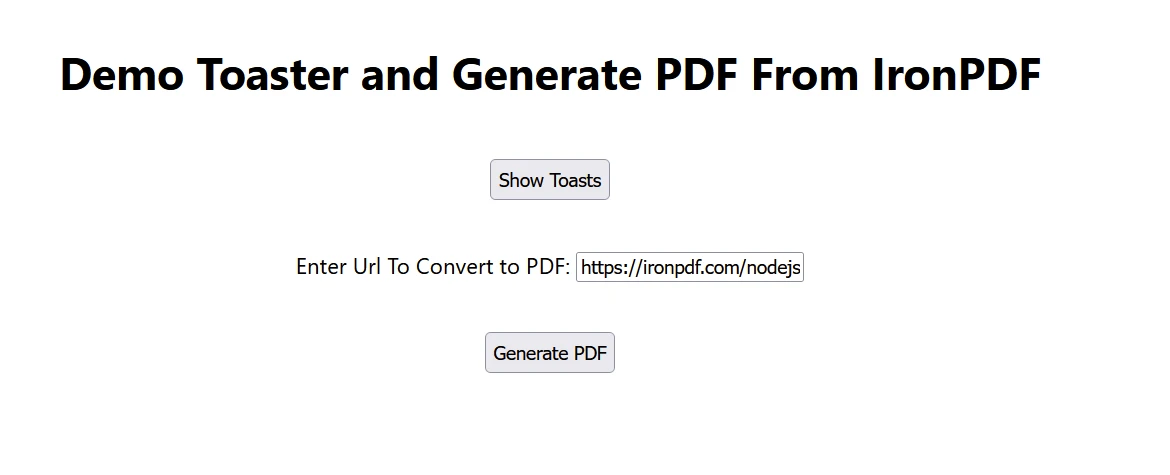
Now click the "Show Toasts" button to see toast messages.
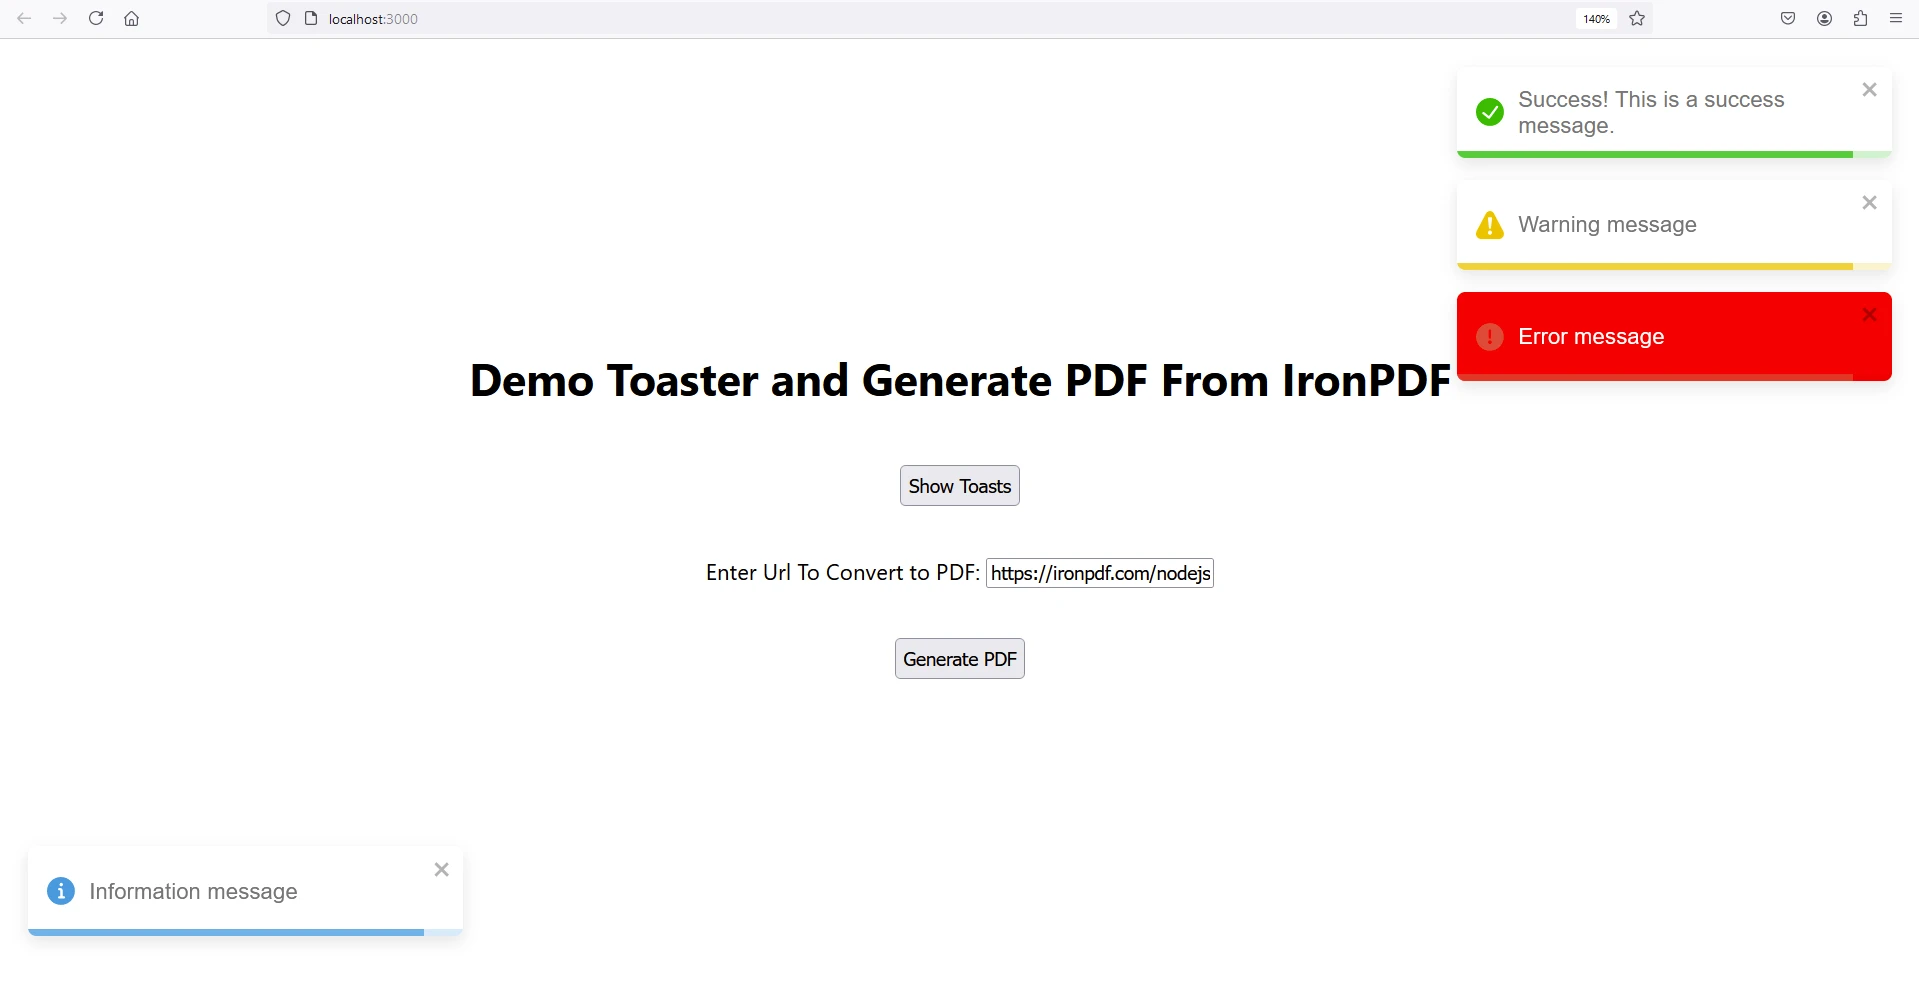
Now enter a website URL to generate a PDF and click "Generate PDF". A file named awesomeIron.pdf will be downloaded.
IronPDF License
For information about the IronPDF license, please refer to the IronPDF Licensing page.
Place the License Key in the app as shown below:
import { IronPdfGlobalConfig, PdfDocument } from "@ironsoftware/ironpdf";
// Apply your IronPDF license key
IronPdfGlobalConfig.getConfig().licenseKey = "Add Your Key Here";import { IronPdfGlobalConfig, PdfDocument } from "@ironsoftware/ironpdf";
// Apply your IronPDF license key
IronPdfGlobalConfig.getConfig().licenseKey = "Add Your Key Here";Conclusion
React-toastify is a powerful and easy-to-use library for adding toast notifications to your React applications. With its wide range of features and customization options, you can enhance the user experience by providing real-time feedback in a super easy and non-intrusive manner. On the other hand, IronPDF is by far the most versatile enterprise library with support to generate, edit, and manage PDF documents. By following the steps outlined in this article, you can quickly integrate React-toastify and IronPDF into your project and start leveraging their capabilities.
For more information on getting started with IronPDF, please refer to their documentation page and code examples.


