
toastify npm(開發者的使用方法)

在現代網頁開發中,提供及時的使用者反饋對於無縫的使用者體驗至關重要。 彈出通知是一種有效的方式,能夠在不打擾使用者工作流程的情況下傳遞訊息。 React-toastify 套件因其簡單性和靈活性,是在 React 應用程式中實施彈出通知的熱門選擇。 我們還將查看 IronPDF NPM 套件,以生成、編輯和管理 PDF 文件。 本文將指導您如何將 React-toastify 和 IronPDF 整合到您的 React 專案中。
什麼是 Toastify?
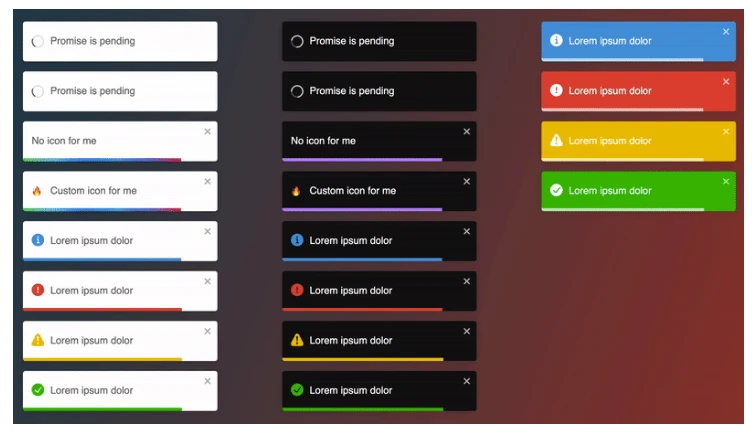
React-toastify 是一個 NPM 套件,可以讓您快速將自訂彈出通知加入到您的 React 應用程式中。它提供了多種功能,包括不同的通知型別、自動關閉功能、自訂樣式等。
安裝
要開始使用 react-toastify,您需要透過 NPM 或 Yarn 安裝該套件。 在您的專案根目錄運行以下命令:
npm install react-toastifynpm install react-toastifyor
yarn add react-toastifyyarn add react-toastify基本用法
安裝完套件後,您可以開始在 React 應用程式中使用 react-toastify。 以下是如何整合和使用 react-toastify 的簡單程式碼範例。
1. 匯入 Toastify 元件
首先,您需要從 react-toastify 匯入必要的元件:
import React from 'react';
import { ToastContainer, toast } from 'react-toastify';
import 'react-toastify/dist/ReactToastify.css';
import React from 'react';
import { ToastContainer, toast } from 'react-toastify';
import 'react-toastify/dist/ReactToastify.css';2. 配置 Toastify
接下來,新增 ToastContainer 元件到您的應用程式中。
function App() {
return (
<div>
<ToastContainer />
</div>
);
}function App() {
return (
<div>
<ToastContainer />
</div>
);
}3. 觸發彈出通知
您可以使用 toast 函式來觸發彈出通知。 以下是顯示成功訊息的程式碼範例:
function notify() {
toast.success("Success! This is a success message.", {
position: toast.POSITION.TOP_RIGHT
});
}
function App() {
return (
<div>
<button onClick={notify}>Show Toast</button>
<ToastContainer />
</div>
);
}function notify() {
toast.success("Success! This is a success message.", {
position: toast.POSITION.TOP_RIGHT
});
}
function App() {
return (
<div>
<button onClick={notify}>Show Toast</button>
<ToastContainer />
</div>
);
}進階功能
OnOpen and OnClose hooks
React-toastify 提供了多種進階功能,允許您使用 onOpen 和 onClose 鉤子自訂彈出通知的行為和外觀。
import React from 'react';
import { ToastContainer, toast } from 'react-toastify';
import 'react-toastify/dist/ReactToastify.css';
function App() {
const notify = () => {
toast("Hello there", {
onOpen: () => window.alert('Called when I open'),
onClose: () => window.alert('Called when I close')
});
};
return (
<div>
<button onClick={notify}>Notify</button>
<ToastContainer />
</div>
);
}
export default App;import React from 'react';
import { ToastContainer, toast } from 'react-toastify';
import 'react-toastify/dist/ReactToastify.css';
function App() {
const notify = () => {
toast("Hello there", {
onOpen: () => window.alert('Called when I open'),
onClose: () => window.alert('Called when I close')
});
};
return (
<div>
<button onClick={notify}>Notify</button>
<ToastContainer />
</div>
);
}
export default App;在此範例中:
- 彈出通知開啟時,onOpen 鉤子觸發,我們顯示一個警告。
- 彈出通知關閉時,onClose 鉤子觸發,顯示另一個警告。
自訂位置
您可以使用 position 選項將彈出通知顯示在螢幕上的不同位置:
toast.info("Information message", {
  position: "top-right"
});
toast.info("Information message", {
position: "top-right"
});自動關閉持續時間
也可以使用 autoClose 選項設定彈出通知顯示的持續時間。
toast.warn("Warning message", {
  autoClose: 5000 // Auto close after 5 seconds
});
toast.warn("Warning message", {
autoClose: 5000 // Auto close after 5 seconds
});自訂樣式
可以使用 className 和 style 選項將自訂樣式應用於彈出通知。
toast.error("Error message", {
  className: 'custom-toast',
  style: { background: 'red', color: 'white' }
});
toast.error("Error message", {
className: 'custom-toast',
style: { background: 'red', color: 'white' }
});關閉彈出通知
可以使用 toast.dismiss 方法程式化地關閉彈出通知。
const toastId = toast("This toast can be dismissed");
function dismissToast() {
toast.dismiss(toastId);
}const toastId = toast("This toast can be dismissed");
function dismissToast() {
toast.dismiss(toastId);
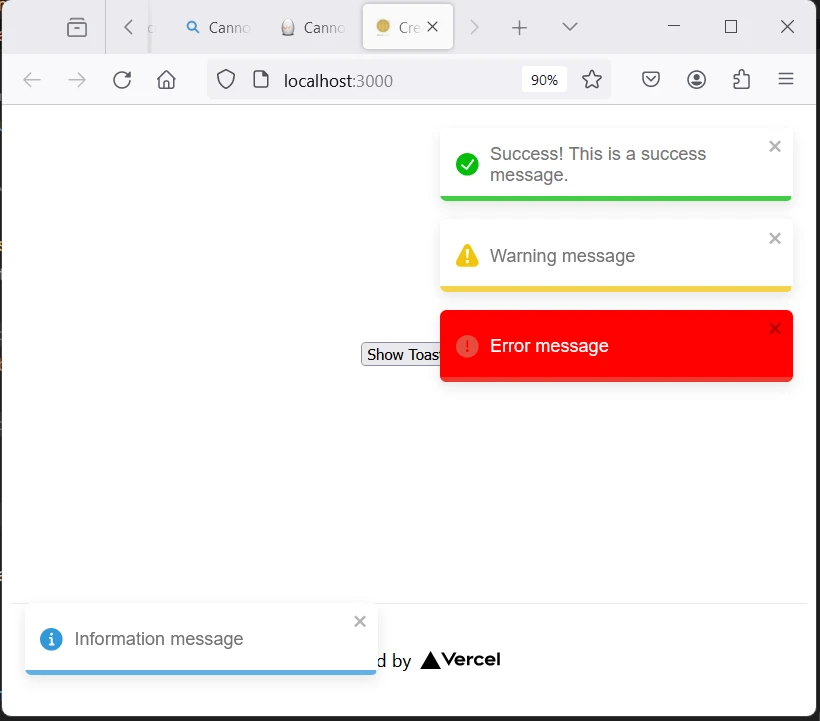
}這裡有一個完整的例子展示了如何使用多種 react-toastify 功能:
import React from 'react';
import { ToastContainer, toast } from 'react-toastify';
import 'react-toastify/dist/ReactToastify.css';
function App() {
const notify = () => {
toast.success("Success! This is a success message.", {
position: "top-right"
});
toast.info("Information message", {
position: "bottom-left"
});
toast.warn("Warning message", {
autoClose: 5000
});
toast.error("Error message", {
  className: 'custom-toast',
  style: { background: 'red', color: 'white' }
});
};
return (
<div>
<button onClick={notify}>Show Toasts</button>
<ToastContainer />
</div>
);
}
export default App;import React from 'react';
import { ToastContainer, toast } from 'react-toastify';
import 'react-toastify/dist/ReactToastify.css';
function App() {
const notify = () => {
toast.success("Success! This is a success message.", {
position: "top-right"
});
toast.info("Information message", {
position: "bottom-left"
});
toast.warn("Warning message", {
autoClose: 5000
});
toast.error("Error message", {
className: 'custom-toast',
style: { background: 'red', color: 'white' }
});
};
return (
<div>
<button onClick={notify}>Show Toasts</button>
<ToastContainer />
</div>
);
}
export default App;輸出
介紹IronPDF
IronPDF 是一個功能強大的 C# PDF 程式庫,允許開發者在其 .NET 專案中生成和編輯 PDF。 無論您需要從 HTML 建立 PDF、操作現有 PDF,還是將網頁轉換為 PDF 格式,IronPDF 都能滿足您的需求。
以下是一些關鍵特性和使用案例:
1. HTML 到 PDF 轉換
IronPDF 可以將 HTML 頁面(無論是來自 URL、HTML 文件還是 HTML 字串)轉換為 PDF。 您也可以將本地的 HTML 文件或 HTML 字串轉換為 PDF。
2. 跨平台支持
IronPDF 可在多種平台上無縫運行,包括:
- .NET Core (8, 7, 6, 5, and 3.1+)
- .NET Standard (2.0+)
- .NET Framework (4.6.2+)
- Web (Blazor & WebForms)
- 桌面 (WPF & MAUI)
- 控制台 (應用及程式庫)
- Windows、Linux 和 macOS 環境。
3. 編輯和操作 PDF
IronPDF 允許您:
4. 自訂化和格式化
您可以應用頁面模板、標題、頁尾、頁碼和自訂邊距。 IronPDF 支持 UTF-8 字元編碼、基本 URL、資產編碼等。
5. 標準合規性
IronPDF 遵循多種 PDF 標準,包括 PDF 版本 (1.2 - 1.7)、PDF/UA (PDF/UA-1) 和 PDF/A (PDF/A-3b)。
使用 IronPDF 和 Toastify NPM 套件生成 PDF 文件
安裝依賴項: 首先,使用以下命令建立一個新的Next.js專案(如果尚未建立)。 請參考 設置 頁。
npx create-next-app@latest my-pdf-app --use-npm --example "https://github.com/vercel/next-learn/tree/main/basics/learn-starter"npx create-next-app@latest my-pdf-app --use-npm --example "https://github.com/vercel/next-learn/tree/main/basics/learn-starter"接下來,導航至您的專案目錄:
cd my-pdf-appcd my-pdf-app安裝所需的套件:
npm install @ironsoftware/ironpdf, react-toastify
建立 PDF: 現在,讓我們透過 IronPDF 生成 PDF 的簡單範例。 在您的Next.js組件中(例如,pages/index.tsx),新增以下程式碼:
import Head from 'next/head';
import styles from '../styles/Home.module.css';
import { ToastContainer, toast } from 'react-toastify';
import 'react-toastify/dist/ReactToastify.css';
import { useState } from "react";

export default function Home() {
    const [textInput, setTextInput] = useState('');

    // Function to show toast notifications
    const notify = () => {
        toast.success("Success! This is a success message.", {
            position: "top-right"
        });
        toast.info("Information message", {
            position: "bottom-left"
        });
        toast.warn("Warning message", {
            autoClose: 5000
        });
        toast.error("Error message", {
            className: 'custom-toast',
            style: { background: 'red', color: 'white' }
        });
    };

    // Function to generate a PDF
    const generatePdf = async () => {
        try {
            const response = await fetch('/api/pdf?url=' + textInput);
            const blob = await response.blob();
            const url = window.URL.createObjectURL(new Blob([blob]));
            const link = document.createElement('a');
            link.href = url;
            link.setAttribute('download', 'example.pdf');
            document.body.appendChild(link);
            link.click();
            link.parentNode.removeChild(link);
        } catch (error) {
            console.error('Error generating PDF:', error);
        }
    };

    // Handler for input change
    const handleChange = (event) => {
        setTextInput(event.target.value);
    }

    return (
        <div className={styles.container}>
            <Head>
                <title>Demo Toaster and Generate PDF From IronPDF</title>
                <link rel="icon" href="/favicon.ico"/>
            </Head>
            <main>
                <h1>Demo Toaster and Generate PDF From IronPDF</h1>
                <button style={{margin: 20, padding: 5}} onClick={notify}>Show Toasts</button>
                <p>
                    <span>Enter Url To Convert to PDF:</span>{" "}
                    <input type="text" value={textInput} onChange={handleChange} />
                </p>
                <button style={{margin: 20, padding: 5}} onClick={generatePdf}>Generate PDF</button>
                <ToastContainer />
            </main>
            <style jsx>{`
                main {
                    padding: 5rem 0;
                    flex: 1;
                    display: flex;
                    flex-direction: column;
                    justify-content: center;
                    align-items: center;
                }
                footer {
                    width: 100%;
                    height: 100px;
                    border-top: 1px solid #eaeaea;
                    display: flex;
                    justify-content: center;
                    align-items: center;
                }
                footer img {
                    margin-left: 0.5rem;
                }
                footer a {
                    display: flex;
                    justify-content: center;
                    align-items: center;
                    text-decoration: none;
                    color: inherit;
                }
                code {
                    background: #fafafa;
                    border-radius: 5px;
                    padding: 0.75rem;
                    font-size: 1.1rem;
                    font-family: Menlo,
                    Monaco,
                    Lucida Console,
                    Liberation Mono,
                    DejaVu Sans Mono,
                    Bitstream Vera Sans Mono,
                    Courier New,
                    monospace;
                }
            `}</style>
            <style jsx global>{`
                html,
                body {
                    padding: 0;
                    margin: 0;
                    font-family: -apple-system,
                    BlinkMacSystemFont,
                    Segoe UI,
                    Roboto,
                    Oxygen,
                    Ubuntu,
                    Cantarell,
                    Fira Sans,
                    Droid Sans,
                    Helvetica Neue,
                    sans-serif;
                }
                * {
                    box-sizing: border-box;
                }
            `}</style>
        </div>
    );
}
import Head from 'next/head';
import styles from '../styles/Home.module.css';
import { ToastContainer, toast } from 'react-toastify';
import 'react-toastify/dist/ReactToastify.css';
import { useState } from "react";
export default function Home() {
const [textInput, setTextInput] = useState('');
// Function to show toast notifications
const notify = () => {
toast.success("Success! This is a success message.", {
position: "top-right"
});
toast.info("Information message", {
position: "bottom-left"
});
toast.warn("Warning message", {
autoClose: 5000
});
toast.error("Error message", {
className: 'custom-toast',
style: { background: 'red', color: 'white' }
});
};
// Function to generate a PDF
const generatePdf = async () => {
try {
const response = await fetch('/api/pdf?url=' + textInput);
const blob = await response.blob();
const url = window.URL.createObjectURL(new Blob([blob]));
const link = document.createElement('a');
link.href = url;
link.setAttribute('download', 'example.pdf');
document.body.appendChild(link);
link.click();
link.parentNode.removeChild(link);
} catch (error) {
console.error('Error generating PDF:', error);
}
};
// Handler for input change
const handleChange = (event) => {
setTextInput(event.target.value);
}
return (
<div className={styles.container}>
<Head>
<title>Demo Toaster and Generate PDF From IronPDF</title>
<link rel="icon" href="/favicon.ico"/>
</Head>
<main>
<h1>Demo Toaster and Generate PDF From IronPDF</h1>
<button style={{margin: 20, padding: 5}} onClick={notify}>Show Toasts</button>
<p>
<span>Enter Url To Convert to PDF:</span>{" "}
<input type="text" value={textInput} onChange={handleChange} />
</p>
<button style={{margin: 20, padding: 5}} onClick={generatePdf}>Generate PDF</button>
<ToastContainer />
</main>
<style jsx>{`
main {
padding: 5rem 0;
flex: 1;
display: flex;
flex-direction: column;
justify-content: center;
align-items: center;
}
footer {
width: 100%;
height: 100px;
border-top: 1px solid #eaeaea;
display: flex;
justify-content: center;
align-items: center;
}
footer img {
margin-left: 0.5rem;
}
footer a {
display: flex;
justify-content: center;
align-items: center;
text-decoration: none;
color: inherit;
}
code {
background: #fafafa;
border-radius: 5px;
padding: 0.75rem;
font-size: 1.1rem;
font-family: Menlo,
Monaco,
Lucida Console,
Liberation Mono,
DejaVu Sans Mono,
Bitstream Vera Sans Mono,
Courier New,
monospace;
}
`}</style>
<style jsx global>{`
html,
body {
padding: 0;
margin: 0;
font-family: -apple-system,
BlinkMacSystemFont,
Segoe UI,
Roboto,
Oxygen,
Ubuntu,
Cantarell,
Fira Sans,
Droid Sans,
Helvetica Neue,
sans-serif;
}
* {
box-sizing: border-box;
}
`}</style>
</div>
);
}由於 IronPDF 只能在 Node.js 上運行,接下來新增一個 API 供應用程式使用 Node.js 生成 PDF。
在 pages/api 資料夾中建立一個文件 pdf.js 並新增下面的程式碼:
// pages/api/pdf.js
import { IronPdfGlobalConfig, PdfDocument } from "@ironsoftware/ironpdf";

// Apply your IronPDF license key
IronPdfGlobalConfig.getConfig().licenseKey = "Add Your Key Here";

export default async function handler(req, res) {
    try {
        const url = req.query.url;
        const pdf = await PdfDocument.fromUrl(url);
        const data = await pdf.saveAsBuffer();
        console.log('data PDF:', data);
        res.setHeader('Content-Type', 'application/pdf');
        res.setHeader('Content-Disposition', 'attachment; filename=awesomeIron.pdf');
        res.send(data);
    } catch (error) {
        console.error('Error generating PDF:', error);
        res.status(500).end();
    }
}
// pages/api/pdf.js
import { IronPdfGlobalConfig, PdfDocument } from "@ironsoftware/ironpdf";
// Apply your IronPDF license key
IronPdfGlobalConfig.getConfig().licenseKey = "Add Your Key Here";
export default async function handler(req, res) {
try {
const url = req.query.url;
const pdf = await PdfDocument.fromUrl(url);
const data = await pdf.saveAsBuffer();
console.log('data PDF:', data);
res.setHeader('Content-Type', 'application/pdf');
res.setHeader('Content-Disposition', 'attachment; filename=awesomeIron.pdf');
res.send(data);
} catch (error) {
console.error('Error generating PDF:', error);
res.status(500).end();
}
}注意: 在上述程式碼中,新增您自己的授權金鑰。
運行您的應用程式: 啟動您的Next.js應用程式:
npm run devnpm run devor
yarn devyarn dev輸出
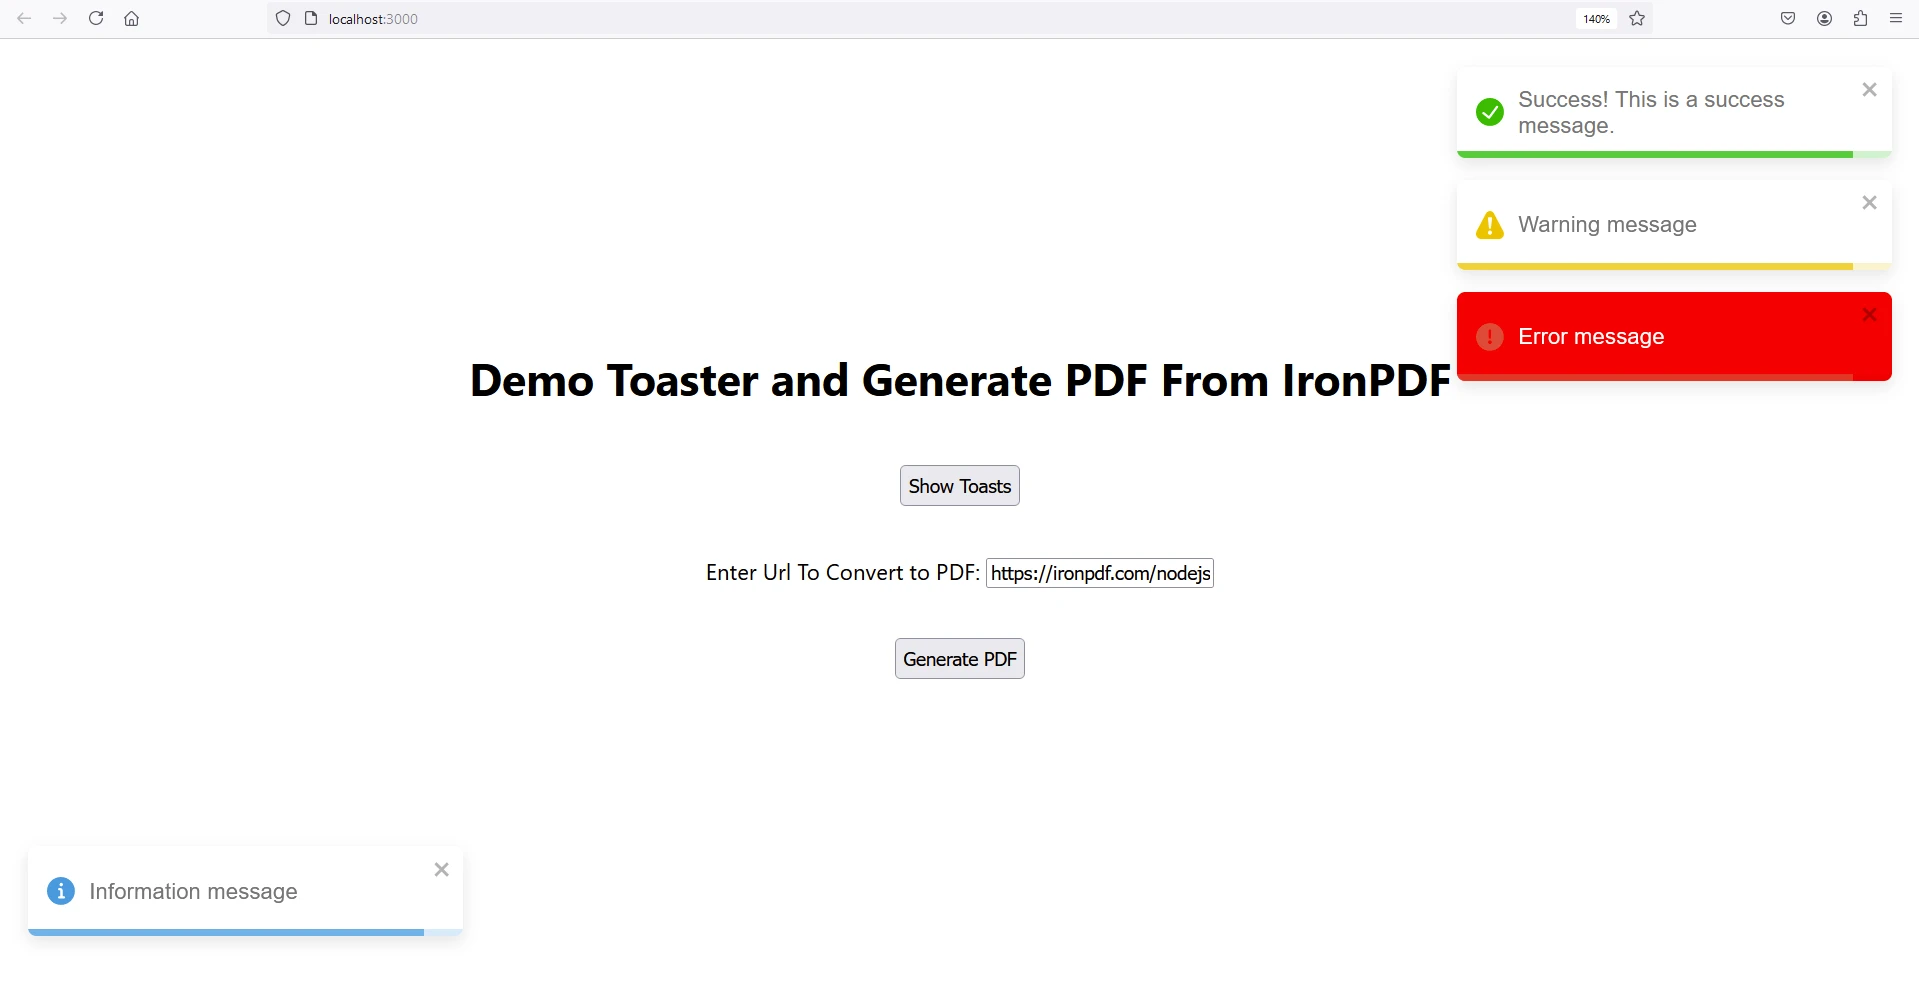
打開您的瀏覽器並導航到 http://localhost:3000 以查看下方的網站:
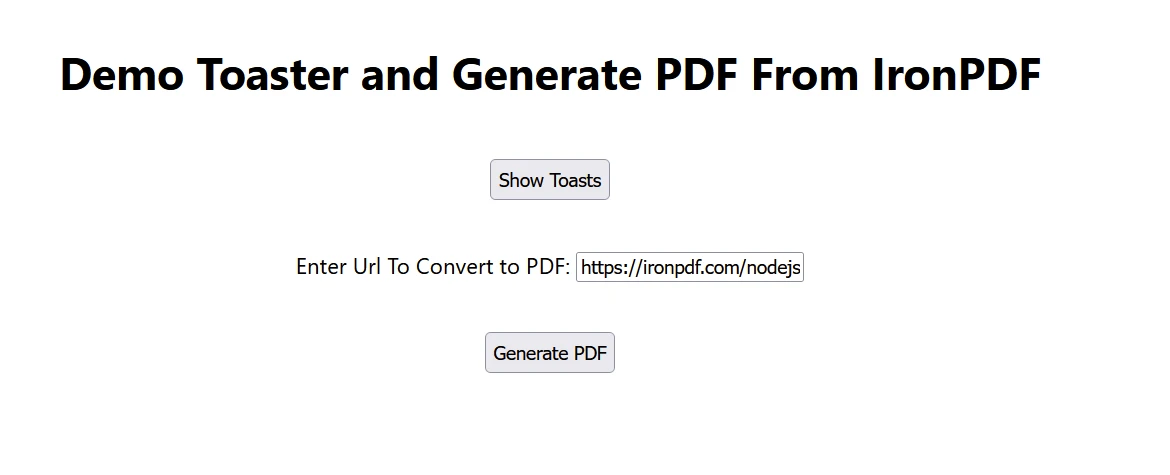
現在點擊 "顯示彈出通知" 按鈕以查看彈出訊息。
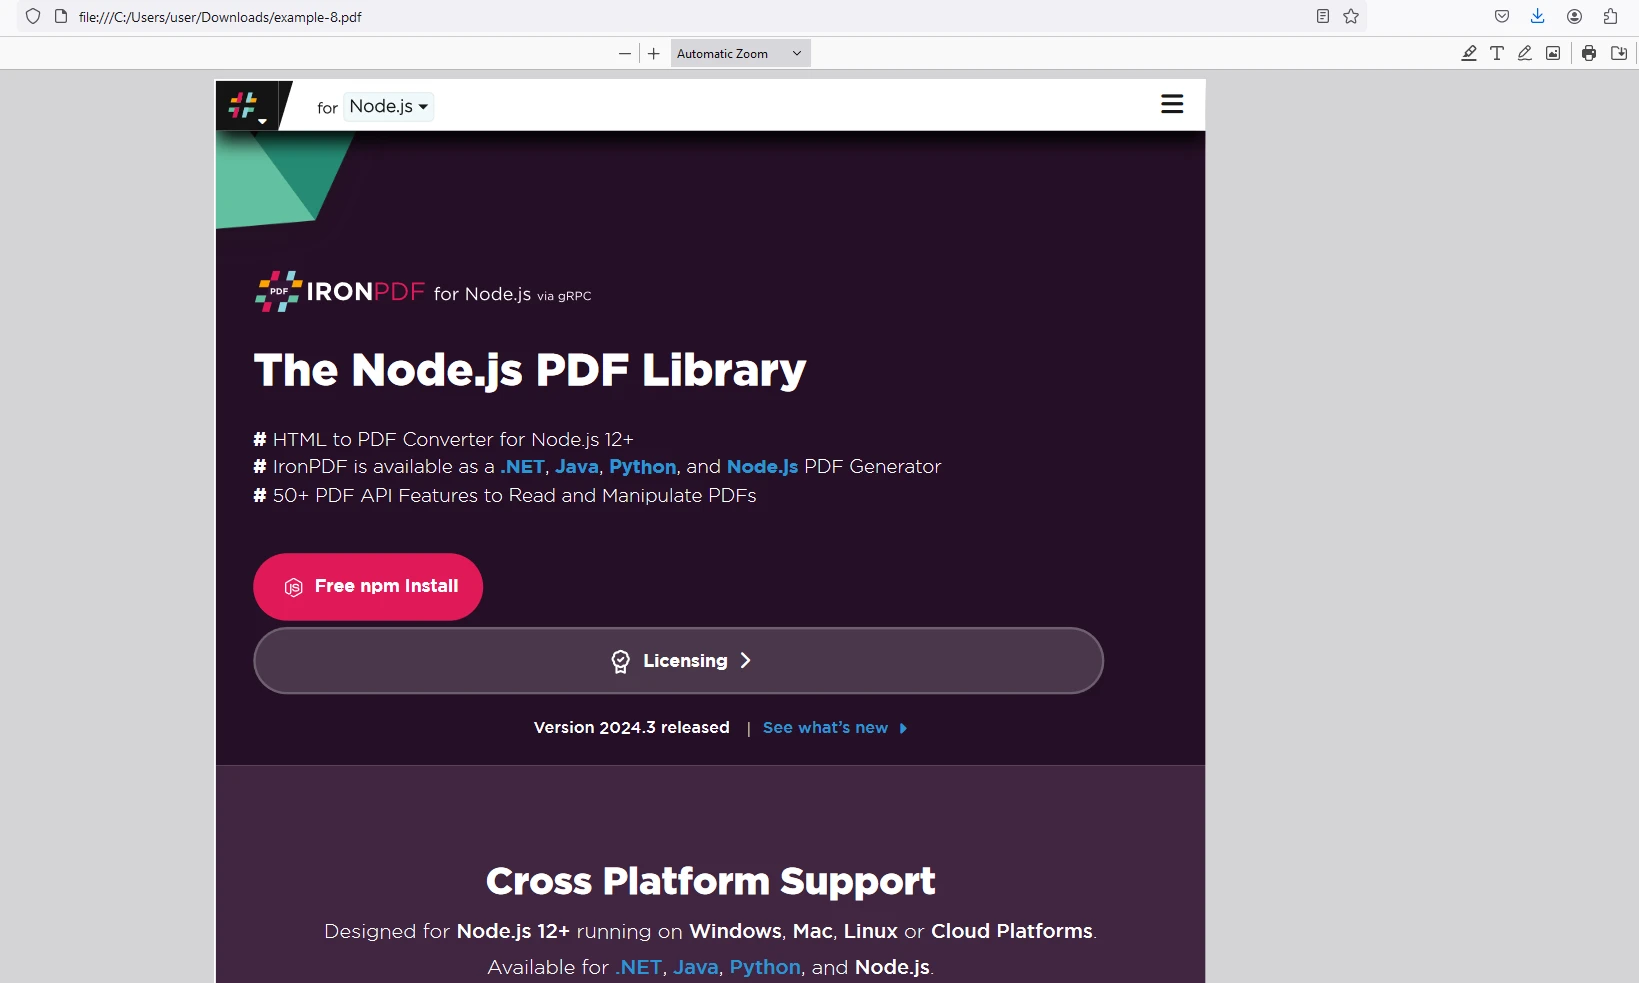
現在輸入一個網站網址來生成 PDF,然後點擊 "生成 PDF"。 一個名為 awesomeIron.pdf 的文件將被下載。
IronPDF 授權
有關 IronPDF 授權的資訊,請參閱 IronPDF 授權 頁。
將授權金鑰放置在應用程式中,如下所示:
import { IronPdfGlobalConfig, PdfDocument } from "@ironsoftware/ironpdf";
// Apply your IronPDF license key
IronPdfGlobalConfig.getConfig().licenseKey = "Add Your Key Here";import { IronPdfGlobalConfig, PdfDocument } from "@ironsoftware/ironpdf";
// Apply your IronPDF license key
IronPdfGlobalConfig.getConfig().licenseKey = "Add Your Key Here";結論
React-toastify 是一個強大且易於使用的庫,可將彈出通知新增到您的 React 應用程式中。 藉由其多樣的功能和自訂選項,您可以在超簡單且不干擾的方式中提供即時反饋,提升使用者體驗。 另一方面,IronPDF 是最靈活的企業程式庫,支持生成、編輯和管理 PDF 文件。 按照本文列出的步驟,您可以快速將 React-toastify 和 IronPDF 整合到您的項目中,並開始利用其功能。






 免費開始
免費開始 免費開始
免費開始 預訂免費直播演示