
replicate npm (How It Works For Developers)
The 'replicate' NPM package is a powerful client tool for integrating machine learning models into React applications. It allows developers to easily use pre-trained models and run inferences directly within their applications without needing to manage complex backend infrastructure. Here's an overview of how you can use the replicate NPM package in your React project. Additionally, we will explore IronPDF, a PDF generation library, and demonstrate how to combine both libraries to create a functioning application.
Introduction to Replicate
Replicate is an online platform that provides access to machine learning models through a simple API. It hosts models from various domains, such as image generation, text analysis, and more. By using the 'replicate' NPM package, developers can seamlessly integrate these models into their applications.
Getting Started
Installation
To use replicate in your React application, you first need to install the package. You can do this using npm or yarn:
npm install replicatenpm install replicateor
yarn add replicateyarn add replicateAPI Key
You will need an API key to interact with the Replicate API. You can obtain this key by signing up on the Replicate website and creating a new API token.
Basic Usage
Here's a step-by-step guide to using the replicate package in a React application.
1. Import the package and initialize the client
import Replicate from 'replicate';

// Initialize the Replicate client with your API token
const replicate = new Replicate({
  auth: 'YOUR_API_TOKEN'
});
import Replicate from 'replicate';
// Initialize the Replicate client with your API token
const replicate = new Replicate({
auth: 'YOUR_API_TOKEN'
});2. Run an inference
Assuming you want to use a model to generate an image from text, with just a few lines of code, you can get the result as shown below:
// Use the replicate client to run an inference using a specified model
const result = await replicate.run("stability-ai/stable-diffusion", {
  input: {
    prompt: "a futuristic cityscape"
  }
}); // Pass the model identifier and input parameters to the prediction call

// Log the result
console.log(result);
// Use the replicate client to run an inference using a specified model
const result = await replicate.run("stability-ai/stable-diffusion", {
input: {
prompt: "a futuristic cityscape"
}
}); // Pass the model identifier and input parameters to the prediction call
// Log the result
console.log(result);Example Application
Let's create a simple React application that allows users to generate images based on text prompts to demonstrate the usage of the replicate package.
1. Set up a new React project:
npx create-react-app replicate-example
cd replicate-example
npm install replicate
npx create-react-app replicate-example
cd replicate-example
npm install replicate2. Create a component for image generation:
import React, { useState } from 'react';
import Replicate from 'replicate';

// Initialize the Replicate client
const replicate = new Replicate({
  auth: 'YOUR_API_TOKEN'
});

const ImageGenerator = () => {
  const [prompt, setPrompt] = useState('');
  const [image, setImage] = useState(null);

  // Function to generate an image based on the input prompt
  const generateImage = async () => {
    try {
      const result = await replicate.run("stability-ai/stable-diffusion", {
        input: { prompt }
      });
      setImage(result.output[0]);
    } catch (error) {
      console.error("Error generating image:", error);
      alert("Failed to generate image. Please try again.");
    }
  };

  return (
    <div>
      <h1>Image Generator</h1>
      <input
        type="text"
        value={prompt}
        onChange={(e) => setPrompt(e.target.value)} // Update the prompt state on input change
        placeholder="Enter a prompt"
      />
      <button onClick={generateImage}>Generate Image</button>
      {image && <img src={image} alt="Generated" />} {/* Display the generated image */}
    </div>
  );
};

export default ImageGenerator;
import React, { useState } from 'react';
import Replicate from 'replicate';
// Initialize the Replicate client
const replicate = new Replicate({
auth: 'YOUR_API_TOKEN'
});
const ImageGenerator = () => {
const [prompt, setPrompt] = useState('');
const [image, setImage] = useState(null);
// Function to generate an image based on the input prompt
const generateImage = async () => {
try {
const result = await replicate.run("stability-ai/stable-diffusion", {
input: { prompt }
});
setImage(result.output[0]);
} catch (error) {
console.error("Error generating image:", error);
alert("Failed to generate image. Please try again.");
}
};
return (
<div>
<h1>Image Generator</h1>
<input
type="text"
value={prompt}
onChange={(e) => setPrompt(e.target.value)} // Update the prompt state on input change
placeholder="Enter a prompt"
/>
<button onClick={generateImage}>Generate Image</button>
{image && <img src={image} alt="Generated" />} {/* Display the generated image */}
</div>
);
};
export default ImageGenerator;3. Use the component in your application:
import React from 'react';
import ReactDOM from 'react-dom';
import './index.css';
import App from './App';
import ImageGenerator from './ImageGenerator';

ReactDOM.render(
  <React.StrictMode>
    <App />
    <ImageGenerator />
  </React.StrictMode>,
  document.getElementById('root')
);
import React from 'react';
import ReactDOM from 'react-dom';
import './index.css';
import App from './App';
import ImageGenerator from './ImageGenerator';
ReactDOM.render(
<React.StrictMode>
<App />
<ImageGenerator />
</React.StrictMode>,
document.getElementById('root')
);Handling Errors
When working with APIs, it's crucial to handle errors gracefully. You can modify the generateImage function to catch and display errors, as shown in the ImageGenerator component above.
Introducing IronPDF
IronPDF is a versatile npm package designed to simplify PDF generation in Node.js applications. It allows you to create PDF documents from HTML content, URLs, or existing PDF files. Whether you need to generate invoices, reports, or other types of documents, IronPDF makes the process easy with its intuitive API and comprehensive feature set.
Key Features of IronPDF
1. HTML to PDF Conversion
Easily convert HTML content into PDF documents, perfect for generating dynamic PDFs from web content.
2. URL to PDF Conversion
Create PDFs directly from URLs, enabling you to capture web page content and save it as PDF files programmatically.
3. PDF Manipulation
Merge, split, and manipulate existing PDF documents with ease. IronPDF provides functionalities for appending pages, splitting documents, creating PDF forms, and more.
4. PDF Security
Secure your PDF documents by encrypting them with passwords or applying digital signatures, protecting your sensitive documents from unauthorized access.
5. High-Quality Output
Produce high-quality PDF documents with accurate rendering of text, images, and formatting, ensuring the generated PDFs remain true to the original content.
6. Cross-Platform Compatibility
IronPDF's compatibility with Windows, Linux, and macOS makes it suitable for various development environments.
7. Simple Integration
Integrate IronPDF into your Node.js applications easily using its npm package. The well-documented API simplifies incorporating PDF generation capabilities into your projects.
Whether you’re developing a web application, a server-side script, or a command-line tool, IronPDF empowers you to create professional-grade PDF documents efficiently and reliably.
Generate PDF Document Using IronPDF and Use Recharts NPM Package
Install Dependencies
First, create a new Next.js project (if you haven’t already) using the following command. Refer here:
npx create-next-app@latest replicate-pdf --use-npm --example "https://github.com/vercel/next-learn/tree/main/basics/learn-starter"npx create-next-app@latest replicate-pdf --use-npm --example "https://github.com/vercel/next-learn/tree/main/basics/learn-starter"Next, navigate to your project directory:
cd replicate-pdfcd replicate-pdfInstall the required packages:
yarn add @ironsoftware/ironpdf @ironsoftware/ironpdf-engine-windows-x64
yarn add replicate
yarn add @ironsoftware/ironpdf @ironsoftware/ironpdf-engine-windows-x64
yarn add replicatePDF Generation API
The first step is to create a backend API to generate the PDF document. Since IronPDF only runs server-side, we need to create an API to call when users want to generate a PDF. Create a file at the path pages/api/pdf/route.js and add the contents below:
// pages/api/pdf.js
import { NextRequest, NextResponse } from 'next/server';
import { IronPdfGlobalConfig, PdfDocument } from "@ironsoftware/ironpdf";

// Apply your IronPDF license key
IronPdfGlobalConfig.getConfig().licenseKey = "your key";

// API handler for generating a PDF from a URL
export const GET = async (req) => {
    const { searchParams } = new URL(req.url);
    const name = searchParams.get("url");
    try {
        const pdf = await PdfDocument.fromUrl(name);
        const data = await pdf.saveAsBuffer();
        console.error('data PDF:', data);
        return new NextResponse(data, {
            status: 200,
            headers: {
                "content-type": "application/pdf",
                "Content-Disposition": "attachment; filename=awesomeIron.pdf",
            },
        });
    } catch (error) {
        console.error('Error generating PDF:', error);
        return NextResponse.json({ detail: "error" }, { status: 500 });
    }
};
// pages/api/pdf.js
import { NextRequest, NextResponse } from 'next/server';
import { IronPdfGlobalConfig, PdfDocument } from "@ironsoftware/ironpdf";
// Apply your IronPDF license key
IronPdfGlobalConfig.getConfig().licenseKey = "your key";
// API handler for generating a PDF from a URL
export const GET = async (req) => {
const { searchParams } = new URL(req.url);
const name = searchParams.get("url");
try {
const pdf = await PdfDocument.fromUrl(name);
const data = await pdf.saveAsBuffer();
console.error('data PDF:', data);
return new NextResponse(data, {
status: 200,
headers: {
"content-type": "application/pdf",
"Content-Disposition": "attachment; filename=awesomeIron.pdf",
},
});
} catch (error) {
console.error('Error generating PDF:', error);
return NextResponse.json({ detail: "error" }, { status: 500 });
}
};IronPDF requires a license key, which you can get from the license page and place in the above code.
Add the Below Code to index.js
'use client';
import { useState, useEffect, useRef } from "react";
import Image from "next/image";

// Utility function to create a delay
const sleep = (ms) => new Promise((r) => setTimeout(r, ms));

export default function Home() {
  const [prediction, setPrediction] = useState(null);
  const [error, setError] = useState(null);
  const promptInputRef = useRef(null);

  // Focus input field on component mount
  useEffect(() => {
    promptInputRef.current.focus();
  }, []);

  // Handle form submission for image prediction
  const handleSubmit = async (e) => {
    e.preventDefault();

    // Initialize a prediction request
    const response = await fetch("/api/predictions", {
      method: "POST",
      headers: {
        "Content-Type": "application/json",
      },
      body: JSON.stringify({
        prompt: e.target.prompt.value,
      }),
    });

    let prediction = await response.json();
    if (response.status !== 201) {
      setError(prediction.detail);
      return;
    }

    // Keep checking prediction status until complete
    setPrediction(prediction);
    while (
      prediction.status !== "succeeded" &&
      prediction.status !== "failed"
    ) {
      await sleep(1000);
      const response = await fetch(`/api/predictions/${prediction.id}`);
      prediction = await response.json();
      if (response.status !== 200) {
        setError(prediction.detail);
        return;
      }
      console.log({ prediction });
      setPrediction(prediction);
    }
  };

  // Generate a PDF from the prediction result
  const generatePdf = async () => {
    try {
      const response = await fetch("/api/pdf?url=" + prediction.output[prediction.output.length - 1]);
      const blob = await response.blob();

      const url = window.URL.createObjectURL(new Blob([blob]));
      const link = document.createElement("a");
      link.href = url;
      link.setAttribute("download", "awesomeIron.pdf");

      document.body.appendChild(link);
      link.click();
      link.parentNode.removeChild(link);
    } catch (error) {
      console.error("Error generating PDF:", error);
    }
  };

  return (
    <div className="container max-w-2xl mx-auto p-5">
      <h1 className="py-6 text-center font-bold text-2xl">
        IronPDF: An Awesome Library for PDFs
      </h1>
      <p>Enter prompt to generate an image, then click "Go" to generate:</p>
      <form className="w-full flex" onSubmit={handleSubmit}>
        <input
          type="text"
          className="flex-grow"
          name="prompt"
          placeholder="Enter a prompt to display an image"
          ref={promptInputRef}
        />
        <button className="button" type="submit">
          Go!
        </button>
        <button className="pdfButton" type="button" onClick={generatePdf}>
          Generate PDF
        </button>
      </form>

      {error && <div>{error}</div>}
      {prediction && (
        <>
          {prediction.output && (
            <div className="image-wrapper mt-5">
              <Image
                fill
                src={prediction.output[prediction.output.length - 1]}
                alt="output"
                sizes="100vw"
              />
            </div>
          )}
          <p className="py-3 text-sm opacity-50">status: {prediction.status}</p>
        </>
      )}
    </div>
  );
}
'use client';
import { useState, useEffect, useRef } from "react";
import Image from "next/image";
// Utility function to create a delay
const sleep = (ms) => new Promise((r) => setTimeout(r, ms));
export default function Home() {
const [prediction, setPrediction] = useState(null);
const [error, setError] = useState(null);
const promptInputRef = useRef(null);
// Focus input field on component mount
useEffect(() => {
promptInputRef.current.focus();
}, []);
// Handle form submission for image prediction
const handleSubmit = async (e) => {
e.preventDefault();
// Initialize a prediction request
const response = await fetch("/api/predictions", {
method: "POST",
headers: {
"Content-Type": "application/json",
},
body: JSON.stringify({
prompt: e.target.prompt.value,
}),
});
let prediction = await response.json();
if (response.status !== 201) {
setError(prediction.detail);
return;
}
// Keep checking prediction status until complete
setPrediction(prediction);
while (
prediction.status !== "succeeded" &&
prediction.status !== "failed"
) {
await sleep(1000);
const response = await fetch(`/api/predictions/${prediction.id}`);
prediction = await response.json();
if (response.status !== 200) {
setError(prediction.detail);
return;
}
console.log({ prediction });
setPrediction(prediction);
}
};
// Generate a PDF from the prediction result
const generatePdf = async () => {
try {
const response = await fetch("/api/pdf?url=" + prediction.output[prediction.output.length - 1]);
const blob = await response.blob();
const url = window.URL.createObjectURL(new Blob([blob]));
const link = document.createElement("a");
link.href = url;
link.setAttribute("download", "awesomeIron.pdf");
document.body.appendChild(link);
link.click();
link.parentNode.removeChild(link);
} catch (error) {
console.error("Error generating PDF:", error);
}
};
return (
<div className="container max-w-2xl mx-auto p-5">
<h1 className="py-6 text-center font-bold text-2xl">
IronPDF: An Awesome Library for PDFs
</h1>
<p>Enter prompt to generate an image, then click "Go" to generate:</p>
<form className="w-full flex" onSubmit={handleSubmit}>
<input
type="text"
className="flex-grow"
name="prompt"
placeholder="Enter a prompt to display an image"
ref={promptInputRef}
/>
<button className="button" type="submit">
Go!
</button>
<button className="pdfButton" type="button" onClick={generatePdf}>
Generate PDF
</button>
</form>
{error && <div>{error}</div>}
{prediction && (
<>
{prediction.output && (
<div className="image-wrapper mt-5">
<Image
fill
src={prediction.output[prediction.output.length - 1]}
alt="output"
sizes="100vw"
/>
</div>
)}
<p className="py-3 text-sm opacity-50">status: {prediction.status}</p>
</>
)}
</div>
);
}Code Explanation
1. Import Statements
The code begins by importing necessary modules from external libraries:
'useState','useEffect', and'useRef'from"react": These are React Hooks that allow function components to manage state, handle side effects, and create references to DOM elements, respectively.'Image'from"next/image": This is a component provided by Next.js for optimized image loading.- The
"use client"statement ensures that the component using it is rendered on the client side within a Next.js application.
2. Component Function
The Home component is defined as the default export. Inside the component, there are several state variables (prediction, error) managed using the useState hook.
A reference (promptInputRef) is created using the useRef hook. The useEffect hook is used to focus on the promptInputRef when the component mounts.
The handleSubmit function is an asynchronous function that handles form submission. It sends a POST request to an API endpoint (/api/predictions) with a prompt value.
The response is processed, and if successful, the prediction state is updated. The function then enters a loop, periodically checking the prediction status until it succeeds or fails.
The generatePdf method fetches a PDF from another API endpoint (/api/pdf) based on the last output in the prediction state.
3. HTML Markup
The component returns a container <div> with styling (max-w-2xl, mx-auto, p-5). Inside the container, there is an <h1> element with the text "IronPDF: An Awesome Library for PDFs".
Overall, this code appears to be part of a Next.js application that handles predictions and generates PDFs based on user input. The "use client" statement is specific to Next.js and ensures client-side rendering for the component where it's used.
Output
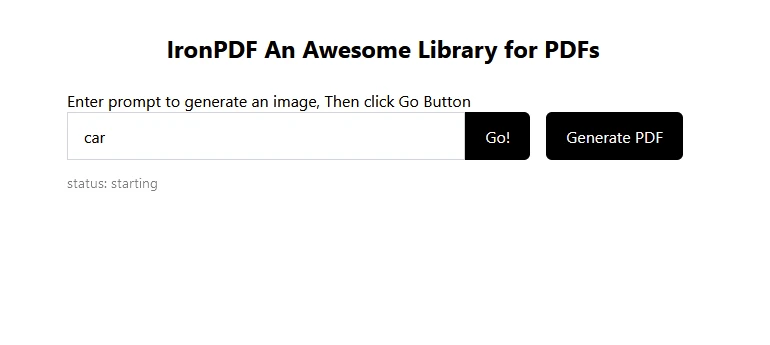
Enter text for prediction as "car", then the image below is predicted:
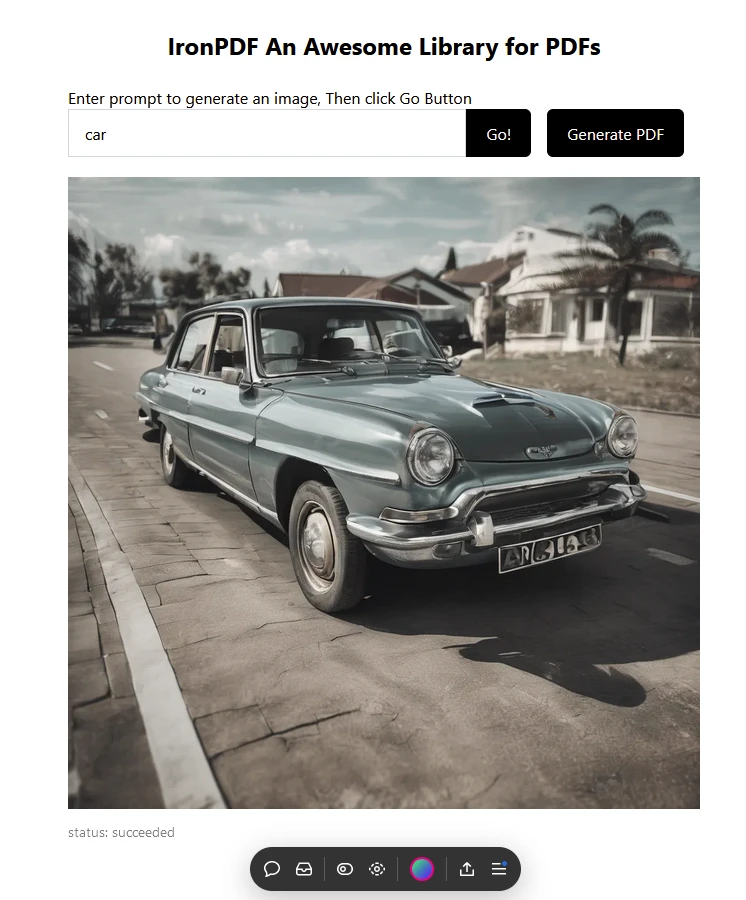
Then click on "Generate PDF" to create a PDF document.
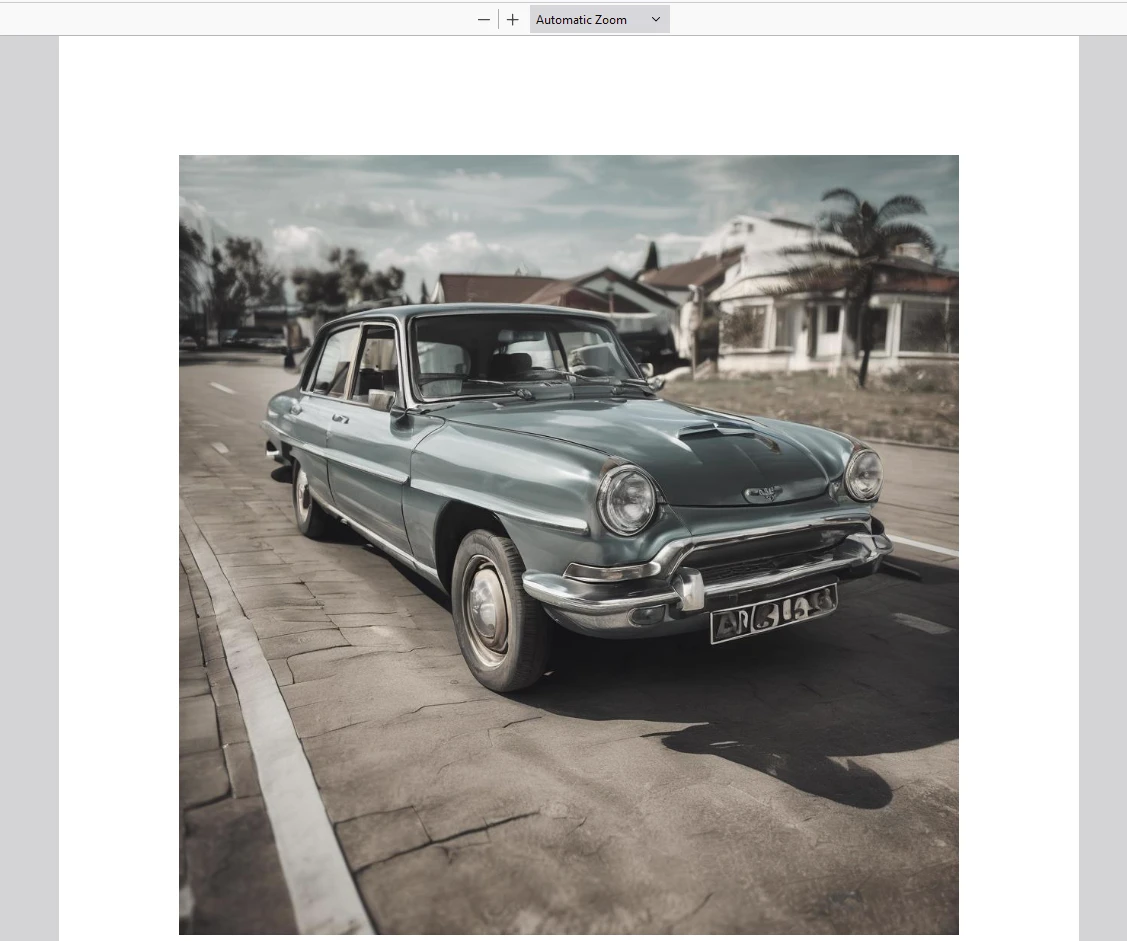
Output PDF Generated Using IronPDF
IronPDF License
Visit the IronPDF licensing page for more information.
Place the License Key in your application as shown in the example below:
import { IronPdfGlobalConfig, PdfDocument } from "@ironsoftware/ironpdf";
// Apply your IronPDF license key
IronPdfGlobalConfig.getConfig().licenseKey = "Add Your key here";
import { IronPdfGlobalConfig, PdfDocument } from "@ironsoftware/ironpdf";
// Apply your IronPDF license key
IronPdfGlobalConfig.getConfig().licenseKey = "Add Your key here";Conclusion
The [**replicate**](https://www.npmjs.com/package/replicate) NPM package provides a convenient way to leverage powerful machine learning models in React applications. By following the steps outlined in this article, you can easily integrate image generation capabilities into your projects. This opens up a wide range of possibilities for creating innovative and interactive user experiences.
Remember to explore other models available on the Replicate platform to further expand the functionality of your applications.
Also, IronPDF is a powerful PDF library for PDF generation and manipulation features, along with the ability to render responsive charts in PDFs on the fly. It enables developers to integrate feature-rich chart packages into apps with just a few lines of code. Together, these two libraries allow developers to work with modern AI technology and save the results reliably in the form of PDFs.


