
.NET 軟體開發(對於開發者的運行原理)
.NET Framework 軟體開發代表 Microsoft 所支援的功能強大、用途廣泛的框架,可讓 .NET 開發人員建立跨越各種平台、作業系統和裝置的強大、高品質應用程式。 此軟體開發框架設計全面,提供工具、程式庫和 API,軟體開發人員可利用這些工具、程式庫和 API 在 .NET 平台上有效率地建立網頁、桌面和行動應用程式。
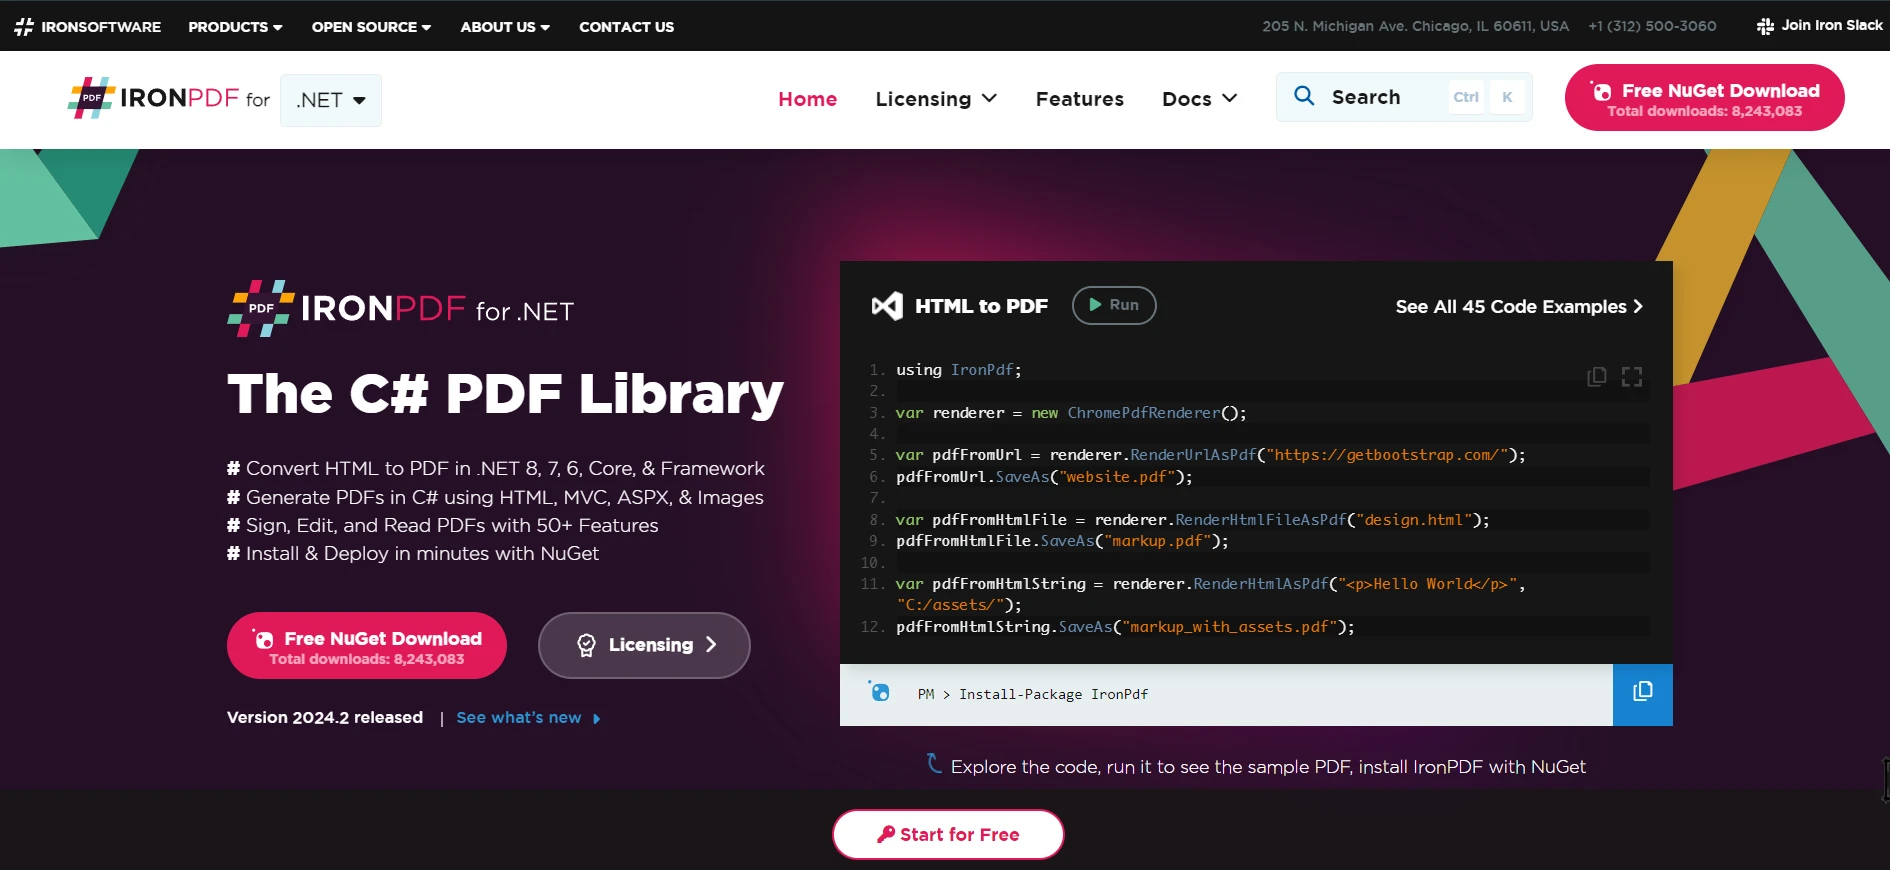
由於支援 C#、Visual Basic 和 F# 等多種程式語言,.NET 開發將其靈活性延伸至開發人員,確保他們能以自己偏好的語言工作,同時受惠於 .NET Core 生態系統的豐富功能。 在本教程中,我們將看IronPDF 如何增強 .NET 開發以解決實際問題。
瞭解 .NET 軟體開發的生態系統。
.NET ecosystem 是 .NET 的主要實作,是一個廣泛、包羅萬象的平台,包含各種元件和技術,旨在促進跨不同作業系統的應用程式開發。 .NET Framework 和 .NET Core 的核心是作為執行 .NET 應用程式的主要引擎,提供一個共通語言執行時 (CLR) 來管理程式碼的執行,並提供記憶體管理、類型安全、異常處理等服務。
通用語言運行時 (CLR)
CLR 是 .NET 架構的重要元素,可讓 .NET 程式碼在不同作業系統上執行。 它可以將 Common Intermediate Language (CIL) 編譯為主機可以直接執行的原生機器程式碼。 此流程可確保 .NET 應用程式能在各種平台上無縫執行,從主要的行動作業系統到 Windows 網路伺服器。
跨平台架構
.NET Core 以跨平台框架的形式出現,允許 .NET 應用程式在 Linux、macOS 和 Windows 上執行。 這種適應性使 .NET 成為開發人員的吸引之選,因為他們希望透過不同的裝置和平台接觸到更多的受眾。 有了 .NET Core,應用程式可以在任何支援的作業系統上開發和部署,提升 .NET 軟體開發的覆蓋範圍和彈性,並由廣泛的 .NET 社群提供支援。
整合開發環境 (IDE)
Visual Studio 是 .NET 開發的主要整合開發環境 (IDE)。 它為開發人員提供了編寫程式碼、除錯和部署 .NET 應用程式的強大工具。 Visual Studio 支援多種程式語言,並提供廣泛的功能來建立網頁、桌面和行動應用程式,是 .NET 開發人員不可或缺的工具。
使用 .NET 建立應用程式。
在 .NET 平台上建立應用程式,需要運用該框架所提供的各種工具、程式庫和程式語言,例如 Visual Basic,以展示其全面的生態系統。 .NET的多樣性讓軟體開發人員能夠建立各種類型的.NET應用程式,從網頁和桌面應用程式到雲端和行動解決方案。
使用 ASP.NET 進行網路開發。
ASP.NET 是 .NET Framework 的重要組成部分,專門用於建立動態網頁和應用程式。 它可讓開發人員建立反應迅速、可擴充的網路應用程式,以處理大量的流量。 ASP.NET Core 是 ASP.NET 的開放原始碼版本,它為建立跨平台的 Web 應用程式帶來了更多的功能,使得在 Windows、Linux 和 macOS 上開發和部署 Web 應用程式成為可能。
桌面應用程式開發
.NET 提供兩種主要的方法來建立桌面應用程式:Windows Forms 和 Windows Presentation Foundation (WPF)。 Windows Forms 提供直接的方式來建立具有豐富圖形使用者介面的桌面應用程式,而 WPF 則使用 XAML (Extensible Application Markup Language,可擴充應用程式標記語言) 來開發具有先進圖形和動畫的視覺吸引人的使用者介面。
行動應用程式開發
在行動開發方面,.NET 透過 Xamarin Framework 將其觸角延伸至主要的行動作業系統,Xamarin Framework 現已整合至 .NET 中,成為 .NET MAUI (Multi-platform App UI)。 此方法可讓開發人員在 iOS、Android 和 Windows 中重複使用程式碼,簡化建立提供原生效能和使用者體驗的行動應用程式的流程。
雲端與微服務
.NET 也非常適合開發在雲端執行的應用程式。 透過 Azure 和其他雲端平台的支援,開發人員可以建立可擴充的分散式應用程式,充分利用雲端運算資源。 ASP.NET Core 在開發微服務方面扮演重要角色,提供輕量、模組化、可獨立部署的服務,並可在雲端環境中擴充。
機器學習與人工智能
.NET 生態系統包含 ML.NET,這是一個機器學習框架,可讓開發人員將自訂的機器學習模型整合到他們的 .NET 應用程式中。 這種整合為創造能夠進行預測分析、自然語言處理等的智慧型應用程式開啟了可能性,在 .NET Framework 中充分利用 AI 的力量。
使用 IronPDF 強化 .NET 軟體開發。
在充滿活力的 .NET 軟體開發生態系統中,在應用程式中直接產生、處理和管理 PDF 文件的能力呈現了顯著的優勢。 IronPDF 是專為 .NET 開發人員設計的強大程式庫,可無縫整合至此環境,提供從 .NET 應用程式(包括以 Windows Forms 建立的應用程式)建立 PDF 的有效方式。
IronPDF 在 .NET 應用程式中的角色。
IronPDF 見證了 .NET 生態系統的靈活性和強大功能,它為開發人員提供了直觀的 API,可從 HTML、圖像、文字甚至 ASP.NET 網頁生成 PDF 文件。 這項能力在需要動態文件建立的情境中特別有用,例如在桌面應用程式中產生發票、報告或個人化文件。
使用 IronPDF 建立 Windows 表單發票產生器。
一個用於生成發票的 Windows Form 應用程式是 .NET 軟體開發與 IronPDF 相結合的實際應用範例。 此應用程式可讓使用者輸入詳細資料,例如客戶資訊、採購項目和價格,然後只需按一下即可產生專業的 PDF 發票。
設定您的 Windows 表單專案並設計使用者介面
首先在 Visual Studio 中建立一個新的 Windows Forms 專案。 這是您的基礎,您將在這裡為您的發票產生器設計使用者介面。 設計您的表單,包含必要的客戶和商品詳細資料輸入欄位,以及產生 PDF 的按鈕。 這是我們的發票產生器 UI:
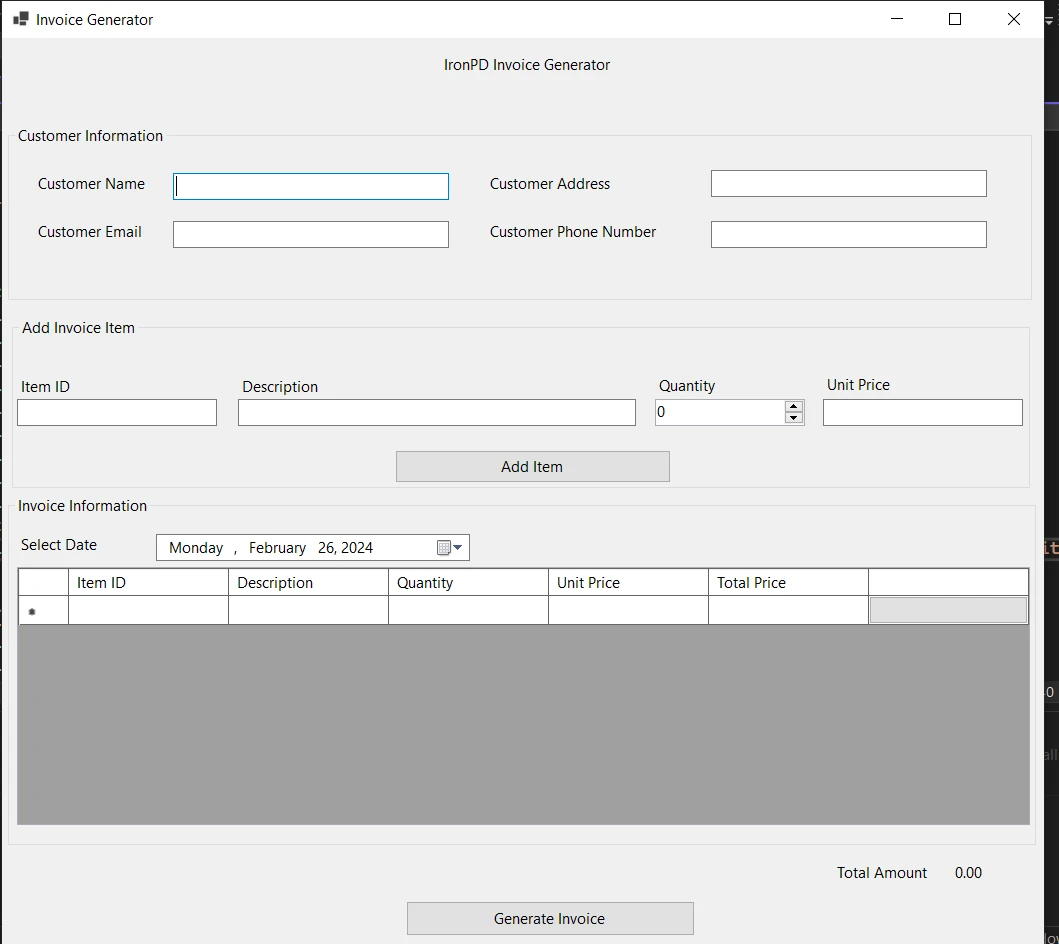
Windows Forms 應用程式的使用者介面經過精心設計,以確保易用性和功能性。 名為"發票產生器"的主視窗被分割成不同的區塊,以提供無縫的使用者體驗。
客戶資訊部分
在表單的頂端,有"客戶姓名"、"客戶地址"、"客戶電子郵件"和"客戶電話號碼"等欄位。此區域專門用於擷取重要的客戶詳細資訊,這些資訊將在產生的發票上顯著標示。
新增發票項目
就在客戶資訊下方,有一個標示為"新增發票項目"的區域。在這裡,使用者可以輸入個別項目的詳細資料,例如"項目 ID"、"說明"、"數量"和"單價"。在這些欄位旁有一個"新增項目"按鈕,讓使用者可以將輸入的項目附加到下方的發票清單。
發票項目清單
表單的中央部分是"發票資訊"區,顯示一個表格,輸入的項目隨著新增而出現。 表格欄位包括"Item ID"、"Description"、"Quantity"、"Unit Price"和"Total Price",最後一欄會根據數量和單價自動計算。標題為"Select Date"的日期選擇器可讓使用者指定發票日期,增加文件的具體性。
發票作業
在表單底部,標籤會顯示"總金額",並隨著項目增加或移除而動態更新。 這可確保使用者即時掌握發票的總價值。 此外,"產生發票"按鈕會提示應用程式使用 IronPDF 函式庫,根據輸入的資料建立 PDF 版本的發票。
此使用者介面不僅要具備功能性,還要直覺化,讓使用者能輕鬆地與應用程式互動,而無需陡峭的學習曲線。 它的設計要容納所有產生發票所需的必要資訊,同時提供從資料輸入到 PDF 建立的明確而直接的路徑。
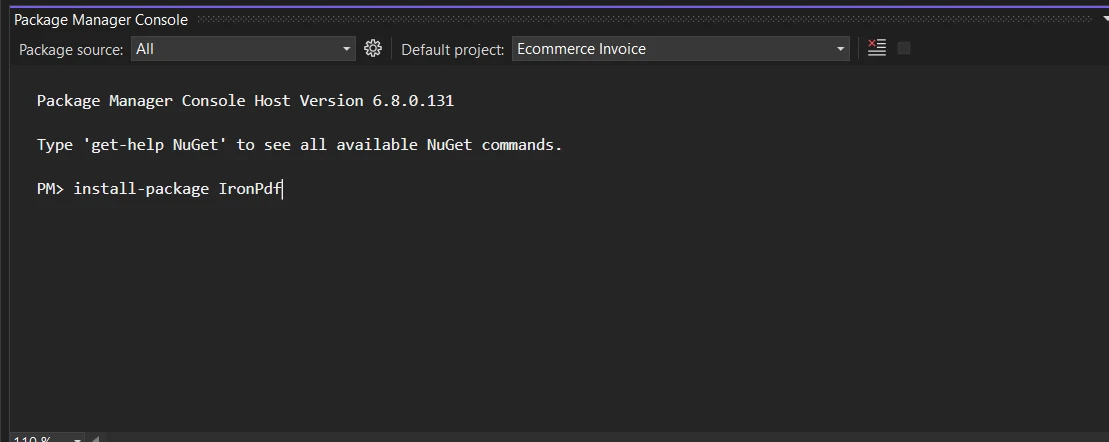
將 IronPDF 加入您的專案。
專案完成後,下一步就是將 IronPDF 加入其中。 這是透過 Visual Studio 的整合式 NuGet 套件管理器來完成,讓您可以毫不費力地將 IronPDF 加入專案中。 在套件管理員控制台執行下列指令:
Install-Package IronPdf
此指令將安裝 IronPDF 並使其可在您的專案中使用。
實現發票生成
Windows Forms 應用程式的核心是其處理使用者輸入、將資料組織成結構化格式,以及產生有形文件的能力 - 在本案例中,是 PDF 格式的發票。 功能建構於應用程式程式碼庫中一系列有條理的步驟之上。
設定資料網格檢視
在初始化表單時,應用程式會呼叫 SetupDataGridViewColumns,以建立顯示發票項目的資料結構。 項目 ID、說明、數量、單價和總價的欄位已建立,其中總價是唯讀欄位,因為它是自動計算的。 此外,還加入了刪除項目的按鈕欄位,加強使用者對發票內容的控制。
private void SetupDataGridViewColumns()
{
    invoiceDataGridView.Columns.Clear(); // Clear existing columns if any
    // Add columns specifying the details to be displayed in the invoice
    invoiceDataGridView.Columns.Add("itemIdColumn", "Item ID");
    invoiceDataGridView.Columns.Add("descriptionColumn", "Description");
    invoiceDataGridView.Columns.Add("quantityColumn", "Quantity");
    invoiceDataGridView.Columns.Add("unitPriceColumn", "Unit Price");
    invoiceDataGridView.Columns.Add("totalPriceColumn", "Total Price");
    // Set the Total Price column to read-only as it will be calculated automatically
    invoiceDataGridView.Columns["totalPriceColumn"].ReadOnly = true;
    // Add a button column for delete action
    DataGridViewButtonColumn deleteButtonColumn = new DataGridViewButtonColumn();
    deleteButtonColumn.HeaderText = "";
    deleteButtonColumn.Name = "deleteButtonColumn";
    deleteButtonColumn.Text = "Delete";
    deleteButtonColumn.UseColumnTextForButtonValue = true; // Set the button text to "Delete"
    // Add the delete button column to the DataGridView
    invoiceDataGridView.Columns.Add(deleteButtonColumn);
}

public Form1()
{
    InitializeComponent();
    SetupDataGridViewColumns();
    // Wire up the CellClick event to a handler to manage deletion of items
    invoiceDataGridView.CellClick += invoiceDataGridView_CellClick;
}

private void invoiceDataGridView_CellClick(object sender, DataGridViewCellEventArgs e)
{
    // If the clicked cell is part of the button column and not the header row
    if (e.ColumnIndex == invoiceDataGridView.Columns["deleteButtonColumn"].Index && e.RowIndex >= 0)
    {
        // Confirm delete operation
        if (MessageBox.Show("Are you sure you want to delete this item?", "Confirm Delete", MessageBoxButtons.YesNo, MessageBoxIcon.Question) == DialogResult.Yes)
        {
            // Remove the row from the DataGridView
            invoiceDataGridView.Rows.RemoveAt(e.RowIndex);
        }
    }
}
private void SetupDataGridViewColumns()
{
invoiceDataGridView.Columns.Clear(); // Clear existing columns if any
// Add columns specifying the details to be displayed in the invoice
invoiceDataGridView.Columns.Add("itemIdColumn", "Item ID");
invoiceDataGridView.Columns.Add("descriptionColumn", "Description");
invoiceDataGridView.Columns.Add("quantityColumn", "Quantity");
invoiceDataGridView.Columns.Add("unitPriceColumn", "Unit Price");
invoiceDataGridView.Columns.Add("totalPriceColumn", "Total Price");
// Set the Total Price column to read-only as it will be calculated automatically
invoiceDataGridView.Columns["totalPriceColumn"].ReadOnly = true;
// Add a button column for delete action
DataGridViewButtonColumn deleteButtonColumn = new DataGridViewButtonColumn();
deleteButtonColumn.HeaderText = "";
deleteButtonColumn.Name = "deleteButtonColumn";
deleteButtonColumn.Text = "Delete";
deleteButtonColumn.UseColumnTextForButtonValue = true; // Set the button text to "Delete"
// Add the delete button column to the DataGridView
invoiceDataGridView.Columns.Add(deleteButtonColumn);
}
public Form1()
{
InitializeComponent();
SetupDataGridViewColumns();
// Wire up the CellClick event to a handler to manage deletion of items
invoiceDataGridView.CellClick += invoiceDataGridView_CellClick;
}
private void invoiceDataGridView_CellClick(object sender, DataGridViewCellEventArgs e)
{
// If the clicked cell is part of the button column and not the header row
if (e.ColumnIndex == invoiceDataGridView.Columns["deleteButtonColumn"].Index && e.RowIndex >= 0)
{
// Confirm delete operation
if (MessageBox.Show("Are you sure you want to delete this item?", "Confirm Delete", MessageBoxButtons.YesNo, MessageBoxIcon.Question) == DialogResult.Yes)
{
// Remove the row from the DataGridView
invoiceDataGridView.Rows.RemoveAt(e.RowIndex);
}
}
}Private Sub SetupDataGridViewColumns()
invoiceDataGridView.Columns.Clear() ' Clear existing columns if any
' Add columns specifying the details to be displayed in the invoice
invoiceDataGridView.Columns.Add("itemIdColumn", "Item ID")
invoiceDataGridView.Columns.Add("descriptionColumn", "Description")
invoiceDataGridView.Columns.Add("quantityColumn", "Quantity")
invoiceDataGridView.Columns.Add("unitPriceColumn", "Unit Price")
invoiceDataGridView.Columns.Add("totalPriceColumn", "Total Price")
' Set the Total Price column to read-only as it will be calculated automatically
invoiceDataGridView.Columns("totalPriceColumn").ReadOnly = True
' Add a button column for delete action
Dim deleteButtonColumn As New DataGridViewButtonColumn()
deleteButtonColumn.HeaderText = ""
deleteButtonColumn.Name = "deleteButtonColumn"
deleteButtonColumn.Text = "Delete"
deleteButtonColumn.UseColumnTextForButtonValue = True ' Set the button text to "Delete"
' Add the delete button column to the DataGridView
invoiceDataGridView.Columns.Add(deleteButtonColumn)
End Sub
'INSTANT VB WARNING: The following constructor is declared outside of its associated class:
'ORIGINAL LINE: public Form1()
Public Sub New()
InitializeComponent()
SetupDataGridViewColumns()
' Wire up the CellClick event to a handler to manage deletion of items
AddHandler invoiceDataGridView.CellClick, AddressOf invoiceDataGridView_CellClick
End Sub
Private Sub invoiceDataGridView_CellClick(ByVal sender As Object, ByVal e As DataGridViewCellEventArgs)
' If the clicked cell is part of the button column and not the header row
If e.ColumnIndex = invoiceDataGridView.Columns("deleteButtonColumn").Index AndAlso e.RowIndex >= 0 Then
' Confirm delete operation
If MessageBox.Show("Are you sure you want to delete this item?", "Confirm Delete", MessageBoxButtons.YesNo, MessageBoxIcon.Question) = DialogResult.Yes Then
' Remove the row from the DataGridView
invoiceDataGridView.Rows.RemoveAt(e.RowIndex)
End If
End If
End Sub新增發票項目
當使用者輸入物品的詳細資訊並按一下"新增物品"時,btnAddItem_Click 事件會收集輸入的資料、驗證資料,然後呼喚 AddItemToInvoice。 此方法在 DataGridView 中新增一列輸入的數值,計算出商品的總價格,並更新顯示在表單底部的發票總金額。
public void AddItemToInvoice(string itemId, string description, int quantity, decimal unitPrice)
{
    decimal totalPrice = quantity * unitPrice;
    invoiceDataGridView.Rows.Add(itemId, description, quantity, unitPrice, totalPrice);
}

private void CalculateTotalAmount()
{
    decimal totalAmount = 0m;
    foreach (DataGridViewRow row in invoiceDataGridView.Rows)
    {
        totalAmount += Convert.ToDecimal(row.Cells["totalPriceColumn"].Value ?? 0);
    }
    // Display the total amount accumulated
    lblTotalAmount.Text = $"{totalAmount:C2}";
}

private void btnAddItem_Click(object sender, EventArgs e)
{
    // Collect data from input controls
    string itemId = txtItemID.Text;
    string description = txtDescription.Text;
    int quantity = (int)numericUpDownQuantity.Value;
    decimal unitPrice;
    // Validate the collected data
    bool isUnitPriceValid = decimal.TryParse(txtUnitPrice.Text, out unitPrice);
    if (string.IsNullOrEmpty(itemId) || string.IsNullOrEmpty(description) || quantity <= 0 || !isUnitPriceValid || unitPrice <= 0)
    {
        MessageBox.Show("Please enter valid data for all fields.", "Invalid Data", MessageBoxButtons.OK, MessageBoxIcon.Warning);
        return;
    }
    // Add data to the DataGridView
    AddItemToInvoice(itemId, description, quantity, unitPrice);
    // Clear the input fields after adding the item to the grid
    txtItemID.Clear();
    txtDescription.Clear();
    txtUnitPrice.Clear();
    numericUpDownQuantity.Value = 0;
    CalculateTotalAmount();
}
public void AddItemToInvoice(string itemId, string description, int quantity, decimal unitPrice)
{
decimal totalPrice = quantity * unitPrice;
invoiceDataGridView.Rows.Add(itemId, description, quantity, unitPrice, totalPrice);
}
private void CalculateTotalAmount()
{
decimal totalAmount = 0m;
foreach (DataGridViewRow row in invoiceDataGridView.Rows)
{
totalAmount += Convert.ToDecimal(row.Cells["totalPriceColumn"].Value ?? 0);
}
// Display the total amount accumulated
lblTotalAmount.Text = $"{totalAmount:C2}";
}
private void btnAddItem_Click(object sender, EventArgs e)
{
// Collect data from input controls
string itemId = txtItemID.Text;
string description = txtDescription.Text;
int quantity = (int)numericUpDownQuantity.Value;
decimal unitPrice;
// Validate the collected data
bool isUnitPriceValid = decimal.TryParse(txtUnitPrice.Text, out unitPrice);
if (string.IsNullOrEmpty(itemId) || string.IsNullOrEmpty(description) || quantity <= 0 || !isUnitPriceValid || unitPrice <= 0)
{
MessageBox.Show("Please enter valid data for all fields.", "Invalid Data", MessageBoxButtons.OK, MessageBoxIcon.Warning);
return;
}
// Add data to the DataGridView
AddItemToInvoice(itemId, description, quantity, unitPrice);
// Clear the input fields after adding the item to the grid
txtItemID.Clear();
txtDescription.Clear();
txtUnitPrice.Clear();
numericUpDownQuantity.Value = 0;
CalculateTotalAmount();
}Imports System
Public Sub AddItemToInvoice(ByVal itemId As String, ByVal description As String, ByVal quantity As Integer, ByVal unitPrice As Decimal)
Dim totalPrice As Decimal = quantity * unitPrice
invoiceDataGridView.Rows.Add(itemId, description, quantity, unitPrice, totalPrice)
End Sub
Private Sub CalculateTotalAmount()
Dim totalAmount As Decimal = 0D
For Each row As DataGridViewRow In invoiceDataGridView.Rows
totalAmount += Convert.ToDecimal(If(row.Cells("totalPriceColumn").Value, 0))
Next row
' Display the total amount accumulated
lblTotalAmount.Text = $"{totalAmount:C2}"
End Sub
Private Sub btnAddItem_Click(ByVal sender As Object, ByVal e As EventArgs)
' Collect data from input controls
Dim itemId As String = txtItemID.Text
Dim description As String = txtDescription.Text
Dim quantity As Integer = CInt(Math.Truncate(numericUpDownQuantity.Value))
Dim unitPrice As Decimal = Nothing
' Validate the collected data
Dim isUnitPriceValid As Boolean = Decimal.TryParse(txtUnitPrice.Text, unitPrice)
If String.IsNullOrEmpty(itemId) OrElse String.IsNullOrEmpty(description) OrElse quantity <= 0 OrElse Not isUnitPriceValid OrElse unitPrice <= 0 Then
MessageBox.Show("Please enter valid data for all fields.", "Invalid Data", MessageBoxButtons.OK, MessageBoxIcon.Warning)
Return
End If
' Add data to the DataGridView
AddItemToInvoice(itemId, description, quantity, unitPrice)
' Clear the input fields after adding the item to the grid
txtItemID.Clear()
txtDescription.Clear()
txtUnitPrice.Clear()
numericUpDownQuantity.Value = 0
CalculateTotalAmount()
End Sub產生 PDF 發票
點選"Generate Invoice"後,應用程式會執行 btnInvoice_Click 事件處理程式,並在此處使用 StringBuilder 建構 HTML 字串。 這個字串包含客戶的詳細資訊,以及一個由 DataGridView 中的發票項目所填充的樣式化 HTML 表格。 IronPDF 的渲染器接著會將此 HTML 轉換成 PDF 文件,並儲存至指定路徑。 應用程式會向使用者傳達訊息,確認發票已成功建立。
private void btnInvoice_Click(object sender, EventArgs e)
{
    IronPdf.License.LicenseKey = "your-license-key"; // Replace with your IronPDF license key
    var customerName = txtName.Text;
    var customerEmail = txtEmail.Text;
    var customerAddress = txtAddress.Text;
    var customerPhone = txtPhone.Text;
    var htmlStringBuilder = new StringBuilder();
    htmlStringBuilder.Append("<html>");
    htmlStringBuilder.Append("<head>");
    htmlStringBuilder.Append("<title>Invoice</title>");
    htmlStringBuilder.Append(@"
        <style>
            body { font-family: 'Arial', sans-serif; }
            h1 { color: #333; text-align: center; }
            table { width: 100%; border-collapse: collapse; margin-top: 20px; }
            th, td { border: 1px solid #999; padding: 8px; text-align: left; }
            th { background-color: #f2f2f2; }
            tr:nth-child(even) { background-color: #f9f9f9; }
            h2 { text-align: right; margin-top: 20px; }
            .customer-info { line-height: 1.6; margin-bottom: 20px; }
            .customer-info p { margin: 0 0 10px 0; color: #333; }
            .customer-info label { font-weight: bold; }
        </style>");
    htmlStringBuilder.Append("</head>");
    htmlStringBuilder.Append("<body>");
    htmlStringBuilder.Append("<h1>Invoice</h1>");
    htmlStringBuilder.Append("<div class='customer-info'>");
    htmlStringBuilder.Append($"<p><strong>Customer Name:</strong> {customerName}</p>");
    htmlStringBuilder.Append($"<p><strong>Customer Email:</strong> {customerEmail}</p>");
    htmlStringBuilder.Append($"<p><strong>Customer Address:</strong> {customerAddress}</p>");
    htmlStringBuilder.Append($"<p><strong>Customer Phone:</strong> {customerPhone}</p>");
    htmlStringBuilder.Append("</div>");
    htmlStringBuilder.Append("<table><tr><th>Item ID</th><th>Description</th><th>Quantity</th><th>Unit Price</th><th>Total Price</th></tr>");
    foreach (DataGridViewRow row in invoiceDataGridView.Rows)
    {
        if (row.IsNewRow) continue;
        htmlStringBuilder.Append("<tr>");
        htmlStringBuilder.Append($"<td>{row.Cells["itemIdColumn"].Value}</td>");
        htmlStringBuilder.Append($"<td>{row.Cells["descriptionColumn"].Value}</td>");
        htmlStringBuilder.Append($"<td>{row.Cells["quantityColumn"].Value}</td>");
        htmlStringBuilder.Append($"<td>{row.Cells["unitPriceColumn"].Value:C2}</td>");
        htmlStringBuilder.Append($"<td>{row.Cells["totalPriceColumn"].Value:C2}</td>");
        htmlStringBuilder.Append("</tr>");
    }
    htmlStringBuilder.Append("</table>");
    htmlStringBuilder.Append($"<h2>Total Amount: {lblTotalAmount.Text}</h2>");
    htmlStringBuilder.Append("</body></html>");
    var renderer = new IronPdf.ChromePdfRenderer();
    var pdfDocument = renderer.RenderHtmlAsPdf(htmlStringBuilder.ToString());
    string savePath = Path.Combine($"F:\\Invoice_{DateTime.Now:yyyyMMddHHmmss}.pdf");
    pdfDocument.SaveAs(savePath);
    MessageBox.Show("The invoice has been successfully saved to your desktop.", "Invoice Saved", MessageBoxButtons.OK, MessageBoxIcon.Information);
}
private void btnInvoice_Click(object sender, EventArgs e)
{
IronPdf.License.LicenseKey = "your-license-key"; // Replace with your IronPDF license key
var customerName = txtName.Text;
var customerEmail = txtEmail.Text;
var customerAddress = txtAddress.Text;
var customerPhone = txtPhone.Text;
var htmlStringBuilder = new StringBuilder();
htmlStringBuilder.Append("<html>");
htmlStringBuilder.Append("<head>");
htmlStringBuilder.Append("<title>Invoice</title>");
htmlStringBuilder.Append(@"
<style>
body { font-family: 'Arial', sans-serif; }
h1 { color: #333; text-align: center; }
table { width: 100%; border-collapse: collapse; margin-top: 20px; }
th, td { border: 1px solid #999; padding: 8px; text-align: left; }
th { background-color: #f2f2f2; }
tr:nth-child(even) { background-color: #f9f9f9; }
h2 { text-align: right; margin-top: 20px; }
.customer-info { line-height: 1.6; margin-bottom: 20px; }
.customer-info p { margin: 0 0 10px 0; color: #333; }
.customer-info label { font-weight: bold; }
</style>");
htmlStringBuilder.Append("</head>");
htmlStringBuilder.Append("<body>");
htmlStringBuilder.Append("<h1>Invoice</h1>");
htmlStringBuilder.Append("<div class='customer-info'>");
htmlStringBuilder.Append($"<p><strong>Customer Name:</strong> {customerName}</p>");
htmlStringBuilder.Append($"<p><strong>Customer Email:</strong> {customerEmail}</p>");
htmlStringBuilder.Append($"<p><strong>Customer Address:</strong> {customerAddress}</p>");
htmlStringBuilder.Append($"<p><strong>Customer Phone:</strong> {customerPhone}</p>");
htmlStringBuilder.Append("</div>");
htmlStringBuilder.Append("<table><tr><th>Item ID</th><th>Description</th><th>Quantity</th><th>Unit Price</th><th>Total Price</th></tr>");
foreach (DataGridViewRow row in invoiceDataGridView.Rows)
{
if (row.IsNewRow) continue;
htmlStringBuilder.Append("<tr>");
htmlStringBuilder.Append($"<td>{row.Cells["itemIdColumn"].Value}</td>");
htmlStringBuilder.Append($"<td>{row.Cells["descriptionColumn"].Value}</td>");
htmlStringBuilder.Append($"<td>{row.Cells["quantityColumn"].Value}</td>");
htmlStringBuilder.Append($"<td>{row.Cells["unitPriceColumn"].Value:C2}</td>");
htmlStringBuilder.Append($"<td>{row.Cells["totalPriceColumn"].Value:C2}</td>");
htmlStringBuilder.Append("</tr>");
}
htmlStringBuilder.Append("</table>");
htmlStringBuilder.Append($"<h2>Total Amount: {lblTotalAmount.Text}</h2>");
htmlStringBuilder.Append("</body></html>");
var renderer = new IronPdf.ChromePdfRenderer();
var pdfDocument = renderer.RenderHtmlAsPdf(htmlStringBuilder.ToString());
string savePath = Path.Combine($"F:\\Invoice_{DateTime.Now:yyyyMMddHHmmss}.pdf");
pdfDocument.SaveAs(savePath);
MessageBox.Show("The invoice has been successfully saved to your desktop.", "Invoice Saved", MessageBoxButtons.OK, MessageBoxIcon.Information);
}Private Sub btnInvoice_Click(ByVal sender As Object, ByVal e As EventArgs)
IronPdf.License.LicenseKey = "your-license-key" ' Replace with your IronPDF license key
Dim customerName = txtName.Text
Dim customerEmail = txtEmail.Text
Dim customerAddress = txtAddress.Text
Dim customerPhone = txtPhone.Text
Dim htmlStringBuilder = New StringBuilder()
htmlStringBuilder.Append("<html>")
htmlStringBuilder.Append("<head>")
htmlStringBuilder.Append("<title>Invoice</title>")
htmlStringBuilder.Append("
<style>
body { font-family: 'Arial', sans-serif; }
h1 { color: #333; text-align: center; }
table { width: 100%; border-collapse: collapse; margin-top: 20px; }
th, td { border: 1px solid #999; padding: 8px; text-align: left; }
th { background-color: #f2f2f2; }
tr:nth-child(even) { background-color: #f9f9f9; }
h2 { text-align: right; margin-top: 20px; }
.customer-info { line-height: 1.6; margin-bottom: 20px; }
.customer-info p { margin: 0 0 10px 0; color: #333; }
.customer-info label { font-weight: bold; }
</style>")
htmlStringBuilder.Append("</head>")
htmlStringBuilder.Append("<body>")
htmlStringBuilder.Append("<h1>Invoice</h1>")
htmlStringBuilder.Append("<div class='customer-info'>")
htmlStringBuilder.Append($"<p><strong>Customer Name:</strong> {customerName}</p>")
htmlStringBuilder.Append($"<p><strong>Customer Email:</strong> {customerEmail}</p>")
htmlStringBuilder.Append($"<p><strong>Customer Address:</strong> {customerAddress}</p>")
htmlStringBuilder.Append($"<p><strong>Customer Phone:</strong> {customerPhone}</p>")
htmlStringBuilder.Append("</div>")
htmlStringBuilder.Append("<table><tr><th>Item ID</th><th>Description</th><th>Quantity</th><th>Unit Price</th><th>Total Price</th></tr>")
For Each row As DataGridViewRow In invoiceDataGridView.Rows
If row.IsNewRow Then
Continue For
End If
htmlStringBuilder.Append("<tr>")
htmlStringBuilder.Append($"<td>{row.Cells("itemIdColumn").Value}</td>")
htmlStringBuilder.Append($"<td>{row.Cells("descriptionColumn").Value}</td>")
htmlStringBuilder.Append($"<td>{row.Cells("quantityColumn").Value}</td>")
htmlStringBuilder.Append($"<td>{row.Cells("unitPriceColumn").Value:C2}</td>")
htmlStringBuilder.Append($"<td>{row.Cells("totalPriceColumn").Value:C2}</td>")
htmlStringBuilder.Append("</tr>")
Next row
htmlStringBuilder.Append("</table>")
htmlStringBuilder.Append($"<h2>Total Amount: {lblTotalAmount.Text}</h2>")
htmlStringBuilder.Append("</body></html>")
Dim renderer = New IronPdf.ChromePdfRenderer()
Dim pdfDocument = renderer.RenderHtmlAsPdf(htmlStringBuilder.ToString())
Dim savePath As String = Path.Combine($"F:\Invoice_{DateTime.Now:yyyyMMddHHmmss}.pdf")
pdfDocument.SaveAs(savePath)
MessageBox.Show("The invoice has been successfully saved to your desktop.", "Invoice Saved", MessageBoxButtons.OK, MessageBoxIcon.Information)
End Sub執行應用程式並產生發票
一旦 Windows Forms 應用程式開發完成並整合 IronPDF 函式庫後,執行應用程式並產生 PDF 發票就是一個簡單直接的過程。 使用者與應用程式的使用者介面互動,輸入資料並產生所需的輸出。 以下是典型的流程:
啟動應用程式
在 Visual Studio 中執行應用程式,或直接從 Windows 環境執行已編譯的可執行檔案 (.exe),即可啟動應用程式。 應用程式的表單顯示,可供使用者互動。
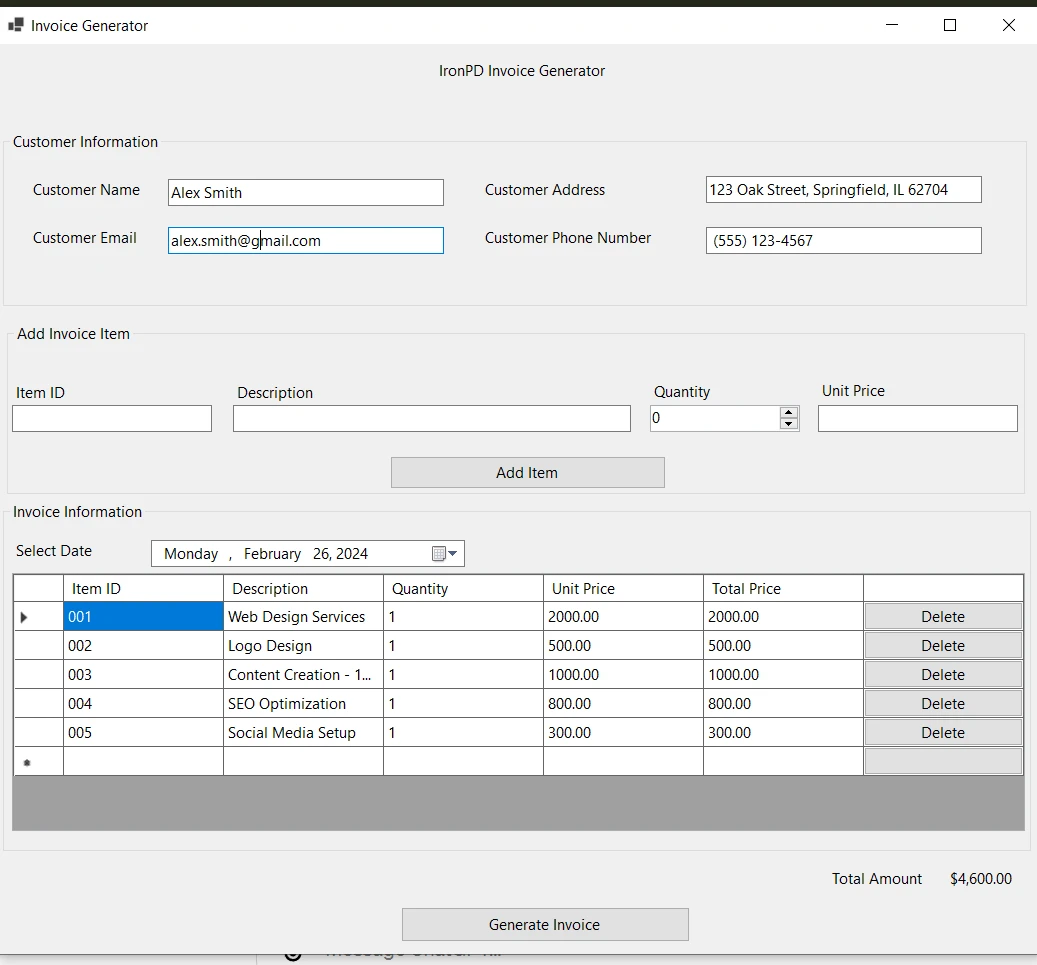
輸入發票資料
在表格頂端的指定文字方塊中輸入客戶詳細資訊,包括客戶的姓名、地址、電子郵件和電話號碼。 填寫表格中"新增發票項目"部分的"項目 ID"、"說明"、"數量"和"單價"欄位,即可新增發票項目。
按一下"新增項目",將項目納入發票清單。DataGridView 將會更新,以顯示新的項目、其詳細資料和計算出的總價格。重複此程序,將所有必要的項目加入發票。總金額"標籤會動態更新,以反映所列項目的累計總金額。
產生 PDF 發票
新增所有項目且客戶資訊完整後,按一下"產生發票"。 應用程式會將資料編譯成 HTML 格式,並使用 CSS 設定風格。 IronPDF 接手將 HTML 字串轉換成 PDF 文件。 它使用 Chrome 引擎渲染,確保高保真度符合現代網路標準。
檢視已產生的發票
PDF 生成後,應用程式會將 PDF 檔案儲存到指定位置,通常是在與應用程式相同的目錄中,或是使用者定義的路徑中。 出現 成功訊息,通知使用者 PDF 發票已成功儲存。 之後,使用者就可以導覽到儲存的位置來檢視或分發發票。

輸出 PDF
輸出的 PDF 會在頂端顯示客戶的資訊,接著是所購物品的詳細表格,包括說明、數量和價格。 發票的總金額會列在文件的最後,清楚說明客戶需要支付的金額。 PDF 的樣式要乾淨且專業,利用程式碼內定義的 CSS 來確保發票不僅功能性強,而且美觀。

將 Windows 表單專案轉換為可執行檔
在徹底測試您的 Windows Forms 應用程式並確保所有功能(如資料輸入、PDF 生成和輸出)都能完美運作之後,下一階段就是將專案打包成可執行 (exe) 檔案。這個轉換過程在 .NET Framework 中被簡化,確保您的應用程式可以在 Windows 機器上安裝和使用。
以下是逐步建立可執行檔的方法:
1.建立應用程式:前往"建立"功能表,並選擇"建立解決方案"。這會將代碼編譯成程式集,並執行必要的最佳化。

2.尋找可執行檔的位置:一旦建立完成,請導航至專案目錄內的 'bin\Debug\net8.0' 資料夾。 在這裡,您可以找到 .exe 檔案以及執行應用程式所需的任何其他相依性。
!a href="/static-assets/pdf/blog/net-software-development/net-software-development-8.webp">.NET 軟體開發 (How It Works For Developers):圖 8 - 可執行位置
3.測試可執行檔案:良好的做法是在不同的機器上執行 .exe 檔案,以確認它在您的開發環境之外也能正常運作。 4.散佈準備:散佈時,如果不需要額外的相依性,您可以直接分享 .exe 檔案。 不過,若要採用更專業的方式,可考慮使用 Visual Studio 中的 setup 專案或第三方安裝套件(如 Inno Setup 或 WiX Toolset)來建立安裝程式。 安裝程式可以管理安裝程序、建立捷徑,並處理其他複雜的問題,例如在需要時向 Windows 註冊表註冊。
按照這些步驟,您的 Windows Forms 應用程式就能濃縮為單一的可執行檔案,隨時可供分享與使用。 此轉換標誌著開發過程達到頂峰,從開發機器上的專案過渡到可部署的軟體,可在多種 Windows 環境中有效地散佈和安裝。
結論
總而言之,使用 IronPDF 和 .NET Framework 開發 Windows Forms 應用程式以產生 PDF 發票,是軟體開發原則實際應用的範例。 本專案不僅展示了 .NET 生態系統的多樣性和強大功能,還展示了開發人員如何整合 IronPDF 等第三方函式庫,以擴展功能並滿足特定的業務需求。
透過遵循所概述的步驟,從設定使用者介面到實作 PDF 生成,以及將應用程式封裝成可執行檔,開發人員可以建立功能強大、使用者友善的應用程式。 這個過程突顯了結合強大的程式設計框架與創新的函式庫來解決實際問題的重要性,並最終提供有效且高效率的產品。
IronPDF 慷慨地提供 免費試用 PDF 產生功能,供開發人員探索其功能,並決定如何最符合他們的需求。 一旦您體驗過 IronPDF 帶來的好處,並準備好將 IronPDF 整合到您的生產環境中,授權就會從經濟實惠的價格選項開始。
常見問題解答
怎樣在 C# 中將 HTML 轉換為 PDF?
您可以使用 IronPDF 的 RenderHtmlAsPdf 方法將 HTML 字符串轉換為 PDF。您還可以使用 RenderHtmlFileAsPdf 將 HTML 文件轉換為 PDF。
使用 .NET Core 進行跨平台開發的好處是什麼?
.NET Core 允許您在多個平台上運行應用程序,如 Linux、macOS 和 Windows,這使其成為那些希望使用單一代碼庫接觸更廣泛受眾的開發者的多才多藝選擇。
如何從 Windows 表單應用程序生成 PDF?
使用 IronPDF,您可以通過在您的項目中集成該庫並利用其方法將表單數據或 HTML 內容轉換為 PDF 文檔來從 Windows 表單應用程序生成 PDF。
.NET 為什麼是一個理想的構建 Web 應用程序的框架?
.NET,特別是 ASP.NET,提供了一個構建動態和可擴展 Web 應用程序的強大框架。它提供了內建的伺服器端腳本、身份驗證、數據處理等工具。
如何通過文檔生成功能增強我的 .NET 應用程序?
將像 IronPDF 這樣的庫集成到您的 .NET 應用程序中可以顯著增強其文檔生成功能,允許您在應用程序內直接創建、操縱和管理 PDF 文件。
.NET 可以用於移動應用程序開發嗎?
是的,.NET 通過 Xamarin 框架支持行動應用開發,該框架現在是 .NET MAUI 的一部分。這使得可以創建具有原生性能的跨平台行動應用程序,適用於 iOS、Android 和 Windows。
通用語言運行時(CLR)在 .NET 中的重要性是什麼?
通用語言運行時(CLR)在 .NET 中至關重要,因為它通過將編譯代碼轉換為本地機器代碼來管理程序的執行,確保在不同操作系統之間的兼容性。
如何使用 NuGet 將 PDF 生成集成到我的 .NET 項目中?
您可以通過使用 NuGet 安裝像 IronPDF 這樣的庫來將 PDF 生成集成到您的 .NET 項目中。這使得在 Visual Studio 中添加 PDF 功能變得方便和簡單。
使用 Windows 表單創建 PDF 發票生成器的步驟有哪些?
過程包括設置一個 Windows 表單項目,設計界面,通過 NuGet 添加所需的庫,實現數據輸入和發票生成的邏輯,並使用 IronPDF 將發票細節轉換為 PDF。


