

已更新 2026年4月23日
在 .NET 中用 Microsoft.Extensions.AI 簡化 LLM 整合
AI 正在改變軟體開發,但將大型語言模型 (LLM) 整合到 .NET 中一直很複雜。利用 IronPdf.AI 將 AI 整合推向更遠,為 .NET 應用程式帶來由 OpenAI 驅動的 PDF 解析、資料擷取和內容總結。
閱讀更多

透過將Refit與IronPDF結合在C#中,可以將兩個強大的程式庫的最佳功能結合起來,從而產生出非常有效的應用程式。 Refit透過允許開發人員設計具有C#特性的API介面,使使用RESTful API更加容易,自動生成HTTP請求,並保證型別安全的API存取。 反之,IronPDF提供了大量強大的功能來處理PDF文件,包括合併和註釋PDF以及轉換HTML內容。 這些程式庫提供了平滑的資料呈現和檢索工作流程。 透過使用如Refit這樣的工具從API檢索資料,以及使用IronPDF產生基於該資料的詳細優秀的PDF報告,可以使資料驅動型應用開發更加高效和生產性。
Refit是一個開源框架,用於.NET,使用聲明式、型別安全的方法來簡化將HTTP請求發送到RESTful API的過程。Refit透過將API端點指定為C#介面並加上特徵來自動生成所需的HTTP客戶端程式碼。 這大大減少了樣板程式碼並提高了程式碼的可讀性。 透過在編譯期間而不是執行期間檢測錯誤,這種技術保證了方法簽名正確匹配API端點。
此外,Refit輕鬆處理JSON序列化和反序列化,使開發人員能夠與C#物件互動,而不需手動轉換API回覆。 透過直接在介面規範中定義HTTP方法、標頭和參數,屬性使配置更加簡單。 由於當API端點更新時需要更少修改客戶端程式碼,因此程式碼變得更簡單且更易於維護。
例如,Refit可以透過在介面中建立一個帶有[Get("/users/{id}")]屬性的方法來生成所需的HTTP GET請求,用於使用者名。 然後可以透過一種型別安全的方法調用來發出此請求。 通過抽象出管理HTTP客戶端的麻煩,Refit是一個全方位更具生產力的解決方案,供開發人員將API整合到.NET應用中。
Refit C#(對開發人員的工作原理):圖1 - Refit:適用於.NET Core、Xamarin和.NET的自動型別安全REST程式庫
Refit在編譯時檢測錯誤,並確保方法簽名匹配API端點。 這種型別安全性減少了因端點不匹配或請求設定不當而引起的運行時錯誤的可能性。
開發人員可以使用C#介面和屬性來構建API端點,從而產生更清晰、更易於維護的HTTP請求程式碼。 這種聲明式方法抽象掉了針對每個客戶端實現HTTP請求方法的複雜性。
Refit自動處理C#物件到JSON数据的轉換。 由於開發人員不再需要手動序列化請求體或反序列化回應,因此資料處理變得更加簡單。
使用屬性來定義HTTP方法(如GET、POST、PUT和DELETE)和參數。 這使得配置簡單且易於理解,因為它包括標頭、請求體、內容、路徑參數和查詢參數。
Refit使用基於Task的方法來處理異步HTTP請求,並設計成易於與.NET中的異步編程模型輕鬆互動。
開發人員可以透過更改超時數字、預設標頭設置以及日誌、認證和重試策略的消息處理器配置來自訂核心HTTP客戶端。
Refit內建功能來處理HTTP問題,讓開發者簡單地整合自訂錯誤處理邏輯。
開發人員可以利用Refit對自訂序列化和反序列化轉換器的支持來使用多種格式或處理不尋常的資料型別。
由於Refit易於整合到DI應用中,因此它非常適合於遵循依賴注入(DI)建議實踐的現代.NET應用。
為了保障API調用,Refit使您能夠輕鬆配置認證標頭、介面方法如Bearer tokens以及基本驗證。
以下步驟可用於構建和設立一個C#中的Refit客戶端:
使用Visual Studio建立一個控制台項目很簡單。 透過遵循這些步驟在Visual Studio中建立一個控制台應用:
在使用Visual Studio之前,確認其已安裝在您的電腦上。
打開Visual Studio,點擊"Create a new project"選項。
Refit C#(對開發人員的工作原理):圖2 - 在Visual Studio中,點擊"Create a new project"選項並選擇Console App。
從"Create a new project"框的左側選擇您喜歡的編程語言(例如C#)。
從以下項目模板參考列表中,可以選擇"Console App"或"Console App (.NET Core)"模板。
給您的項目命名,並選擇項目的儲存位置。

選擇適當的.NET Framework。 然後點擊"Create"來建立控制台應用項目。

必須首先將Refit程式庫包括在您的項目中。 您可以使用NuGet套件管理器安裝Refit NuGet套件,或在Visual Studio中使用.NET CLI來完成此操作。
使用.NET CLI進行安裝:
dotnet add package Refit建立一個介面來表示您的API。 使用Refit屬性來定義HTTP方法和端點。
using Refit;
using System.Threading.Tasks;

// Define the API interface
public interface IMyApi
{
    // Get user details by ID
    [Get("/users/{id}")]
    Task<User> GetUserAsync(int id);

    // Create a new user
    [Post("/users")]
    Task<User> CreateUserAsync([Body] User user);
}

// Define the User class
public class User
{
    public int Id { get; set; }
    public string Name { get; set; }
    // Other properties...
}Imports Refit
Imports System.Threading.Tasks
' Define the API interface
Public Interface IMyApi
' Get user details by ID
<Get("/users/{id}")>
Function GetUserAsync(ByVal id As Integer) As Task(Of User)
' Create a new user
<Post("/users")>
Function CreateUserAsync(<Body> ByVal user As User) As Task(Of User)
End Interface
' Define the User class
Public Class User
Public Property Id As Integer
Public Property Name As String
' Other properties...
End Class啟動Refit客戶端並根據需要調整其設定。 這可以直接在您的主要程式碼中或應用程式的其他位置的一個服務中實現。
using Refit;
using System;
using System.Threading.Tasks;

public class Program
{
    public static async Task Main(string[] args)
    {
        // Define the base URL of your API
        var apiClient = RestService.For<IMyApi>("https://api.example.com");

        // Use the API client to make requests
        var user = await apiClient.GetUserAsync(1);
        Console.WriteLine($"User ID: {user.Id}, Name: {user.Name}");

        // Create a new user
        var newUser = new User { Name = "John Doe" };
        var createdUser = await apiClient.CreateUserAsync(newUser);
        Console.WriteLine($"Created User ID: {createdUser.Id}, Name: {createdUser.Name}");
    }
}Imports Refit
Imports System
Imports System.Threading.Tasks
Public Class Program
Public Shared Async Function Main(ByVal args() As String) As Task
' Define the base URL of your API
Dim apiClient = RestService.For(Of IMyApi)("https://api.example.com")
' Use the API client to make requests
Dim user = Await apiClient.GetUserAsync(1)
Console.WriteLine($"User ID: {user.Id}, Name: {user.Name}")
' Create a new user
Dim newUser = New User With {.Name = "John Doe"}
Dim createdUser = Await apiClient.CreateUserAsync(newUser)
Console.WriteLine($"Created User ID: {createdUser.Id}, Name: {createdUser.Name}")
End Function
End Class透過設定基礎的HttpClient,您可以進一步個性化Refit客戶端。 例如,您可以設置超時、應用標頭屬性、新增預設標頭或使用消息處理器來實現重試策略、認證和日誌。
using System.Net.Http;
using Refit;
using System;
using System.Threading.Tasks;

public class Program
{
    public static async Task Main(string[] args)
    {
        // Configure HttpClient with custom handler and timeout
        var httpClient = new HttpClient(new HttpClientHandler
        {
            // Customize the HttpClientHandler as needed
        })
        {
            BaseAddress = new Uri("https://api.example.com"),
            Timeout = TimeSpan.FromSeconds(30)
        };

        // Add default headers if needed
        httpClient.DefaultRequestHeaders.Add("Authorization", "Bearer YOUR_TOKEN_HERE");

        // Create the Refit API client
        var apiClient = RestService.For<IMyApi>(httpClient);

        // Use the API client to make requests
        var user = await apiClient.GetUserAsync(1);
        Console.WriteLine($"User ID: {user.Id}, Name: {user.Name}");

        // Create a new user
        var newUser = new User { Name = "John Doe" };
        var createdUser = await apiClient.CreateUserAsync(newUser);
        Console.WriteLine($"Created User ID: {createdUser.Id}, Name: {createdUser.Name}");
    }
}Imports System.Net.Http
Imports Refit
Imports System
Imports System.Threading.Tasks
Public Class Program
Public Shared Async Function Main(ByVal args() As String) As Task
' Configure HttpClient with custom handler and timeout
Dim httpClient As New HttpClient(New HttpClientHandler ) With {
.BaseAddress = New Uri("https://api.example.com"),
.Timeout = TimeSpan.FromSeconds(30)
}
' Add default headers if needed
httpClient.DefaultRequestHeaders.Add("Authorization", "Bearer YOUR_TOKEN_HERE")
' Create the Refit API client
Dim apiClient = RestService.For(Of IMyApi)(httpClient)
' Use the API client to make requests
Dim user = Await apiClient.GetUserAsync(1)
Console.WriteLine($"User ID: {user.Id}, Name: {user.Name}")
' Create a new user
Dim newUser = New User With {.Name = "John Doe"}
Dim createdUser = Await apiClient.CreateUserAsync(newUser)
Console.WriteLine($"Created User ID: {createdUser.Id}, Name: {createdUser.Name}")
End Function
End Class透過遵循這些指示在C#中建立和配置一個Refit客戶端,您能夠使用型別安全且可維護的RESTful API消費。
Refit C#(對開發人員的工作原理):圖5 - 控制台輸出
在C#項目中整合Refit和IronPDF的第一步是安裝這兩個程式庫,配置一個簡單的API客戶端以使用Refit檢索資料,並使用IronPDF根據該資料建立PDF。 以下是實現這一點的步驟:
IronPDF是一個功能豐富的程式庫,用於在.NET應用中處理PDF文件。 使用其豐富的功能集,使用者可以從頭建立PDF或從HTML材料建立PDF,並且通過新增、刪除或更改部分來更改現有的PDF文件。 IronPDF為開發者提供了一個強大的API用於建立、修改和轉換PDF文件,使得在.NET應用中更容易處理PDF。
IronPDF在HTML到PDF轉換方面表現出色,確保精確保留原始佈局和樣式。 它特別適合從基於網頁的內容建立PDF,例如報告、發票和文件。 IronPDF支持HTML文件、URL和原始HTML字串,可輕鬆製作高質量的PDF文件。
using IronPdf;

class Program
{
    static void Main(string[] args)
    {
        var renderer = new ChromePdfRenderer();

        // 1. Convert HTML String to PDF
        var htmlContent = "<h1>Hello, IronPDF!</h1><p>This is a PDF from an HTML string.</p>";
        var pdfFromHtmlString = renderer.RenderHtmlAsPdf(htmlContent);
        pdfFromHtmlString.SaveAs("HTMLStringToPDF.pdf");

        // 2. Convert HTML File to PDF
        var htmlFilePath = "path_to_your_html_file.html"; // Specify the path to your HTML file
        var pdfFromHtmlFile = renderer.RenderHtmlFileAsPdf(htmlFilePath);
        pdfFromHtmlFile.SaveAs("HTMLFileToPDF.pdf");

        // 3. Convert URL to PDF
        var url = "http://ironpdf.com"; // Specify the URL
        var pdfFromUrl = renderer.RenderUrlAsPdf(url);
        pdfFromUrl.SaveAs("URLToPDF.pdf");
    }
}Imports IronPdf
Friend Class Program
Shared Sub Main(ByVal args() As String)
Dim renderer = New ChromePdfRenderer()
' 1. Convert HTML String to PDF
Dim htmlContent = "<h1>Hello, IronPDF!</h1><p>This is a PDF from an HTML string.</p>"
Dim pdfFromHtmlString = renderer.RenderHtmlAsPdf(htmlContent)
pdfFromHtmlString.SaveAs("HTMLStringToPDF.pdf")
' 2. Convert HTML File to PDF
Dim htmlFilePath = "path_to_your_html_file.html" ' Specify the path to your HTML file
Dim pdfFromHtmlFile = renderer.RenderHtmlFileAsPdf(htmlFilePath)
pdfFromHtmlFile.SaveAs("HTMLFileToPDF.pdf")
' 3. Convert URL to PDF
Dim url = "http://ironpdf.com" ' Specify the URL
Dim pdfFromUrl = renderer.RenderUrlAsPdf(url)
pdfFromUrl.SaveAs("URLToPDF.pdf")
End Sub
End ClassRefit C#(對開發人員的工作原理):圖6 - IronPDF for .NET:C# PDF 程式庫
IronPDF使您能夠使用HTML內容(包括CSS和JavaScript)建立高品質的PDF文件。 這一功能非常有助於從動態內容或網頁建立PDF。
IronPDF提供現有PDF文件的修改工具。可以從PDF中提取頁面、新增文字、圖像、水印或註釋,以及將多個PDF合併到一個文件中。
使用IronPDF的API,您可以程式化地將文字、圖像、形狀和其他物件新增到新的PDF文件中。 這使得能夠動態生成PDF發票、報告和其他基於文件的輸出。
您可以使用IronPDF加密PDF文件並新增密碼保護來管理存取和保護重要資料。
使用者可以透過將資料輸入表單欄位,建立和填寫IronPDF中的PDF表單來與PDF文件互動。
IronPDF透過從PDF文件中提取文字內容,簡化了文字資料的搜尋、分析和操作。
IronPDF適用於需要圖像而不是PDF情況,因為它可以將PDF文件轉換為常見的圖像格式,包括PNG、JPEG和BMP。
使用.NET CLI或NuGet套件管理器將IronPDF加入至您的.NET項目。
讓我們解析一個將Refit與IronPDF結合的C#程式碼範例。 在此範例中,我們將使用Refit從虛構的RESTful API獲取資料,並使用IronPDF根據該資料建立PDF文件。 以下是此程式碼的操作:
using System;
using System.Threading.Tasks;
using IronPdf;
using Refit;

public class Program
{
    public static async Task Main(string[] args)
    {
        // Define the base URL of your API
        var apiClient = RestService.For<IMyApi>("https://api.example.com");

        try
        {
            // Use the API client to make requests
            var user = await apiClient.GetUserAsync(1);

            // Generate PDF with the retrieved user data
            GeneratePdf(user);
            Console.WriteLine($"User ID: {user.Id}, Name: {user.Name}");

            // Create a new user
            var rand = new Random();
            var newUser = new User { Id = rand.Next(), Name = "John Doe" };
            var createdUser = await apiClient.CreateUserAsync(newUser);
            Console.WriteLine($"Created User ID: {createdUser.Id}, Name: {createdUser.Name}");
        }
        catch (Exception ex)
        {
            Console.WriteLine($"Error: {ex.Message}");
        }
    }

    // Generate a PDF from user data
    public static void GeneratePdf(User user)
    {
        // Construct HTML content for the PDF
        var htmlContent = $@"
        <html>
            <head>
                <style>
                    body {{font-family: Arial, sans-serif;}}
                    h1 {{color: navy;}}
                    p {{font-size: 14px;}}
                </style>
            </head>
            <body>
                <h1>User Details</h1>
                <p><strong>ID:</strong> {user.Id}</p>
                <p><strong>Name:</strong> {user.Name}</p>
            </body>
        </html>";

        // Create an IronPDF ChromePdfRenderer instance
        var renderer = new ChromePdfRenderer();
        var pdfDocument = renderer.RenderHtmlAsPdf(htmlContent);

        // Save the PDF to a file
        var filePath = "UserDetails.pdf";
        pdfDocument.SaveAs(filePath);
        Console.WriteLine($"PDF generated and saved to {filePath}");
    }
}使用Refit屬性,我們建立了一個名為IMyApi的API介面,並提供了使用者資料提取的端點。 我們為API構建了一個Refit客戶端,並在Main函式中異步檢索使用者資料。 如果資料成功檢索到,則將使用者物件傳遞給GeneratePdf方法。 使用IronPDF的ChromePdfRenderer類,我們在GeneratePdf方法中建立了呈現使用者詳細資訊的PDF文字轉換的HTML內容,然後將其作為PDF文件輸出。 然後,建立的PDF將儲存在一個磁碟文件中。
Refit C#(對開發人員的工作原理):圖7 - 控制台輸出
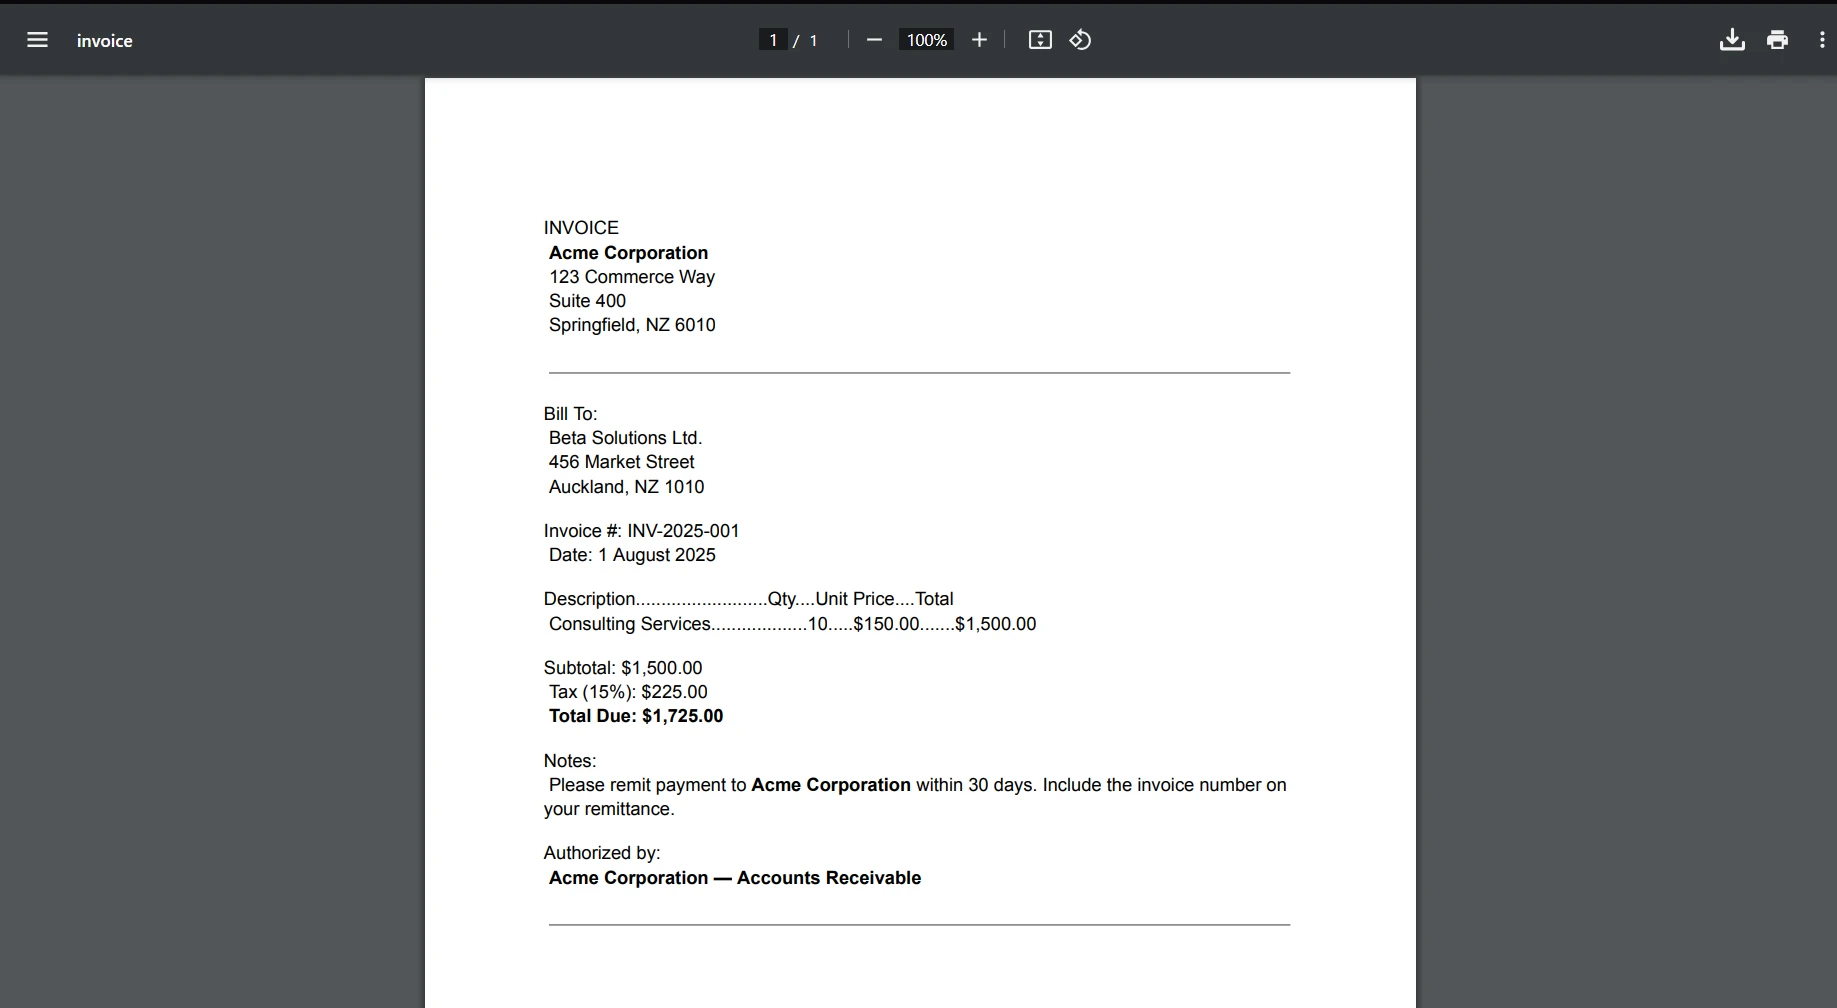
以下是生成的PDF文件的截圖。
Refit C#(對開發人員的工作原理):圖8 - 使用IronPDF生成的輸出PDF
總結一下,Refit與IronPDF在C#中的結合為開發RESTful API和PDF生成的開發者提供了一個強大而有效的解決方案。 Refit介面減少了樣板程式碼,改進了可維護性,並提供了一種型別安全、聲明式的方法,使得API使用更容易。然而,IronPDF提供了一個豐富的工具集,用於生成、修改和操作PDF文件,這使得從HTML文字建立高品質的PDF變得簡單。
開發人員可以透過整合這兩個工具,使用Refit輕鬆地從API檢索資料,並利用IronPDF基於該資料建立動態PDF文件。 這一整合簡化了工作流程,也創造了大量機會來生成動態的、資料驅動的PDF報告、發票和其他基於文件的產出。
您可以將IronPDF和其他Iron Software技術整合到您的企業應用開發堆疊中,以為客戶和最終使用者提供提供功能豐富、高端的軟體解決方案。 這種堅實的基礎也會使項目、後端系統和流程改進更加容易。
開發人員可以充分利用免費試用 IronPDF的費用是$999。 由於其豐富的文件、活躍的在線開發者社群和定期更新,這些技術是現代軟體開發項目的極佳選擇。
要了解有關如何開始使用IronPDF的更多資訊,請存取HTML到PDF的程式碼範例和綜合文件。

Jacob Mellor是Iron Software的首席技術官,一位在C# PDF技術上開創先河的遠見工程師。作為Iron Software核心程式碼庫的原開發者,他從創立以來就一直在塑造公司的產品架構,與首席執行官Cameron Rimington一起將公司轉變為服務於NASA、特斯拉和全球政府公司的50多名人員的公司。

IronPDF 是 IRONSUITE 的一部分
10 款適用於辦公室文件的 .NET API 產品

當您需要您的PDF看起來像HTML一樣快速。