Dotnetopenauth .NET Core(开发人员如何使用)
DotNetOpenAuth .NET Core 是最初的DotNetOpenAuth库的一个版本,适用于.NET Core,提供了一个强大的公共API。 此库可帮助您将 OAuth2 和 OpenID 身份验证添加到您的 .NET 应用程序中。 IronPDF 是一个用于在 .NET 中创建、读取和编辑 PDF 文件的库。 它对于直接从您的 .NET 应用程序生成报告和发票等文档非常有用。
您可以在各种类型的项目中使用 DotNetOpenAuth .NET Core 和 IronPDF,例如 Web 和桌面应用程序,以利用共享代码并实现新功能。 对于希望在其软件中处理身份验证和 PDF 文档管理的开发人员来说,它们是必不可少的。
DotNetOpenAuth .NET Core 入门
在 .NET 项目中设置 DotNetOpenAuth .NET Core
要开始在 Microsoft 技术支持的 .NET 项目中使用 DotNetOpenAuth .NET Core,请按照以下步骤操作:
1.在 Visual Studio 中打开您的项目。
- 转到解决方案资源管理器。
- 右键单击您的项目名称。
- 选择
Manage NuGet Packages。 - 在 NuGet 包管理器中,搜索
DotNetOpenAuth.NetCore和其他 NuGet 包。 - 点击
Install将其添加到您的项目中。
这将向您的项目中添加 DotNetOpenAuth .NET Core 库,提供集成身份验证功能的支持。
使用 DotNetOpenAuth .NET Core 的基本代码示例
这是一个简单的示例,显示了如何使用 DotNetOpenAuth .NET Core 在您的应用程序中设置 OAuth2 身份验证:
using DotNetOpenAuth.OAuth2;

// Initialize the OAuth2 client with the authorization server details
var client = new WebServerClient(new AuthorizationServerDescription
{
    TokenEndpoint = new Uri("https://your-auth-server.com/token"),
    AuthorizationEndpoint = new Uri("https://your-auth-server.com/authorize")
}, "your-client-id", "your-client-secret");

// Start the authentication process and get the authorization state
IAuthorizationState state = client.ProcessUserAuthorization();
if (state != null && state.IsAuthorized)
{
    // Authorized successfully, now you can access protected resources
}
using DotNetOpenAuth.OAuth2;
// Initialize the OAuth2 client with the authorization server details
var client = new WebServerClient(new AuthorizationServerDescription
{
TokenEndpoint = new Uri("https://your-auth-server.com/token"),
AuthorizationEndpoint = new Uri("https://your-auth-server.com/authorize")
}, "your-client-id", "your-client-secret");
// Start the authentication process and get the authorization state
IAuthorizationState state = client.ProcessUserAuthorization();
if (state != null && state.IsAuthorized)
{
// Authorized successfully, now you can access protected resources
}Imports DotNetOpenAuth.OAuth2
' Initialize the OAuth2 client with the authorization server details
Private client = New WebServerClient(New AuthorizationServerDescription With {
.TokenEndpoint = New Uri("https://your-auth-server.com/token"),
.AuthorizationEndpoint = New Uri("https://your-auth-server.com/authorize")
}, "your-client-id", "your-client-secret")
' Start the authentication process and get the authorization state
Private state As IAuthorizationState = client.ProcessUserAuthorization()
If state IsNot Nothing AndAlso state.IsAuthorized Then
' Authorized successfully, now you can access protected resources
End If此代码片段使用 DotNetOpenAuth .NET Core 设置 OAuth2 客户端,连接到授权服务器并处理用户授权。
实现 DotNetOpenAuth .NET Core 的功能
集成 OpenID Connect
要使用 DotNetOpenAuth .NET Core 集成 OpenID Connect,您可以按照这种基本方法:
using DotNetOpenAuth.OAuth2;

// Configure the OpenID Connect client with authority details
var openIdClient = new WebServerClient(new AuthorizationServerDescription
{
    TokenEndpoint = new Uri("https://your-openid-provider.com/token"),
    AuthorizationEndpoint = new Uri("https://your-openid-provider.com/authorize")
}, "your-client-id");

// Redirect user for authentication
Uri authUri = openIdClient.GetAuthorizationRequestUri("openid email profile");
Response.Redirect(authUri.AbsoluteUri);
using DotNetOpenAuth.OAuth2;
// Configure the OpenID Connect client with authority details
var openIdClient = new WebServerClient(new AuthorizationServerDescription
{
TokenEndpoint = new Uri("https://your-openid-provider.com/token"),
AuthorizationEndpoint = new Uri("https://your-openid-provider.com/authorize")
}, "your-client-id");
// Redirect user for authentication
Uri authUri = openIdClient.GetAuthorizationRequestUri("openid email profile");
Response.Redirect(authUri.AbsoluteUri);Imports DotNetOpenAuth.OAuth2
' Configure the OpenID Connect client with authority details
Private openIdClient = New WebServerClient(New AuthorizationServerDescription With {
.TokenEndpoint = New Uri("https://your-openid-provider.com/token"),
.AuthorizationEndpoint = New Uri("https://your-openid-provider.com/authorize")
}, "your-client-id")
' Redirect user for authentication
Private authUri As Uri = openIdClient.GetAuthorizationRequestUri("openid email profile")
Response.Redirect(authUri.AbsoluteUri)该代码配置了一个 OpenID Connect 客户端,并将用户重定向到 OpenID 提供者的身份验证页面。
处理访问令牌
以下是如何使用 DotNetOpenAuth .NET Core 处理访问令牌:
// After the user is authenticated, process the authorization response to retrieve the token
IAuthorizationState authState = openIdClient.ProcessUserAuthorization();
if (authState != null && authState.IsAuthorized)
{
    // Access token is available, and you can use it to make authenticated requests
    string accessToken = authState.AccessToken;
}
// After the user is authenticated, process the authorization response to retrieve the token
IAuthorizationState authState = openIdClient.ProcessUserAuthorization();
if (authState != null && authState.IsAuthorized)
{
// Access token is available, and you can use it to make authenticated requests
string accessToken = authState.AccessToken;
}' After the user is authenticated, process the authorization response to retrieve the token
Dim authState As IAuthorizationState = openIdClient.ProcessUserAuthorization()
If authState IsNot Nothing AndAlso authState.IsAuthorized Then
' Access token is available, and you can use it to make authenticated requests
Dim accessToken As String = authState.AccessToken
End If此代码片段处理用户授权响应以检索并使用访问令牌。
刷新令牌
要在令牌过期时刷新令牌,请使用以下代码:
// Check if the access token is expired and refresh it
if (authState.AccessTokenExpirationUtc <= DateTime.UtcNow)
{
    if (openIdClient.RefreshAuthorization(authState))
    {
        // Token refreshed successfully
    }
}
// Check if the access token is expired and refresh it
if (authState.AccessTokenExpirationUtc <= DateTime.UtcNow)
{
if (openIdClient.RefreshAuthorization(authState))
{
// Token refreshed successfully
}
}' Check if the access token is expired and refresh it
If authState.AccessTokenExpirationUtc <= DateTime.UtcNow Then
If openIdClient.RefreshAuthorization(authState) Then
' Token refreshed successfully
End If
End If此代码检查当前令牌是否已过期,并尝试刷新它。
撤销令牌
如果需要撤销令牌,请按照如下显示的方式实现:
// Revoke the access token
bool success = openIdClient.RevokeAuthorization(authState);
if (success)
{
    // Token revoked successfully
}
// Revoke the access token
bool success = openIdClient.RevokeAuthorization(authState);
if (success)
{
// Token revoked successfully
}' Revoke the access token
Dim success As Boolean = openIdClient.RevokeAuthorization(authState)
If success Then
' Token revoked successfully
End If此代码片段撤销了授权,有效地使访问令牌失效。
自定义令牌请求
要根据特定需求自定义令牌请求,例如添加额外的参数:
// Customize the token request with additional parameters
var additionalParams = new Dictionary<string, string>
{
    {"custom_parameter", "value"}
};
IAuthorizationState customizedState = openIdClient.ProcessUserAuthorization(additionalParams);
if (customizedState != null && customizedState.IsAuthorized)
{
    // Token request customized and processed successfully
}
// Customize the token request with additional parameters
var additionalParams = new Dictionary<string, string>
{
{"custom_parameter", "value"}
};
IAuthorizationState customizedState = openIdClient.ProcessUserAuthorization(additionalParams);
if (customizedState != null && customizedState.IsAuthorized)
{
// Token request customized and processed successfully
}' Customize the token request with additional parameters
Dim additionalParams = New Dictionary(Of String, String) From {
{"custom_parameter", "value"}
}
Dim customizedState As IAuthorizationState = openIdClient.ProcessUserAuthorization(additionalParams)
If customizedState IsNot Nothing AndAlso customizedState.IsAuthorized Then
' Token request customized and processed successfully
End If此代码向令牌请求中添加了自定义参数,这对于处理授权服务器的特定要求可能很有用。
DotNetOpenAuth .NET Core 与 IronPDF
IronPDF 是一个综合性的库,允许开发人员在 .NET 环境中创建、读取和操作 PDF 文件。 它特别适用于从 HTML 或直接从 URL 生成 PDF,这对于报告、生成发票或只是在静态格式中存储网页都非常实用。 当与 DotNetOpenAuth .NET Core 集成时,它确保这些功能仅对经过身份验证的用户是安全和可访问的。
将 IronPDF 与 DotNetOpenAuth .NET Core 合并的使用案例
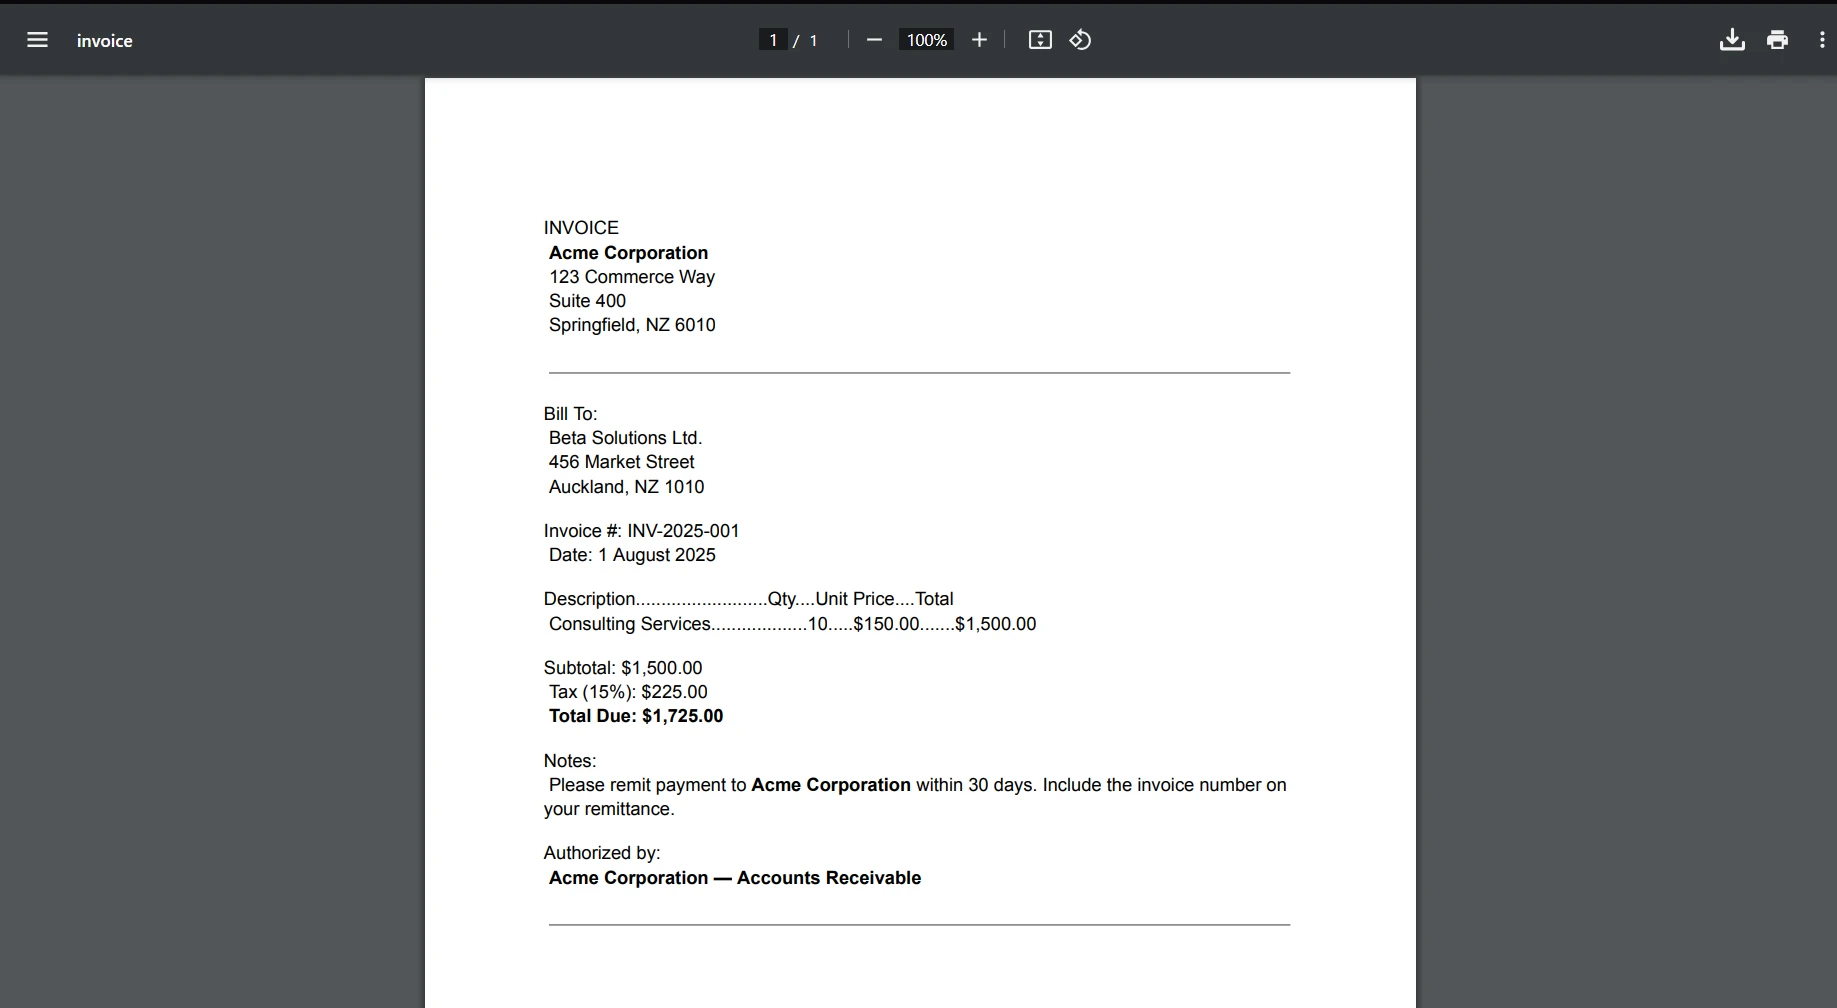
将 IronPDF 与 DotNetOpenAuth .NET Core 合并的一个实际使用案例是在 Web 应用程序中,经过身份验证的用户需要生成和下载个性化报告。 例如,想象一个场景,用户登录到您的应用程序并以 PDF 形式访问他们的财务报告。 DotNetOpenAuth 确保用户被正确验证和授权以访问他们的文档,而 IronPDF 负责创建和传递这些个性化的 PDF。
用例的代码示例
让我们看看一个完整的代码示例,展示如何实现这一点。 我们将创建一个简单的 .NET Core Web API,它对用户进行身份验证,然后使用 IronPDF 生成 PDF 报告:
using IronPdf;
using Microsoft.AspNetCore.Mvc;
using Microsoft.AspNetCore.Authorization;

[Route("api/[controller]")]
[ApiController]
public class ReportController : ControllerBase
{
    [Authorize]
    [HttpGet("download-pdf")]
    public IActionResult DownloadPdfReport()
    {
        // Authentication is handled by DotNetOpenAuth .NET Core
        var currentUser = HttpContext.User.Identity.Name;

        // Generate PDF content using IronPDF
        var Renderer = new ChromePdfRenderer();
        var PDF = Renderer.RenderHtmlAsPdf($"<h1>Report for {currentUser}</h1><p>This is your personalized financial report.</p>");

        // Set file name and content type for the PDF
        var outputFileName = $"Report-{currentUser}.pdf";
        Response.Headers.Add("Content-Disposition", $"attachment; filename={outputFileName}");
        Response.ContentType = "application/pdf";

        // Return the generated PDF file
        return File(PDF.Stream.ToArray(), "application/pdf");
    }
}
using IronPdf;
using Microsoft.AspNetCore.Mvc;
using Microsoft.AspNetCore.Authorization;
[Route("api/[controller]")]
[ApiController]
public class ReportController : ControllerBase
{
[Authorize]
[HttpGet("download-pdf")]
public IActionResult DownloadPdfReport()
{
// Authentication is handled by DotNetOpenAuth .NET Core
var currentUser = HttpContext.User.Identity.Name;
// Generate PDF content using IronPDF
var Renderer = new ChromePdfRenderer();
var PDF = Renderer.RenderHtmlAsPdf($"<h1>Report for {currentUser}</h1><p>This is your personalized financial report.</p>");
// Set file name and content type for the PDF
var outputFileName = $"Report-{currentUser}.pdf";
Response.Headers.Add("Content-Disposition", $"attachment; filename={outputFileName}");
Response.ContentType = "application/pdf";
// Return the generated PDF file
return File(PDF.Stream.ToArray(), "application/pdf");
}
}Imports IronPdf
Imports Microsoft.AspNetCore.Mvc
Imports Microsoft.AspNetCore.Authorization
<Route("api/[controller]")>
<ApiController>
Public Class ReportController
Inherits ControllerBase
<Authorize>
<HttpGet("download-pdf")>
Public Function DownloadPdfReport() As IActionResult
' Authentication is handled by DotNetOpenAuth .NET Core
Dim currentUser = HttpContext.User.Identity.Name
' Generate PDF content using IronPDF
Dim Renderer = New ChromePdfRenderer()
Dim PDF = Renderer.RenderHtmlAsPdf($"<h1>Report for {currentUser}</h1><p>This is your personalized financial report.</p>")
' Set file name and content type for the PDF
Dim outputFileName = $"Report-{currentUser}.pdf"
Response.Headers.Add("Content-Disposition", $"attachment; filename={outputFileName}")
Response.ContentType = "application/pdf"
' Return the generated PDF file
Return File(PDF.Stream.ToArray(), "application/pdf")
End Function
End Class在这个示例中,我们使用 [Authorize] 属性来确保只有经过身份验证的用户才能访问 PDF 生成端点。 IronPDF 中的 ChromePdfRenderer 类用于从 HTML 内容创建 PDF,在这种情况下,该内容会根据用户的姓名进行动态个性化。

结论
将 DotNetOpenAuth .NET Core 与 IronPDF 集成为提升您 .NET 应用程序的安全性和功能性提供了强大解决方案。 通过利用这些技术,您可以有效保护敏感数据,并通过动态 PDF 生成提供个性化的用户体验。
IronPDF 不仅多功能,而且对开发人员友好,提供了一种在 .NET 应用程序中创建和管理 PDF 文件的简单方法。 如果考虑将 IronPDF 集成到您的项目中,建议探索IronPDF 官方网站以获取免费试用和许可选项。
常见问题解答
DotNetOpenAuth .NET Core的用途是什么?
DotNetOpenAuth .NET Core用于将OAuth2和OpenID认证功能集成到.NET应用程序中,实现Web和桌面环境中的安全认证过程。
如何将OAuth2认证添加到我的.NET应用程序?
要添加OAuth2认证,请使用DotNetOpenAuth .NET Core初始化一个WebServerClient并提供授权服务器的详细信息,然后指导用户完成认证过程并处理他们的授权响应。
我可以在带有认证的.NET应用程序中创建PDF吗?
可以,通过集成DotNetOpenAuth .NET Core进行认证并结合IronPDF进行PDF生成,您可以创建安全的已认证PDF文档,如个性化报告和发票。
如何在.NET应用程序中管理访问令牌?
DotNetOpenAuth .NET Core通过处理授权响应来管理访问令牌,允许您检索并使用访问令牌进行安全的认证请求。
如何在.NET Core中刷新访问令牌?
要在.NET Core中刷新访问令牌,请检查令牌是否已过期,并使用`RefreshAuthorization`方法获取新令牌,以确保连续的安全访问。
集成DotNetOpenAuth与PDF生成的好处是什么?
集成DotNetOpenAuth与PDF生成可以确保对敏感文档的安全访问,使认证用户能够生成和下载个性化的PDF文件,如报告和发票。
如何在.NET应用程序中撤销令牌?
通过在DotNetOpenAuth .NET Core中实现`RevokeAuthorization`方法来撤销令牌,该方法会使访问令牌失效,防止进一步的未授权请求。
如何在.NET认证中自定义令牌请求?
您可以通过在令牌处理代码中添加附加参数来自定义令牌请求,以满足您的授权服务器的特定要求。
在.NET项目中设置OpenID Connect需要哪些步骤?
要设置OpenID Connect,请配置一个OpenID Connect客户端并提供所需的授权详细信息,引导用户通过OpenID提供者进行认证,并与DotNetOpenAuth .NET Core进行无缝认证集成。