Sqlite C# .NET (How It Works For Developers)
SQLite is a popular, lightweight, and self-contained relational database engine that is widely used in various data access applications and environment platforms. In the context of .NET development, SQLite source code serves as an excellent choice for integrating a reliable database solution control into your system applications. This article will delve into the world of SQLite transactions, exploring its features, advantages, and how to use it in your .NET projects effectively.
How to Use SQLite in C#
- Download SQLite library
- Create a database and insert the data
- Read using reader
- Use SQLite using Entity Framework and LINQ query method
- Generate PDF Report using IronPDF
What is SQLite?
SQLite is a popular open-source database engine that can be embedded in applications without requiring a separate server component. It is fast, reliable, and cross-platform. SQLite can be used with .NET project applications through various libraries that provide ADO.NET interfaces. One of these libraries is Microsoft.Data.SQLite. This allows you to use SQLite as a data source for your .NET applications, whether they are Console, Desktop, Web, or Mobile. You can also use Entity Framework Core to perform object-relational mapping and query your SQLite database using LINQ.
This article shows you how to use Microsoft.Data.Sqlite to develop, connect, and manipulate an SQLite database in a .NET Console Application. You will learn how to:
- Install the Microsoft.Data.Sqlite NuGet package
- Create a SQLite connection and execute SQL commands
- Create and populate tables using data readers and parameters
- Query data using data readers
- Implement EntityFramework Core
- Query data using LINQ
- Generate PDF Report
Installing the SQLite Library
To use Microsoft.Data.Sqlite, you need to install the NuGet package that contains the library and its dependencies. You can do this using the Visual Studio Package Manager, the .NET Core CLI, or any other tool that supports NuGet. This article will use the Package Manager to create a Console Application and install Microsoft.Data.Sqlite. To do this, open a Package Manager Console and run the following commands:
Install-Package Microsoft.Data.Sqlite
The above command will install the package as shown below.
Creating SQLite Database
To work with a SQLite database, you need to create a SqliteConnection object that represents the connection to the database file. You can specify the file name and other options in the connection string. If the file does not exist, it will be created automatically. For example, the below program creates a connection to a database file named employee.db in the current directory:
using (var connection = new SqliteConnection("Data Source=employee.db"))
{
    connection.Open();
    // ...
}
using (var connection = new SqliteConnection("Data Source=employee.db"))
{
connection.Open();
// ...
}The using statement ensures that the connection is closed and disposed of when it goes out of scope. To execute SQL commands, you need to create a SqlCommand object and associate it with the connection. You can set the CommandText property to the SQL statement you want to execute, and optionally add parameters to the Parameters collection. You can then call one of the methods of the SqlCommand object to execute the command, such as ExecuteNonQuery, ExecuteScalar, or ExecuteReader.
Create Table in SQLite
The following code creates a table named Employee using the ExecuteNonQuery method:
using (var connection = new SqliteConnection("Data Source=employee.db"))
{
    connection.Open();
    var command = connection.CreateCommand();
    command.CommandText = @"CREATE TABLE Employee (
        Id INTEGER PRIMARY KEY,
        FirstName TEXT NOT NULL,
        LastName TEXT NOT NULL,
        Designation TEXT NOT NULL )";
    command.ExecuteNonQuery();
}
using (var connection = new SqliteConnection("Data Source=employee.db"))
{
connection.Open();
var command = connection.CreateCommand();
command.CommandText = @"CREATE TABLE Employee (
Id INTEGER PRIMARY KEY,
FirstName TEXT NOT NULL,
LastName TEXT NOT NULL,
Designation TEXT NOT NULL )";
command.ExecuteNonQuery();
}Insert Data into Table
To insert data into a table, you can use the same SqlCommand object and set the CommandText property to an INSERT statement. For example, the following code inserts three rows into the Employee table.
using (var connection = new SqliteConnection("Data Source=employee.db"))
{
    var command = connection.CreateCommand();
    StringBuilder builder = new StringBuilder();
    builder.Append("INSERT INTO Employee VALUES(1, 'John', 'Sami', 'CEO');");
    builder.Append("INSERT INTO Employee VALUES(2, 'David', 'Watson', 'Software Engineer');");
    builder.Append("INSERT INTO Employee VALUES(3, 'Victor', 'Khan', 'Content Writer');");
    connection.Open();
    command.CommandText = builder.ToString();
    command.ExecuteNonQuery();
}
using (var connection = new SqliteConnection("Data Source=employee.db"))
{
var command = connection.CreateCommand();
StringBuilder builder = new StringBuilder();
builder.Append("INSERT INTO Employee VALUES(1, 'John', 'Sami', 'CEO');");
builder.Append("INSERT INTO Employee VALUES(2, 'David', 'Watson', 'Software Engineer');");
builder.Append("INSERT INTO Employee VALUES(3, 'Victor', 'Khan', 'Content Writer');");
connection.Open();
command.CommandText = builder.ToString();
command.ExecuteNonQuery();
}Read Data from SQLite
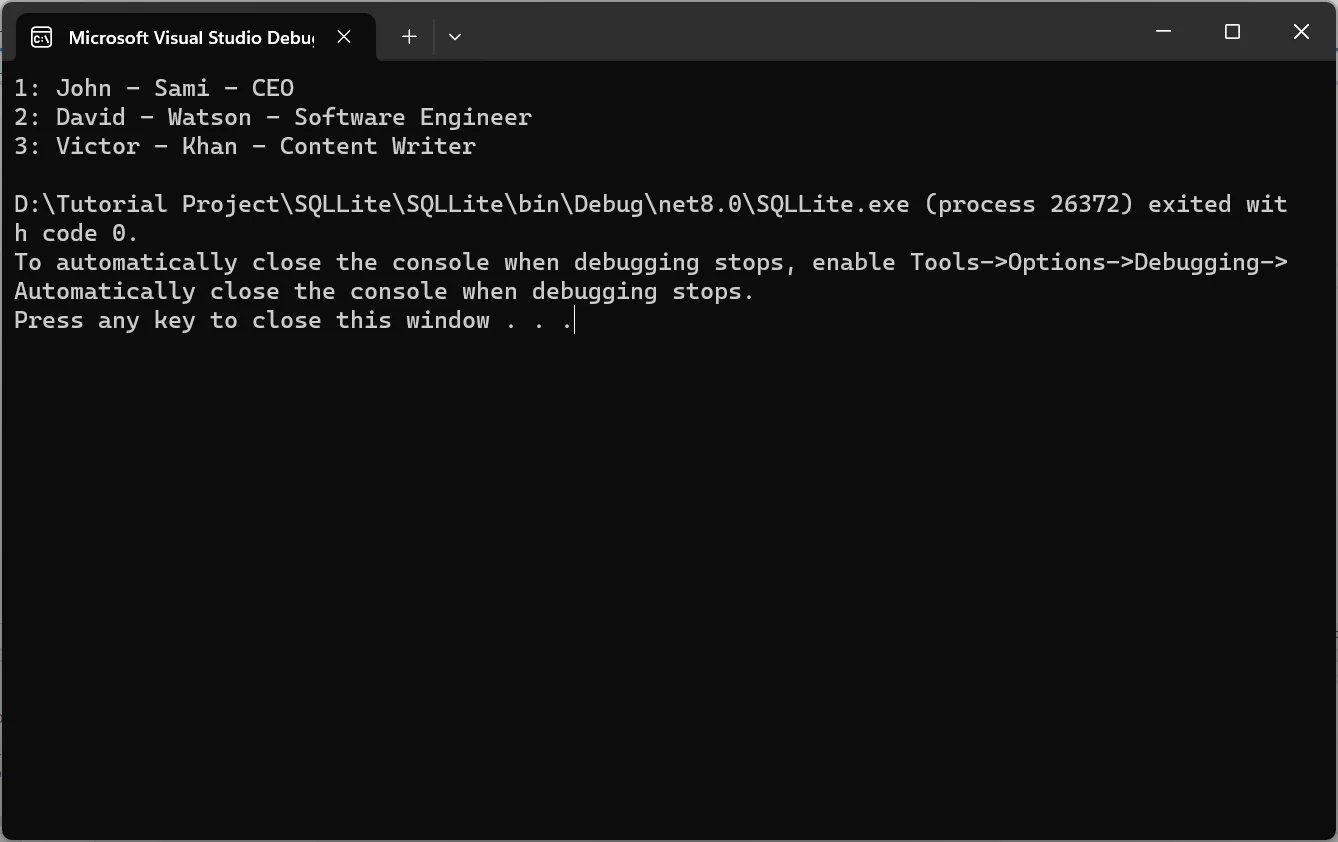
To read data from a table, you can use the ExecuteReader method of the SqlCommand object and set the CommandText property to a SELECT statement. This will return a SqliteDataReader object that allows you to iterate over the rows and access the values by column name or index. You can use the Read method to move to the next row, and the GetXXX methods to get the values as the appropriate data type. For example, the following code reads all the rows from the Employee table and prints them to the console:
using (var connection = new SqliteConnection("Data Source=employee.db"))
{
    var command = connection.CreateCommand();
    command.CommandText = @"SELECT * FROM Employee";
    connection.Open();
    using (var reader = command.ExecuteReader())
    {
        while (reader.Read())
        {
            var id = reader.GetInt32(0);
            string firstName = reader.GetString(1);
            string lastName = reader.GetString(2);
            string designation = reader.GetString(3);
            Console.WriteLine($"{id}: {firstName} - {lastName} - {designation}");
        }
    }
}
using (var connection = new SqliteConnection("Data Source=employee.db"))
{
var command = connection.CreateCommand();
command.CommandText = @"SELECT * FROM Employee";
connection.Open();
using (var reader = command.ExecuteReader())
{
while (reader.Read())
{
var id = reader.GetInt32(0);
string firstName = reader.GetString(1);
string lastName = reader.GetString(2);
string designation = reader.GetString(3);
Console.WriteLine($"{id}: {firstName} - {lastName} - {designation}");
}
}
}Output
The output of this code is:
Querying Data
If you prefer to use LINQ to query your SQLite database, you can use Entity Framework Core to map your tables to classes and perform queries using LINQ expressions. To do this, you need to install the Microsoft.EntityFrameworkCore.Sqlite package, which depends on Microsoft.Data.Sqlite package. You also need to create a class that inherits from DbContext and represents the database context. This class must have a constructor that accepts a DbContextOptions parameter and passes it to the base constructor. It must also have a DbSet property for each table you want to map to a class. For example, the following code defines a Stock class and a DatabaseContext class:
using Microsoft.EntityFrameworkCore;
public class Stock
{
    public int Id { get; set; }
    public string Name { get; set; } = string.Empty;
    public string Symbol { get; set; } = string.Empty;
    public double Price { get; set; }
}
public class DatabaseContext : DbContext
{
    public DatabaseContext(DbContextOptions options) : base(options) { }
    public DbSet<Stock> Stock { get; set; }
}
using Microsoft.EntityFrameworkCore;
public class Stock
{
public int Id { get; set; }
public string Name { get; set; } = string.Empty;
public string Symbol { get; set; } = string.Empty;
public double Price { get; set; }
}
public class DatabaseContext : DbContext
{
public DatabaseContext(DbContextOptions options) : base(options) { }
public DbSet<Stock> Stock { get; set; }
}To create the database context, you need to use the DbContextOptionsBuilder class and specify the connection string and the database provider. You can also use the Database.EnsureCreated method to create the database and the tables if they do not exist. For example, the following code creates the database context and the database:
var optionsBuilder = new DbContextOptionsBuilder<DatabaseContext>();
optionsBuilder.UseSqlite("Data Source=stock.db");
using (var context = new DatabaseContext(optionsBuilder.Options))
{
    context.Database.EnsureCreated();
}
var optionsBuilder = new DbContextOptionsBuilder<DatabaseContext>();
optionsBuilder.UseSqlite("Data Source=stock.db");
using (var context = new DatabaseContext(optionsBuilder.Options))
{
context.Database.EnsureCreated();
}To insert data into the database, you can use the Add or AddRange methods of the DbSet property and pass the objects you want to insert. You can also use the SaveChanges method to commit the changes to the database. For example, the following code inserts three Stocks into the database:
static void Main(string[] args)
{
    var optionsBuilder = new DbContextOptionsBuilder<DatabaseContext>();
    optionsBuilder.UseSqlite("Data Source=stock.db");
    using (var context = new DatabaseContext(optionsBuilder.Options))
    {
        context.Database.EnsureCreated();
        var stock = new List<Stock> {
            new Stock { Id = 1, Name = "NCR", Symbol = "$$", Price = 5.6 },
            new Stock { Id = 2, Name = "Google", Symbol = "GG", Price = 10.6 },
            new Stock { Id = 3, Name = "Apple", Symbol = "AA", Price = 3.6 }
        };
        context.AddRange(stock);
        context.SaveChanges();
    }
}
static void Main(string[] args)
{
var optionsBuilder = new DbContextOptionsBuilder<DatabaseContext>();
optionsBuilder.UseSqlite("Data Source=stock.db");
using (var context = new DatabaseContext(optionsBuilder.Options))
{
context.Database.EnsureCreated();
var stock = new List<Stock> {
new Stock { Id = 1, Name = "NCR", Symbol = "$$", Price = 5.6 },
new Stock { Id = 2, Name = "Google", Symbol = "GG", Price = 10.6 },
new Stock { Id = 3, Name = "Apple", Symbol = "AA", Price = 3.6 }
};
context.AddRange(stock);
context.SaveChanges();
}
}To query data, you can use the LINQ methods or expressions on the DbSet property and apply filters, projections, aggregations, and other operations. The queries will be translated to SQL statements and executed on the database. For example, the following code queries the stocks whose price is less than six dollars and prints their names:
using (var context = new DatabaseContext(optionsBuilder.Options))
{
    var cheapStocks = context.Stock.Where(p => p.Price < 6).Select(p => p.Name);
    Console.WriteLine("Stock Less than $6 are:");
    foreach (string stock in cheapStocks)
    {
        Console.WriteLine(stock);
    }
}
using (var context = new DatabaseContext(optionsBuilder.Options))
{
var cheapStocks = context.Stock.Where(p => p.Price < 6).Select(p => p.Name);
Console.WriteLine("Stock Less than $6 are:");
foreach (string stock in cheapStocks)
{
Console.WriteLine(stock);
}
}Let's suppose we have a scenario where we need to create a PDF file containing the list of Stocks. We can easily do that by using IronPDF.
Introducing IronPDF
IronPDF is a library that helps you create, edit, and read PDF files in your .NET applications without the need for multiple packages. It can generate PDFs from HTML, URL, JavaScript, CSS, and many image formats, as well as add headers, footers, signatures, attachments, and passwords. It also supports cross-platform compatibility, multithreading, and async support.
IronPDF's HTML to PDF Feature is its main highlight, preserving all layouts and styles. It generates PDFs from web content, ideal for reports, invoices, and documentation. You can convert HTML files, URLs, and HTML strings to PDFs seamlessly.
using IronPdf;

class Program
{
    static void Main(string[] args)
    {
        var renderer = new ChromePdfRenderer();

        // 1. Convert HTML String to PDF
        var htmlContent = "<h1>Hello, IronPDF!</h1><p>This is a PDF from an HTML string.</p>";
        var pdfFromHtmlString = renderer.RenderHtmlAsPdf(htmlContent);
        pdfFromHtmlString.SaveAs("HTMLStringToPDF.pdf");

        // 2. Convert HTML File to PDF
        var htmlFilePath = "path_to_your_html_file.html"; // Specify the path to your HTML file
        var pdfFromHtmlFile = renderer.RenderHtmlFileAsPdf(htmlFilePath);
        pdfFromHtmlFile.SaveAs("HTMLFileToPDF.pdf");

        // 3. Convert URL to PDF
        var url = "http://ironpdf.com"; // Specify the URL
        var pdfFromUrl = renderer.RenderUrlAsPdf(url);
        pdfFromUrl.SaveAs("URLToPDF.pdf");
    }
}
using IronPdf;
class Program
{
static void Main(string[] args)
{
var renderer = new ChromePdfRenderer();
// 1. Convert HTML String to PDF
var htmlContent = "<h1>Hello, IronPDF!</h1><p>This is a PDF from an HTML string.</p>";
var pdfFromHtmlString = renderer.RenderHtmlAsPdf(htmlContent);
pdfFromHtmlString.SaveAs("HTMLStringToPDF.pdf");
// 2. Convert HTML File to PDF
var htmlFilePath = "path_to_your_html_file.html"; // Specify the path to your HTML file
var pdfFromHtmlFile = renderer.RenderHtmlFileAsPdf(htmlFilePath);
pdfFromHtmlFile.SaveAs("HTMLFileToPDF.pdf");
// 3. Convert URL to PDF
var url = "http://ironpdf.com"; // Specify the URL
var pdfFromUrl = renderer.RenderUrlAsPdf(url);
pdfFromUrl.SaveAs("URLToPDF.pdf");
}
}Install IronPDF
To install the IronPDF in our project, write the following command in the Package Manager Console.
Install-Package IronPdf
This command will install IronPDF along with all its dependencies.
Add License Key
IronPDF requires a License Key to use it. We can easily get a trial license key from IronPDF Trial License Page.
Add this code to the startup of your application before IronPDF is used. This approach is universally effective and straightforward, working for both .NET Core and .NET Framework applications.
IronPdf.License.LicenseKey = "IRONSUITE.ABC.XYZ.MYCOMPANY.COM.ABC-DEPLOYMENT.TRIAL-P45MXL.TRIAL.EXPIRES.31.JAN.2028";IronPdf.License.LicenseKey = "IRONSUITE.ABC.XYZ.MYCOMPANY.COM.ABC-DEPLOYMENT.TRIAL-P45MXL.TRIAL.EXPIRES.31.JAN.2028";Create PDF File Containing Stock List
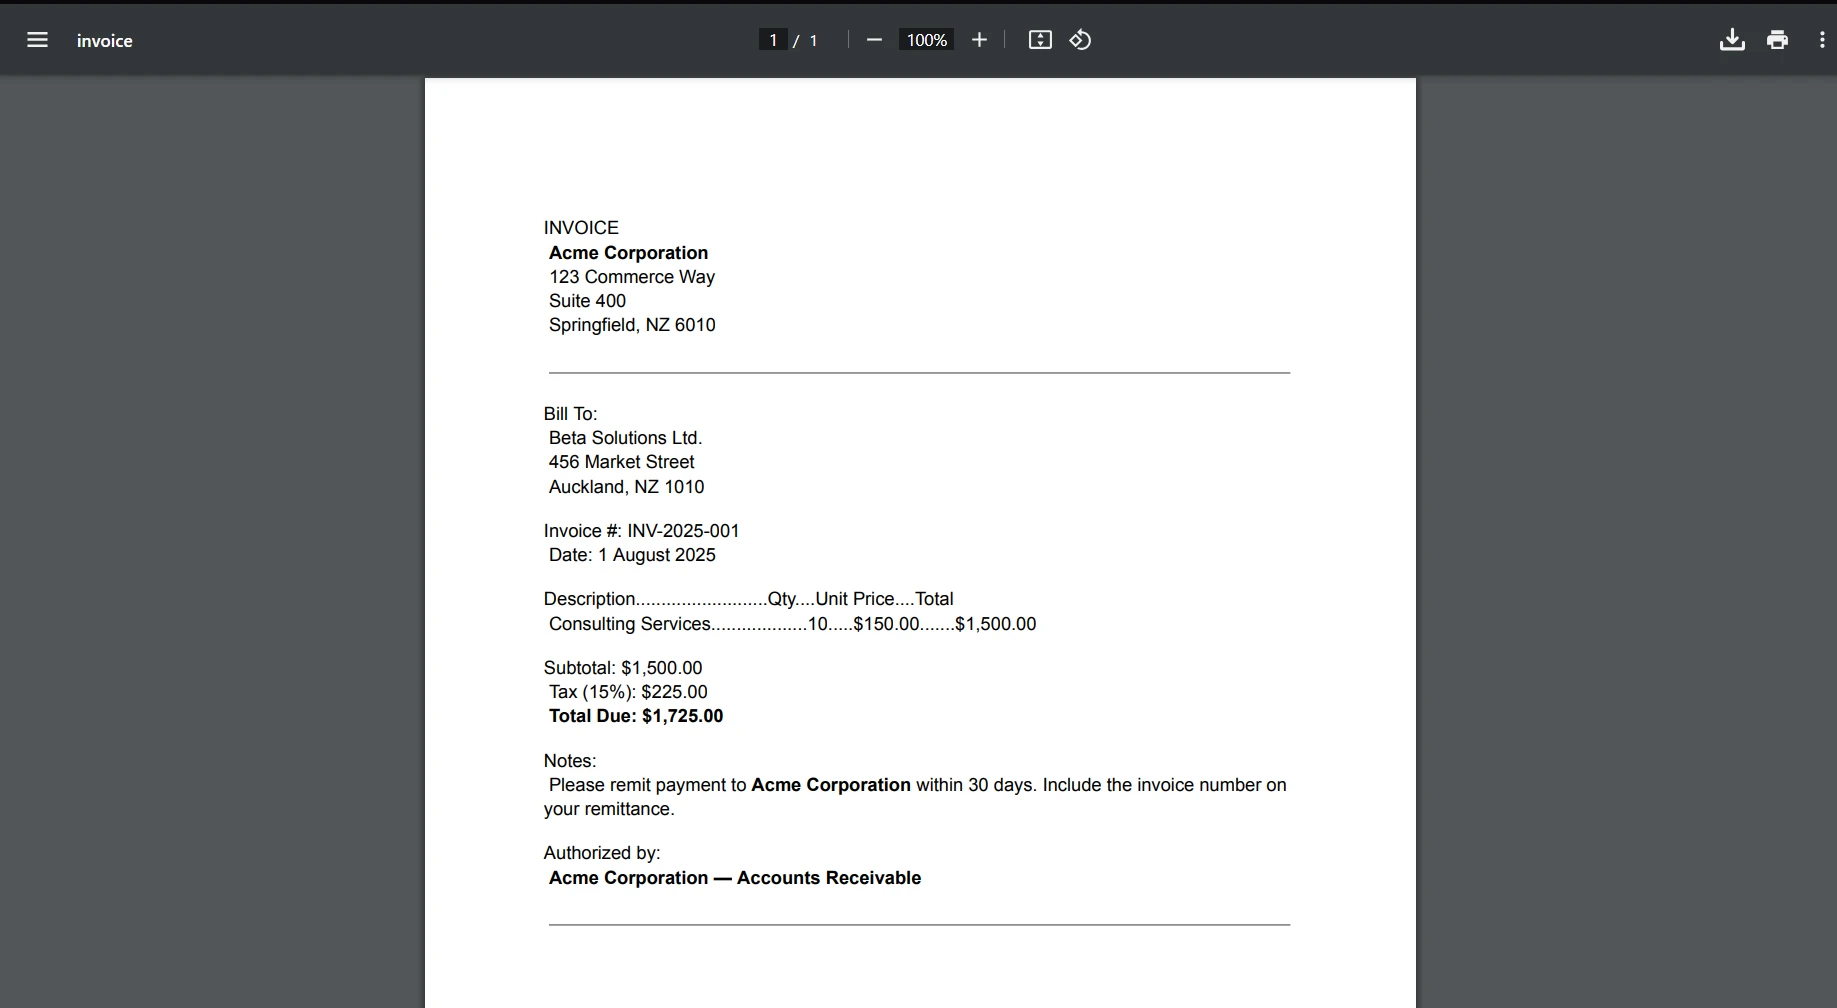
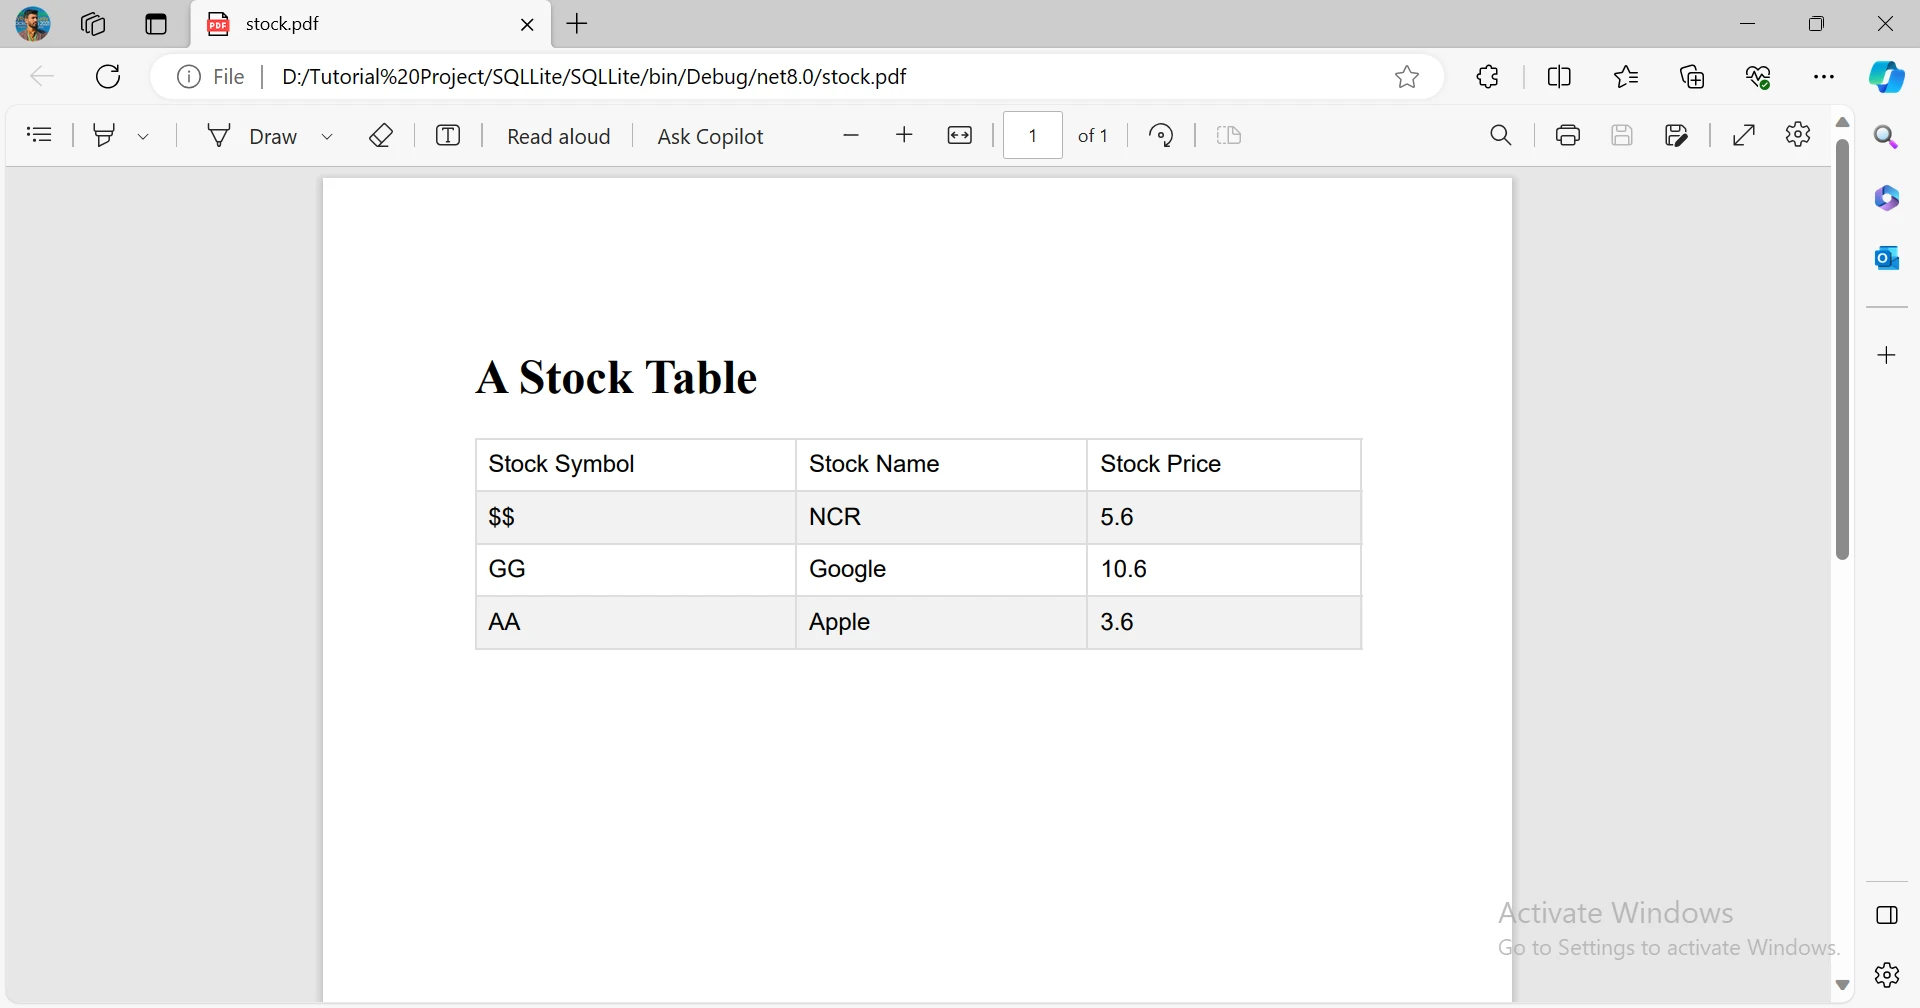
This C# code generates a PDF report from stock data stored in a SQLite database. It dynamically creates an HTML table, populates it with stock information, and uses a Chrome-based PDF renderer to convert the table into a downloadable "stock.pdf" file, facilitating efficient reporting and distribution of stock details.
var optionsBuilder = new DbContextOptionsBuilder<DatabaseContext>();
optionsBuilder.UseSqlite("Data Source=stock.db");
StringBuilder builder = new StringBuilder();
string style = "<!DOCTYPE html>\r\n<html>\r\n<head>\r\n<style>\r\n#stock {\r\n  font-family: Arial, Helvetica, sans-serif;\r\n  border-collapse: collapse;\r\n  width: 100%;\r\n}\r\n\r\n#stock td, #stock th {\r\n  border: 1px solid #ddd;\r\n  padding: 8px;\r\n}\r\n\r\n#stock tr:nth-child(even){background-color: #f2f2f2;}\r\n\r\n#stock tr:hover {background-color: #ddd;}\r\n\r\n#stock th {\r\n  padding-top: 12px;\r\n  padding-bottom: 12px;\r\n  text-align: left;\r\n  background-color: #04AA6D;\r\n  color: white;\r\n}\r\n</style>\r\n</head>\r\n<body>\r\n\r\n<h1>A Stock Table</h1>";
builder.Append(style);
builder.Append("<table id=\"stock\"><tr><td>Stock Symbol</td><td>Stock Name</td><td>Stock Price</td></tr>");
using (var context = new DatabaseContext(optionsBuilder.Options))
{
    var stocks = context.Stock;
    foreach (Stock stock in stocks)
    {
        builder.Append($"<tr><td>{stock.Symbol}</td><td>{stock.Name}</td><td>{stock.Price}</td></tr>");
    }
}
builder.Append("</table></body></html>");
var renderer = new ChromePdfRenderer();
var pdf = renderer.RenderHtmlAsPdf(builder.ToString());
pdf.SaveAs("stock.pdf");
var optionsBuilder = new DbContextOptionsBuilder<DatabaseContext>();
optionsBuilder.UseSqlite("Data Source=stock.db");
StringBuilder builder = new StringBuilder();
string style = "<!DOCTYPE html>\r\n<html>\r\n<head>\r\n<style>\r\n#stock {\r\n font-family: Arial, Helvetica, sans-serif;\r\n border-collapse: collapse;\r\n width: 100%;\r\n}\r\n\r\n#stock td, #stock th {\r\n border: 1px solid #ddd;\r\n padding: 8px;\r\n}\r\n\r\n#stock tr:nth-child(even){background-color: #f2f2f2;}\r\n\r\n#stock tr:hover {background-color: #ddd;}\r\n\r\n#stock th {\r\n padding-top: 12px;\r\n padding-bottom: 12px;\r\n text-align: left;\r\n background-color: #04AA6D;\r\n color: white;\r\n}\r\n</style>\r\n</head>\r\n<body>\r\n\r\n<h1>A Stock Table</h1>";
builder.Append(style);
builder.Append("<table id=\"stock\"><tr><td>Stock Symbol</td><td>Stock Name</td><td>Stock Price</td></tr>");
using (var context = new DatabaseContext(optionsBuilder.Options))
{
var stocks = context.Stock;
foreach (Stock stock in stocks)
{
builder.Append($"<tr><td>{stock.Symbol}</td><td>{stock.Name}</td><td>{stock.Price}</td></tr>");
}
}
builder.Append("</table></body></html>");
var renderer = new ChromePdfRenderer();
var pdf = renderer.RenderHtmlAsPdf(builder.ToString());
pdf.SaveAs("stock.pdf");The above C# code snippet is designed to create an HTML table displaying stock information from a SQLite database and subsequently convert it into a PDF file. It uses the Entity Framework Core library to interact with the database. Initially, it configures a DbContextOptionsBuilder to use SQLite with a specific connection string. The code then constructs an HTML string with embedded CSS styles for the table's appearance, creates a table structure with headers, queries the SQLite database for stock information, populates the HTML table with the retrieved data, and finally, utilizes a Chrome-based PDF renderer to convert the HTML content into a PDF file named "stock.pdf." The resulting PDF will contain a table presenting stock symbols, names, and prices.
Output is as
Conclusion
In conclusion, leveraging SQLite in .NET for database management offers a lightweight and versatile solution. This article explored the integration of SQLite into .NET applications, showcasing its key features and advantages. The provided code demonstrated practical steps for creating, connecting, and manipulating an SQLite database in a .NET console application. Additionally, it highlighted the use of Microsoft.Data.Sqlite and Entity Framework Core for efficient data handling. The incorporation of IronPDF illustrated how to seamlessly generate a PDF report from the SQLite database, enhancing the application's capabilities for reporting and data distribution.
IronPDF offers various licensing options, depending on the number of developers, locations, projects, and redistribution needs. The licenses are perpetual and include one year of free support and updates.
Frequently Asked Questions
What is SQLite and why is it popular for .NET development?
SQLite is a lightweight and self-contained relational database engine that is widely used in .NET development due to its speed, reliability, and cross-platform capabilities. It can be embedded in applications without requiring a separate server component.
How can I integrate SQLite into my .NET application?
You can integrate SQLite into your .NET application by installing the Microsoft.Data.Sqlite NuGet package. This provides ADO.NET interfaces, allowing you to create, connect, and manipulate SQLite databases within Console, Desktop, Web, or Mobile apps.
How do I create and connect to a SQLite database in C#?
To create and connect to a SQLite database in C#, use the SqliteConnection class to establish a connection. You can then execute SQL commands to create tables and manipulate data using the SqlCommand object.
Can I use LINQ queries with SQLite in .NET?
Yes, you can use LINQ queries with SQLite in .NET by utilizing Entity Framework Core. This allows object-relational mapping, enabling you to perform LINQ queries on DbSet properties within a DbContext class.
How can I generate PDF reports from SQLite database data?
You can generate PDF reports from SQLite database data using IronPDF. By converting HTML representations of your data or directly using database content, you can create detailed PDF reports and export them using IronPDF's rendering capabilities.
How do I troubleshoot common SQLite issues in .NET applications?
Common SQLite issues in .NET applications can be troubleshooted by ensuring proper installation of the Microsoft.Data.Sqlite package, checking SQL syntax, and verifying connection strings. Debugging tools and logs can also help identify and resolve errors.
How do I install and use a PDF library in a .NET project?
To install a PDF library like IronPDF in a .NET project, run Install-Package IronPdf in the Package Manager Console. Once installed, IronPDF enables you to create, edit, and read PDF files by utilizing its extensive API.
What are the advantages of using SQLite with .NET?
Using SQLite with .NET offers advantages such as simplicity, no need for a separate server, cross-platform support, and reliable performance. It is ideal for lightweight applications and can be easily integrated using libraries like Microsoft.Data.Sqlite.


