在C#中使用Itextsharp为PDF添加数字签名
Full Comparison
Looking for a detailed feature-by-feature breakdown? See how IronPDF stacks up against Itext on pricing, HTML support, and licensing.
在当今瞬息万变的世界里,纸质文件正迅速被电子文档所取代。 无论是签署合同、审批发票还是提交政府表格,电子文档都已成为标准。 然而,这种便利也带来了一个新的挑战:确保数字文档的真实性和完整性。
电子签名提供了一种解决方案。 数字签名不仅仅是在触摸屏上随意涂鸦,它还使用加密技术来验证签名者的身份,并确保文档内容保持不变。 对于 C# 开发人员来说,将这种级别的安全性集成到 PDF 工作流程中现在比以往任何时候都更容易,尤其是有IronPDF和iTextSharp等工具。 在本文中,我们将指导您完成对 PDF 进行数字签名的过程,比较不同的库,提供最佳实践,并帮助您为下一个项目选择合适的解决方案。
理解数字签名
数字签名是一种加密技术,用于验证数字信息或文件的真实性和完整性。 与简单的图像签名或打字姓名不同,数字签名使用私钥对文档的哈希值进行加密。 然后,任何人都可以使用签名者的公钥对加密后的哈希值进行验证。
为什么这很重要? 因为它能确保两点:
1.身份验证– 该签名验证了来自所述发件人的 PDF 文档。
2.完整性 - 文件自签署以来未作任何改动。 即使是微小的改动也会导致签名无效。
数字签名在许多司法管辖区都具有法律约束力,在金融、医疗保健、法律和政府等行业至关重要。
为什么要在 PDF 中使用数字签名?
PDF 是分发从法律合同到官方报告等专业文件的标准格式。 向PDF添加数字签名具有几个重要目的:
-合法性和合规性:数字签名符合 eIDAS(欧洲)、ESIGN(美国)等法规,因此具有法律认可度。
-安全性:签名文件不能随意更改而不破坏签名,从而防止篡改或欺诈。
-高效:无需打印、签名和扫描。 利用安全可靠的数字化审批,节省时间,简化工作流程。
-信任:客户和合作伙伴可以放心地验证文件的来源和完整性。
简而言之,数字签名为您的文档工作流程带来了信任和效率。
比较 iTextSharp 和 IronPDF.
在 C# 中实现数字签名时,有两个库往往脱颖而出:iTextSharp和IronPDF。 这两种工具都很实用,但它们满足了不同类型的开发人员和项目要求。 让我们分析一下它们在实际使用中的比较。
iTextSharp:以复杂性为动力
iTextSharp 是 PDF 操作领域的知名品牌。 它是更广泛的 iText 7 生态系统的一部分,为底层 PDF 操作提供广泛支持,包括加密数字签名。
需要对签名外观、散列算法、证书链和自定义验证工作流进行精细控制的开发人员会发现 iTextSharp 非常实用。 它具有高度可扩展性,在设计时考虑到了复杂的企业需求。
然而,这种灵活性是有代价的。学习曲线非常陡峭。简单的任务,如添加可见签名,往往需要多个类、流和配置步骤。 对于新用户来说,这可能会让他们不知所措。
此外,iTextSharp 采用 AGPL 许可,除非您购买商业许可,否则您的应用程序必须是开源的--这对许多封闭源代码或专有项目来说是个障碍。
IronPDF:简约与专业的完美结合
IronPDF则采用了现代的、开发人员优先的方法。 其 API 设计用于处理常见的 PDF 任务(如数字签名、生成、合并和编辑),只需最少的设置,使其成为 .NET Framework 项目的强大 PDF 库。
例如,在 IronPDF 中签署 PDF 不需要直接处理流或加密设置。 您只需加载 PDF,调用 SignPdf(),然后传入您的证书即可。 它甚至还支持额外的元数据,如签名者的位置、原因和联系方式,所有这些都只需调用一个方法即可完成。
另一个关键优势是许可。 IronPDF 提供商业友好型许可证,没有 AGPL 限制,非常适合专业和企业级应用。 虽然这是一款付费产品,但免费试用版可让您在使用前轻松进行评估。
并排摘要
| 特性 | iTextSharp | IronPDF |
|---|---|---|
| 易用性 | 陡峭的学习曲线 | 适合初学者,代码量极少 |
| 许可 | AGPL(或付费商业许可证) | 商业许可,无开源授权 |
| 签名定制 | 通过密码学控制实现高度自定义 | 简化的 API,带有可选的元数据字段 |
| 文档 | 详细但密集 | 清晰的示例和面向开发者的文档 |
| 最适合 | 深度定制的企业应用程序 | 需要快速实施和支持的团队 |
使用iTextSharp和IronPDF入门
在深入研究数字签名实现之前,了解如何使用每个库并开始运行至关重要。 无论您是要构建一个企业级解决方案还是一个快速的内部工具,正确的设置都能让一切变得不同。
设置iTextSharp
iTextSharp 是基于 Java 的强大 iText PDF 库的 .NET 移植。 要开始使用,您需要通过 NuGet 安装,并在项目中引用正确的命名空间。
安装
您可以通过NuGet包管理器控制台轻松将iTextSharp库安装到您的项目中。 您只需运行以下命令即可:
Install-Package iTextSharp
该库安装简便,可确保在您的 C# 项目中快速实施。
基本设置
安装完成后,您就可以开始在项目中使用 iTextSharp 命名空间了:
using iTextSharp.text.pdf;
using iTextSharp.text.pdf.security;
using iTextSharp.text.pdf;
using iTextSharp.text.pdf.security;Imports iTextSharp.text.pdf
Imports iTextSharp.text.pdf.security请记住 iTextSharp 是模块化的。 如果您计划使用高级加密功能或时间戳,您可能需要额外的软件包,如 BouncyCastle.Cryptography。 安装方法与 iTextSharp 类似,只需运行一行即可:
Install-Package BouncyCastle.Cryptography
需要注意的事项
-许可: AGPL 许可要求任何使用 iTextSharp 的软件都必须是开源的,除非您购买商业许可。
-依赖项:加密操作通常需要BouncyCastle进行证书处理。
-学习曲线:即使是基本的签名也需要了解 IExternalSignature 和各种加密提供商。
如果您能够自如地配置这些构建模块,并且需要完全控制签名过程(例如,设置外观、验证级别或时间戳服务器),那么 iTextSharp 将是一个可靠的选择。
设置 IronPDF
IronPDF是一个商业 PDF 库,以提高开发人员的工作效率为宗旨。 它专为希望轻松生成、编辑和签署 PDF 的 .NET 开发人员而设计。 IronPDF 提供了更加顺畅的上机体验,尤其是对于那些重视简洁的 API 和快速结果的人来说。
安装
通过 NuGet 安装最新的 IronPDF 软件包:
Install-Package IronPdf
或使用 .NET CLI:
Install-Package IronPdf
基本设置
首先导入 IronPDF 的主命名空间:
using IronPdf;using IronPdf;Imports IronPdf就这样,您就可以加载 PDF 并开始添加数字签名了。
IronPDF 在内部管理一切:证书加载、可见签名定位、元数据和最终导出。 您无需手动管理 PDF 流或加密算法,这对于快速开发而言是一个巨大的优势。
初学者的主要优势
-一体化:无需额外的依赖项或加密库。
-无需担心 AGPL 许可: IronPDF提供永久许可和慷慨的免费试用。
-视觉渲染: IronPDF能够将 PDF 文件渲染成与打印时完全相同的样子,因此非常适合用于合同和官方文件。
循序渐进:添加数字签名
1.准备证书
您需要一个.pfx证书文件和密码。 这些工具用于生成数字签名。 您可以从可信的证书颁发机构 (CA) 获取证书,也可以使用 OpenSSL 等工具生成内部使用的证书。
2. 使用 iTextSharp 和 BouncyCastle 进行 PDF 签名
定义证书路径和密码
包含必要的命名空间
首先,确保在代码顶部使用正确的 using 语句,以访问 iTextSharp 对 PDF 进行数字签名所需的各种类和方法。
using System;
using System.IO;
using System.Linq;
using iTextSharp.text.pdf;
using iTextSharp.text.pdf.security;
using Org.BouncyCastle.Crypto;
using Org.BouncyCastle.Pkcs;using System;
using System.IO;
using System.Linq;
using iTextSharp.text.pdf;
using iTextSharp.text.pdf.security;
using Org.BouncyCastle.Crypto;
using Org.BouncyCastle.Pkcs;Imports System
Imports System.IO
Imports System.Linq
Imports iTextSharp.text.pdf
Imports iTextSharp.text.pdf.security
Imports Org.BouncyCastle.Crypto
Imports Org.BouncyCastle.Pkcs定义输入 PDF 并将其加载到 PdfReader 中。
然后,我们指定现有 PDF 的路径,并将其加载到 PdfReader 中。 我们还将分配一些字符串变量,这些变量将在后面的代码中使用。
// Path to the unsigned PDF you want to sign
string filename = "example.pdf";

// Load the existing PDF into a reader
PdfReader pdfReader = new PdfReader(filename);

string reason = "Digital Signature Reason";
string location = "Digital Signature Location";
// Path to the unsigned PDF you want to sign
string filename = "example.pdf";
// Load the existing PDF into a reader
PdfReader pdfReader = new PdfReader(filename);
string reason = "Digital Signature Reason";
string location = "Digital Signature Location";' Path to the unsigned PDF you want to sign
Dim filename As String = "example.pdf"
' Load the existing PDF into a reader
Dim pdfReader As New PdfReader(filename)
Dim reason As String = "Digital Signature Reason"
Dim location As String = "Digital Signature Location"定义证书路径和密码
接下来,我们指向 .pfx 证书文件,并提供用于保护该文件的密码。
// Path to your .pfx certificate file (must contain private key)
string pfxFilePath = "certificate-file.pfx";

// Password for the certificate (make sure to protect this securely!)
string pfxPassword = "Password";
// Path to your .pfx certificate file (must contain private key)
string pfxFilePath = "certificate-file.pfx";
// Password for the certificate (make sure to protect this securely!)
string pfxPassword = "Password";' Path to your .pfx certificate file (must contain private key)
Dim pfxFilePath As String = "certificate-file.pfx"
' Password for the certificate (make sure to protect this securely!)
Dim pfxPassword As String = "Password"使用 Pkcs12Store 加载 .PFX 证书
我们使用 BouncyCastle 将证书和私钥加载到安全存储中。
// Initialize a new PKCS#12 key store (used for handling the PFX certificate)
Pkcs12StoreBuilder pkcs12StoreBuilder = new Pkcs12StoreBuilder();
Pkcs12Store pfxKeyStore = pkcs12StoreBuilder.Build();

// Load the certificate and private key from the PFX file
using (FileStream pfxStream = new FileStream(pfxFilePath, FileMode.Open, FileAccess.Read))
{
    // Load into the key store using the provided password
    pfxKeyStore.Load(pfxStream, pfxPassword.ToCharArray());
}
// Initialize a new PKCS#12 key store (used for handling the PFX certificate)
Pkcs12StoreBuilder pkcs12StoreBuilder = new Pkcs12StoreBuilder();
Pkcs12Store pfxKeyStore = pkcs12StoreBuilder.Build();
// Load the certificate and private key from the PFX file
using (FileStream pfxStream = new FileStream(pfxFilePath, FileMode.Open, FileAccess.Read))
{
// Load into the key store using the provided password
pfxKeyStore.Load(pfxStream, pfxPassword.ToCharArray());
}' Initialize a new PKCS#12 key store (used for handling the PFX certificate)
Dim pkcs12StoreBuilder As New Pkcs12StoreBuilder()
Dim pfxKeyStore As Pkcs12Store = pkcs12StoreBuilder.Build()
' Load the certificate and private key from the PFX file
Using pfxStream As New FileStream(pfxFilePath, FileMode.Open, FileAccess.Read)
' Load into the key store using the provided password
pfxKeyStore.Load(pfxStream, pfxPassword.ToCharArray())
End Using为 PdfStamper 添加签名做好准备
通过 PdfStamper,我们可以在保留原始内容的同时应用数字签名。
// Create a PdfStamper that enables signing and appends the signature to the document
PdfStamper pdfStamper = PdfStamper.CreateSignature(
    pdfReader,
    new FileStream("MyPDF_Signed.pdf", FileMode.Create), // Output path
    '\0',                                                // PDF version (unchanged)
    null,                                                // Temp file path (optional)
    true                                                 // Append mode (preserves original content)
);
// Create a PdfStamper that enables signing and appends the signature to the document
PdfStamper pdfStamper = PdfStamper.CreateSignature(
pdfReader,
new FileStream("MyPDF_Signed.pdf", FileMode.Create), // Output path
'\0', // PDF version (unchanged)
null, // Temp file path (optional)
true // Append mode (preserves original content)
);Imports Microsoft.VisualBasic
' Create a PdfStamper that enables signing and appends the signature to the document
Dim pdfStamper As PdfStamper = PdfStamper.CreateSignature(pdfReader, New FileStream("MyPDF_Signed.pdf", FileMode.Create), ControlChars.NullChar, Nothing, True)自定义签名外观
现在,我们要确定签名在文档中的显示方式和位置。
// Access the signature appearance settings
PdfSignatureAppearance signatureAppearance = pdfStamper.SignatureAppearance;

// Add optional metadata (shows up in PDF signature details)
signatureAppearance.Reason = reason;
signatureAppearance.Location = location;

// Position the visible signature on the page (x, y, width, height in points)
float x = 360;
float y = 130;
signatureAppearance.Acro6Layers = false;              // Use compact signature appearance
signatureAppearance.Layer4Text = PdfSignatureAppearance.QuestionMark; // Custom label text
signatureAppearance.SetVisibleSignature(
    new iTextSharp.text.Rectangle(x, y, x + 150, y + 50), // Rectangle position
    1,                                                    // Page number
    "signature"                                           // Field name
);
// Access the signature appearance settings
PdfSignatureAppearance signatureAppearance = pdfStamper.SignatureAppearance;
// Add optional metadata (shows up in PDF signature details)
signatureAppearance.Reason = reason;
signatureAppearance.Location = location;
// Position the visible signature on the page (x, y, width, height in points)
float x = 360;
float y = 130;
signatureAppearance.Acro6Layers = false; // Use compact signature appearance
signatureAppearance.Layer4Text = PdfSignatureAppearance.QuestionMark; // Custom label text
signatureAppearance.SetVisibleSignature(
new iTextSharp.text.Rectangle(x, y, x + 150, y + 50), // Rectangle position
1, // Page number
"signature" // Field name
);' Access the signature appearance settings
Dim signatureAppearance As PdfSignatureAppearance = pdfStamper.SignatureAppearance
' Add optional metadata (shows up in PDF signature details)
signatureAppearance.Reason = reason
signatureAppearance.Location = location
' Position the visible signature on the page (x, y, width, height in points)
Dim x As Single = 360
Dim y As Single = 130
signatureAppearance.Acro6Layers = False ' Use compact signature appearance
signatureAppearance.Layer4Text = PdfSignatureAppearance.QuestionMark ' Custom label text
signatureAppearance.SetVisibleSignature(New iTextSharp.text.Rectangle(x, y, x + 150, y + 50), 1, "signature")提取私钥并签署PDF
我们检索包含私钥的证书条目的别名(名称)。 如果存在别名,我们将使用 SHA-256 生成并嵌入数字签名。
// Find the first alias in the PFX that has a private key entry
string alias = pfxKeyStore.Aliases.Cast<string>().FirstOrDefault(
    entryAlias => pfxKeyStore.IsKeyEntry(entryAlias)
);

// Ensure a valid alias (certificate) was found
if (alias != null)
{
    // Retrieve the private key for signing
    ICipherParameters privateKey = pfxKeyStore.GetKey(alias).Key;

    // Create a signer using SHA-256 and the private key
    IExternalSignature pks = new PrivateKeySignature(privateKey, DigestAlgorithms.SHA256);

    // Perform the digital signing operation using CMS format
    MakeSignature.SignDetached(
        signatureAppearance,     // Signature appearance
        pks,                     // External signature handler
        new Org.BouncyCastle.X509.X509Certificate[] {
            pfxKeyStore.GetCertificate(alias).Certificate
        },                       // Certificate chain (basic single-cert example)
        null, null, null,        // Optional CRL, OCSP, TSA
        0,                       // Estimated size for the signature (0 = auto)
        CryptoStandard.CMS       // Signature standard (CMS vs CAdES)
    );
}
else
{
    Console.WriteLine("Private key not found in the PFX certificate.");
}
// Find the first alias in the PFX that has a private key entry
string alias = pfxKeyStore.Aliases.Cast<string>().FirstOrDefault(
entryAlias => pfxKeyStore.IsKeyEntry(entryAlias)
);
// Ensure a valid alias (certificate) was found
if (alias != null)
{
// Retrieve the private key for signing
ICipherParameters privateKey = pfxKeyStore.GetKey(alias).Key;
// Create a signer using SHA-256 and the private key
IExternalSignature pks = new PrivateKeySignature(privateKey, DigestAlgorithms.SHA256);
// Perform the digital signing operation using CMS format
MakeSignature.SignDetached(
signatureAppearance, // Signature appearance
pks, // External signature handler
new Org.BouncyCastle.X509.X509Certificate[] {
pfxKeyStore.GetCertificate(alias).Certificate
}, // Certificate chain (basic single-cert example)
null, null, null, // Optional CRL, OCSP, TSA
0, // Estimated size for the signature (0 = auto)
CryptoStandard.CMS // Signature standard (CMS vs CAdES)
);
}
else
{
Console.WriteLine("Private key not found in the PFX certificate.");
}' Find the first alias in the PFX that has a private key entry
Dim [alias] As String = pfxKeyStore.Aliases.Cast(Of String)().FirstOrDefault(Function(entryAlias) pfxKeyStore.IsKeyEntry(entryAlias))
' Ensure a valid alias (certificate) was found
If [alias] IsNot Nothing Then
' Retrieve the private key for signing
Dim privateKey As ICipherParameters = pfxKeyStore.GetKey([alias]).Key
' Create a signer using SHA-256 and the private key
Dim pks As IExternalSignature = New PrivateKeySignature(privateKey, DigestAlgorithms.SHA256)
' Perform the digital signing operation using CMS format
MakeSignature.SignDetached(signatureAppearance, pks, New Org.BouncyCastle.X509.X509Certificate() { pfxKeyStore.GetCertificate([alias]).Certificate }, Nothing, Nothing, Nothing, 0, CryptoStandard.CMS)
Else
Console.WriteLine("Private key not found in the PFX certificate.")
End If最终确定文档
最后,我们关闭 stamper,完成签名过程,并将签名后的 PDF 写入磁盘。
// Close the stamper to save and finalize the signed PDF
pdfStamper.Close();
// Close the stamper to save and finalize the signed PDF
pdfStamper.Close();' Close the stamper to save and finalize the signed PDF
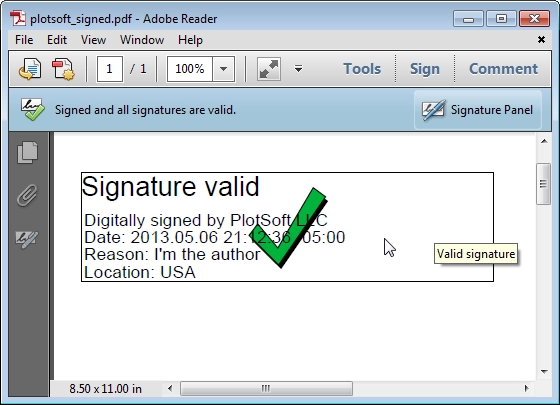
pdfStamper.Close()输出
Bootstrap安全配置表单
专业的 PDF 安全性需要直观的配置界面。 该 Bootstrap 5 示例展示了 IronPDF 渲染具有验证状态和进度跟踪功能的多步骤安全配置表单的能力。
using IronPdf;

var renderer = new ChromePdfRenderer();

string securityConfigForm = @"
<!DOCTYPE html>
<html>
<head>
    <meta charset='utf-8'>
    <link href='https://cdn.jsdelivr.net/npm/bootstrap@5.3.0/dist/css/bootstrap.min.css' rel='stylesheet'>
    <style>
        .step-indicator { display: flex; justify-content: space-between; margin-bottom: 30px; }
        .step { flex: 1; text-align: center; position: relative; }
        .step-number { width: 40px; height: 40px; border-radius: 50%; background: #e9ecef;
            display: inline-flex; align-items: center; justify-content: center; font-weight: 700; }
        .step.completed .step-number { background: #198754; color: white; }
        .step.active .step-number { background: #0d6efd; color: white; }
        @media print { .form-section { page-break-inside: avoid; } }
    </style>
</head>
<body class='bg-light'>
    <div class='container py-4'>
        <div class='row justify-content-center'>
            <div class='col-lg-8'>
                <h2 class='text-center mb-4'>PDF Security Configuration</h2>

                <div class='step-indicator mb-4'>
                    <div class='step completed'>
                        <div class='step-number'>✓</div>
                        <div class='small mt-2'>Certificate</div>
                    </div>
                    <div class='step completed'>
                        <div class='step-number'>✓</div>
                        <div class='small mt-2'>Signature</div>
                    </div>
                    <div class='step active'>
                        <div class='step-number'>3</div>
                        <div class='small mt-2'>Encryption</div>
                    </div>
                    <div class='step'>
                        <div class='step-number'>4</div>
                        <div class='small mt-2'>Finalize</div>
                    </div>
                </div>

                <div class='card shadow-sm form-section'>
                    <div class='card-header bg-primary text-white'>
                        <h5 class='mb-0'>Step 3: Encryption & Permissions</h5>
                    </div>
                    <div class='card-body'>
                        <div class='mb-3'>
                            <label class='form-label'><strong>Encryption Level</strong></label>
                            <select class='form-select'>
                                <option>AES 128-bit</option>
                                <option selected>AES 256-bit (Recommended)</option>
                                <option>RC4 128-bit (Legacy)</option>
                            </select>
                            <small class='text-muted'>AES-256 provides enterprise-grade security</small>
                        </div>

                        <div class='mb-3'>
                            <label class='form-label'><strong>Document Permissions</strong></label>
                            <div class='form-check form-switch'>
                                <input class='form-check-input' type='checkbox' id='allowPrint' checked>
                                <label class='form-check-label' for='allowPrint'>Allow Printing</label>
                            </div>
                            <div class='form-check form-switch'>
                                <input class='form-check-input' type='checkbox' id='allowCopy'>
                                <label class='form-check-label' for='allowCopy'>Allow Content Copying</label>
                            </div>
                            <div class='form-check form-switch'>
                                <input class='form-check-input' type='checkbox' id='allowModify'>
                                <label class='form-check-label' for='allowModify'>Allow Document Modification</label>
                            </div>
                            <div class='form-check form-switch'>
                                <input class='form-check-input' type='checkbox' id='allowAnnotate' checked>
                                <label class='form-check-label' for='allowAnnotate'>Allow Annotations</label>
                            </div>
                        </div>

                        <div class='mb-3'>
                            <label class='form-label'><strong>Password Protection</strong></label>
                            <input type='password' class='form-control mb-2' placeholder='Owner Password' value='••••••••'>
                            <input type='password' class='form-control' placeholder='User Password (Optional)'>
                            <small class='text-muted'>Owner password controls document permissions</small>
                        </div>

                        <div class='alert alert-success'>
                            <strong>✓ Configuration Valid</strong><br>
                            <small>Security settings meet compliance requirements</small>
                        </div>
                    </div>
                    <div class='card-footer'>
                        <div class='d-flex justify-content-between'>
                            <button class='btn btn-outline-secondary'>← Previous</button>
                            <button class='btn btn-primary'>Continue →</button>
                        </div>
                    </div>
                </div>

                <div class='card mt-3 shadow-sm'>
                    <div class='card-body'>
                        <h6 class='text-primary'>Security Comparison</h6>
                        <div class='row g-2'>
                            <div class='col-6'>
                                <div class='text-center p-2 bg-success text-white rounded'>
                                    <strong>IronPDF</strong><br>
                                    <small>AES-256 Native</small>
                                </div>
                            </div>
                            <div class='col-6'>
                                <div class='text-center p-2 bg-warning text-dark rounded'>
                                    <strong>iTextSharp</strong><br>
                                    <small>Complex Setup</small>
                                </div>
                            </div>
                        </div>
                    </div>
                </div>
            </div>
        </div>
    </div>
</body>
</html>";

var pdf = renderer.RenderHtmlAsPdf(securityConfigForm);
pdf.SaveAs("security-configuration.pdf");
using IronPdf;
var renderer = new ChromePdfRenderer();
string securityConfigForm = @"
<!DOCTYPE html>
<html>
<head>
<meta charset='utf-8'>
<link href='https://cdn.jsdelivr.net/npm/bootstrap@5.3.0/dist/css/bootstrap.min.css' rel='stylesheet'>
<style>
.step-indicator { display: flex; justify-content: space-between; margin-bottom: 30px; }
.step { flex: 1; text-align: center; position: relative; }
.step-number { width: 40px; height: 40px; border-radius: 50%; background: #e9ecef;
display: inline-flex; align-items: center; justify-content: center; font-weight: 700; }
.step.completed .step-number { background: #198754; color: white; }
.step.active .step-number { background: #0d6efd; color: white; }
@media print { .form-section { page-break-inside: avoid; } }
</style>
</head>
<body class='bg-light'>
<div class='container py-4'>
<div class='row justify-content-center'>
<div class='col-lg-8'>
<h2 class='text-center mb-4'>PDF Security Configuration</h2>
<div class='step-indicator mb-4'>
<div class='step completed'>
<div class='step-number'>✓</div>
<div class='small mt-2'>Certificate</div>
</div>
<div class='step completed'>
<div class='step-number'>✓</div>
<div class='small mt-2'>Signature</div>
</div>
<div class='step active'>
<div class='step-number'>3</div>
<div class='small mt-2'>Encryption</div>
</div>
<div class='step'>
<div class='step-number'>4</div>
<div class='small mt-2'>Finalize</div>
</div>
</div>
<div class='card shadow-sm form-section'>
<div class='card-header bg-primary text-white'>
<h5 class='mb-0'>Step 3: Encryption & Permissions</h5>
</div>
<div class='card-body'>
<div class='mb-3'>
<label class='form-label'><strong>Encryption Level</strong></label>
<select class='form-select'>
<option>AES 128-bit</option>
<option selected>AES 256-bit (Recommended)</option>
<option>RC4 128-bit (Legacy)</option>
</select>
<small class='text-muted'>AES-256 provides enterprise-grade security</small>
</div>
<div class='mb-3'>
<label class='form-label'><strong>Document Permissions</strong></label>
<div class='form-check form-switch'>
<input class='form-check-input' type='checkbox' id='allowPrint' checked>
<label class='form-check-label' for='allowPrint'>Allow Printing</label>
</div>
<div class='form-check form-switch'>
<input class='form-check-input' type='checkbox' id='allowCopy'>
<label class='form-check-label' for='allowCopy'>Allow Content Copying</label>
</div>
<div class='form-check form-switch'>
<input class='form-check-input' type='checkbox' id='allowModify'>
<label class='form-check-label' for='allowModify'>Allow Document Modification</label>
</div>
<div class='form-check form-switch'>
<input class='form-check-input' type='checkbox' id='allowAnnotate' checked>
<label class='form-check-label' for='allowAnnotate'>Allow Annotations</label>
</div>
</div>
<div class='mb-3'>
<label class='form-label'><strong>Password Protection</strong></label>
<input type='password' class='form-control mb-2' placeholder='Owner Password' value='••••••••'>
<input type='password' class='form-control' placeholder='User Password (Optional)'>
<small class='text-muted'>Owner password controls document permissions</small>
</div>
<div class='alert alert-success'>
<strong>✓ Configuration Valid</strong><br>
<small>Security settings meet compliance requirements</small>
</div>
</div>
<div class='card-footer'>
<div class='d-flex justify-content-between'>
<button class='btn btn-outline-secondary'>← Previous</button>
<button class='btn btn-primary'>Continue →</button>
</div>
</div>
</div>
<div class='card mt-3 shadow-sm'>
<div class='card-body'>
<h6 class='text-primary'>Security Comparison</h6>
<div class='row g-2'>
<div class='col-6'>
<div class='text-center p-2 bg-success text-white rounded'>
<strong>IronPDF</strong><br>
<small>AES-256 Native</small>
</div>
</div>
<div class='col-6'>
<div class='text-center p-2 bg-warning text-dark rounded'>
<strong>iTextSharp</strong><br>
<small>Complex Setup</small>
</div>
</div>
</div>
</div>
</div>
</div>
</div>
</div>
</body>
</html>";
var pdf = renderer.RenderHtmlAsPdf(securityConfigForm);
pdf.SaveAs("security-configuration.pdf");Imports IronPdf
Dim renderer As New ChromePdfRenderer()
Dim securityConfigForm As String = "
<!DOCTYPE html>
<html>
<head>
<meta charset='utf-8'>
<link href='https://cdn.jsdelivr.net/npm/bootstrap@5.3.0/dist/css/bootstrap.min.css' rel='stylesheet'>
<style>
.step-indicator { display: flex; justify-content: space-between; margin-bottom: 30px; }
.step { flex: 1; text-align: center; position: relative; }
.step-number { width: 40px; height: 40px; border-radius: 50%; background: #e9ecef;
display: inline-flex; align-items: center; justify-content: center; font-weight: 700; }
.step.completed .step-number { background: #198754; color: white; }
.step.active .step-number { background: #0d6efd; color: white; }
@media print { .form-section { page-break-inside: avoid; } }
</style>
</head>
<body class='bg-light'>
<div class='container py-4'>
<div class='row justify-content-center'>
<div class='col-lg-8'>
<h2 class='text-center mb-4'>PDF Security Configuration</h2>
<div class='step-indicator mb-4'>
<div class='step completed'>
<div class='step-number'>✓</div>
<div class='small mt-2'>Certificate</div>
</div>
<div class='step completed'>
<div class='step-number'>✓</div>
<div class='small mt-2'>Signature</div>
</div>
<div class='step active'>
<div class='step-number'>3</div>
<div class='small mt-2'>Encryption</div>
</div>
<div class='step'>
<div class='step-number'>4</div>
<div class='small mt-2'>Finalize</div>
</div>
</div>
<div class='card shadow-sm form-section'>
<div class='card-header bg-primary text-white'>
<h5 class='mb-0'>Step 3: Encryption & Permissions</h5>
</div>
<div class='card-body'>
<div class='mb-3'>
<label class='form-label'><strong>Encryption Level</strong></label>
<select class='form-select'>
<option>AES 128-bit</option>
<option selected>AES 256-bit (Recommended)</option>
<option>RC4 128-bit (Legacy)</option>
</select>
<small class='text-muted'>AES-256 provides enterprise-grade security</small>
</div>
<div class='mb-3'>
<label class='form-label'><strong>Document Permissions</strong></label>
<div class='form-check form-switch'>
<input class='form-check-input' type='checkbox' id='allowPrint' checked>
<label class='form-check-label' for='allowPrint'>Allow Printing</label>
</div>
<div class='form-check form-switch'>
<input class='form-check-input' type='checkbox' id='allowCopy'>
<label class='form-check-label' for='allowCopy'>Allow Content Copying</label>
</div>
<div class='form-check form-switch'>
<input class='form-check-input' type='checkbox' id='allowModify'>
<label class='form-check-label' for='allowModify'>Allow Document Modification</label>
</div>
<div class='form-check form-switch'>
<input class='form-check-input' type='checkbox' id='allowAnnotate' checked>
<label class='form-check-label' for='allowAnnotate'>Allow Annotations</label>
</div>
</div>
<div class='mb-3'>
<label class='form-label'><strong>Password Protection</strong></label>
<input type='password' class='form-control mb-2' placeholder='Owner Password' value='••••••••'>
<input type='password' class='form-control' placeholder='User Password (Optional)'>
<small class='text-muted'>Owner password controls document permissions</small>
</div>
<div class='alert alert-success'>
<strong>✓ Configuration Valid</strong><br>
<small>Security settings meet compliance requirements</small>
</div>
</div>
<div class='card-footer'>
<div class='d-flex justify-content-between'>
<button class='btn btn-outline-secondary'>← Previous</button>
<button class='btn btn-primary'>Continue →</button>
</div>
</div>
</div>
<div class='card mt-3 shadow-sm'>
<div class='card-body'>
<h6 class='text-primary'>Security Comparison</h6>
<div class='row g-2'>
<div class='col-6'>
<div class='text-center p-2 bg-success text-white rounded'>
<strong>IronPDF</strong><br>
<small>AES-256 Native</small>
</div>
</div>
<div class='col-6'>
<div class='text-center p-2 bg-warning text-dark rounded'>
<strong>iTextSharp</strong><br>
<small>Complex Setup</small>
</div>
</div>
</div>
</div>
</div>
</div>
</div>
</div>
</body>
</html>"
Dim pdf = renderer.RenderHtmlAsPdf(securityConfigForm)
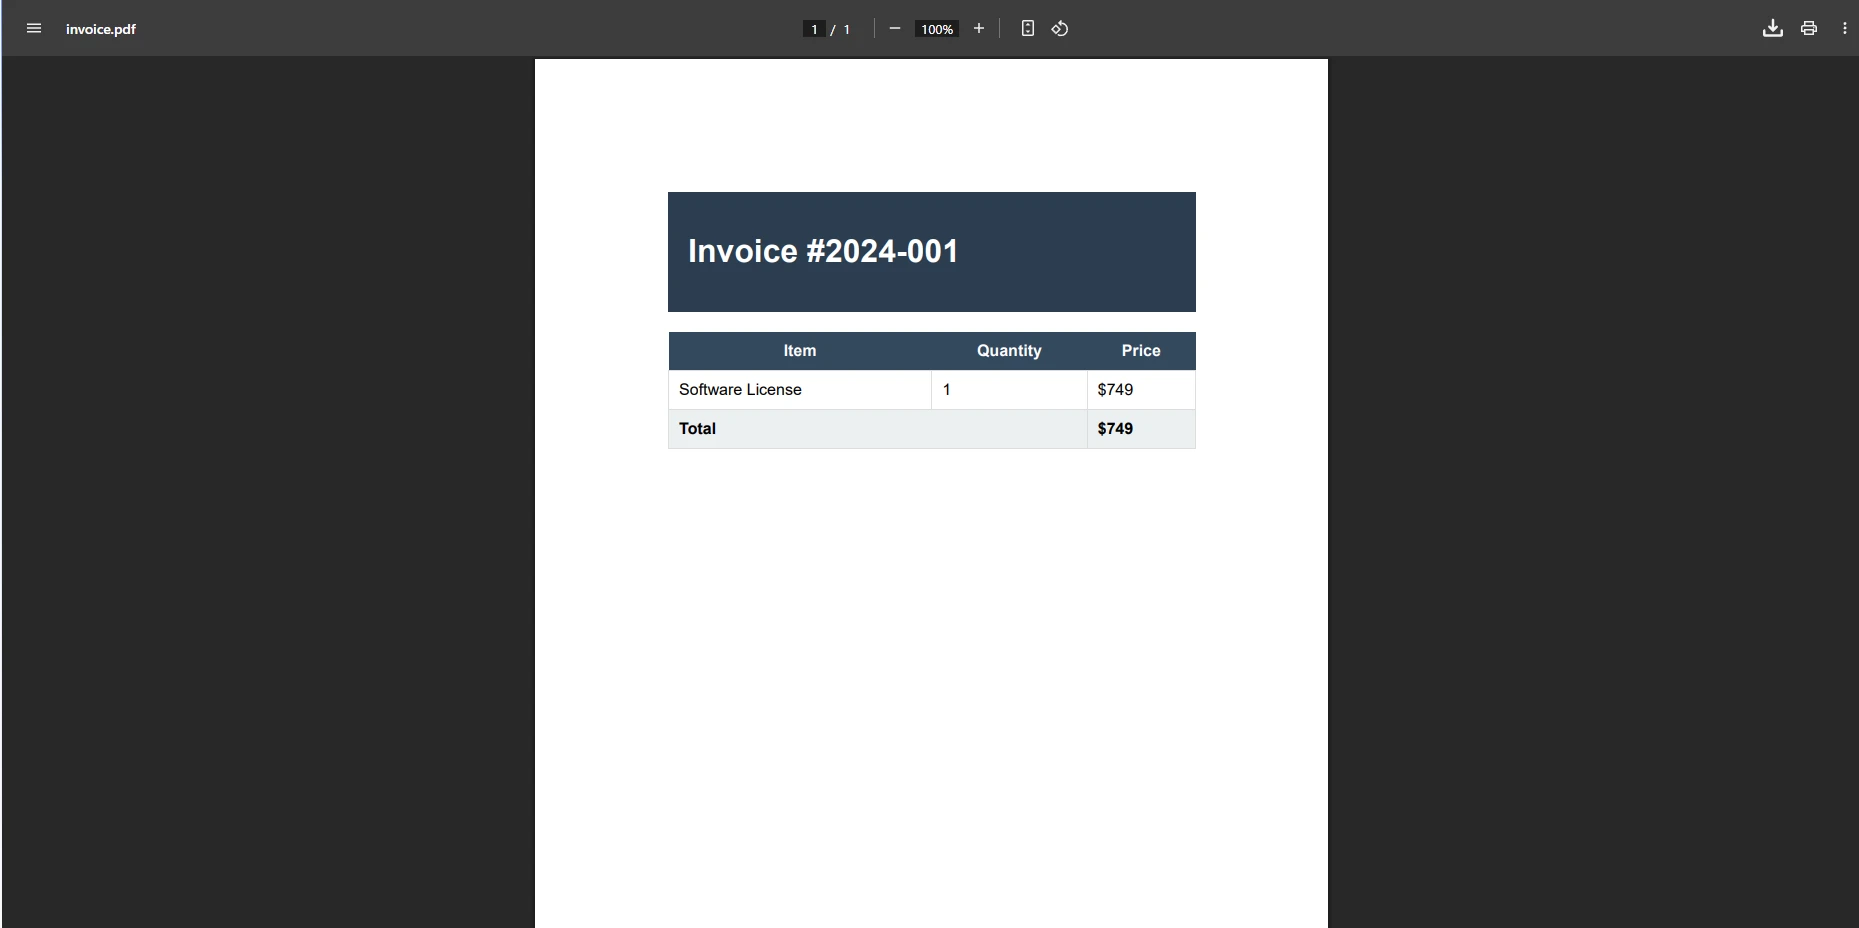
pdf.SaveAs("security-configuration.pdf")输出:一个Professional的安全配置表单 PDF,带有 Bootstrap 5 步骤指示器、表单控件、开关和验证警报。 IronPDF 以完美的保真度渲染了所有表单样式、实用工具类和交互式元素,与 iTextSharp 的编程方法相比,展示了卓越的表单渲染能力。
有关Bootstrap表单支持的更多详细信息,请参阅Bootstrap & Flexbox CSS指南。
3.使用 IronPDF 在 C# 中对 PDF 进行数字签名
包含必要的命名空间
我们首先导入处理PDF签署、证书处理和图像定位所需的命名空间。
using IronPdf;
using IronPdf.Signing;
using IronSoftware.Drawing;
using System.Security.Cryptography.X509Certificates;
using IronPdf;
using IronPdf.Signing;
using IronSoftware.Drawing;
using System.Security.Cryptography.X509Certificates;Imports IronPdf
Imports IronPdf.Signing
Imports IronSoftware.Drawing
Imports System.Security.Cryptography.X509Certificates加载您要签署的 PDF 文件
我们使用IronPDF简单的PdfDocument API从磁盘加载现有的PDF文件。 您也可以为此任务创建一个新的 PDF 文档。
var pdf = PdfDocument.FromFile("example.pdf");var pdf = PdfDocument.FromFile("example.pdf");Dim pdf = PdfDocument.FromFile("example.pdf")加载用于签名的 PFX 证书
我们加载包含私钥的 .pfx 证书。 需要使用 "可导出 "标志,以便访问签名密钥。
X509Certificate2 cert = new X509Certificate2(
    "IronSoftware.pfx",
    "Password",
    X509KeyStorageFlags.Exportable
);
X509Certificate2 cert = new X509Certificate2(
"IronSoftware.pfx",
"Password",
X509KeyStorageFlags.Exportable
);Dim cert As New X509Certificate2("IronSoftware.pfx", "Password", X509KeyStorageFlags.Exportable)使用证书创建新的 PdfSignature。
我们从加载的证书中创建一个新的PdfSignature对象。
var sig = new PdfSignature(cert);var sig = new PdfSignature(cert);Dim sig = New PdfSignature(cert)应用签名并保存输出。
我们对 PDF 进行数字签名,并将签名后的 PDF 文档保存为新文件。
pdf.Sign(sig);
pdf.SaveAs("signed.pdf");
pdf.Sign(sig);
pdf.SaveAs("signed.pdf");pdf.Sign(sig)
pdf.SaveAs("signed.pdf")输出
4.代码解释
-
IronPDF使签署过程简单易读。 您加载 PDF 文件,提供证书,然后拨打
SignPdf()。 可选元数据(联系人、地点、原因)增加了专业性。 - iTextSharp可提供更多控制,但需要对散列算法、流和证书链进行详细设置。
摘要:只需几行代码,IronPDF 就能让使用标准 .pfx 证书应用数字签名变得异常简单,无需低级加密技术。 与 iTextSharp 等库处理相同任务所需的冗长代码相比,这样更易于实现。
5.真实世界使用案例
-法务团队:自动签署根据模板生成的合同。
-财务:对发票和报告进行电子签名,以防止篡改。
-政府门户网站:提交表格前请先签名,以符合监管标准。
数字签名的最佳实践
要从数字签名实施中获得最大收益:
-使用强证书:选择 2048 位 RSA 密钥或更强的密钥。
-保护私钥安全:安全地存储证书,最好存储在硬件安全模块 (HSM) 中。
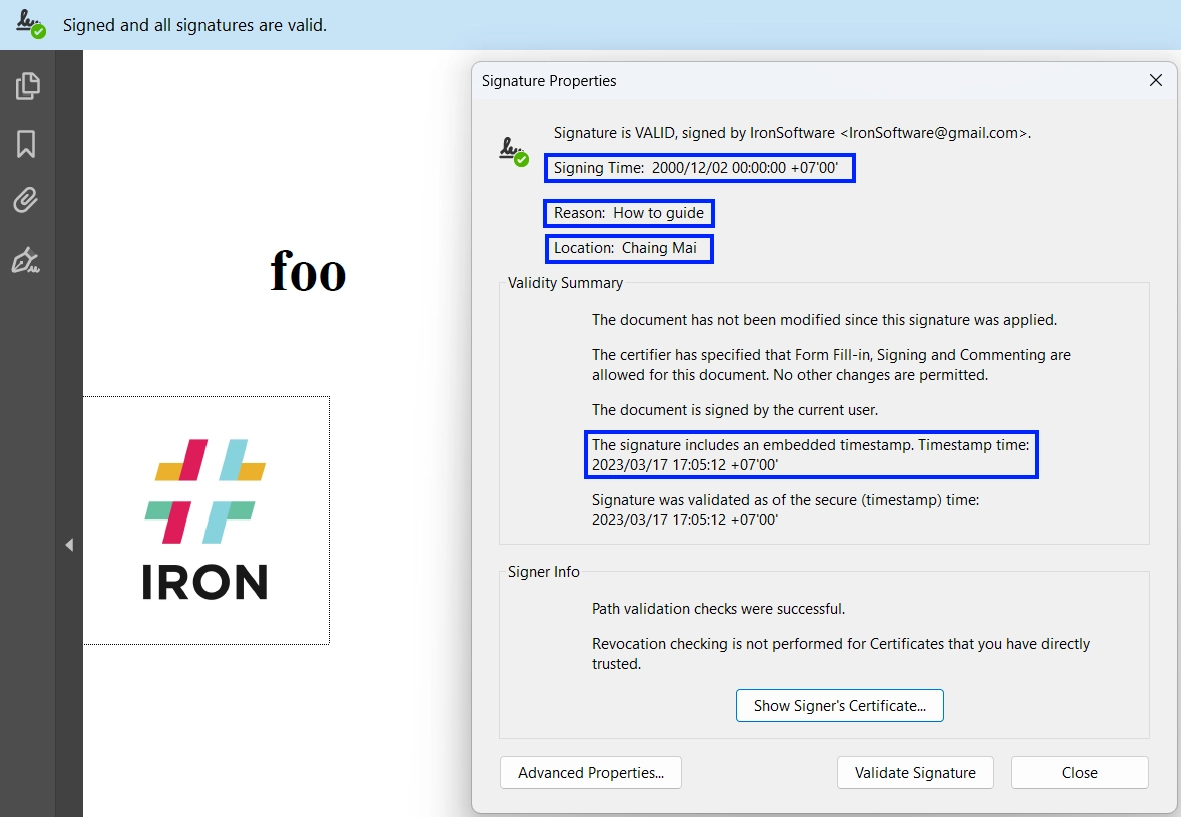
-为您的签名添加时间戳:添加可信时间戳,以确保即使证书过期,签名仍然有效。
-验证签名:在您的应用程序中加入验证功能,以检测篡改或过期的证书。
-自动化:在部署管道中安排签名操作,以确保文档完整性的一致性。
结论
在 PDF 文档中添加数字签名不再是奢侈品,而是当今注重安全的数字环境中的必需品。 无论您是要保护合同、发票、报告还是法律文件,有可信证书支持的防篡改签名都能确保您的文件保持真实性和完整性。
在本文中,我们探讨了用 C# 进行 PDF 签名的两种强大方法:
-
iTextSharp,它为您提供了底层加密控制和灵活性,但需要更多的模板并熟悉 BouncyCastle。
- IronPDF提供了一个现代化的、高级的 API,使应用安全签名的过程流畅且对开发人员友好。
这两种工具都支持安全的 .pfx 证书,但 IronPDF 显然简化了工作流程--非常适合希望花更少的时间处理加密原语、花更多的时间提供业务价值的 .NET 开发人员。
下一步
如果您还没有下载,请考虑下载 IronPDF 的免费试用版,并尝试只需几行代码就能签署自己的 PDF。 仅生产力的提升就值得切换,尤其是在处理时间敏感的项目时。
常见问题解答
数字签名如何确保 PDF 文档的真实性?
数字签名使用加密技术验证签名者的身份,并确保文档未被更改。这是通过使用私钥加密文档的哈希来实现的,既提供了身份验证又确保了完整性。
为什么数字签名对于电子文档很重要?
数字签名对于维护电子文档的合法性、安全性、效率和信任至关重要。它们确保遵守法规,防止篡改,简化文档工作流程,并确认文档的来源和完整性。
如何在 C# 中向 PDF 添加数字签名?
在 C# 中,您可以使用 IronPDF 向 PDF 添加数字签名。该过程包括加载 PDF,使用 X509Certificate2 提供 .pfx 证书,并调用 Sign 方法应用签名。
iTextSharp 和另一种 PDF 库在数字签名方面的主要区别是什么?
iTextSharp 提供详尽的 PDF 操作支持,学习曲线陡峭且需要特定许可。相比之下,IronPDF 更适合初学者,其简化的 API 允许快速实现,不需要开源许可。
如何在 C# 中安装用于签署文档的 PDF 库?
您可以使用命令 Install-Package IronPDF 通过 NuGet 安装 IronPDF,或者使用 .NET CLI 的 dotnet add package IronPDF。
使用 iTextSharp 数字签名 PDF 需要哪些步骤?
要使用 iTextSharp 数字签名 PDF,您需要配置 PdfStamper,自定义签名外观,使用 BouncyCastle 加载 .pfx 证书,并使用 PdfSigner 和 IExternalSignature 执行加密操作。
在 PDF 中实现数字签名的一些最佳实践是什么?
最佳实践包括使用强大的证书、保护私钥、对签名应用时间戳、定期验证签名,并自动化签名过程以维护文档完整性。
数字签名在 PDF 文档中的一些实际应用是什么?
数字签名通常用于法律部门签署合同、金融部门批准发票和报告、以及政府机构处理表格,以确保符合法规标准。
哪种 PDF 库更适合需要快速实施数字签名的开发人员?
对于需要快速实施数字签名的开发人员,IronPDF 是推荐的选择,因为其简单明了的 API 简化了签名过程,仅需少量代码。
IronPDF 是否兼容 .NET 10,可用于添加和验证数字签名?
是的——IronPDF 与 .NET 10 完全兼容。它支持 .NET 10(以及 .NET 9、8、7 等),其数字签名功能(例如使用PdfSignature 、 X509Certificate2 、签名和验证)在 .NET 10 运行时中开箱即用。