
How to Create a Fillable PDF in Minutes (Every Method That Works)
You have a form like a job application, a client intake sheet, an event registration and you need people to fill it out digitally with zero printing. The answer is a fillable PDF: a document with interactive text boxes, checkboxes, dropdowns, signature fields, signature boxes, and action buttons that anyone can complete on their computer or phone. You can create fillable forms from scratch or by converting existing Word files or PDFs into a fillable PDF document.
The fastest way to get there? Open your document in Adobe Acrobat, simply open your PDF document or Word file, go to Tools → Prepare Form, and let Acrobat auto-detect your fields. In under a minute, your static PDF becomes interactive. Acrobat can also convert PDF files into fillable PDF documents automatically.
But Adobe Acrobat is one of several options, and the right choice varies by situation. This guide covers every method, from free browser tools to desktop apps, so you can pick the one that fits your situation. You can create fillable PDFs using a variety of tools, and this guide will show you how to create fillable PDFs from scratch or by converting existing documents. *
What is a Fillable PDF?
A fillable PDF (also called an interactive PDF, PDF form, or fillable form) contains fillable form fields that users can type into, click, or select without editing the document itself. The underlying layout stays locked; only the designated fields are interactive. A fillable PDF document allows users to interact with designated fields electronically.
Common fillable form fields include:
- Text fields — for names, addresses, open answers
- Checkboxes — for yes/no or multi-select options
- Radio buttons — for single-choice selections
- Dropdown menus — for long lists of options
- Date pickers — for structured date input
- Signature fields — for electronic signatures
- Submit/Reset buttons — for web-connected forms
For a neat, professional layout, align your fillable form fields horizontally to ensure all elements are visually consistent and easy to read.
The right tool depends on what you’re starting from (Word doc, existing PDF, or blank page), how complex the form needs to be, and whether you want a paid or free solution.
Benefits of Using Fillable PDF Forms
Switching to fillable PDF forms brings a host of benefits for both organizations and users. First and foremost, fillable PDF forms save time by eliminating the need for printing, scanning, or mailing paper forms, users can simply fill, save, and submit their responses electronically. This digital workflow not only reduces costs but also streamlines data collection, making it easier to organize and analyze information.
With advanced form features like checkboxes, drop-down menus, and signature fields, you can create complex forms tailored to your specific needs. These interactive elements help ensure that users provide accurate and complete data, reducing errors and inconsistencies that often occur with manual entry. Fillable PDF forms also enhance the user experience by making forms easier to navigate and complete, whether on a computer or mobile device.
By adopting fillable PDF forms, businesses and organizations can create more efficient processes, improve data quality, and focus on what matters most without getting bogged down by paperwork. Whether you’re collecting registrations, applications, or feedback, fillable PDF forms are a smart way to save time, reduce hassle, and deliver a better experience for everyone involved.
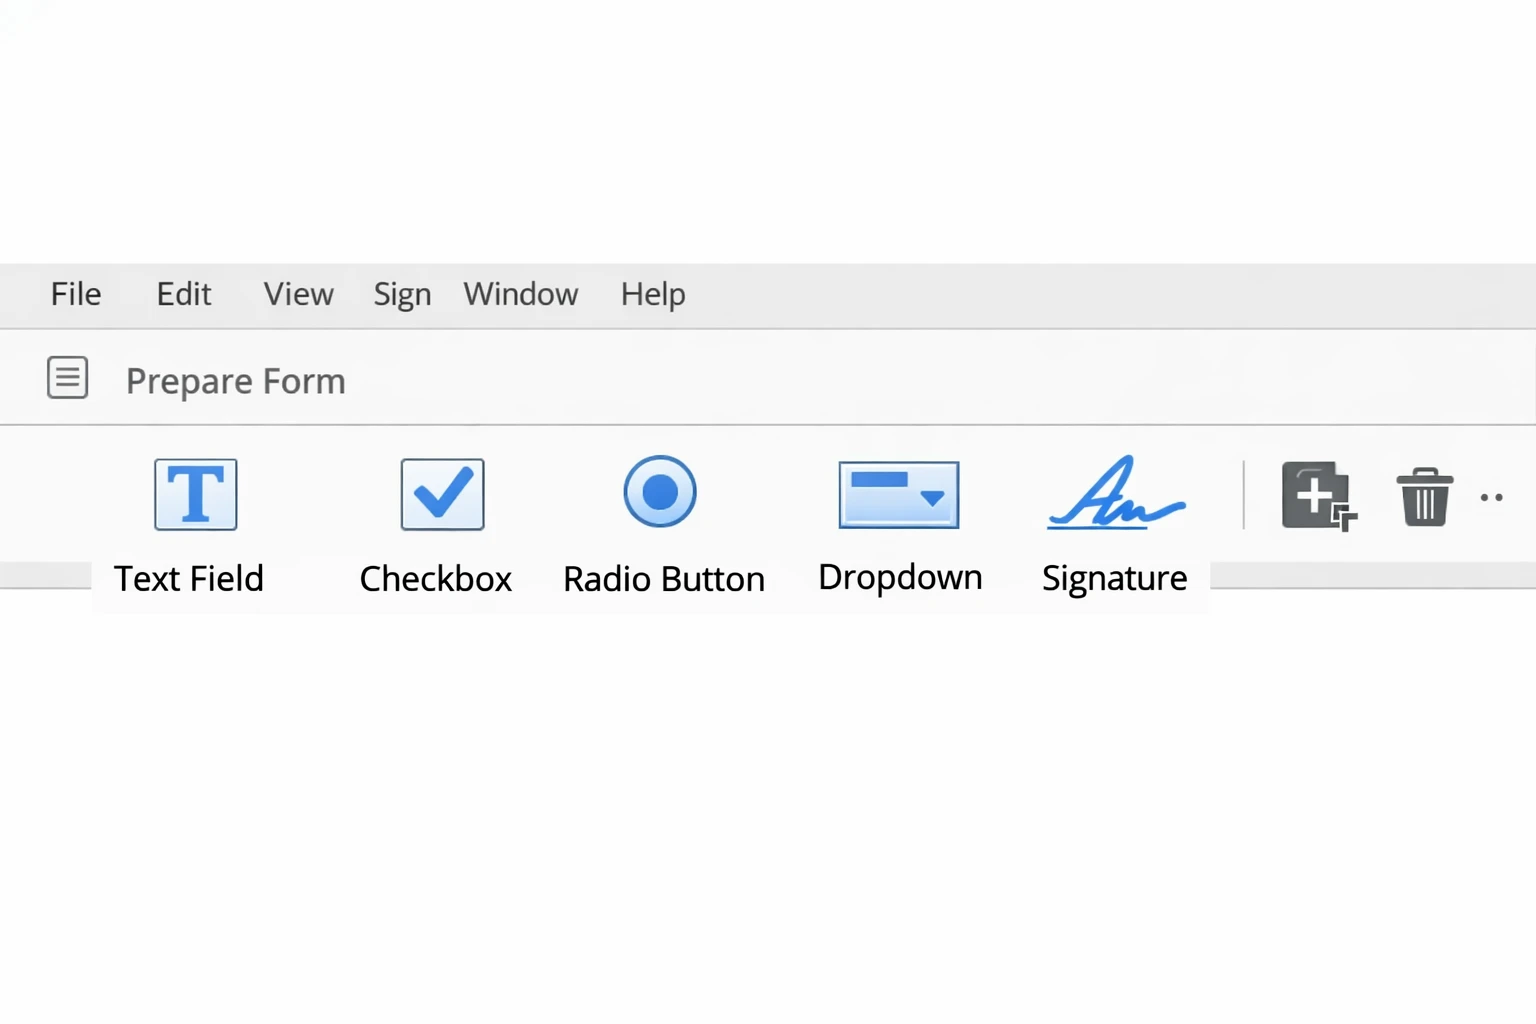
Method 1: Adobe Acrobat Pro — The Gold Standard
Best for: Anyone who works with PDFs regularly and needs reliable, professional results.
Adobe Acrobat Pro is the industry benchmark for fillable PDF creation. Its “Prepare Form” tool can automatically detect form fields from an existing layout saving a significant amount of manual work. Acrobat can automatically analyze your PDF document to identify potential form fields, streamlining the process of making your PDF interactive. Acrobat also offers powerful features for creating and editing fillable PDFs, such as editable form fields, drop-down menus, and checkboxes.
How to do it
- Open your PDF (or Word/Excel file) in Adobe Acrobat Pro.
- Go to Tools in the top menu bar and select Prepare Form.
- Acrobat will scan the document and auto-detect fields based on lines, boxes, and labels it recognizes.
- Review the suggested fields rename, resize, or delete any that are wrong.
- To add a field manually, select the field type from the toolbar at the top (Text Field, Checkbox, Radio Button, etc.) and click where you want it on the page.
- Double-click any field to open its Properties panel, here you can set the field name, font size, required status, tooltip text, and more.
- When you're done, click File → Save to save as a fillable PDF.
Setting field properties (the step most guides skip)
Right-click any field → Properties to access:
- Required field toggle — shows a red outline to the end user
- Tooltip — a helper text hint that appears on hover
- Default value — pre-fills text (e.g., "MM/DD/YYYY" in a date field)
- Validation — restrict input to numbers, dates, or custom formats
- Tab order — controls the sequence when users press Tab through the form
Distributing the form
Once saved, share the PDF by email or link, or generate a shareable link for easy distribution. Recipients can fill it out in free Adobe Acrobat Reader, they don’t need a paid subscription.
Cost: Adobe Acrobat Pro costs approximately $19.99/month (or bundled with Adobe Creative Cloud). A 7-day free trial is available.
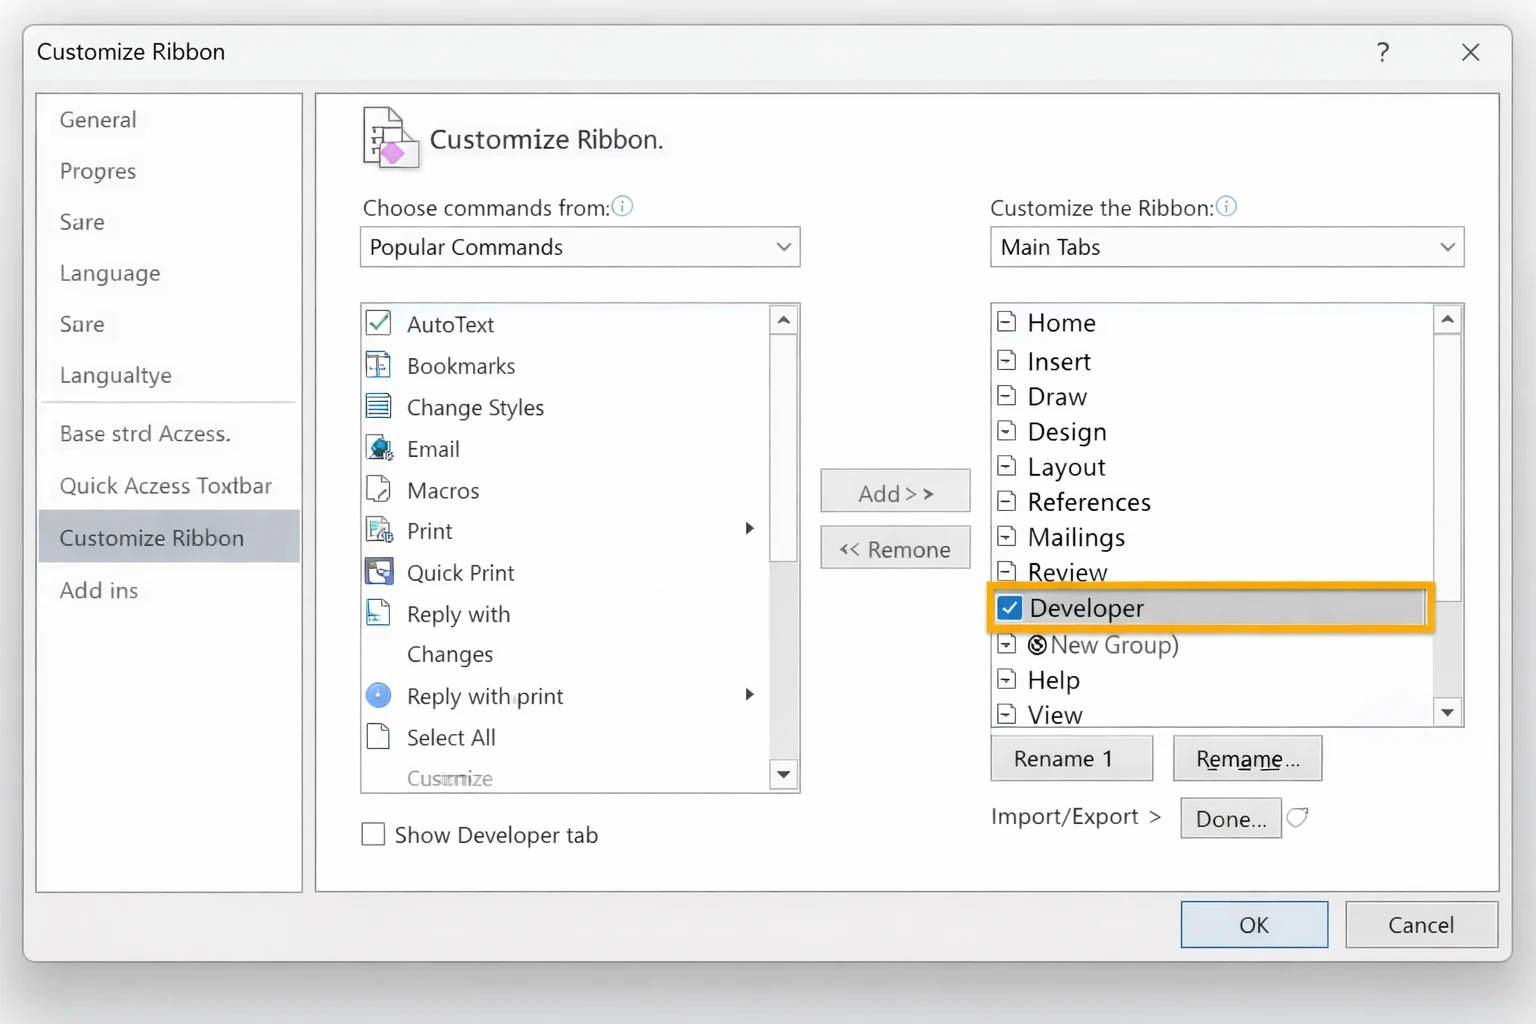
Method 2: Microsoft Word → Export as Fillable PDF
Best for: Users who already have their form designed in Word or other Word files and want a quick path to PDF without buying extra software.
Word has its own “Developer” form fields (content controls), and when you export to PDF correctly, they can transfer as interactive fields though with less control than Acrobat. You can convert PDFs from Word files using this method. For example, tools like Adobe Acrobat or LibreOffice can help convert Word files into fillable PDF forms with interactive fields.
To create a fillable PDF, you can upload a document from your device or cloud storage.
Step 1 — Enable the Developer tab
- Go to File → Options → Customize Ribbon.
- In the right column, check Developer and click OK.
- The Developer tab now appears in your ribbon.
Step 2 — Insert form controls
-
Click in your document where you want a field.
-
In the Developer tab, click the appropriate control:
-
Rich Text Content Control (Aa with lines) — for open text
-
Plain Text Content Control (Aa) — for simple text
-
Check Box Content Control — for checkboxes
- Drop-Down List Content Control — for dropdown menus
-
- Date Picker Content Control — for dates
-
- Click the field and then Properties to customize label, placeholder text, and options.
Step 3 — Protect the document (important)
In the Developer tab, click Restrict Editing → Allow only this type of editing: Filling in forms. This locks the layout and lets users only interact with the form fields.
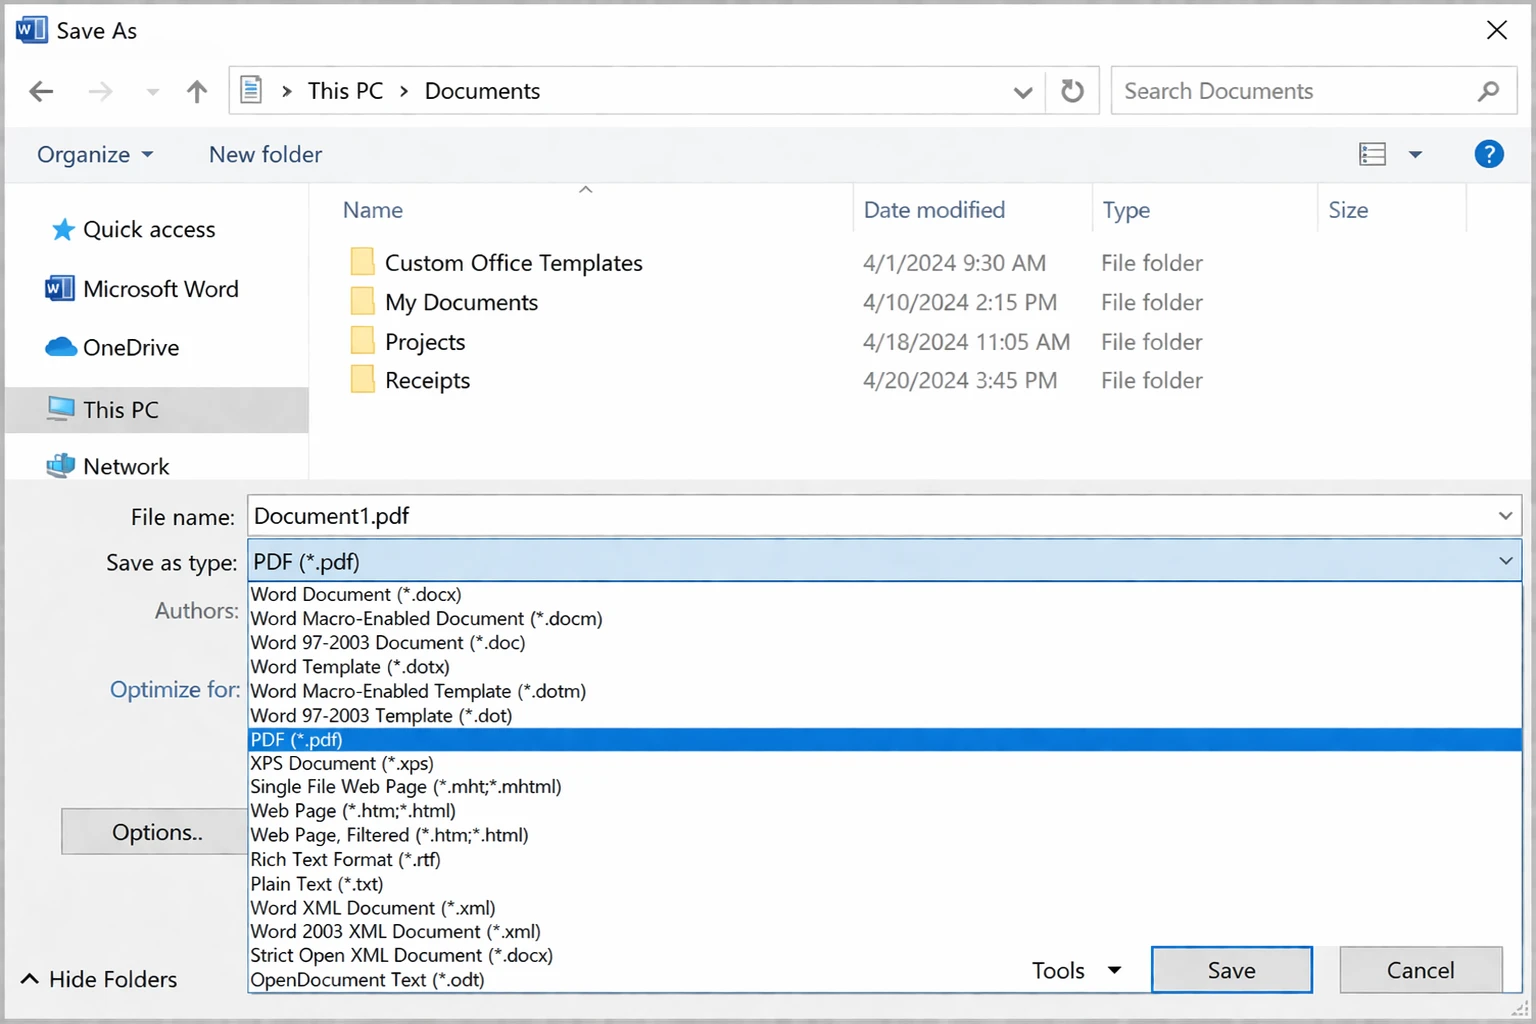
Step 4 — Export to PDF
Go to File → Save As → PDF. In the options dialog, check "Document structure tags for accessibility" and make sure "Bitmap text when fonts may not be embedded" is unchecked.
Limitation: Word-to-PDF export doesn't always preserve all field types perfectly. For complex forms, consider opening the exported PDF in Acrobat afterward to clean up or supplement fields. *
Method 3: Google Docs + Google Forms (Free)
Best for: Teams already in Google Workspace who need a quick, shareable form though technically this isn’t a traditional PDF form.
If your goal is a form people fill out online and submit, Google Forms is the simplest free option. You’ll need a Google account to create and manage your forms. You design the form in a browser, share a link, and responses land in a Google Sheet automatically.
Most online PDF editors allow users to save their documents in various formats and share them easily.
How to create a Google Form
-
Go to forms.google.com and click the + button.
- Add your questions using the question type dropdown (Short answer, Multiple choice, Checkboxes, Dropdown, Date, etc.).
-
Click the palette icon to change theme/color.
-
Click the eye icon to preview.
- Click Send to share by link, email, or embed code.
Exporting as a PDF
If you need a physical PDF version of the form structure (not interactive): File → Print → Save as PDF. This gives you a flat PDF of the form layout, which you can then make fillable in Acrobat.
Limitation: Google Forms can't produce a native interactive PDF. If you need a genuine fillable PDF file (not a web form), use another method. *
Method 4: Free Online PDF Tools
Best for: Occasional users who don’t want to install software or pay for a subscription.
Several browser-based tools let you upload a PDF and add form fields in your browser, no software installation needed. Some of these tools, like PDF24 Form Editor, do not have registration required, making it easy to start creating a fillable PDF document right away. These tools allow you to convert existing files, such as Word or Excel documents, into a PDF fillable format, so you can create interactive forms, contracts, or surveys that can be filled out electronically.
| Tool | Key Features | Registration Required? | | --- | --- | --- | | PDF24 Form Editor | Add, edit, and remove interactive form fields in PDFs without installation. | No | | Smallpdf | Simple interface, supports basic form field creation. | No | | DocFly | Drag-and-drop editor, supports text fields, checkboxes, and signatures. | No | | PDFescape | Edit PDFs, add form fields, annotate, and password-protect documents. | No |
Many PDF editing tools offer features to rearrange pages, compress files, and convert documents to and from various formats.
Top free options
| Tool | URL | What it does well | | --- | --- | --- | | PDF24 Forms | pdf24.org | Clean interface, adds text/checkbox fields | | Smallpdf | smallpdf.com | Beginner-friendly, good for simple forms | | DocHub | dochub.com | Full-featured, integrates with Google Drive | | Sejda | sejda.com | No signup required for small files | | iLovePDF | ilovepdf.com | Fast, handles larger files |
General steps (similar across tools)
-
Go to the tool's website and click Edit PDF or Create Form.
- Upload your PDF.
- Use the toolbar to add field types like text box, checkbox, dropdown, and signature.
- Click Save/Download to export the finished fillable PDF.
Privacy note: You're uploading documents to a third-party server. Avoid using these tools with documents containing sensitive personal data, financial information, or confidential business content. *
Method 5: LibreOffice Writer (Free Desktop App)
Best for: Users who want free desktop software without relying on cloud services.
LibreOffice is a powerful free office suite that supports PDF fillable export natively. With LibreOffice Writer, you can create fillable PDF forms from scratch, adding interactive fields such as text boxes, checkboxes, and dropdowns directly to your document.
PDFgear is another free all-in-one PDF solution that allows you to add text boxes, checkboxes, and dropdowns without any file size limits.
For users seeking more advanced features, Foxit PDF Editor offers a drag-and-drop designer, dynamic fields, and e-signing, while PDF-XChange Editor is known for its extensive form design tools and support for complex calculations.
How to do it
-
Design your form in LibreOffice Writer as you normally would.
-
To add interactive fields: go to View → Toolbars → Form Controls to show the form toolbar.
- Draw form controls (Text Box, Check Box, List Box, Combo Box) onto the page by clicking and dragging.
-
Right-click any control → Control Properties to configure name, default value, and options.
- When ready: File → Export as PDF.
- In the PDF Export dialog, check "Create PDF form" under the "General" tab, and choose PDF Forms as the submit format.
Limitation: Field alignment can be fiddly, and the resulting forms may render slightly differently in non-Adobe PDF readers. *
Method 6: Mac Preview (For Simple Forms on macOS)
Best for: Mac users who need to quickly add basic fillable fields to an existing PDF.
Preview on macOS has a hidden trick: it can detect and highlight potential form fields in some PDFs automatically.
Using Preview's form detection
- Open a PDF in Preview.
-
If the document has clear field layouts (lines, boxes), Preview may automatically show blue highlighted regions which are interactive fields.
- Click any blue region to start typing.
This only works on PDFs that already have some structural markup. It doesn't work on flat, image-based PDFs.
Adding fields manually in Preview
Preview doesn't support manually adding custom form fields. For that, you'll need one of the tools above.
Method 7: Convert an Existing Paper Form via Scan
Best for: When you have a physical paper form and want to digitize it.
-
Scan the paper form at 300 DPI or higher using a scanner or scanning app (Adobe Scan, Microsoft Lens, CamScanner).
- Open the scanned PDF in Adobe Acrobat Pro.
-
Go to Tools → Scan & OCR → Recognize Text — this converts the image to searchable text.
-
Then go to Tools → Prepare Form — Acrobat will now be able to detect field locations from the text layer.
- Clean up auto-detected fields and add any the tool missed. *
Best Practices for Creating a Fillable PDF
To create a fillable PDF form that’s both effective and user-friendly, start with careful planning and the right tools. Choose a reliable PDF editor such as Adobe Acrobat that offers advanced form features and makes it easy to add and customize form fields. When designing your PDF forms, use a clear, logical layout so users can easily find and fill each field.
Include a variety of form fields, such as text fields for open responses, checkboxes for multiple selections, and drop down menus for standardized choices. Make sure each field is clearly labeled and sized appropriately for the expected input. Group related fields together and use spacing to guide the user’s eye through the form.
Before sharing your fillable PDF, thoroughly test it on different devices and browsers to ensure all form fields work as intended. Consider using online tools or PDF editors like pdfFiller to create, edit, and review your fillable PDF forms. By following these best practices thoughtful layout, clear labeling, and thorough testing, you’ll create a fillable PDF that’s easy to fill, edit, and submit, providing a smooth experience for every user.
Security and Accessibility Considerations for Fillable PDFs
When you create a fillable PDF, it’s crucial to prioritize both security and accessibility to protect your data and ensure everyone can use your forms. For security, use features in Adobe Acrobat or your preferred PDF editor to encrypt your PDF forms and set password protection, preventing unauthorized access. Adding digital signatures or signature fields helps verify the identity of users and maintain the integrity of the data collected.
Accessibility is equally important. Make sure your fillable PDF is compatible with assistive technologies, such as screen readers, so users with disabilities can access and fill out your forms. Follow established guidelines like WCAG to ensure your forms are navigable and understandable for all users. Tools like Adobe Acrobat offer built-in accessibility checks and features to help you create accessible fillable PDF forms.
By addressing both security and accessibility, you ensure your fillable PDF forms are safe, trustworthy, and usable for every user no matter their needs or abilities.
Finalizing Your Fillable PDF
After you’ve created your fillable PDF form, take a few final steps to ensure it’s ready for distribution. Carefully review your fillable PDF, checking that all form fields are present, labeled correctly, and functioning as intended. Make any necessary changes to improve clarity or fix errors, and test the form on different devices to confirm compatibility.
Save your fillable PDF in a widely supported PDF format to ensure users can open and fill it on any platform. For easy sharing and collaboration, consider uploading your fillable PDF to Google Drive or another cloud storage service, or use online tools like pdfFiller to distribute your form. Provide clear instructions and helpful resources so users know how to fill out and submit the form, and offer support if they encounter any issues.
By finalizing your fillable PDF with these steps, you’ll create a smooth, professional experience for users helping you collect accurate data and streamline your workflow.
Common Issues and Troubleshooting
"Fields disappeared after saving"
This usually happens when saving as "Print to PDF" instead of "Save as PDF." Print to PDF flattens all interactivity. Always use File → Save As → PDF or your app's dedicated PDF export option.
"Recipients can't fill out the form"
Check that the PDF isn't protected or encrypted. In Acrobat: File → Properties → Security make sure filling in forms is permitted. If the document has a password restriction, you'll need to remove it first.
"Fields are in the wrong position after converting from Word"
Margins and layout can shift during Word-to-PDF conversion. Open the exported PDF in Acrobat and use Prepare Form to reposition any misaligned fields.
"The PDF is locked"
Some PDFs have editing restrictions applied by the creator. If you own the document and know the password, go to File → Properties → Security → Change Settings in Acrobat to remove restrictions.
"Scanned form isn't detecting fields"
The scan quality may be too low, or the form has a complex layout. Try re-scanning at higher resolution (300–600 DPI), increasing contrast, and straightening the page. Then re-run OCR in Acrobat before using Prepare Form.
"Checkboxes in the form all toggle together (radio button behavior)"
In Acrobat, radio buttons in the same group share a name, that's intentional. If you want independent checkboxes, make sure each checkbox has a unique field name in its Properties.
"The form looks different on mobile"
PDF form rendering varies across mobile apps. Adobe Acrobat Reader (free, iOS and Android) gives the most consistent results. Test your form in Acrobat Reader before distributing.
"Users are saving a blank copy instead of their filled version"
Add a note to your form instructions: "After filling out, use File → Save As to save a copy with your entries." Some PDF readers default to saving the original template.
For Developers: Create Fillable PDFs Programmatically with IronPDF
If you're building an application that needs to generate fillable PDFs at scale, pre-populated intake forms, dynamic contracts, auto-generated reports with input fields, doing it manually in Acrobat doesn't scale. That's where IronPDF comes in.
IronPDF is a .NET library that lets you create, edit, and fill PDF forms programmatically in C# or VB.NET. You can generate a PDF from HTML (including standard ,