How to Reduce PDF File Size: Every Method That Actually Works
If your PDF is too large to email, upload, or share, you are not alone. Bloated PDF files are one of the most common frustrations in any modern workplace. Large PDF files can be difficult to share, upload, or store due to size limits imposed by email and cloud services. This guide covers every method worth knowing, from the fastest one-click approach to more advanced options for stubborn files, helping you create a smaller version of your large PDFs for easier sharing and storage.
Reducing PDF file size improves upload speeds, saves storage, and ensures documents are email-friendly.
Introduction to PDF Compression
PDF compression is the process of reducing the size of a PDF file to make it easier to upload, share, and store. By compressing a PDF, you can significantly decrease the file size without losing quality, which is especially important when dealing with large documents or limited storage space. Effective PDF compression ensures that your files remain accessible and quick to transfer, whether you’re sending them via email, uploading to the web, or archiving for future use. The main goal is to strike a balance between minimizing the size of a PDF and maintaining the image quality and integrity of the document. With the right compression techniques, you can optimize your PDF files for faster access and smoother collaboration, all while preserving the essential quality and content of your files.
Choosing the Right Tool
Selecting the best tool to compress PDF files is key to achieving the smallest possible file size without compromising quality. Adobe Acrobat is a popular choice, offering advanced PDF compression features and the powerful Optimize PDF tool, which lets you fine-tune settings for the perfect balance between file size and quality. Canva Pro and various online services also provide user-friendly solutions for reducing PDF file size quickly and efficiently. When choosing a PDF compression tool, consider factors such as ease of use, available compression levels, and the ability to customize optimization settings. Tools like Adobe Acrobat give you full control over the compression process, allowing you to adjust image quality, remove unnecessary elements, and ensure your final PDF meets your needs. Whether you prefer a desktop application or an online service, the right tool will help you optimize your PDF files for any situation.
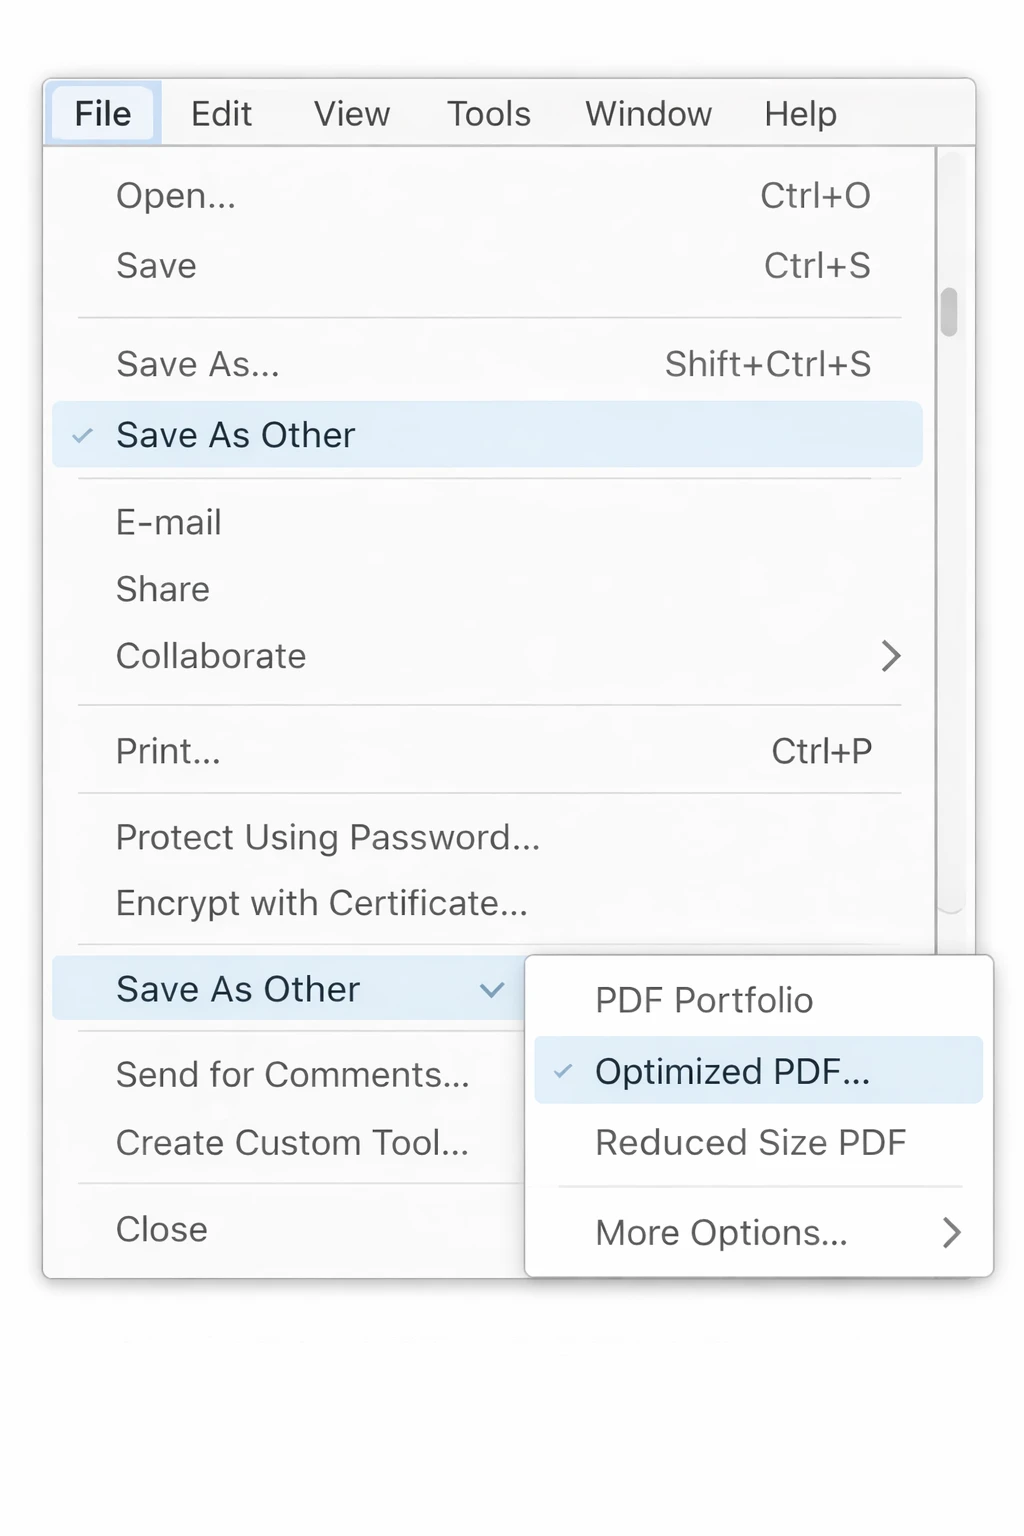
The Fastest Method: Save as Optimized PDF in Adobe Acrobat
If you have the paid Adobe Acrobat app, this is the quickest path to a smaller file with the least effort.
- Open your PDF in Adobe Acrobat.
-
Go to File in the top menu bar.
-
Select Save As Other, then choose Reduced Size PDF or Optimized PDF.
- Choose your compatibility setting (newer versions compress better; older versions support more devices).
- Click OK and save the file.
Adobe Acrobat offers several built-in features to reduce the size of your PDF files, making it easy to generate a compressed file for sharing or storage.
That is it. For most everyday documents, this single step will cut the file size by 30 to 60 percent without any visible quality loss. If you use Adobe's online tool, you can download the compressed PDF without sharing any personal information.
Method 2: Use the PDF Optimizer (Acrobat Pro)
For more control, the PDF Optimizer in Acrobat Pro lets you target exactly what is making your file large.
- Open the PDF in Acrobat Pro.
- Go to File > Save As Other > Optimized PDF.
-
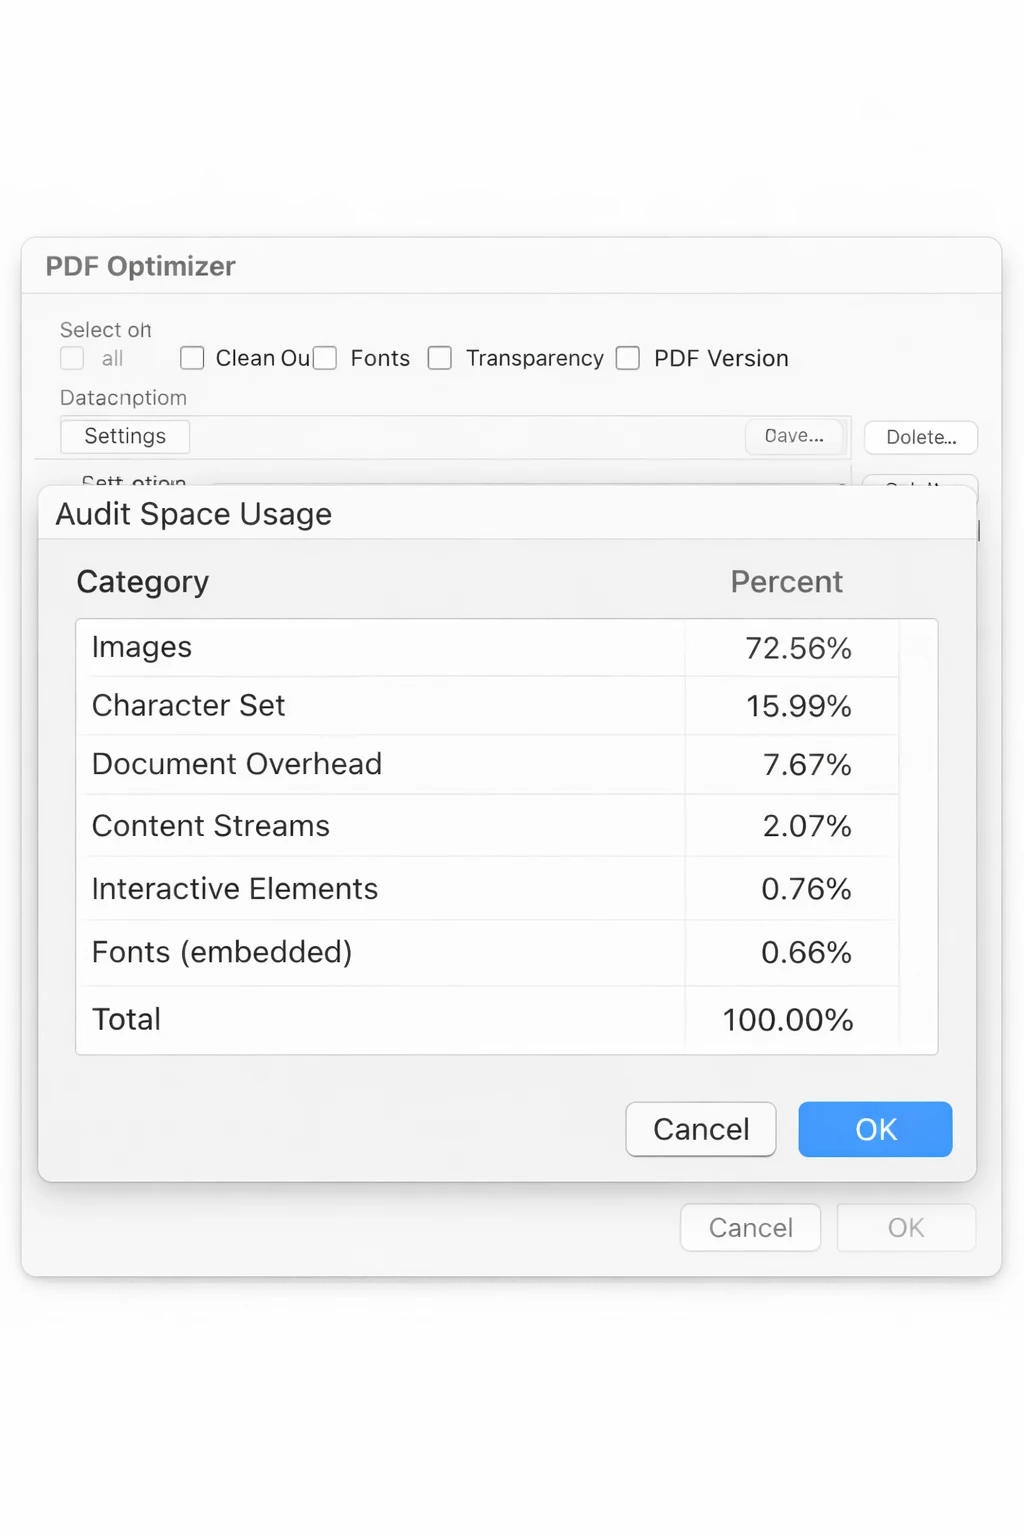
Click Audit Space Usage in the top-right of the dialog. This shows you a breakdown of what is consuming file size: images, fonts, embedded content, and so on.
-
Adjust the sliders and checkboxes for each category:
-
Images — Reduce DPI for color and grayscale images (150 DPI is fine for screen viewing; 300 DPI for print).
-
Fonts — Uncheck "Embed all fonts" if recipients are unlikely to need them.
-
Transparency — Flatten transparency to reduce rendering complexity.
- Discard Objects — Remove embedded thumbnails, JavaScript, form actions, and metadata you do not need.
-
- Clean Up — Remove deleted content, compression artifacts, and redundant objects.
-
- Click OK and save.
This is the most powerful method available inside Acrobat. It gives you surgical control over every contributing factor. *
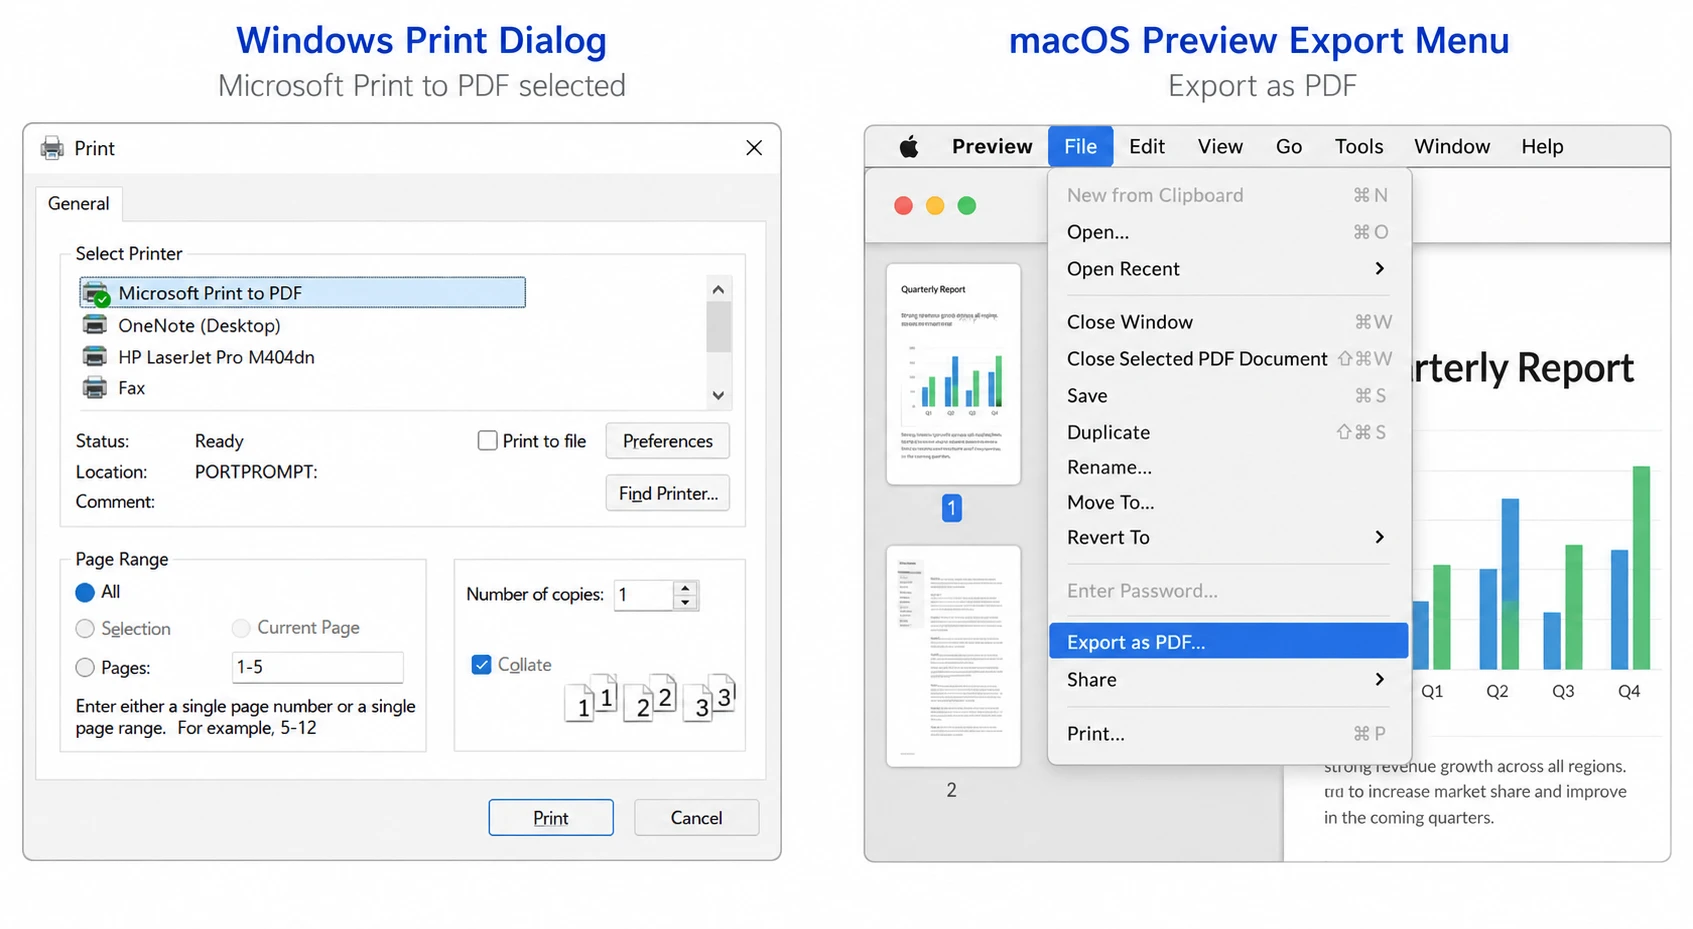
Method 3: Compress via the Acrobat Print Dialog (No Pro Required)
If you only have the standard version of Acrobat, you can still compress using the print-to-PDF trick.
-
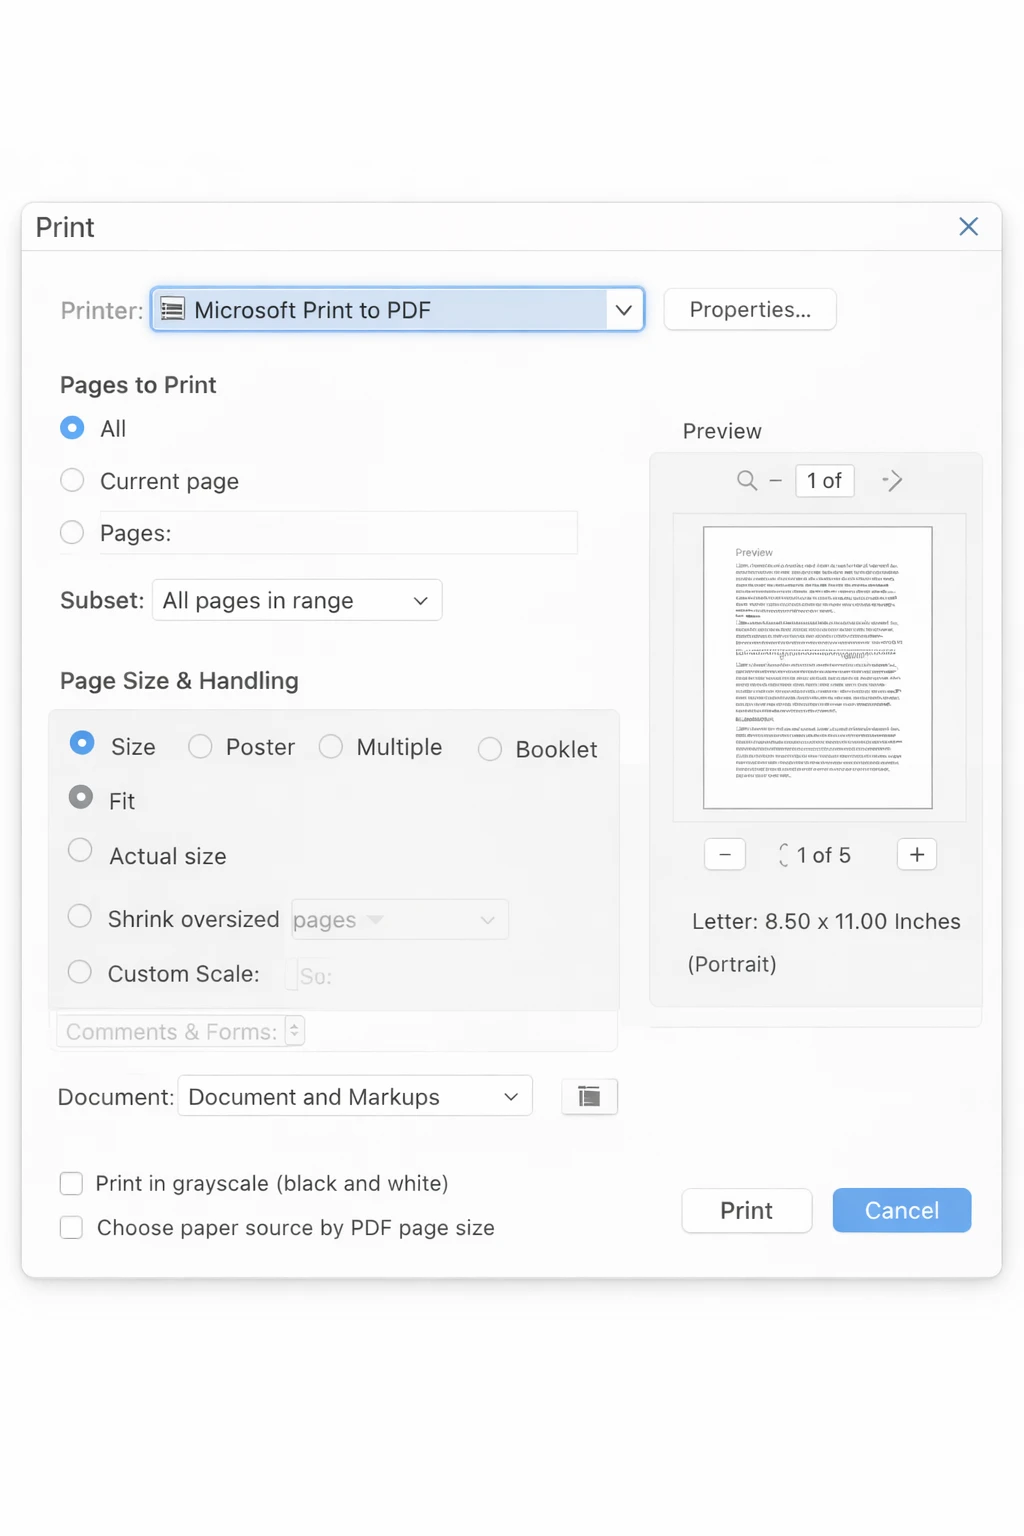
Open the PDF in Adobe Acrobat Reader or any PDF viewer.
-
Press Ctrl + P (Windows) or Cmd + P (Mac) to open the Print dialog.
-
Set the printer to Microsoft Print to PDF (Windows) or Save as PDF (Mac).
- Click Print and save the output file.
The resulting file is re-rendered at screen resolution, which strips out excess metadata and compresses embedded images. This approach may result in lower quality images or graphics compared to the original export. Printing to Microsoft Print to PDF generally results in smaller file sizes than exporting directly from Excel, and saving a PDF directly from Word or Excel usually results in a larger file size than printing to a PDF writer. This method gives you less control than the Optimizer, but it works on any computer without paid software.
Method 4: Reduce PDF Size Using Microsoft Word
If your PDF originally came from a Word document, or an Excel spreadsheet exported to PDF, the easiest fix is to go back to the source.
-
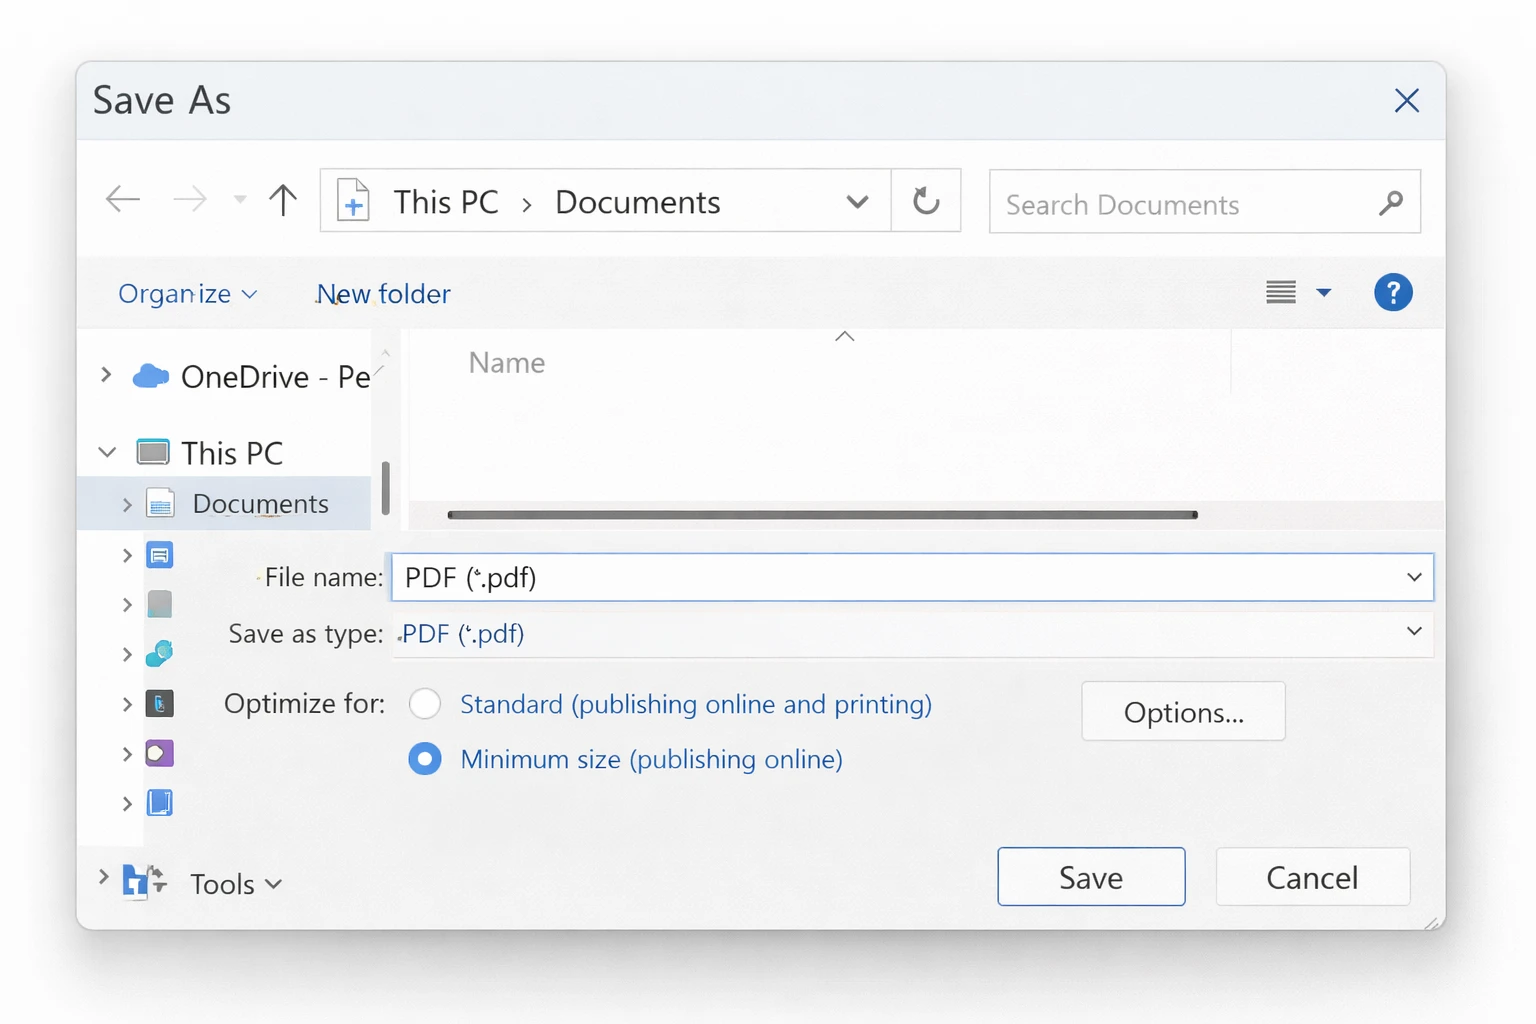
Open the original .DOCX file in Microsoft Word (or the original spreadsheet in Excel).
-
Go to File > Save As and select PDF as the file format.
-
Before clicking Save, click Options (or More options).
-
Under Optimize for, select Minimum size (publishing online) instead of “Standard.”
- Save the file.
This re-exports the PDF with web-optimized compression settings, which is typically much smaller than the original export. If you scanned images into the Word document, also reduce their resolution before exporting by right-clicking each image and selecting Compress Pictures.
Compressing a PDF can reduce its file size while maintaining the quality of text and images.
Method 5: Compress a PDF Using Preview on Mac
Mac users have everything built in — the Preview app includes a compression filter.
- Open the PDF in Preview.
-
Go to File > Export (not "Save As").
- In the Format dropdown, select PDF.
-
Open the Quartz Filter dropdown and select Reduce File Size.
- Click Save.
A word of caution: the Reduce File Size filter in Preview can be aggressive. It sometimes downgrades image quality more than you want. If the result looks poor, use one of the online tools below or create a custom Quartz filter with a gentler setting via ColorSync Utility (covered in the troubleshooting section). *
Method 6: Use a Free Online PDF Compressor
If you do not have Acrobat and are on Windows, free online tools are a practical option for one-off files.
Popular options include Smallpdf, ILovePDF, Compress2Go, and Adobe’s own free web tool. The process is similar across all of them:
- Go to the tool’s website and navigate to the PDF compress section.
-
Simply upload your PDF by dragging it in or clicking Choose File for quick compression.
- Select a compression level (usually labeled Low, Medium, or High, or a quality percentage).
- Click Compress and download the result.
Many online tools help you reduce file size to stay within size limits for email attachments or storage needs. Adobe's PDF compressor can handle files up to 2GB, and you can choose between High, Medium, and Low compression levels in Acrobat's online tool.
Privacy note: Be cautious about uploading sensitive or confidential documents to third-party websites. For internal company documents, use a desktop method instead or check whether your organization has an approved online tool.
Method 7: Compress PDF Using Google Drive
If your file is already in Google Drive, or if you want a free, privacy-friendlier online option, Google's conversion pathway reduces size as a side effect.
- Upload the PDF to Google Drive.
- Right-click the file and select Open with > Google Docs.
- Once it opens in Google Docs, go to File > Download > PDF Document.
- Save the downloaded file.
The re-export process re-renders the content and typically produces a smaller file. Note that highly formatted documents with complex layouts may look slightly different after this process, so compare the result with the original before using it. *
Method 8: Compress PDF Images Specifically
A large PDF is almost always caused by high-resolution images. If the Optimizer is not available, targeting images directly is the most effective manual approach.
In Acrobat Pro:
- Go to Tools > Edit PDF.
- Click on an image in the document.
-
In the right panel, click Edit Image (this opens the image in Photoshop or a linked editor).
- Reduce the image resolution or dimensions, then save.
- Back in Acrobat, save the PDF.
Alternative — Remove and re-insert images at lower resolution: If you built the document in Word, PowerPoint, or InDesign, go back to the source file. Select each image, right-click and choose Format Picture > Compress Pictures, and set the resolution to Email (96 ppi) or Web (150 ppi). Re-export to PDF. *
Method 9: Reduce PDF Size in Adobe InDesign (For Designed Documents)
If your PDF came from InDesign, you have control over export compression from the source.
- Open the InDesign file.
-
Go to File > Adobe PDF Presets and choose Smallest File Size from the list.
-
In the export dialog, navigate to the Compression tab and reduce image resolution settings.
- Click Export.
Exported PDFs from InDesign with the "Smallest File Size" preset are typically significantly smaller than those exported with the standard "High Quality Print" preset. *
Method 10: Flatten Layers and Transparency
Documents created in design tools like Illustrator or InDesign sometimes retain editable layers and live transparency effects, which add significant file weight. Flattening removes these without affecting the visual output.
In Adobe Acrobat Pro:
-
Go to Tools > Print Production > Flattener Preview or use PDF Optimizer > Transparency.
- Set the flattening level to High and apply.
In Adobe Illustrator (before export):
- Go to Object > Flatten Transparency.
- Set the Raster/Vector Balance to 100 (fully rasterized) if file size is the priority.
- Export to PDF. *
Method 11: Remove Embedded Fonts
Fonts embedded in PDFs for precise rendering can account for a surprisingly large portion of file size, especially in documents using many typefaces or custom fonts.
In Acrobat Pro PDF Optimizer:
- Go to File > Save As Other > Optimized PDF.
-
Click the Fonts tab on the left.
- Move fonts from the "Fonts to embed" list to "Fonts to unembed."
- Save.
Only do this if the recipient's computer is likely to have the same fonts installed, or if you do not need pixel-perfect font matching. *
Method 12: Split the PDF Into Smaller Parts
If none of the compression methods brings the file within your size limit, consider whether you need to send the whole document at once. Splitting the PDF into logical sections is sometimes the most practical answer.
In Acrobat:
- Go to Tools > Organize Pages.
-
Click Split at the top.
- Choose to split by number of pages, file size, or top-level bookmarks.
- Save the parts.
Free online alternative: ILovePDF and Smallpdf both offer free split tools. Upload, split by page range, and download the parts. *
Avoiding Quality Loss
When you reduce PDF file size, it’s important to avoid compromising quality, especially if your document contains images or graphics. To maintain high image quality, use compression techniques such as downsampling images to an appropriate resolution for web viewing or print, and opt for lossless compression whenever possible. Removing unnecessary metadata and embedded elements can also help shrink file size without affecting the visual appearance of your PDF. Tools like Adobe’s PDF Optimizer provide granular control over compression settings, allowing you to optimize your PDF for specific uses whether you need a crisp print version or a lightweight file for web sharing. By carefully adjusting these settings, you can compress your PDF files while preserving the clarity and integrity of your images and text, ensuring your document remains professional and easy to read.
Common Issues and Troubleshooting
The file barely gets smaller after compression. This usually means the content is already compressed, or the bulk of the file is vector graphics or text rather than images. Raster graphics (photos) and raster effects (such as drop shadows and glows) are often the biggest contributors to PDF file size, so if your PDF contains these, they may be limiting how much you can reduce the size. Try the PDF Optimizer’s Audit Space Usage feature to identify what is actually large. If it is fonts, follow Method 11. If it is embedded attachments (other files embedded within the PDF), go to Document > Embedded Files in Acrobat and remove them.
The PDF looks blurry after compression. The compression settings reduced image quality too aggressively. In Acrobat’s PDF Optimizer, increase the minimum image quality or set a higher DPI floor (e.g., 150 DPI minimum instead of 72). If you used Preview on Mac with the Reduce File Size filter, try a custom Quartz filter instead: open ColorSync Utility, click the Filters tab, duplicate the “Reduce File Size” filter, and adjust the image quality slider up to 50 or 60 percent.
The compressed PDF fails to open or shows errors. This can happen when the optimization removes content that the file still references internally. Open the original file, use a lighter compression setting, and avoid stripping metadata if the PDF has form fields or interactive elements that depend on it.
The file is large but has no images, it is all text. Scanned documents saved as image-only PDFs are a common culprit. Each page is literally a photo of text rather than actual searchable text. To fix this properly, run OCR (optical character recognition) on the file first: in Acrobat, go to Tools > Scan & OCR > Recognize Text. After OCR, the text layers compress far more efficiently than raw image data, and the file size will drop dramatically.
Mac Preview’s Reduce File Size produces a file larger than the original. This is a known bug that occurs when the source PDF is already well-compressed. Preview’s Quartz filter adds its own overhead in this case. Use an online tool or, if you have Acrobat, use the PDF Optimizer instead.
Compression removes digital signatures or form data. Certain optimization processes strip interactive elements. Always keep a copy of the original signed or fillable PDF. For sending purposes, create a compressed copy and retain the original for archival.
Quick Comparison: Which Method to Use
| Situation | Best Method | | --- | --- | | Have Acrobat Pro, need fast result | File > Save As Other > Reduced Size PDF | | Need precise control over what is compressed | Acrobat PDF Optimizer | | On a Mac with no paid software | Preview > Export > Quartz Filter | | On Windows with no paid software | Print to PDF (Ctrl+P) or online tool | | Document came from Word or PowerPoint | Re-export from source with "Minimum size" | | File is mostly scanned images | Run OCR first, then compress | | File still too large after compression | Split into sections | | Confidential document, no online tools | Acrobat or Preview desktop methods only |
Best Practices for PDF Management
Efficient PDF management goes beyond just compressing files, it’s about keeping your documents organized, accessible, and optimized for every use case. Always keep an original, uncompressed version of important PDFs in case you need to revert changes or create a higher-quality version later. Regularly review and optimize your PDF files to ensure they don’t take up unnecessary storage space, especially if you handle large volumes of documents. Use clear naming conventions and folder structures to make files easy to find and share. When compressing PDFs, choose the right settings for your intended use, lower file size for web and email, higher quality for print. Finally, stay up to date with the latest PDF tools and features, such as the PDF Optimizer in Adobe Acrobat, to take full advantage of new ways to reduce file size and streamline your workflow. By following these best practices, you’ll ensure your PDF files remain manageable, high-quality, and ready for any task.
For Developers: Compress PDFs Programmatically with IronPDF
If you are building an application or workflow that processes PDFs at scale, handling file size compression in code gives you far more control than any GUI tool. IronPDF is a .NET library that lets developers render, manipulate, and compress PDF files directly from C# or VB.NET, no Acrobat required, no user interaction needed.
Here is a simple example that opens an existing PDF and saves it with compressed image quality settings:
using IronPdf;
// Load the existing PDF
var pdf = PdfDocument.FromFile("original-document.pdf");
// Configure compression settings
pdf.CompressImages(60); // Compress images to 60% quality
// Optionally scale down very large images
pdf.ScaleImages(0.8); // Scale to 80% of original dimensions
// Save the optimized file
pdf.SaveAs("compressed-document.pdf");
using IronPdf;
// Load the existing PDF
var pdf = PdfDocument.FromFile("original-document.pdf");
// Configure compression settings
pdf.CompressImages(60); // Compress images to 60% quality
// Optionally scale down very large images
pdf.ScaleImages(0.8); // Scale to 80% of original dimensions
// Save the optimized file
pdf.SaveAs("compressed-document.pdf");Imports IronPdf
' Load the existing PDF
Dim pdf = PdfDocument.FromFile("original-document.pdf")
' Configure compression settings
pdf.CompressImages(60) ' Compress images to 60% quality
' Optionally scale down very large images
pdf.ScaleImages(0.8) ' Scale to 80% of original dimensions
' Save the optimized file
pdf.SaveAs("compressed-document.pdf")This approach is particularly useful for document management systems, automated report pipelines, or any scenario where PDFs are generated and distributed programmatically. You can apply different compression levels based on file type, destination (email vs. archive), or document category, all without manual intervention.
IronPDF also handles PDF generation from HTML, merging, splitting, watermarking, and much more, making it a practical choice for teams that work with PDFs as part of a larger application.