Python PDF 到图像的转换 Copy for LLMs Copy page as Markdown for LLMs
# Python PDF 到图像的转换
PDF到图像转换是Python应用程序中的常见需求。 开发者使用它来生成文档缩略图、Web预览,并将PDF内容输入图像处理管道。 [IronPDF for Python](https://ironpdf.com/python/docs/)提供了`RasterizeToImageFiles`方法,该方法可以将任何PDF文档(或URL)转换为具有可配置DPI和尺寸的JPEG、PNG或TIFF图像文件。
本指南展示了如何在Python中将PDF文件转换为图像、如何控制输出质量以及如何调整生成的图像以满足布局约束。
*as-heading:2(快速入门:将PDF转换为图像)*
1. 安装IronPDF: `pip install ironpdf`
2. 加载一个PDF文档: `pdf = PdfDocument.FromFile("document.pdf")`
3. 将每一页转换为PNG: `pdf.RasterizeToImageFiles("output/*.png", DPI=96)`
```python
#:path=/static-assets/pdf/content-code-examples/how-to/python-pdf-to-image/quickstart.py
from ironpdf import PdfDocument

pdf = PdfDocument.FromFile("document.pdf")
pdf.RasterizeToImageFiles("output/*.png", DPI=96)
```
<div class="hsg-featured-snippet">
<h3>如何在 Python 中将 PDF 转换为图像</h3>
<ol>
<li><a class="js-modal-open" data-modal-id="download-modal" href="#download-modal">安装IronPDF Python库</a></li>
<li>用<code>PdfDocument.FromFile</code>加载PDF或用<code>ChromePdfRenderer</code>从URL渲染</li>
<li>用输出路径模式(例如,<code>output/*.png</code>)调用<code>RasterizeToImageFiles</code></li>
<li>设置<code>DPI</code>以控制图像质量——值越高,输出越清晰</li>
<li>使用<code>ImageMaxWidth</code>和<code>ImageMaxHeight</code>来约束输出尺寸</li>
</ol>
</div>
## 为什么开发者将PDF转换为图像?
PDF到图像的转换解决了软件开发中的若干实际问题。 最常见的需求是预览生成——在Web界面或移动应用程序中显示PDF文档的缩略图,而无需用户下载并打开完整文件。
其他常见用例包括:
- **机器学习管道**:OCR模型、布局分析工具和计算机视觉系统接受图像输入,而非PDF
- **档案和合规性**:在原始PDF旁边存储视觉快照,以确保长时间可读,即使PDF查看器发生变化
- **报告嵌入**:将特定PDF页面作为图像包含在其他文档或电子邮件模板中
- **自动化测试**:通过比较渲染页面快照,检测PDF输出的视觉回归
Python的标准库不包括原生的PDF到图像功能。 像[`pdf2image`](https://pypi.org/project/pdf2image/)这样的工具需要安装Poppler作为外部二进制文件,这增加了部署的复杂性。 IronPDF内部处理渲染,因此将PDF到图像转换添加到任何Python项目中只需要一个`pip install`。
[[i:(IronPDF使用基于Chromium的渲染引擎。HTML渲染的PDF生成看起来与浏览器显示完全相同的图像,这在PDF源自HTML或URL时很有用。)]]
## 如何将PDF文件转换为图像?
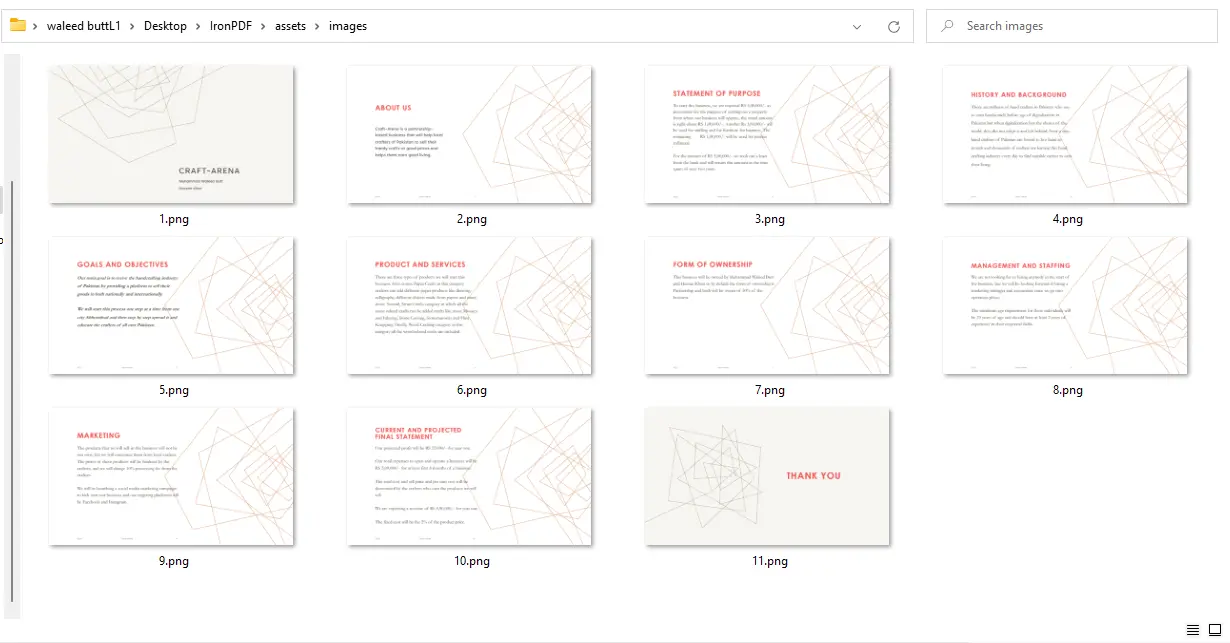
要将PDF转换为图像,在`RasterizeToImageFiles`。 该方法将每页生成一个图像文件写入指定目录。 输出路径中的星号(`assets/images/2.png`依此类推。
在调用该方法之前创建输出目录。 如果不存在,IronPDF不会自动创建。
```python
#:path=/static-assets/pdf/content-code-examples/how-to/python-pdf-to-image/convert-pdf-to-images.py
from ironpdf import PdfDocument

# Load a PDF from disk
pdf = PdfDocument.FromFile("my-content.pdf")

# Write each page to a PNG file in the "assets/images" folder
# The folder must exist before calling this method
pdf.RasterizeToImageFiles("assets/images/*.png", DPI=96)
```
`DPI`参数控制图像分辨率。 更高的DPI产生更清晰的图像,但代价是文件大小更大和处理时间更长。标准值包括:
<table class="content__data-table" data-content-table>
<caption>DPI值及其典型用例</caption>
<thead>
<tr><th>DPI</th><th>典型用途</th></tr>
</thead>
<tbody>
<tr><td>72</td><td>屏幕分辨率,快速处理</td></tr>
<tr><td>96</td><td>标准Web质量</td></tr>
<tr><td>150</td><td>良好的打印质量</td></tr>
<tr><td>300</td><td>高质量的打印输出</td></tr>
</tbody>
</table>
<div class="content-img-align-center">
<div class="center-image-wrapper">
<img src="/static-assets/ironpdf-java/howto/java-pdf-to-image/java-pdf-to-image-5.webp" alt="文件资源管理器显示由 RasterizeToImageFiles 从 11 页 PDF 生成的编号 PNG 输出文件(1.png 到 11.png)" class="img-responsive add-shadow" />
<p class="content__image-caption">每个PDF页面生成一个PNG文件的输出目录</p>
</div>
</div>
如果输出图像显得模糊,请增加`DPI`值。 在一个50页的文档上处理300 DPI明显比96 DPI要耗时更久——请根据用例的实际质量需求做出选择。
[[t:(对于Web缩略图生成,96 DPI就足够了,并保持文件尺寸小。 为将要打印或以全尺寸显示的情况预留150-300 DPI。)]]
### 如何将特定页面范围转换为图像?
为了只转换一部分页面,将页面索引作为第二个参数传递给`RasterizeToImageFiles`。 页面索引是从0开始的整数。
```python
#:path=/static-assets/pdf/content-code-examples/how-to/python-pdf-to-image/convert-page-range.py
from ironpdf import PdfDocument

pdf = PdfDocument.FromFile("my-content.pdf")

# Convert only pages 1, 2, and 3 (zero-based indices: 0, 1, 2)
pdf.RasterizeToImageFiles("assets/images/*.png", [0, 1, 2], DPI=96)
```
选择性页面提取对仅需预览前几页的文档很有用,避免不必要地处理整个文件。对于[提取PDF中已嵌入的图像](https://ironpdf.com/how-to/extract-text-and-images/)的工作流,IronPDF提供了单独的提取方法。
## 如何将URL转换为图像?
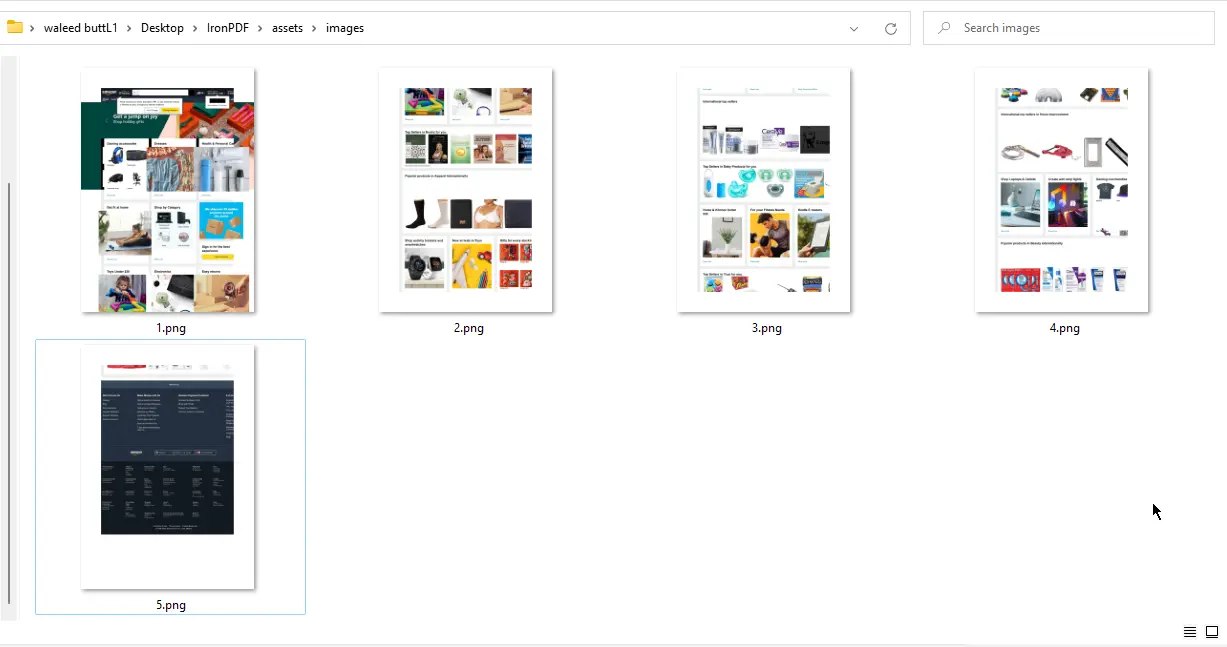
IronPDF可以将网页渲染为PDF,然后在单一工作流中将该PDF转换为图像。 使用`RasterizeToImageFiles`。 这种方法可以创建网页或生成基于Web内容的预览图像的视觉档案,而无需单独的截屏工具。
```python
#:path=/static-assets/pdf/content-code-examples/how-to/python-pdf-to-image/url-to-images.py
from ironpdf import ChromePdfRenderer

# Render a web page to PDF
renderer = ChromePdfRenderer()
pdf = renderer.RenderUrlAsPdf("https://www.example.com")

# Convert each rendered page to a PNG image
pdf.RasterizeToImageFiles("assets/images/*.png", DPI=96)
```
渲染的图像反映了页面在Chromium浏览器中的显示效果,包括CSS样式和JavaScript渲染的内容。 对于需要身份验证或交互的页面,考虑使用IronPDF的[HTML到PDF教程](https://ironpdf.com/python/tutorials/html-to-pdf/)来直接提供预渲染标记。 然后可使用上面显示的相同方法栅格化生成的PDF。
<div class="content-img-align-center">
<div class="center-image-wrapper">
<img src="/static-assets/ironpdf-java/howto/java-pdf-to-image/java-pdf-to-image-6.webp" alt="文件资源管理器显示由 IronPDF 将 URL 渲染为 PDF 后生成的 5 个 PNG 文件(1.png 到 5.png)" class="img-responsive add-shadow" />
<p class="content__image-caption">从通过IronPDF渲染的URL生成的图像</p>
</div>
</div>
## 如何控制输出图像尺寸?
默认情况下,`RasterizeToImageFiles`生成的图像按DPI因子缩放为本机页面尺寸。 要限制输出大小,设置单位为像素的`ImageMaxHeight`。
IronPDF根据`ImageMaxHeight`值保留原始的纵横比。 即使指定的宽度和高度与源页面的比例不同,输出也不会被拉伸或变形。
```python
#:path=/static-assets/pdf/content-code-examples/how-to/python-pdf-to-image/constrained-dimensions.py
from ironpdf import PdfDocument

pdf = PdfDocument.FromFile("my-content.pdf")

# Generate thumbnail images constrained to 500x500 pixels
pdf.RasterizeToImageFiles(
    "assets/images/*.png",
    ImageMaxWidth=500,
    ImageMaxHeight=500,
    DPI=200
)
```
将`ImageMaxWidth=500, ImageMaxHeight=500`设置为200 DPI会生成适合缩略图显示或基于卡片的用户界面布局的图像。 调整这些值以匹配应用程序设计所需的尺寸。 为了生成即将被栅格化的PDF内容,IronPDF还支持[从Python创建PDF](https://ironpdf.com/python/how-to/python-create-pdf/)和[合并多个PDF](https://ironpdf.com/python/how-to/python-merge-pdf/)后再进行转换。
[[n:(基于高度保留纵横比。 如果源页面宽于高,则生成的图像可能比`ImageMaxWidth`更窄。 设计布局以处理可变宽度的缩略图。)]]
## PDF到图像转换的下一步是什么?
本指南涵盖了三个核心工作流:将PDF文件转换为图像,将URL转换为图像,控制图像尺寸和质量。 IronPDF支持JPEG、JPG、PNG、TIFF和通过相同`RasterizeToImageFiles`方法的附加格式。 更改输出路径模式中的文件扩展名以切换格式。
欲实现进一步自动化,请考虑这些后续步骤:
- **批处理**:循环遍历PDF目录并依次转换每一个,或使用Python的`concurrent.futures`模块进行并行处理
- **选择性提取**:使用页面索引参数仅提取相关页面
- **图像管道集成**:将输出文件输入[PIL/Pillow](https://pypi.org/project/Pillow/)或[OpenCV](https://pypi.org/project/opencv-python/)进行进一步处理,如裁剪、注释或格式标准化
- **转换前压缩**:使用IronPDF的[PDF压缩](https://ironpdf.com/python/how-to/python-compress-pdf/)在栅格化大文档之前减小文件大小
- **表单工作流**:[编程填写PDF表单](https://ironpdf.com/python/how-to/python-fill-pdf-form/),然后将填好的表单页面转换为图像以供审核或存档
要继续使用IronPDF构建,请探索[IronPDF for Python文档](https://ironpdf.com/python/docs/)和[栅格化PDF至图像示例](https://ironpdf.com/python/examples/rasterize-a-pdf-to-images/)。
[开始免费使用IronPDF for Python的30天试用](#trial-license)以在生产中使用这些功能。 准备部署时,[查看许可选项](#licensing)以获取适合项目规模的方案。
[[i:(延伸阅读:[将 PDF 转换为图像](https://ironpdf.com/python/examples/rasterize-a-pdf-to-images/))]]
Ask ChatGPT about this page
Ask Gemini about this page
Ask Perplexity about this page
PDF到图像转换是Python应用程序中的常见需求。 开发者使用它来生成文档缩略图、Web预览,并将PDF内容输入图像处理管道。 IronPDF for Python 提供了RasterizeToImageFiles方法,该方法可以将任何PDF文档(或URL)转换为具有可配置DPI和尺寸的JPEG、PNG或TIFF图像文件。
本指南展示了如何在Python中将PDF文件转换为图像、如何控制输出质量以及如何调整生成的图像以满足布局约束。
安装IronPDF: pip install ironpdf
加载一个PDF文档: pdf = PdfDocument.FromFile("document.pdf")
将每一页转换为PNG: pdf.RasterizeToImageFiles("output/*.png", DPI=96)
#:path=/static-assets/pdf/content-code-examples/how-to/python-pdf-to-image/quickstart.py from ironpdf import PdfDocument pdf = PdfDocument . FromFile ( "document.pdf" ) pdf. RasterizeToImageFiles ( "output/*.png" , DPI = 96 ) #:path=/static-assets/pdf/content-code-examples/how-to/python-pdf-to-image/quickstart.py
from ironpdf import PdfDocument
pdf = PdfDocument.FromFile("document.pdf")
pdf.RasterizeToImageFiles("output/*.png", DPI=96)
Python
如何在 Python 中将 PDF 转换为图像
安装IronPDF Python库 用PdfDocument.FromFile加载PDF或用ChromePdfRenderer从URL渲染
用输出路径模式(例如,output/*.png)调用RasterizeToImageFiles
设置DPI以控制图像质量——值越高,输出越清晰
使用ImageMaxWidth和ImageMaxHeight来约束输出尺寸 为什么开发者将PDF转换为图像?
PDF到图像的转换解决了软件开发中的若干实际问题。 最常见的需求是预览生成——在Web界面或移动应用程序中显示PDF文档的缩略图,而无需用户下载并打开完整文件。
其他常见用例包括:
机器学习管道 :OCR模型、布局分析工具和计算机视觉系统接受图像输入,而非PDF档案和合规性 :在原始PDF旁边存储视觉快照,以确保长时间可读,即使PDF查看器发生变化报告嵌入 :将特定PDF页面作为图像包含在其他文档或电子邮件模板中自动化测试 :通过比较渲染页面快照,检测PDF输出的视觉回归
Python的标准库不包括原生的PDF到图像功能。 像pdf2imagepip install。
IronPDF使用基于Chromium的渲染引擎。HTML渲染的PDF生成看起来与浏览器显示完全相同的图像,这在PDF源自HTML或URL时很有用。
如何将PDF文件转换为图像?
要将PDF转换为图像,在RasterizeToImageFiles。 该方法将每页生成一个图像文件写入指定目录。 输出路径中的星号(assets/images/2.png依此类推。
在调用该方法之前创建输出目录。 如果不存在,IronPDF不会自动创建。
#:path=/static-assets/pdf/content-code-examples/how-to/python-pdf-to-image/convert-pdf-to-images.py from ironpdf import PdfDocument # Load a PDF from disk pdf = PdfDocument . FromFile ( "my-content.pdf" ) # Write each page to a PNG file in the "assets/images" folder # The folder must exist before calling this method pdf. RasterizeToImageFiles ( "assets/images/*.png" , DPI = 96 ) #:path=/static-assets/pdf/content-code-examples/how-to/python-pdf-to-image/convert-pdf-to-images.py
from ironpdf import PdfDocument
# Load a PDF from disk
pdf = PdfDocument.FromFile("my-content.pdf")
# Write each page to a PNG file in the "assets/images" folder
# The folder must exist before calling this method
pdf.RasterizeToImageFiles("assets/images/*.png", DPI=96)
Python
DPI参数控制图像分辨率。 更高的DPI产生更清晰的图像,但代价是文件大小更大和处理时间更长。标准值包括:
每个PDF页面生成一个PNG文件的输出目录
如果输出图像显得模糊,请增加DPI值。 在一个50页的文档上处理300 DPI明显比96 DPI要耗时更久——请根据用例的实际质量需求做出选择。
对于Web缩略图生成,96 DPI就足够了,并保持文件尺寸小。 为将要打印或以全尺寸显示的情况预留150-300 DPI。
如何将特定页面范围转换为图像?
为了只转换一部分页面,将页面索引作为第二个参数传递给RasterizeToImageFiles。 页面索引是从0开始的整数。
#:path=/static-assets/pdf/content-code-examples/how-to/python-pdf-to-image/convert-page-range.py from ironpdf import PdfDocument pdf = PdfDocument . FromFile ( "my-content.pdf" ) # Convert only pages 1, 2, and 3 (zero-based indices: 0, 1, 2) pdf. RasterizeToImageFiles ( "assets/images/*.png" , [ 0 , 1 , 2 ], DPI = 96 ) #:path=/static-assets/pdf/content-code-examples/how-to/python-pdf-to-image/convert-page-range.py
from ironpdf import PdfDocument
pdf = PdfDocument.FromFile("my-content.pdf")
# Convert only pages 1, 2, and 3 (zero-based indices: 0, 1, 2)
pdf.RasterizeToImageFiles("assets/images/*.png", [0, 1, 2], DPI=96)
Python
选择性页面提取对仅需预览前几页的文档很有用,避免不必要地处理整个文件。对于提取PDF中已嵌入的图像 的工作流,IronPDF提供了单独的提取方法。
如何将URL转换为图像?
IronPDF可以将网页渲染为PDF,然后在单一工作流中将该PDF转换为图像。 使用RasterizeToImageFiles。 这种方法可以创建网页或生成基于Web内容的预览图像的视觉档案,而无需单独的截屏工具。
#:path=/static-assets/pdf/content-code-examples/how-to/python-pdf-to-image/url-to-images.py from ironpdf import ChromePdfRenderer # Render a web page to PDF renderer = ChromePdfRenderer () pdf = renderer. RenderUrlAsPdf ( "https://www.example.com" ) # Convert each rendered page to a PNG image pdf. RasterizeToImageFiles ( "assets/images/*.png" , DPI = 96 ) #:path=/static-assets/pdf/content-code-examples/how-to/python-pdf-to-image/url-to-images.py
from ironpdf import ChromePdfRenderer
# Render a web page to PDF
renderer = ChromePdfRenderer()
pdf = renderer.RenderUrlAsPdf("https://www.example.com")
# Convert each rendered page to a PNG image
pdf.RasterizeToImageFiles("assets/images/*.png", DPI=96)
Python
渲染的图像反映了页面在Chromium浏览器中的显示效果,包括CSS样式和JavaScript渲染的内容。 对于需要身份验证或交互的页面,考虑使用IronPDF的HTML到PDF教程 来直接提供预渲染标记。 然后可使用上面显示的相同方法栅格化生成的PDF。
从通过IronPDF渲染的URL生成的图像
如何控制输出图像尺寸?
默认情况下,RasterizeToImageFiles生成的图像按DPI因子缩放为本机页面尺寸。 要限制输出大小,设置单位为像素的ImageMaxHeight。
IronPDF根据ImageMaxHeight值保留原始的纵横比。 即使指定的宽度和高度与源页面的比例不同,输出也不会被拉伸或变形。
#:path=/static-assets/pdf/content-code-examples/how-to/python-pdf-to-image/constrained-dimensions.py from ironpdf import PdfDocument pdf = PdfDocument . FromFile ( "my-content.pdf" ) # Generate thumbnail images constrained to 500x500 pixels pdf. RasterizeToImageFiles ( "assets/images/*.png" , ImageMaxWidth = 500 , ImageMaxHeight = 500 , DPI = 200 ) #:path=/static-assets/pdf/content-code-examples/how-to/python-pdf-to-image/constrained-dimensions.py
from ironpdf import PdfDocument
pdf = PdfDocument.FromFile("my-content.pdf")
# Generate thumbnail images constrained to 500x500 pixels
pdf.RasterizeToImageFiles(
"assets/images/*.png",
ImageMaxWidth=500,
ImageMaxHeight=500,
DPI=200
)
Python
将ImageMaxWidth=500, ImageMaxHeight=500设置为200 DPI会生成适合缩略图显示或基于卡片的用户界面布局的图像。 调整这些值以匹配应用程序设计所需的尺寸。 为了生成即将被栅格化的PDF内容,IronPDF还支持从Python创建PDF 和合并多个PDF 后再进行转换。
基于高度保留纵横比。 如果源页面宽于高,则生成的图像可能比ImageMaxWidth更窄。 设计布局以处理可变宽度的缩略图。
PDF到图像转换的下一步是什么?
本指南涵盖了三个核心工作流:将PDF文件转换为图像,将URL转换为图像,控制图像尺寸和质量。 IronPDF支持JPEG、JPG、PNG、TIFF和通过相同RasterizeToImageFiles方法的附加格式。 更改输出路径模式中的文件扩展名以切换格式。
欲实现进一步自动化,请考虑这些后续步骤:
批处理 :循环遍历PDF目录并依次转换每一个,或使用Python的concurrent.futures模块进行并行处理选择性提取 :使用页面索引参数仅提取相关页面图像管道集成 :将输出文件输入PIL/Pillow 或OpenCV 进行进一步处理,如裁剪、注释或格式标准化转换前压缩 :使用IronPDF的PDF压缩 在栅格化大文档之前减小文件大小表单工作流 :编程填写PDF表单 ,然后将填好的表单页面转换为图像以供审核或存档
要继续使用IronPDF构建,请探索IronPDF for Python文档 和栅格化PDF至图像示例 。
开始免费使用IronPDF for Python的30天试用 以在生产中使用这些功能。 准备部署时,查看许可选项 以获取适合项目规模的方案。
常见问题解答 使用pip install ironpdf安装IronPDF,然后使用PdfDocument.FromFile("file.pdf")加载PDF,并调用RasterizeToImageFiles("output/*.png", DPI=96)。这将每页写入一个图像到指定目录。
IronPDF支持PNG、JPEG、JPG和TIFF输出格式。通过改变传递给RasterizeToImageFiles的输出路径模式中的文件扩展名来指定格式,如*.jpg用于JPEG或*.tiff用于TIFF。
在RasterizeToImageFiles中使用DPI参数。96是标准的网络质量。150适合打印预览。300可生成高品质打印输出。更高的DPI值增加文件大小和处理时间。
可以。在RasterizeToImageFiles中传递ImageMaxWidth和ImageMaxHeight,单位为像素。IronPDF根据高度值保留纵横比,因此图像不会变形。
将零基页面索引的列表作为第二个参数传递给RasterizeToImageFiles。例如,[0, 1, 2]只转换前三页。
可以。使用ChromePdfRenderer调用RenderUrlAsPdf与URL,返回一个PdfDocument。然后在该文档上调用RasterizeToImageFiles以从每个渲染的页面生成图像文件。
不需要。IronPDF包含自己的基于Chromium的渲染引擎,不需要Poppler、Ghostscript或任何外部二进制文件安装。一个pip install ironpdf就足够了。
图像模糊是由低DPI值引起的。将它从默认的96增加到150或300以获得更清晰的结果。请注意,较高的DPI会产生更大的文件大小并需要更长的处理时间。
Common DPI values are 72 for fast processing and screen resolution, 96 for standard web quality, 150 for good print quality, and 300 for high-quality print output.
Yes, IronPDF provides separate extraction methods to work with images already embedded in PDFs, which can be useful for specific workflows focusing on image content.
技术作家
Curtis Chau 拥有卡尔顿大学的计算机科学学士学位,专注于前端开发,精通 Node.js、TypeScript、JavaScript 和 React。他热衷于打造直观且美观的用户界面,喜欢使用现代框架并创建结构良好、视觉吸引力强的手册。
...
阅读更多