
Socket io .NET(對開發者如何理解的工作)

該Socket.IO伺服器作為一個強大的程式庫,促進即時、雙向和事件驅動的通信。 它廣泛應用於網頁應用中,如聊天應用、即時更新和協作平台。 雖然Socket.IO通常與JavaScript相關,但它也可以在客戶端與C#有效地使用。 有時候,客戶端可能是網頁瀏覽器。 在本文中,我們將探討如何在C#環境中設置和使用Socket.IO客戶端。 我們將通過一些基本範例,最後總結其優勢和潛在的使用情境。
建立Socket.IO連接的方法
Socket.IO連接可以通過不同的低級運輸協議來建立:
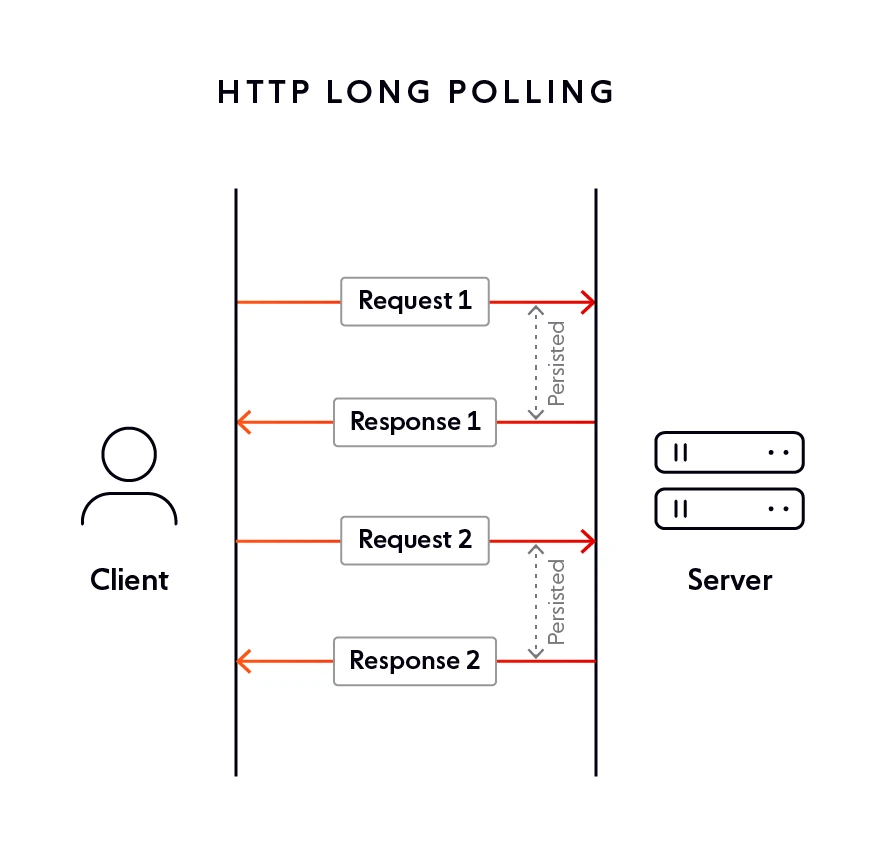
- HTTP長輪詢
-
Web Sockets
- Web Transport

在Visual Studio 2022中建立控制台專案
打開Visual Studio,選擇建立新專案在開始窗口。
要在Visual Studio 2022中建立控制台應用,啟動Visual Studio並從開始窗口選擇"建立新專案"。 選擇"控制台應用"模板,配置專案名稱和位置,並確保選擇.NET 6.0。
什麼是Socket.IO?
Socket.IO,一個JavaScript程式庫,使得Web客戶端和伺服器能夠進行即時通信。 它由兩個部分組成:
Socket IO的部分
- 客戶端程式庫:在瀏覽器中運行。
- 伺服器端程式庫:在Node.js上運行。
安裝必要的套件
要在Visual Studio中使用Socket.IO進行.NET應用,您需要一個相容的伺服器實現。 其中一個實現是SocketIoClientDotNet for .NET,允許Socket.IO客戶端從C#應用連接到Socket.IO。
首先,安裝所需的NuGet套件。 您可以通過套件管理器控制台或將引用新增到您的專案文件中來完成這個操作:
Install-Package SocketIoClientDotNet
SocketIoClientDotNet套件的截圖
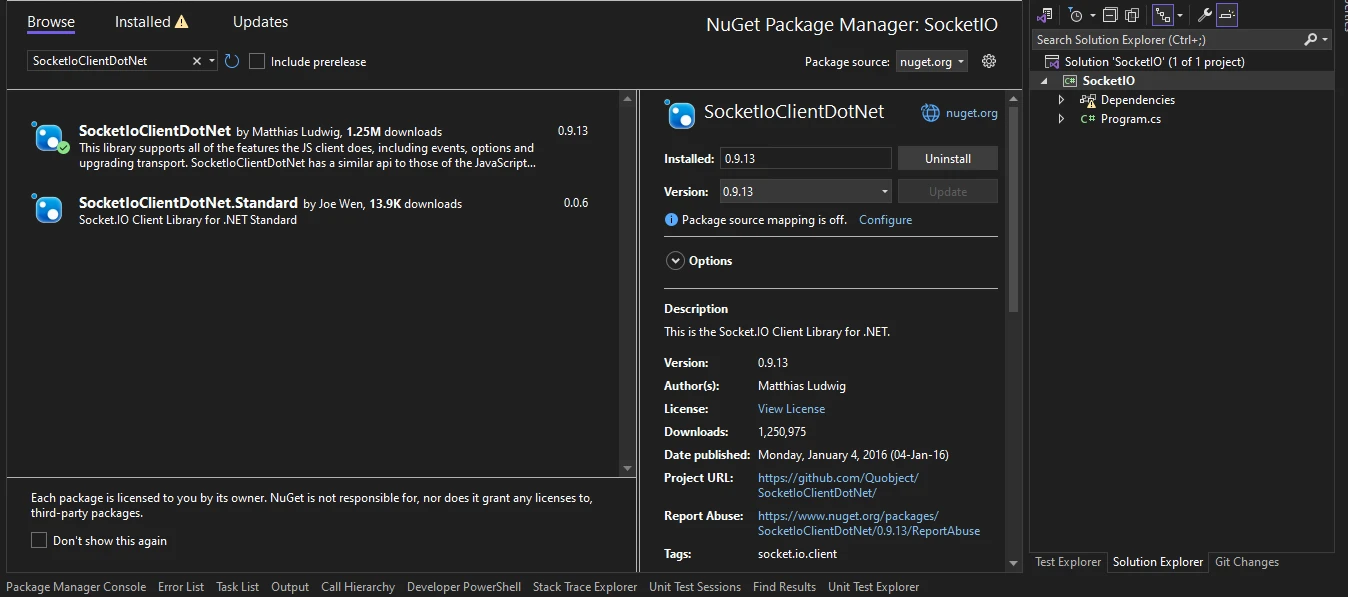
執行此命令會將Socket.IO客戶端程式庫納入到您的.NET專案,使您的C#應用能夠連接到Socket.IO伺服器,促進使用者和系統之間的通信。
建立Socket.IO
在深入C#客戶端之前,我們在Visual Studio中使用.NET Core控制台應用設置一個Socket IO的基本範例。 這將幫助我們測試客戶端實現。
建立伺服器實現
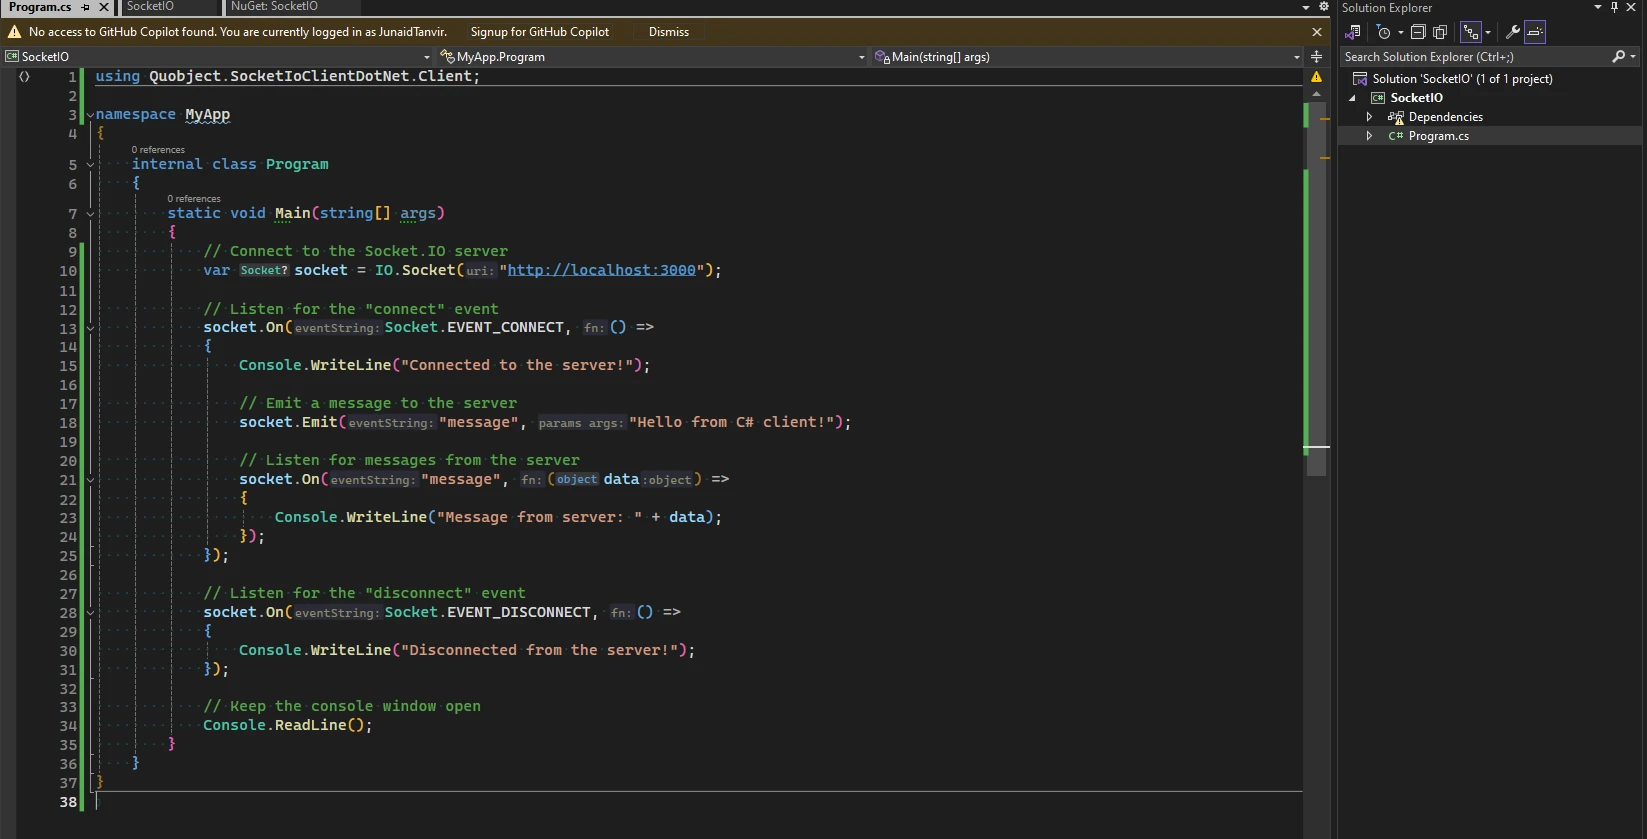
以下程式碼設置了一個基本的C#中的Socket.IO伺服器,用於監聽端口3000上的客戶端連接。當客戶端發送消息時,伺服器記錄該消息並回應客戶端確認接收。
using System;
using System.Net.WebSockets;
using System.Text;
using System.Threading;
using System.Threading.Tasks;
using Quobject.SocketIoClientDotNet.Client;

namespace DemoApp
{
    internal class Program
    {
        static void Main(string[] args)
        {
            // Connect to the Socket.IO server
            var socket = IO.Socket("http://localhost:3000");

            // Listen for the "connect" event
            socket.On(Socket.EVENT_CONNECT, () =>
            {
                Console.WriteLine("Connected to the server!");

                // Emit a message to the server
                socket.Emit("message", "Hello from C# client!");

                // Listen for messages from the server
                socket.On("message", (data) =>
                {
                    Console.WriteLine("Message from server: " + data);
                });
            });

            // Listen for the "disconnect" event
            socket.On(Socket.EVENT_DISCONNECT, () =>
            {
                Console.WriteLine("Disconnected from the server!");
            });

            // Keep the console window open
            Console.ReadLine();
        }
    }
}
using System;
using System.Net.WebSockets;
using System.Text;
using System.Threading;
using System.Threading.Tasks;
using Quobject.SocketIoClientDotNet.Client;
namespace DemoApp
{
internal class Program
{
static void Main(string[] args)
{
// Connect to the Socket.IO server
var socket = IO.Socket("http://localhost:3000");
// Listen for the "connect" event
socket.On(Socket.EVENT_CONNECT, () =>
{
Console.WriteLine("Connected to the server!");
// Emit a message to the server
socket.Emit("message", "Hello from C# client!");
// Listen for messages from the server
socket.On("message", (data) =>
{
Console.WriteLine("Message from server: " + data);
});
});
// Listen for the "disconnect" event
socket.On(Socket.EVENT_DISCONNECT, () =>
{
Console.WriteLine("Disconnected from the server!");
});
// Keep the console window open
Console.ReadLine();
}
}
}Imports System
Imports System.Net.WebSockets
Imports System.Text
Imports System.Threading
Imports System.Threading.Tasks
Imports Quobject.SocketIoClientDotNet.Client
Namespace DemoApp
Friend Class Program
Shared Sub Main(ByVal args() As String)
' Connect to the Socket.IO server
Dim socket = IO.Socket("http://localhost:3000")
' Listen for the "connect" event
socket.On(Socket.EVENT_CONNECT, Sub()
Console.WriteLine("Connected to the server!")
' Emit a message to the server
socket.Emit("message", "Hello from C# client!")
' Listen for messages from the server
socket.On("message", Sub(data)
Console.WriteLine("Message from server: " & data)
End Sub)
End Sub)
' Listen for the "disconnect" event
socket.On(Socket.EVENT_DISCONNECT, Sub()
Console.WriteLine("Disconnected from the server!")
End Sub)
' Keep the console window open
Console.ReadLine()
End Sub
End Class
End Namespace程式碼說明
在這段程式碼中,我們首先通IO.Socket("http://localhost:3000")建立一個Socket.IO客戶端實例,這個實例連接到客戶機上的端口3000的本地伺服器。
成功連接時(Socket.EVENT_CONNECT),我們列印一條消息,表明我們已連接到伺服器。
然後,我們使用socket.Emit("message", "Hello from C# client!")從客戶端向伺服器發送消息。 這會將內容為"Hello from C# client!"的消息發送到伺服器。
接著,我們通過註冊"消息"事件的回調來監聽來自伺服器的消息socket.On("message", (data) => { ... })。 當伺服器發送"消息"事件時,回調函式被調用,我們將接收到的消息列印到控制台。
如果客戶端到伺服器的連接被斷開(Socket.EVENT_DISCONNECT),我們列印一條消息以表明已斷開連接。
最後,Console.ReadLine()方法保持控制台窗口打開,這樣程式就不會在執行後立即退出。 這使我們能夠看到輸出並確保程式不會過早終止。
程式碼的截圖
HTTP長輪詢
長輪詢是一種在網頁開發中使用的技術,利用一個程式庫在客戶端(通常是網頁瀏覽器)和伺服器之間發送消息。 它通過在伺服器上觸發事件來實現即時通信,客戶端可以在不需要連續輪詢的情況下接收這些事件。 這種方法對於需要立即更新的應用程式特別有用,例如聊天應用或股票行情推送。
Web Sockets
WebSocket通過在單個TCP連接上建立全雙工通信通道促進雙向通信。 該協議使客戶端(通常是網頁瀏覽器)和伺服器之間的即時交互成為可能,雙方可以異步交換消息。
建立WebSocket通信
客戶端向伺服器發送WebSocket握手請求,表明其希望建立WebSocket連接。 伺服器收到握手請求後,返回一個WebSocket握手響應,表明連接已成功建立。 通過WebSocket連接發送的消息可以是任何格式(例如,文字或二進制),可以異步發送和接收。
Web Transport
Web Transport作為一個先進的協議,介紹了額外的功能以增強Web通信,超越傳統協議如TCP和UDP的限制。通過利用UDP和QUIC,它解決了其前身的缺點,使其更加使用者友好且高效。 對使用者而言,這轉化為減少延遲和改進擁塞控制,最終提供更平滑和響應更快的網頁體驗。 此外,Web Transport提供了更好的安全措施,確保比TCP更安全的資料傳輸。隨著這些進步,Web Transport減少了資料傳輸中耗時的方面,優化了客戶端和伺服器的整體性能。
這裡有一個基本的範例,說明如何在Web應用中使用Web Transport:
using System;
using System.Net.WebSockets;
using System.Threading;
using System.Threading.Tasks;

namespace SocketIO.Demo
{
    class Program
    {
        static async Task Main(string[] args)
        {
            // The WebSocket URI
            string uri = "wss://echo.websocket.org";

            // Creating a new WebSocket connection
            using (ClientWebSocket webSocket = new ClientWebSocket())
            {
                await webSocket.ConnectAsync(new Uri(uri), CancellationToken.None);
                Console.WriteLine("Connected to the server");

                // Sending data over the WebSocket
                byte[] sendBuffer = new byte[] { 1, 2, 3, 4 };
                await webSocket.SendAsync(new ArraySegment<byte>(sendBuffer), WebSocketMessageType.Binary, true, CancellationToken.None);
                Console.WriteLine("Data sent to the server");

                // Receiving data from the WebSocket
                byte[] receiveBuffer = new byte[1024];
                WebSocketReceiveResult result = await webSocket.ReceiveAsync(new ArraySegment<byte>(receiveBuffer), CancellationToken.None);
                byte[] data = new byte[result.Count];
                Array.Copy(receiveBuffer, data, result.Count);
                Console.WriteLine("Received data: " + BitConverter.ToString(data));
            }
        }
    }
}
using System;
using System.Net.WebSockets;
using System.Threading;
using System.Threading.Tasks;
namespace SocketIO.Demo
{
class Program
{
static async Task Main(string[] args)
{
// The WebSocket URI
string uri = "wss://echo.websocket.org";
// Creating a new WebSocket connection
using (ClientWebSocket webSocket = new ClientWebSocket())
{
await webSocket.ConnectAsync(new Uri(uri), CancellationToken.None);
Console.WriteLine("Connected to the server");
// Sending data over the WebSocket
byte[] sendBuffer = new byte[] { 1, 2, 3, 4 };
await webSocket.SendAsync(new ArraySegment<byte>(sendBuffer), WebSocketMessageType.Binary, true, CancellationToken.None);
Console.WriteLine("Data sent to the server");
// Receiving data from the WebSocket
byte[] receiveBuffer = new byte[1024];
WebSocketReceiveResult result = await webSocket.ReceiveAsync(new ArraySegment<byte>(receiveBuffer), CancellationToken.None);
byte[] data = new byte[result.Count];
Array.Copy(receiveBuffer, data, result.Count);
Console.WriteLine("Received data: " + BitConverter.ToString(data));
}
}
}
}Imports System
Imports System.Net.WebSockets
Imports System.Threading
Imports System.Threading.Tasks
Namespace SocketIO.Demo
Friend Class Program
Shared Async Function Main(ByVal args() As String) As Task
' The WebSocket URI
Dim uri As String = "wss://echo.websocket.org"
' Creating a new WebSocket connection
Using webSocket As New ClientWebSocket()
Await webSocket.ConnectAsync(New Uri(uri), CancellationToken.None)
Console.WriteLine("Connected to the server")
' Sending data over the WebSocket
Dim sendBuffer() As Byte = { 1, 2, 3, 4 }
Await webSocket.SendAsync(New ArraySegment(Of Byte)(sendBuffer), WebSocketMessageType.Binary, True, CancellationToken.None)
Console.WriteLine("Data sent to the server")
' Receiving data from the WebSocket
Dim receiveBuffer(1023) As Byte
Dim result As WebSocketReceiveResult = Await webSocket.ReceiveAsync(New ArraySegment(Of Byte)(receiveBuffer), CancellationToken.None)
Dim data(result.Count - 1) As Byte
Array.Copy(receiveBuffer, data, result.Count)
Console.WriteLine("Received data: " & BitConverter.ToString(data))
End Using
End Function
End Class
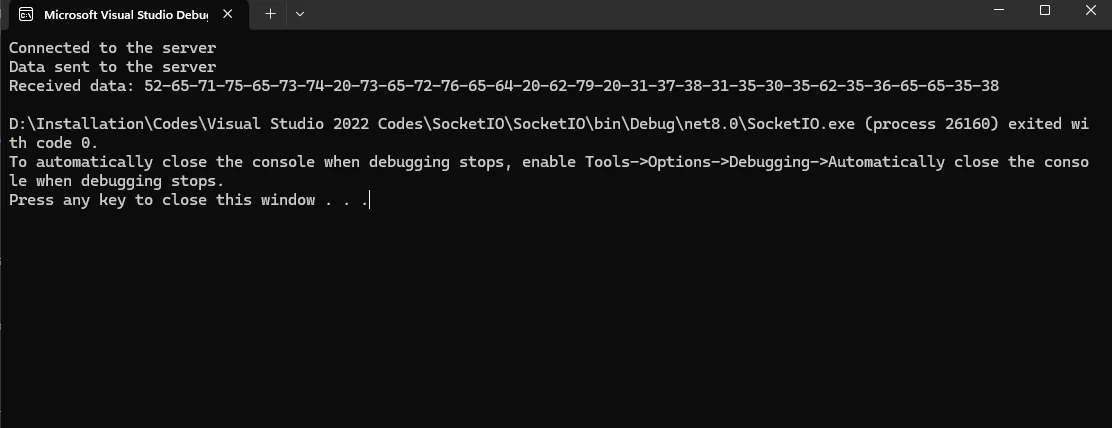
End Namespace在這個範例中,我們首先使用WebSocket URL(wss://echo.websocket.org)建立一個新的WebSocket連接到伺服器。 然後,我們在連接之上建立一個雙向流,並通過該流發送一些資料([1, 2, 3, 4])。 最後,我們從流中讀取資料,並將其日誌記錄到控制台。
上述程式碼的輸出
當您運行與WebSocket回聲伺服器的應用程式時,輸出應如下所示:
Web Transport的優點
- 現代替代方案:Web Transport提供了對傳統Web通信協議如TCP和UDP的現代替代方案。
- 高效資料傳輸:它通過利用多路復用流和先進功能提供高效的資料傳輸。
- 高性能:非常適合構建需要低延遲和可靠資料傳輸的高性能Web應用程式。
- 多路復用流:支持多路復用流,允許多個資料流在單個連接上同時發送和接收。
- 創新:隨著Web開發人員繼續採用Web Transport,我們可以期待看到更多Web通信協議的創新。
- 改善的使用者體驗:Web Transport的採用可以改善網頁上的使用者體驗,因為它的資料傳輸更快和更可靠。
IronPDF程式庫的介紹
IronPDF是一個專為與C#開發人員設計的綜合.NET PDF程式庫。 這個強大的工具允許開發者簡單地在應用程式中建立、操作和閱讀PDF文件。 通過IronPDF,開發者可以從HTML字串、HTML文件和URL生成PDF文件,使其在各種使用情景中高度靈活。 此外,IronPDF提供了高級PDF編輯功能,如新增頁眉、頁腳、水印等等。 通過NuGet包管理器將其無縫整合到C#專案中,簡化了處理PDF文件的過程,促進開發並提高生產力。
使用NuGet包管理器安裝
在Visual Studio或從命令行使用NuGet包管理器安裝IronPDF。 在Visual Studio中,到控制台:
- 工具 -> NuGet包管理器 -> 套件管理器控制台
Install-Package IronPdf
IronPDF程式碼範例
這是一個使用IronPDF將二進制資料轉換為PDF文件的簡單範例。在GeneratePDF方法,並將我們在上述範例中的資料作為參數傳入:
using System;
using System.Net.WebSockets;
using System.Threading;
using System.Threading.Tasks;

namespace SocketIO.Demo
{
    class Program
    {
        static async Task Main(string[] args)
        {
            // The WebSocket URI
            string uri = "wss://echo.websocket.org";

            // Creating a new WebSocket connection
            using (ClientWebSocket webSocket = new ClientWebSocket())
            {
                await webSocket.ConnectAsync(new Uri(uri), CancellationToken.None);
                Console.WriteLine("Connected to the server");

                // Sending data over the WebSocket
                byte[] sendBuffer = new byte[] { 1, 2, 3, 4 };
                await webSocket.SendAsync(new ArraySegment<byte>(sendBuffer), WebSocketMessageType.Binary, true, CancellationToken.None);
                Console.WriteLine("Data sent to the server");

                // Receiving data from the WebSocket
                byte[] receiveBuffer = new byte[1024];
                WebSocketReceiveResult result = await webSocket.ReceiveAsync(new ArraySegment<byte>(receiveBuffer), CancellationToken.None);
                byte[] data = new byte[result.Count];
                Array.Copy(receiveBuffer, data, result.Count);
                Console.WriteLine("Received data: " + BitConverter.ToString(data));

                // Data to generate in PDF file
                string pdfData = BitConverter.ToString(data);
                PDFGenerator.GeneratePDF(pdfData);
            }
        }
    }
}
using System;
using System.Net.WebSockets;
using System.Threading;
using System.Threading.Tasks;
namespace SocketIO.Demo
{
class Program
{
static async Task Main(string[] args)
{
// The WebSocket URI
string uri = "wss://echo.websocket.org";
// Creating a new WebSocket connection
using (ClientWebSocket webSocket = new ClientWebSocket())
{
await webSocket.ConnectAsync(new Uri(uri), CancellationToken.None);
Console.WriteLine("Connected to the server");
// Sending data over the WebSocket
byte[] sendBuffer = new byte[] { 1, 2, 3, 4 };
await webSocket.SendAsync(new ArraySegment<byte>(sendBuffer), WebSocketMessageType.Binary, true, CancellationToken.None);
Console.WriteLine("Data sent to the server");
// Receiving data from the WebSocket
byte[] receiveBuffer = new byte[1024];
WebSocketReceiveResult result = await webSocket.ReceiveAsync(new ArraySegment<byte>(receiveBuffer), CancellationToken.None);
byte[] data = new byte[result.Count];
Array.Copy(receiveBuffer, data, result.Count);
Console.WriteLine("Received data: " + BitConverter.ToString(data));
// Data to generate in PDF file
string pdfData = BitConverter.ToString(data);
PDFGenerator.GeneratePDF(pdfData);
}
}
}
}Imports System
Imports System.Net.WebSockets
Imports System.Threading
Imports System.Threading.Tasks
Namespace SocketIO.Demo
Friend Class Program
Shared Async Function Main(ByVal args() As String) As Task
' The WebSocket URI
Dim uri As String = "wss://echo.websocket.org"
' Creating a new WebSocket connection
Using webSocket As New ClientWebSocket()
Await webSocket.ConnectAsync(New Uri(uri), CancellationToken.None)
Console.WriteLine("Connected to the server")
' Sending data over the WebSocket
Dim sendBuffer() As Byte = { 1, 2, 3, 4 }
Await webSocket.SendAsync(New ArraySegment(Of Byte)(sendBuffer), WebSocketMessageType.Binary, True, CancellationToken.None)
Console.WriteLine("Data sent to the server")
' Receiving data from the WebSocket
Dim receiveBuffer(1023) As Byte
Dim result As WebSocketReceiveResult = Await webSocket.ReceiveAsync(New ArraySegment(Of Byte)(receiveBuffer), CancellationToken.None)
Dim data(result.Count - 1) As Byte
Array.Copy(receiveBuffer, data, result.Count)
Console.WriteLine("Received data: " & BitConverter.ToString(data))
' Data to generate in PDF file
Dim pdfData As String = BitConverter.ToString(data)
PDFGenerator.GeneratePDF(pdfData)
End Using
End Function
End Class
End NamespacePDF生成類程式碼
using IronPdf;

namespace SocketIO.Demo
{
    public class PDFGenerator
    {
        public static void GeneratePDF(string data)
        {
            IronPdf.License.LicenseKey = "Your-Licence-Key-Here";
            Console.WriteLine("PDF Generating Started...");

            // Instantiate Renderer
            var renderer = new ChromePdfRenderer();
            Console.WriteLine("PDF Processing ....");

            var pdf = renderer.RenderHtmlAsPdf($"<h1>Received Data</h1><p>{data}</p>");
            string filePath = "Data.pdf";
            pdf.SaveAs(filePath);
            Console.WriteLine($"PDF Generation Completed. File Saved as {filePath}");
        }
    }
}
using IronPdf;
namespace SocketIO.Demo
{
public class PDFGenerator
{
public static void GeneratePDF(string data)
{
IronPdf.License.LicenseKey = "Your-Licence-Key-Here";
Console.WriteLine("PDF Generating Started...");
// Instantiate Renderer
var renderer = new ChromePdfRenderer();
Console.WriteLine("PDF Processing ....");
var pdf = renderer.RenderHtmlAsPdf($"<h1>Received Data</h1><p>{data}</p>");
string filePath = "Data.pdf";
pdf.SaveAs(filePath);
Console.WriteLine($"PDF Generation Completed. File Saved as {filePath}");
}
}
}Imports IronPdf
Namespace SocketIO.Demo
Public Class PDFGenerator
Public Shared Sub GeneratePDF(ByVal data As String)
IronPdf.License.LicenseKey = "Your-Licence-Key-Here"
Console.WriteLine("PDF Generating Started...")
' Instantiate Renderer
Dim renderer = New ChromePdfRenderer()
Console.WriteLine("PDF Processing ....")
Dim pdf = renderer.RenderHtmlAsPdf($"<h1>Received Data</h1><p>{data}</p>")
Dim filePath As String = "Data.pdf"
pdf.SaveAs(filePath)
Console.WriteLine($"PDF Generation Completed. File Saved as {filePath}")
End Sub
End Class
End Namespace輸出
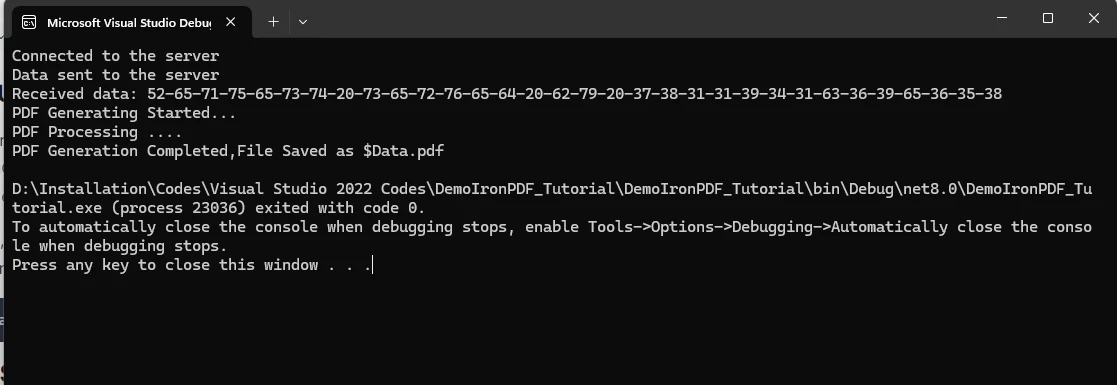
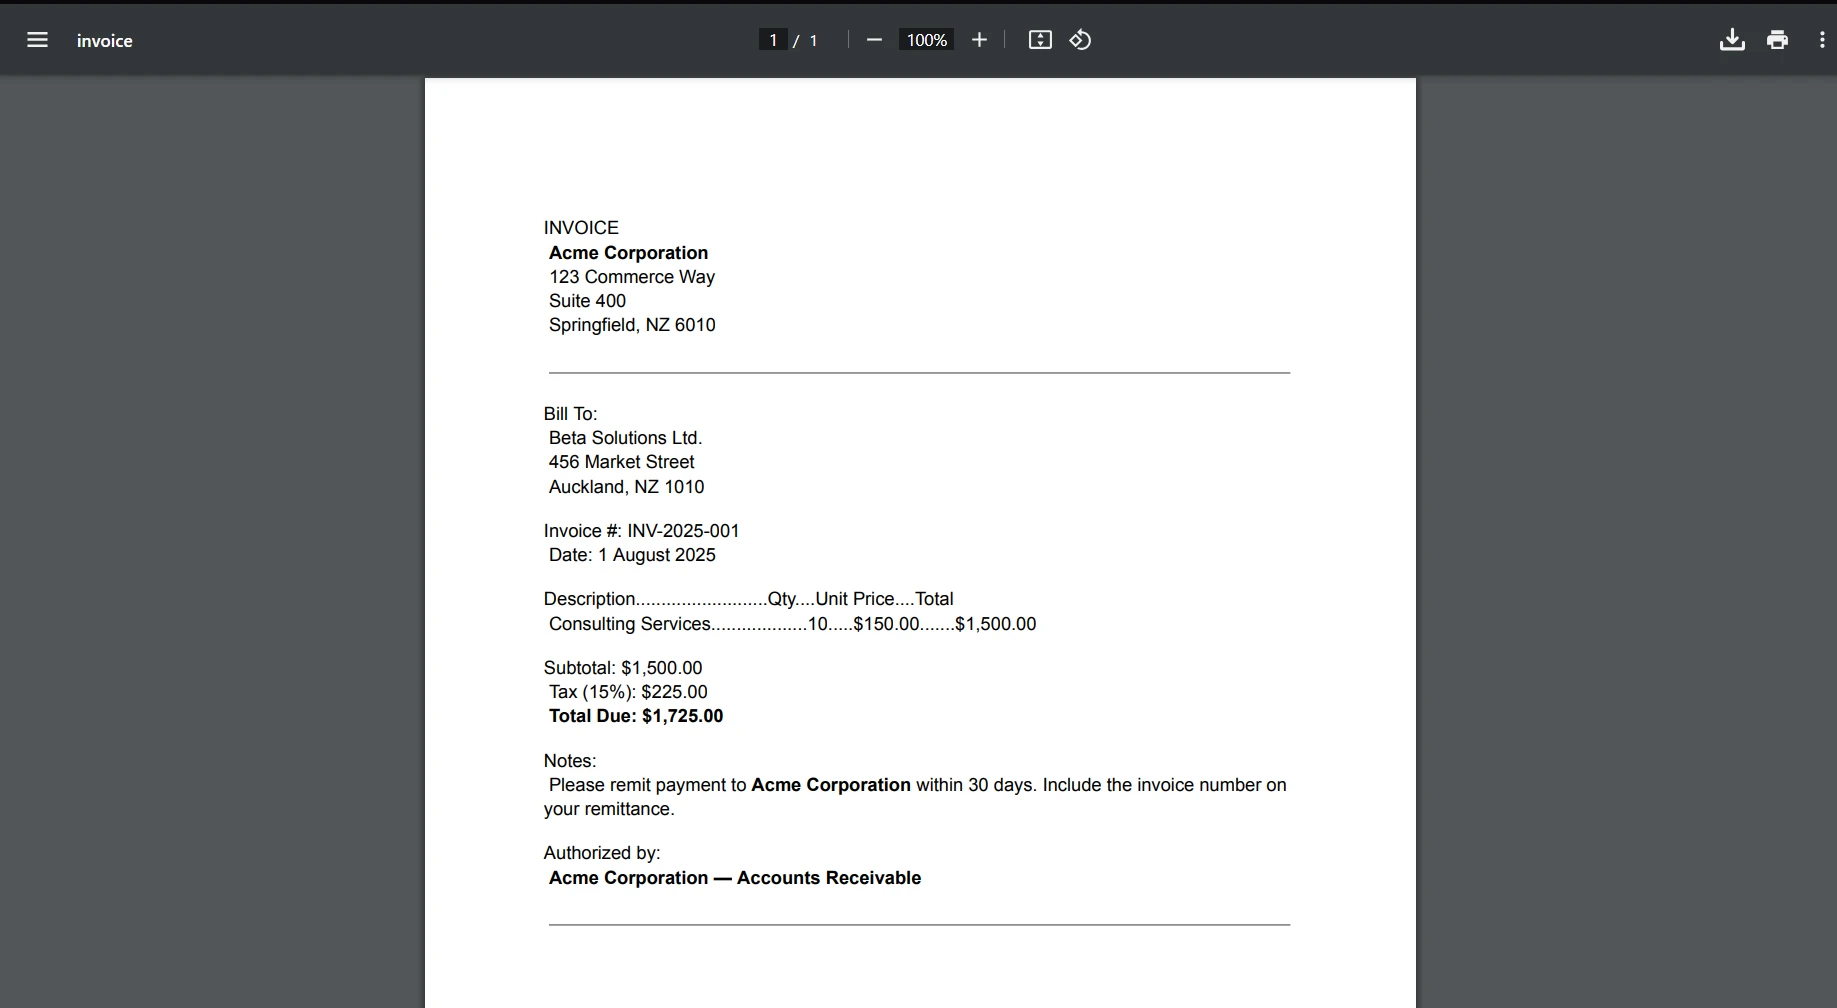
在提供的程式碼中,使用IronPDF從通過WebSocket連接接收的十六進制字串生成PDF文件。 RenderHtmlAsPdf方法。 您可以從這裡獲取免費授權金鑰。 然後使用SaveAs方法將此PDF本地保存為"Data.pdf"。 IronPDF的整合允許動態WebSocket資料無縫轉換為結構化的PDF格式,展示了其在將即時資料流轉化為存檔文件方面的實用性。
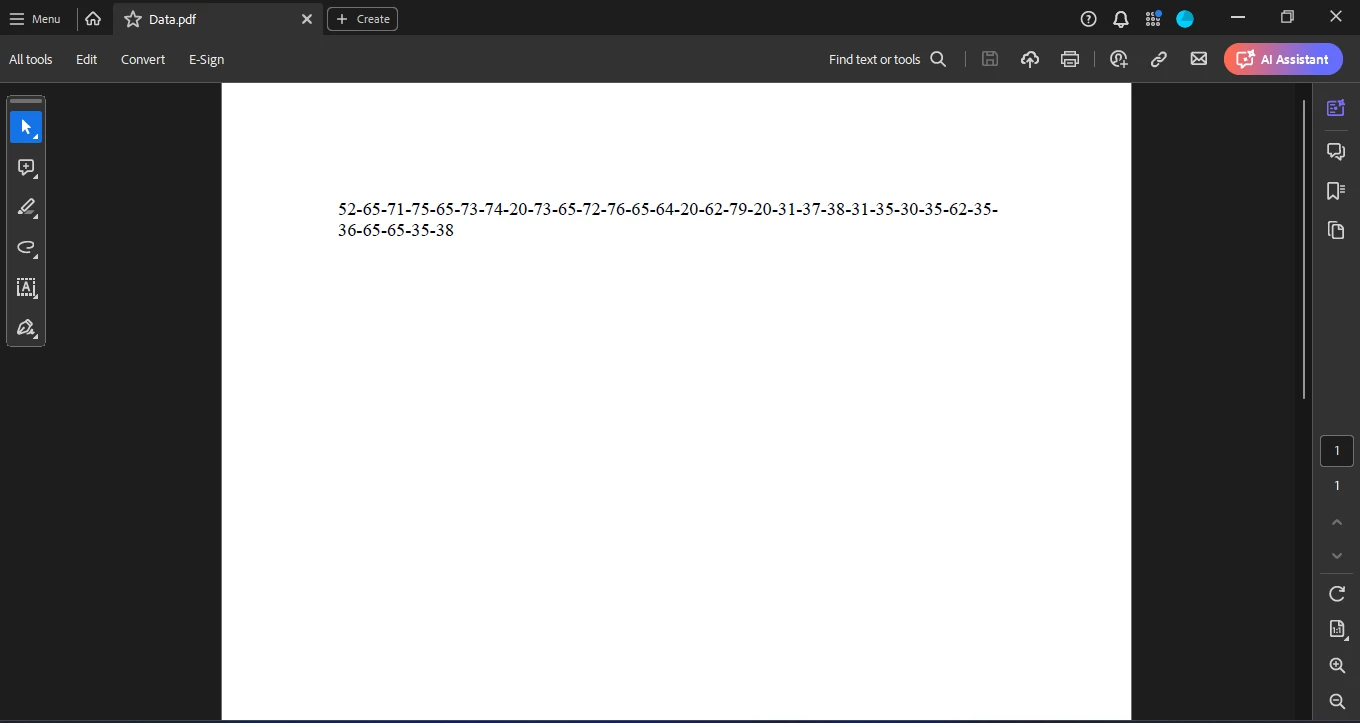
生成的PDF文件
結論
將Socket.IO與C#結合使用,為與連接客戶端的即時互動帶來了無數的機會,超越了JavaScript和Node.js的領域。 將像Socket.IO和IronPDF這樣的工具整合到您的.NET項目中,可以顯著提升即時通信和PDF處理能力。 Socket.IO促進客戶端和伺服器之間無縫的即時、雙向通信,而IronPDF則提供有力的功能來建立和操作PDF文件變得毫不費力。
常見問題
如何在C#環境中設置Socket.IO客戶端?
要在C#環境中設置Socket.IO客戶端,可以使用SocketIoClientDotNet套件。這允許您的C#應用程式與Socket.IO伺服器通信,實現即時的雙向通信。
在網頁應用中使用Socket.IO有何優勢?
Socket.IO提供即時的、雙向的和事件驅動的通信,非常適合需要即時更新的網頁應用,例如聊天應用、協作平台和線上遊戲。
我可以在Visual Studio 2022中使用Socket.IO嗎?
可以,您可以在Visual Studio 2022中使用Socket.IO,建立一個控制台專案並安裝必要的套件,如SocketIoClientDotNet,以在您的C#應用中實現即時通信。
IronPDF如何增強使用Socket.IO的即時應用程式?
IronPDF可以通過允許開發者從即時WebSocket資料生成和處理PDF來增強即時應用程式。這對於從動態資料流建立結構化文件非常有用。
將C#客戶端連接到Socket.IO伺服器的過程是什麼?
要將C#客戶端連接到Socket.IO伺服器,您需要使用SocketIoClientDotNet套件。這涉及到設置客戶端來監聽和發出事件,從而實現與伺服器的即時通信。
HTTP long-polling在Socket.IO中如何運作?
HTTP long-polling是Socket.IO維持持久連接的一種方法,通過保持請求開放直到伺服器回應,允許一旦有新資料就立即更新。
WebSocket在Socket.IO通信中扮演什麼角色?
WebSocket在Socket.IO通信中起著重要作用,允許通過單一TCP連接進行全雙工通信,從而促進客戶端和伺服器之間高效的即時資料交換。
如何安裝SocketIoClientDotNet套件?
您可以使用Visual Studio中的NuGet套件管理器安裝SocketIoClientDotNet套件。打開Package Manager Console並執行命令:Install-Package SocketIoClientDotNet。
將IronPDF與Socket.IO整合的使用案例有哪些?
將IronPDF與Socket.IO整合對於需要從動態資料生成PDF的即時應用程式非常有用,例如報告工具、即時資料分析和自動文件生成系統。
在Socket.IO中使用Web Transport的好處是什麼?
Web Transport在傳統TCP和UDP上提供改進的延遲和擁塞控制,支持多路複用資料流和增強的安全性,使其適合現代即時通訊需求。







 免費開始
免費開始 免費開始
免費開始 預訂免費直播演示