

如何使用 C# 在 ASP.NET MVC 中將視圖轉換為 PDF
IronPDF 讓您只需幾行程式碼,即可透過 ChromePdfRenderer.RenderView() 方法,將 ASP.NET MVC 檢視轉換為 PDF 文件。 IronPdf.Extensions.Mvc.Framework 套件可與 ASP.NET MVC 專案無縫整合,將 CSHTML 檢視頁渲染為 PDF 檔案。
View 是 .NET Framework 中的一種元件,用於在網頁應用程式中產生 HTML 標記。 它是 Model-View-Controller (MVC) 模式的一部分,常應用於 ASP.NET MVC 和 ASP.NET Core MVC 應用程式中。 檢視(Views)負責透過動態渲染 HTML 內容,將資料呈現給使用者。 IronPDF 的 Chrome PDF 渲染引擎具備強大效能,確保您的頁面以像素級精準度呈現,完整保留所有樣式、版面配置及互動元素。
ASP.NET Web Application (.NET Framework) MVC 是微軟提供的一套 Web 應用程式框架。 它遵循一種稱為模型-視圖-控制器(MVC)的結構化架構模式,用以組織並簡化網頁應用的開發流程。
- 模型:管理資料、業務邏輯及資料完整性。
- 檢視 (View):呈現使用者介面並渲染資訊。
- 控制器 (Controller):處理使用者輸入、處理請求,並協調模型 (Model) 與視圖 (View) 之間的互動。
IronPDF 簡化了在 ASP.NET MVC 專案中從視圖建立 PDF 檔案的流程。 這使得在 ASP.NET MVC 中生成 PDF 既簡單又直接。 無論您是要從網頁視圖中產生發票、報告或任何文件,IronPDF 都能提供專業 PDF 輸出所需的工具。 如需完整的設定指南,請造訪"安裝概覽"頁面。
快速入門:輕鬆將 ASP.NET MVC 檢視轉換為 PDF
瞭解如何使用 IronPDF 快速將您的 ASP.NET MVC 檢視轉換為 PDF 文件。 只需幾行程式碼,您就能將 CSHTML 檢視渲染為高品質的 PDF 檔案,從而提升應用程式的功能。 IronPDF 簡化了此流程,讓各級開發者都能輕鬆上手。 首先將 IronPDF 整合至您的 ASP.NET Core 專案中,即可輕鬆地從視圖(Views)生成 PDF 檔案。
簡化工作流程(5 個步驟)
- 下載用於在 ASP.NET MVC 中將視圖轉換為 PDF 的 C# 函式庫
- 為資料新增一個模型類別
- 在控制器中建立一個"Person"動作,並使用
RenderView方法 - 使用 MVC 5 視圖骨架新增視圖
- 下載範例專案以快速上手
我需要哪種擴充套件?
為什麼 IronPDF 需要擴充套件?
IronPdf.Extensions.Mvc.Framework 套件是 IronPDF 主套件的擴充套件。 在 ASP.NET MVC 中,若要將視圖渲染為 PDF 文件,必須同時安裝 IronPdf.Extensions.Mvc.Framework 和 IronPdf 套件。 此種分離設計,既能針對 MVC 框架優化特定功能,同時維持核心的 PDF 渲染能力。
如何安裝擴充套件?
Install-Package IronPdf.Extensions.Mvc.Framework
透過 NuGet 安裝
Install-Package IronPdf.Extensions.Mvc.Framework
如何將檢視頁渲染為 PDF?
我需要哪種專案型別?
若要將 Views 轉換為 PDF 檔案,您需要一個 ASP.NET Web Application (.NET Framework) MVC 專案。 IronPDF 支援多種 MVC 版本,並提供豐富的渲染選項,讓您能根據需求自訂 PDF 輸出格式。
如何新增模型類別?
我應該在哪裡建立模型?
- 導航至"Models"資料夾
- 建立一個名為
Person的新 C# 類別檔案。 此類別用作表示個別資料的模型。 請使用以下程式碼:
:path=/static-assets/pdf/content-code-examples/how-to/cshtml-to-pdf-mvc-framework-model.csnamespace ViewToPdfMVCSample.Models
{
public class Person
{
public int Id { get; set; }
public string Name { get; set; }
public string Title { get; set; }
public string Description { get; set; }
}
}Namespace ViewToPdfMVCSample.Models
Public Class Person
Public Property Id() As Integer
Public Property Name() As String
Public Property Title() As String
Public Property Description() As String
End Class
End Namespace如何編輯控制器?
我應該在控制器中加入什麼程式碼?
導航至"Controllers"資料夾,並開啟 HomeController 檔案。使用以下程式碼新增 Persons 動作:
在提供的程式碼中,首先建立 ChromePdfRenderer 類別。 若要使用 RenderView 方法,請提供 HttpContext,指定"Persons.cshtml"檔案的路徑,並提供包含必要資料的 List<Person>。 在渲染視圖時,您可以利用 RenderingOptions 自訂邊距、新增自訂文字及 HTML 頁首與頁尾,並在生成的 PDF 文件中加入頁碼。
File(pdf.BinaryData, "application/pdf", "viewToPdfMVC.pdf")。using IronPdf;
using System.Collections.Generic;
using System.Web.Mvc;
using ViewToPdfMVCSample.Models;
namespace ViewToPdfMVCSample.Controllers
{
public class HomeController : Controller
{
public ActionResult Index()
{
return View();
}
// GET: Person
public ActionResult Persons()
{
// Create a list of Person objects
var persons = new List<Person>
{
new Person { Name = "Alice", Title = "Mrs.", Description = "Software Engineer" },
new Person { Name = "Bob", Title = "Mr.", Description = "Software Engineer" },
new Person { Name = "Charlie", Title = "Mr.", Description = "Software Engineer" }
};
if (HttpContext.Request.HttpMethod == "POST")
{
// Define the path to the View file
var viewPath = "~/Views/Home/Persons.cshtml";
// Instantiate the ChromePdfRenderer
ChromePdfRenderer renderer = new ChromePdfRenderer();
// Render the view to a PDF document
PdfDocument pdf = renderer.RenderView(this.HttpContext, viewPath, persons);
// Set headers to view the PDF in-browser
Response.Headers.Add("Content-Disposition", "inline");
// Return the generated PDF file
return File(pdf.BinaryData, "application/pdf");
}
return View(persons);
}
public ActionResult About()
{
ViewBag.Message = "Your application description page.";
return View();
}
public ActionResult Contact()
{
ViewBag.Message = "Your contact page.";
return View();
}
}
}using IronPdf;
using System.Collections.Generic;
using System.Web.Mvc;
using ViewToPdfMVCSample.Models;
namespace ViewToPdfMVCSample.Controllers
{
public class HomeController : Controller
{
public ActionResult Index()
{
return View();
}
// GET: Person
public ActionResult Persons()
{
// Create a list of Person objects
var persons = new List<Person>
{
new Person { Name = "Alice", Title = "Mrs.", Description = "Software Engineer" },
new Person { Name = "Bob", Title = "Mr.", Description = "Software Engineer" },
new Person { Name = "Charlie", Title = "Mr.", Description = "Software Engineer" }
};
if (HttpContext.Request.HttpMethod == "POST")
{
// Define the path to the View file
var viewPath = "~/Views/Home/Persons.cshtml";
// Instantiate the ChromePdfRenderer
ChromePdfRenderer renderer = new ChromePdfRenderer();
// Render the view to a PDF document
PdfDocument pdf = renderer.RenderView(this.HttpContext, viewPath, persons);
// Set headers to view the PDF in-browser
Response.Headers.Add("Content-Disposition", "inline");
// Return the generated PDF file
return File(pdf.BinaryData, "application/pdf");
}
return View(persons);
}
public ActionResult About()
{
ViewBag.Message = "Your application description page.";
return View();
}
public ActionResult Contact()
{
ViewBag.Message = "Your contact page.";
return View();
}
}
}Imports IronPdf
Imports System.Collections.Generic
Imports System.Web.Mvc
Imports ViewToPdfMVCSample.Models
Namespace ViewToPdfMVCSample.Controllers
Public Class HomeController
Inherits Controller
Public Function Index() As ActionResult
Return View()
End Function
' GET: Person
Public Function Persons() As ActionResult
' Create a list of Person objects
'INSTANT VB NOTE: The local variable persons was renamed since Visual Basic will not allow local variables with the same name as their enclosing function or property:
Dim persons_Conflict = New List(Of Person) From {
New Person With {
.Name = "Alice",
.Title = "Mrs.",
.Description = "Software Engineer"
},
New Person With {
.Name = "Bob",
.Title = "Mr.",
.Description = "Software Engineer"
},
New Person With {
.Name = "Charlie",
.Title = "Mr.",
.Description = "Software Engineer"
}
}
If HttpContext.Request.HttpMethod = "POST" Then
' Define the path to the View file
Dim viewPath = "~/Views/Home/Persons.cshtml"
' Instantiate the ChromePdfRenderer
Dim renderer As New ChromePdfRenderer()
' Render the view to a PDF document
Dim pdf As PdfDocument = renderer.RenderView(Me.HttpContext, viewPath, persons_Conflict)
' Set headers to view the PDF in-browser
Response.Headers.Add("Content-Disposition", "inline")
' Return the generated PDF file
Return File(pdf.BinaryData, "application/pdf")
End If
Return View(persons_Conflict)
End Function
Public Function About() As ActionResult
ViewBag.Message = "Your application description page."
Return View()
End Function
Public Function Contact() As ActionResult
ViewBag.Message = "Your contact page."
Return View()
End Function
End Class
End Namespace如何自訂 PDF 渲染選項?
針對更進階的應用情境,您可以透過各種渲染選項自訂 PDF 輸出格式。 以下是一個包含自訂邊距、紙張尺寸及額外設定的範例:
// Advanced rendering with custom options
public ActionResult PersonsAdvanced()
{
    var persons = GetPersonsList();

    if (HttpContext.Request.HttpMethod == "POST")
    {
        var viewPath = "~/Views/Home/Persons.cshtml";

        // Configure the renderer with custom options
        ChromePdfRenderer renderer = new ChromePdfRenderer();

        // Set custom rendering options
        renderer.RenderingOptions.MarginTop = 40;
        renderer.RenderingOptions.MarginBottom = 40;
        renderer.RenderingOptions.MarginLeft = 20;
        renderer.RenderingOptions.MarginRight = 20;

        // Set custom paper size
        renderer.RenderingOptions.PaperSize = IronPdf.Rendering.PdfPaperSize.A4;
        renderer.RenderingOptions.PaperOrientation = IronPdf.Rendering.PdfPaperOrientation.Portrait;

        // Add header and footer
        renderer.RenderingOptions.TextHeader.DrawDividerLine = true;
        renderer.RenderingOptions.TextHeader.CenterText = "{pdf-title}";
        renderer.RenderingOptions.TextHeader.Font = IronPdf.Font.FontTypes.Helvetica;
        renderer.RenderingOptions.TextHeader.FontSize = 12;

        renderer.RenderingOptions.TextFooter.DrawDividerLine = true;
        renderer.RenderingOptions.TextFooter.Font = IronPdf.Font.FontTypes.Arial;
        renderer.RenderingOptions.TextFooter.FontSize = 10;
        renderer.RenderingOptions.TextFooter.RightText = "{page} of {total-pages}";

        // Enable JavaScript execution if needed
        renderer.RenderingOptions.EnableJavaScript = true;
        renderer.RenderingOptions.RenderDelay = 500; // Wait for JS to execute

        // Render the view to PDF
        PdfDocument pdf = renderer.RenderView(this.HttpContext, viewPath, persons);

        // Optional: Apply compression to reduce file size
        pdf.CompressImages(60);

        Response.Headers.Add("Content-Disposition", "inline");
        return File(pdf.BinaryData, "application/pdf");
    }

    return View("Persons", persons);
}
// Advanced rendering with custom options
public ActionResult PersonsAdvanced()
{
var persons = GetPersonsList();
if (HttpContext.Request.HttpMethod == "POST")
{
var viewPath = "~/Views/Home/Persons.cshtml";
// Configure the renderer with custom options
ChromePdfRenderer renderer = new ChromePdfRenderer();
// Set custom rendering options
renderer.RenderingOptions.MarginTop = 40;
renderer.RenderingOptions.MarginBottom = 40;
renderer.RenderingOptions.MarginLeft = 20;
renderer.RenderingOptions.MarginRight = 20;
// Set custom paper size
renderer.RenderingOptions.PaperSize = IronPdf.Rendering.PdfPaperSize.A4;
renderer.RenderingOptions.PaperOrientation = IronPdf.Rendering.PdfPaperOrientation.Portrait;
// Add header and footer
renderer.RenderingOptions.TextHeader.DrawDividerLine = true;
renderer.RenderingOptions.TextHeader.CenterText = "{pdf-title}";
renderer.RenderingOptions.TextHeader.Font = IronPdf.Font.FontTypes.Helvetica;
renderer.RenderingOptions.TextHeader.FontSize = 12;
renderer.RenderingOptions.TextFooter.DrawDividerLine = true;
renderer.RenderingOptions.TextFooter.Font = IronPdf.Font.FontTypes.Arial;
renderer.RenderingOptions.TextFooter.FontSize = 10;
renderer.RenderingOptions.TextFooter.RightText = "{page} of {total-pages}";
// Enable JavaScript execution if needed
renderer.RenderingOptions.EnableJavaScript = true;
renderer.RenderingOptions.RenderDelay = 500; // Wait for JS to execute
// Render the view to PDF
PdfDocument pdf = renderer.RenderView(this.HttpContext, viewPath, persons);
// Optional: Apply compression to reduce file size
pdf.CompressImages(60);
Response.Headers.Add("Content-Disposition", "inline");
return File(pdf.BinaryData, "application/pdf");
}
return View("Persons", persons);
}Imports System.Web.Mvc
Imports IronPdf
' Advanced rendering with custom options
Public Function PersonsAdvanced() As ActionResult
Dim persons = GetPersonsList()
If HttpContext.Request.HttpMethod = "POST" Then
Dim viewPath = "~/Views/Home/Persons.cshtml"
' Configure the renderer with custom options
Dim renderer As New ChromePdfRenderer()
' Set custom rendering options
renderer.RenderingOptions.MarginTop = 40
renderer.RenderingOptions.MarginBottom = 40
renderer.RenderingOptions.MarginLeft = 20
renderer.RenderingOptions.MarginRight = 20
' Set custom paper size
renderer.RenderingOptions.PaperSize = IronPdf.Rendering.PdfPaperSize.A4
renderer.RenderingOptions.PaperOrientation = IronPdf.Rendering.PdfPaperOrientation.Portrait
' Add header and footer
renderer.RenderingOptions.TextHeader.DrawDividerLine = True
renderer.RenderingOptions.TextHeader.CenterText = "{pdf-title}"
renderer.RenderingOptions.TextHeader.Font = IronPdf.Font.FontTypes.Helvetica
renderer.RenderingOptions.TextHeader.FontSize = 12
renderer.RenderingOptions.TextFooter.DrawDividerLine = True
renderer.RenderingOptions.TextFooter.Font = IronPdf.Font.FontTypes.Arial
renderer.RenderingOptions.TextFooter.FontSize = 10
renderer.RenderingOptions.TextFooter.RightText = "{page} of {total-pages}"
' Enable JavaScript execution if needed
renderer.RenderingOptions.EnableJavaScript = True
renderer.RenderingOptions.RenderDelay = 500 ' Wait for JS to execute
' Render the view to PDF
Dim pdf As PdfDocument = renderer.RenderView(Me.HttpContext, viewPath, persons)
' Optional: Apply compression to reduce file size
pdf.CompressImages(60)
Response.Headers.Add("Content-Disposition", "inline")
Return File(pdf.BinaryData, "application/pdf")
End If
Return View("Persons", persons)
End Function如需更多關於優化邊距的資訊,請參閱我們的《設定自訂邊距》指南。 若需處理特定紙張尺寸,請參閱我們的"自訂紙張尺寸"文件。
生成的 PDF 檔案可以做什麼?
一旦透過 RenderView 方法取得 PdfDocument 物件,您便可對其進行各種改進與調整。 您可以將 PDF 轉換為 PDF/A 或 PDFUA 格式,對生成的 PDF 套用數位簽章,或根據需求合併及分割 PDF 文件。 此函式庫讓您能夠旋轉頁面、插入註解或書籤,並在 PDF 檔案上套用獨特的水印。
為優化檔案大小,請考慮採用 PDF 壓縮技術。 在處理大量 JavaScript 內容時,我們的 JavaScript 渲染指南提供了關於處理自訂渲染延遲的詳細資訊。 有關各種匯出選項,請參閱我們關於"儲存與匯出 PDF 文件"的完整指南。
如何新增檢視?
我該遵循哪些步驟來建立視圖?
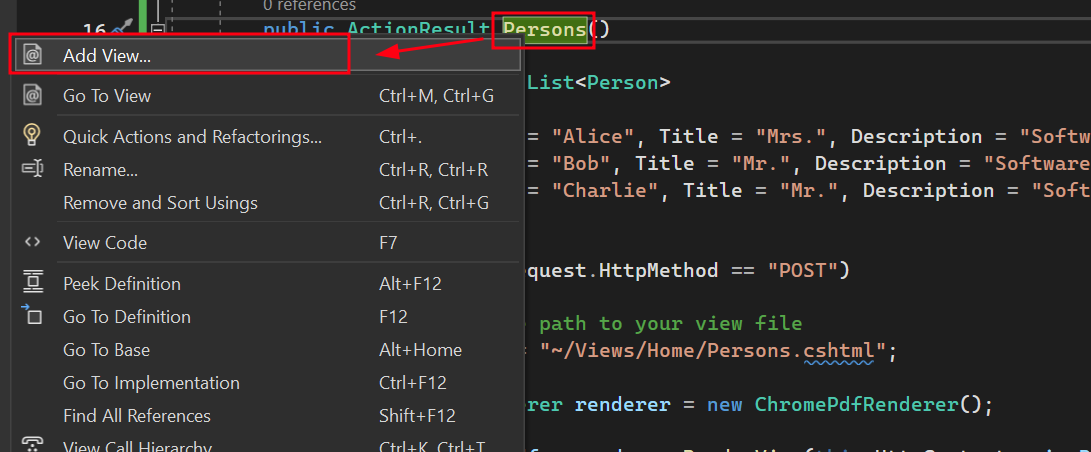
- 右鍵點擊新新增的"Person"動作,並選擇"新增檢視"。
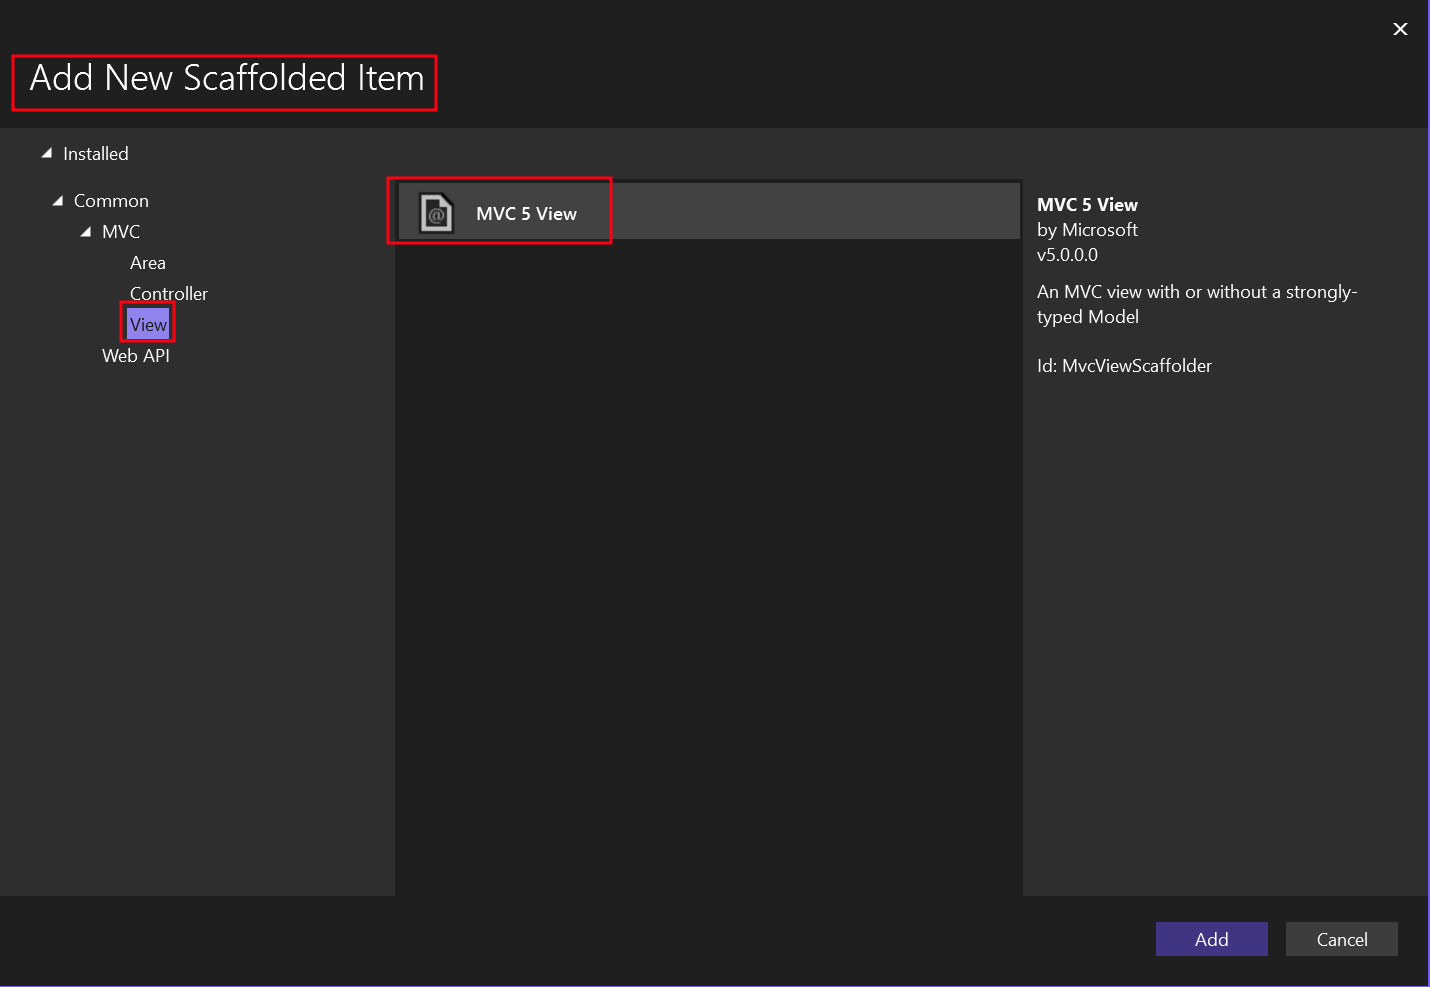
- 為新的 Scaffolded 項目選擇"MVC 5 View"。
- 請選擇"List"範本及
Person模型類別。
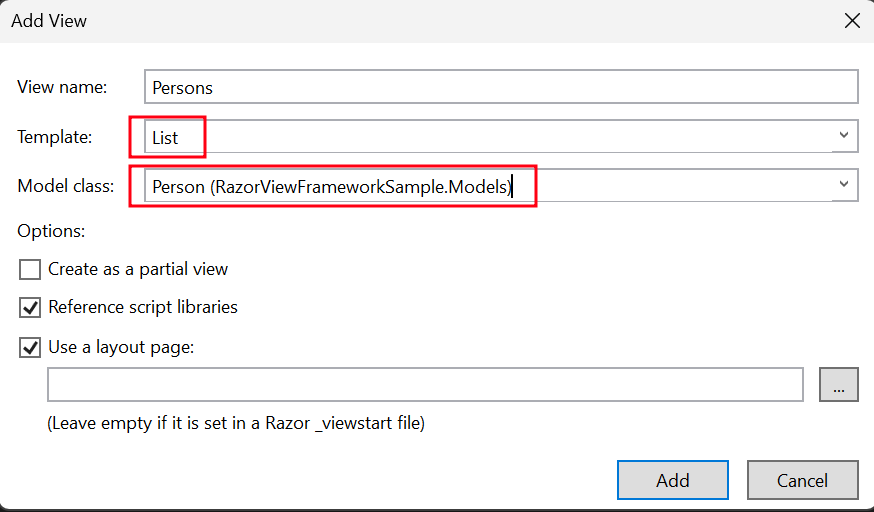
這會建立一個名為"Persons"的 .cshtml 檔案。
如何在檢視中新增PRINT按鈕?
- 導航至"Views"資料夾 -> "首頁"資料夾 -> "Persons.cshtml"檔案。
若要新增一個可觸發 Persons 動作的按鈕,請使用以下程式碼:
@using (Html.BeginForm("Persons", "Home", FormMethod.Post))
{
    <input type="submit" value="Print Person" />
}
@using (Html.BeginForm("Persons", "Home", FormMethod.Post))
{
<input type="submit" value="Print Person" />
}如何在頂部導覽列中新增區塊?
我應該在哪裡更新導覽列?
- 在"Views"資料夾中,導航至"Shared"資料夾 -> "_Layout.cshtml"檔案。將"Person"導覽項目置於"首頁"之後。
請確保 ActionLink 方法的參數值與我們的檔案名稱"Persons"完全一致。
<nav class="navbar navbar-expand-sm navbar-toggleable-sm navbar-dark bg-dark">
    <div class="container">
        @Html.ActionLink("Application name", "Index", "Home", new { area = "" }, new { @class = "navbar-brand" })
        <button type="button" class="navbar-toggler" data-bs-toggle="collapse" data-bs-target=".navbar-collapse" title="Toggle navigation" aria-controls="navbarSupportedContent" aria-expanded="false" aria-label="Toggle navigation">
            <span class="navbar-toggler-icon"></span>
        </button>
        <div class="collapse navbar-collapse d-sm-inline-flex justify-content-between">
            <ul class="navbar-nav flex-grow-1">
                <li>@Html.ActionLink("Home", "Index", "Home", new { area = "" }, new { @class = "nav-link" })</li>
                <li>@Html.ActionLink("Persons", "Persons", "Home", new { area = "" }, new { @class = "nav-link" })</li>
                <li>@Html.ActionLink("About", "About", "Home", new { area = "" }, new { @class = "nav-link" })</li>
                <li>@Html.ActionLink("Contact", "Contact", "Home", new { area = "" }, new { @class = "nav-link" })</li>
            </ul>
        </div>
    </div>
</nav>
<nav class="navbar navbar-expand-sm navbar-toggleable-sm navbar-dark bg-dark">
<div class="container">
@Html.ActionLink("Application name", "Index", "Home", new { area = "" }, new { @class = "navbar-brand" })
<button type="button" class="navbar-toggler" data-bs-toggle="collapse" data-bs-target=".navbar-collapse" title="Toggle navigation" aria-controls="navbarSupportedContent" aria-expanded="false" aria-label="Toggle navigation">
<span class="navbar-toggler-icon"></span>
</button>
<div class="collapse navbar-collapse d-sm-inline-flex justify-content-between">
<ul class="navbar-nav flex-grow-1">
<li>@Html.ActionLink("Home", "Index", "Home", new { area = "" }, new { @class = "nav-link" })</li>
<li>@Html.ActionLink("Persons", "Persons", "Home", new { area = "" }, new { @class = "nav-link" })</li>
<li>@Html.ActionLink("About", "About", "Home", new { area = "" }, new { @class = "nav-link" })</li>
<li>@Html.ActionLink("Contact", "Contact", "Home", new { area = "" }, new { @class = "nav-link" })</li>
</ul>
</div>
</div>
</nav>如何執行與測試此專案?
執行專案
此處將向您展示如何執行專案並產生 PDF 文件。

輸出 PDF
我該去哪裡下載完整的專案?
範例專案包含哪些內容?
您可以下載本指南的完整程式碼。該檔案為 ZIP 檔,您可在 Visual Studio 中將其開啟為 ASP.NET Web Application (.NET Framework) MVC 專案。 此範例包含所有必要的設定、模型類別、控制器及檢視,讓您能快速在 MVC 應用程式中開始進行 PDF 生成。
常見問題
如何在 ASP.NET MVC 中將 CSHTML 檢視轉換為 PDF?
您可以在 ASP.NET MVC 中使用 IronPDF 的 ChromePdfRenderer.RenderView() 方法,將 CSHTML 檢視轉換為 PDF。只需安裝 IronPdf.Extensions.Mvc.Framework 套件,並使用此渲染方法,僅需幾行程式碼即可將您的檢視轉換為高品質的 PDF 文件。
將視圖渲染為 PDF 所需的最小程式碼為何?
將視圖渲染為 PDF 的最簡程式碼如下:var pdf = new IronPdf.ChromePdfRenderer.RenderRazorToPdf(this.ControllerContext); 這一行使用 IronPdf 的程式碼將把您當前的視圖轉換為 PDF 文件。
進行 ASP.NET MVC PDF 生成時,我需要哪個擴充套件?
對於 ASP.NET MVC 應用程式,您需要 IronPdf.Extensions.Mvc.Framework 套件。此擴充套件可與 ASP.NET MVC 專案無縫整合,並與主要 IronPdf 套件協同運作,以實現視圖轉 PDF 的功能。
轉換檢視表為 PDF 時使用的是哪種渲染引擎?
IronPDF 採用 Chrome PDF 渲染引擎,確保將視圖轉換為 PDF 時能達到像素級的精準度。此引擎能在最終的 PDF 輸出中完整保留原始 CSHTML 視圖中的所有樣式、版面配置及互動元素。
我可以在 MVC 檢視中產生發票和報表嗎?
是的,IronPDF 非常適合從您的 MVC 檢視中產生發票、報告及任何其他文件。此函式庫提供專業的 PDF 輸出功能,使其成為直接從您的網頁應用程式檢視中建立商業文件的理想選擇。
要實現「檢視轉 PDF」功能,基本步驟有哪些?
基本實作包含 5 個步驟:1) 下載並安裝 IronPDF 函式庫,2) 為您的資料新增模型類別,3) 使用 RenderView 方法建立控制器動作,4) 透過 MVC 5 檢視骨架新增檢視,以及 5) 使用 IronPDF 的渲染方法執行轉換。
PDF 輸出是否保留原始的版面樣式?
是的,IronPDF 的 Chrome 渲染引擎可確保您 CSHTML 視圖中的所有 CSS 樣式、版面配置及互動元素,皆能完整保留於 PDF 輸出中。這能提供像素級的精準度,並維持原始網頁視圖的視覺完整性。


還在捲動嗎?
想快速獲得證明嗎? PM > Install-Package IronPdf
執行範例 看您的HTML變成PDF。


