ASP.NETのC#でRazorページをPDFに変換する方法
IronPDFは、RenderRazorToPdfメソッドを使用して、ASP.NET CoreアプリケーションでRazor Pages (.cshtmlファイル)をPDFドキュメントにシームレスに変換し、C#とHTMLレンダリングを完全にサポートしてWebコンテンツからのPDF生成を簡素化します。
Razor Page は、.cshtml という拡張子を持つファイルで、C# と HTML を組み合わせてウェブコンテンツを生成します。 .NET Coreでは、Razor PagesはWebアプリケーションのコードを整理するシンプルな方法で、読み取り専用や単純なデータ入力を行うシンプルなページに最適です。
ASP.NET Core Web Appは、ASP.NET Coreを使用して構築されたWebアプリケーションで、これは現代のWebアプリケーションを開発するためのクロスプラットフォームフレームワークです。
IronPDFは、ASP.NET Core Web Appプロジェクト内でRazor PagesからPDFファイルを作成するプロセスを簡素化します。 これにより、ASP.NET Core Web AppsでのPDF生成が簡単になります。
クイックスタート: Razor Pagesを数秒でPDFに変換する
.NET CoreアプリケーションでRazor Pagesを高品質のPDFに変換します。 RenderRazorToPdfメソッドを使用することで、CSHTMLファイルをPDFドキュメントに変換し、ワークフローを最適化し、ドキュメントの配布を強化することができます。 このガイドでは、これを数分で達成するために必要な簡単な手順を説明します。
 今すぐ NuGet で PDF を作成してみましょう:
NuGet パッケージ マネージャーを使用して IronPDF をインストールします
このコード スニペットをコピーして実行します。
// インストール-パッケージ IronPdf.Extensions.Razor
var pdf = new IronPdf.ChromePdfRenderer().RenderRazorToPdf("Views/Home/Index.cshtml");
実際の環境でテストするためにデプロイする
最小限のワークフロー(5ステップ)
- ASP.NETコアWebアプリでRazorページをPDFに変換するためのC#ライブラリをダウンロードする。
- データ用のモデルクラスを追加する
- 新しいRazorページを作成し、データを表示するために".cshtml "ファイルを編集してください。
- .cs "ファイルを編集し、
RenderRazorToPdfメソッドを使用してください。 - クイックスタート用のサンプルプロジェクトをダウンロード
はじめに
Razor Pages は、ASP.NET Core アプリケーションで動的な Web コンテンツを構築するための強力かつ直感的な方法を提供します。 IronPDFのレンダリング機能と組み合わせることで、開発者はウェブコンテンツから直接プロフェッショナルなPDFドキュメントを作成することができます。 このアプローチでは、複雑なPDF生成ロジックを排除し、既存のHTMLとCSSのスキルを使用することができます。
IronPdfとRazor Pagesの統合は、レポート、請求書、証明書、その他ダイナミックなデータ表示が必要な文書の作成に特に有効です。 すでに使い慣れたRazorの構文を使用することで、WebビューとPDF出力の一貫性を保つことができます。
どの NuGet パッケージが Razor から PDF への変換に必要ですか?
IronPdf.Extensions.Razorパッケージは、メインのIronPdfパッケージの拡張です。 IronPdf.Extensions.Razor と IronPdf パッケージの両方が、ASP.NET Core Web App で Razor Pages を PDF ドキュメントにレンダリングするために必要です。詳細なインストール手順については、インストールの概要ガイドをご覧ください。
# Command to install IronPdf.Extensions.Razor package using NuGet Package Manager
インストール-パッケージ IronPdf.Extensions.Razor
# Command to install IronPdf.Extensions.Razor package using NuGet Package Manager
インストール-パッケージ IronPdf.Extensions.Razor .
.Install with NuGet
インストール-パッケージ IronPdf.Extensions.Razor
どのようにASP.NET CoreでRazorページをPDFに変換しますか?
Razor PagesをPDFファイルに変換するには、ASP.NET Core Web Appプロジェクトが必要です。 このプロセスでは、データのモデルを作成し、そのデータを表示するRazor Pageを設定し、IronPDFのRenderRazorToPdfメソッドを使ってPDF出力を生成します。
なぜPDF生成にモデルクラスが必要なのか
モデルクラスは、Razor Pages のデータ表現のバックボーンとして機能します。 これらのツールは、コントローラロジックからビューにデータを渡すための構造化された方法を提供し、型の安全性と保守性を保証します。 PDFを作成する場合、これらのモデルは、最終的なドキュメントに表示されるデータの正確な構造を定義するため、さらに重要になります。
- プロジェクトに新しいフォルダを作成し、"Models"と名付けます。
- フォルダに標準的なC#クラスを追加し、"Person"と名付けます。このクラスは個々のデータのモデルとして使用されます。 次のコードスニペットを使用してください。
:path=/static-assets/pdf/content-code-examples/how-to/cshtml-to-pdf-razor-model.csnamespace RazorPageSample.Models
{
public class Person
{
public int Id { get; set; }
public string Name { get; set; }
public string Title { get; set; }
public string Description { get; set; }
}
}PDF変換用にRazorページを設定するにはどうすればよいですか?
"Pages"フォルダに空のRazor Pageを追加し、"persons.cshtml"と名付けます。
- 新しく作成された "Persons.cshtml "ファイルを、以下で提供されるコードサンプルを使用して修正してください。
以下のコードは、ブラウザに情報を表示します。 Razorの構文により、HTML内にC#コードをシームレスに統合できるため、PDFに変換可能な動的コンテンツの生成に最適であることに注目してください:
@page
@using RazorPageSample.Models;
@model RazorPageSample.Pages.PersonsModel
@{
}

<table class="table">
    <tr>
        <th>Name</th>
        <th>Title</th>
        <th>Description</th>
    </tr>
    @foreach (var person in ViewData["personList"] as List<Person>)
    {
        <tr>
            <td>@person.Name</td>
            <td>@person.Title</td>
            <td>@person.Description</td>
        </tr>
    }
</table>

<form method="post">
    <button type="submit">Print</button>
</form>
@page
@using RazorPageSample.Models;
@model RazorPageSample.Pages.PersonsModel
@{
}
<table class="table">
<tr>
<th>Name</th>
<th>Title</th>
<th>Description</th>
</tr>
@foreach (var person in ViewData["personList"] as List<Person>)
{
<tr>
<td>@person.Name</td>
<td>@person.Title</td>
<td>@person.Description</td>
</tr>
}
</table>
<form method="post">
<button type="submit">Print</button>
</form>Razor PagesをPDFにレンダリングする
次に、次のコードはChromePdfRendererクラスをインスタンス化します。 thisをRenderRazorToPdfメソッドに渡すだけで、このRazor PageをPDFドキュメントに変換するのに十分です。
あなたは、RenderingOptionsで利用可能な機能に完全にアクセスできます。 これらの機能には、生成されたPDFにページ番号を適用する機能、カスタムマージンを設定する機能、カスタムテキストやHTMLヘッダーとフッターを追加する機能などが含まれます。 また、文書の適切な識別と検索性を確保するために、PDFにメタデータを設定することもできます。
- "Persons.cshtml"ファイルを開くと、"Persons.cshtml.cs"ファイルが表示されます。
- 以下のコードで"Persons.cshtml.cs"を修正します。
using IronPdf.Razor;
using Microsoft.AspNetCore.Mvc;
using Microsoft.AspNetCore.Mvc.RazorPages;
using RazorPageSample.Models;

namespace RazorPageSample.Pages
{
    public class PersonsModel : PageModel
    {
        [BindProperty(SupportsGet = true)]
        public List<Person> Persons { get; set; }

        // Handle GET request to load initial data
        public void OnGet()
        {
            Persons = new List<Person>
            {
                new Person { Name = "Alice", Title = "Mrs.", Description = "Software Engineer" },
                new Person { Name = "Bob", Title = "Mr.", Description = "Software Engineer" },
                new Person { Name = "Charlie", Title = "Mr.", Description = "Software Engineer" }
            };

            ViewData["personList"] = Persons;
        }

        // Handle POST request to convert Razor page to PDF
        public IActionResult OnPost()
        {
            Persons = new List<Person>
            {
                new Person { Name = "Alice", Title = "Mrs.", Description = "Software Engineer" },
                new Person { Name = "Bob", Title = "Mr.", Description = "Software Engineer" },
                new Person { Name = "Charlie", Title = "Mr.", Description = "Software Engineer" }
            };

            ViewData["personList"] = Persons;

            ChromePdfRenderer renderer = new ChromePdfRenderer();

            // Render Razor Page to PDF document
            PdfDocument pdf = renderer.RenderRazorToPdf(this);

            // Return the generated PDF file with appropriate content headers
            Response.Headers.Add("Content-Disposition", "inline");
            return File(pdf.BinaryData, "application/pdf", "razorPageToPdf.pdf");

            // Optionally view the output PDF in browser (uncomment below line if needed)
            // return File(pdf.BinaryData, "application/pdf");
        }
    }
}
using IronPdf.Razor;
using Microsoft.AspNetCore.Mvc;
using Microsoft.AspNetCore.Mvc.RazorPages;
using RazorPageSample.Models;
namespace RazorPageSample.Pages
{
public class PersonsModel : PageModel
{
[BindProperty(SupportsGet = true)]
public List<Person> Persons { get; set; }
// Handle GET request to load initial data
public void OnGet()
{
Persons = new List<Person>
{
new Person { Name = "Alice", Title = "Mrs.", Description = "Software Engineer" },
new Person { Name = "Bob", Title = "Mr.", Description = "Software Engineer" },
new Person { Name = "Charlie", Title = "Mr.", Description = "Software Engineer" }
};
ViewData["personList"] = Persons;
}
// Handle POST request to convert Razor page to PDF
public IActionResult OnPost()
{
Persons = new List<Person>
{
new Person { Name = "Alice", Title = "Mrs.", Description = "Software Engineer" },
new Person { Name = "Bob", Title = "Mr.", Description = "Software Engineer" },
new Person { Name = "Charlie", Title = "Mr.", Description = "Software Engineer" }
};
ViewData["personList"] = Persons;
ChromePdfRenderer renderer = new ChromePdfRenderer();
// Render Razor Page to PDF document
PdfDocument pdf = renderer.RenderRazorToPdf(this);
// Return the generated PDF file with appropriate content headers
Response.Headers.Add("Content-Disposition", "inline");
return File(pdf.BinaryData, "application/pdf", "razorPageToPdf.pdf");
// Optionally view the output PDF in browser (uncomment below line if needed)
// return File(pdf.BinaryData, "application/pdf");
}
}
}RenderRazorToPdfメソッドは、PdfDocumentオブジェクトを返します。 PDFをPDFAまたはPDFUAとしてエクスポートしたり、レンダリングされたPDF文書に電子署名を適用したり、PDF文書を結合したり分割したりすることができます。 この方法では、ページの回転、注釈やしおりの追加、PDFへのカスタム透かしのスタンプも可能です。
文書管理を強化するために、品質を損なうことなくファイルサイズを縮小するためにPDFを圧縮することもできます。 これは、大規模なレポートを扱う場合や、帯域幅が懸念される場合に特に役立ちます。 さらに、IronPDFが提供する幅広い編集機能については、包括的なPDF編集チュートリアルで説明しています。
PDF生成ページにナビゲーションを追加するには?
ナビゲーションは、ASP.NET Coreアプリケーションのユーザーエクスペリエンスにとって非常に重要です。 PDF生成ページをメインナビゲーションに統合することで、ユーザーはURLを手入力することなく、簡単に機能にアクセスすることができます。
- Pagesフォルダ -> Sharedフォルダ -> _Layout.cshtmlに移動します。 "Home"の後に"Person"ナビゲーション項目を配置します。
asp-page属性の値が、ファイル名と正確に一致していることを確認してください。 これにより、ASP.NET Coreアプリケーション内での適切なルーティングが保証されます:
<header>
    <nav class="navbar navbar-expand-sm navbar-toggleable-sm navbar-light bg-white border-bottom box-shadow mb-3">
        <div class="container">
            <a class="navbar-brand" asp-area="" asp-page="/Index">RazorPageSample</a>
            <button class="navbar-toggler" type="button" data-bs-toggle="collapse" data-bs-target=".navbar-collapse" aria-controls="navbarSupportedContent"
                    aria-expanded="false" aria-label="Toggle navigation">
                <span class="navbar-toggler-icon"></span>
            </button>
            <div class="navbar-collapse collapse d-sm-inline-flex justify-content-between">
                <ul class="navbar-nav flex-grow-1">
                    <li class="nav-item">
                        <a class="nav-link text-dark" asp-area="" asp-page="/Index">Home</a>
                    </li>
                    <li class="nav-item">
                        <a class="nav-link text-dark" asp-area="" asp-page="/Persons">Person</a>
                    </li>
                    <li class="nav-item">
                        <a class="nav-link text-dark" asp-area="" asp-page="/Privacy">Privacy</a>
                    </li>
                </ul>
            </div>
        </div>
    </nav>
</header>
<header>
<nav class="navbar navbar-expand-sm navbar-toggleable-sm navbar-light bg-white border-bottom box-shadow mb-3">
<div class="container">
<a class="navbar-brand" asp-area="" asp-page="/Index">RazorPageSample</a>
<button class="navbar-toggler" type="button" data-bs-toggle="collapse" data-bs-target=".navbar-collapse" aria-controls="navbarSupportedContent"
aria-expanded="false" aria-label="Toggle navigation">
<span class="navbar-toggler-icon"></span>
</button>
<div class="navbar-collapse collapse d-sm-inline-flex justify-content-between">
<ul class="navbar-nav flex-grow-1">
<li class="nav-item">
<a class="nav-link text-dark" asp-area="" asp-page="/Index">Home</a>
</li>
<li class="nav-item">
<a class="nav-link text-dark" asp-area="" asp-page="/Persons">Person</a>
</li>
<li class="nav-item">
<a class="nav-link text-dark" asp-area="" asp-page="/Privacy">Privacy</a>
</li>
</ul>
</div>
</div>
</nav>
</header>PDF生成を実行するとどうなりますか?
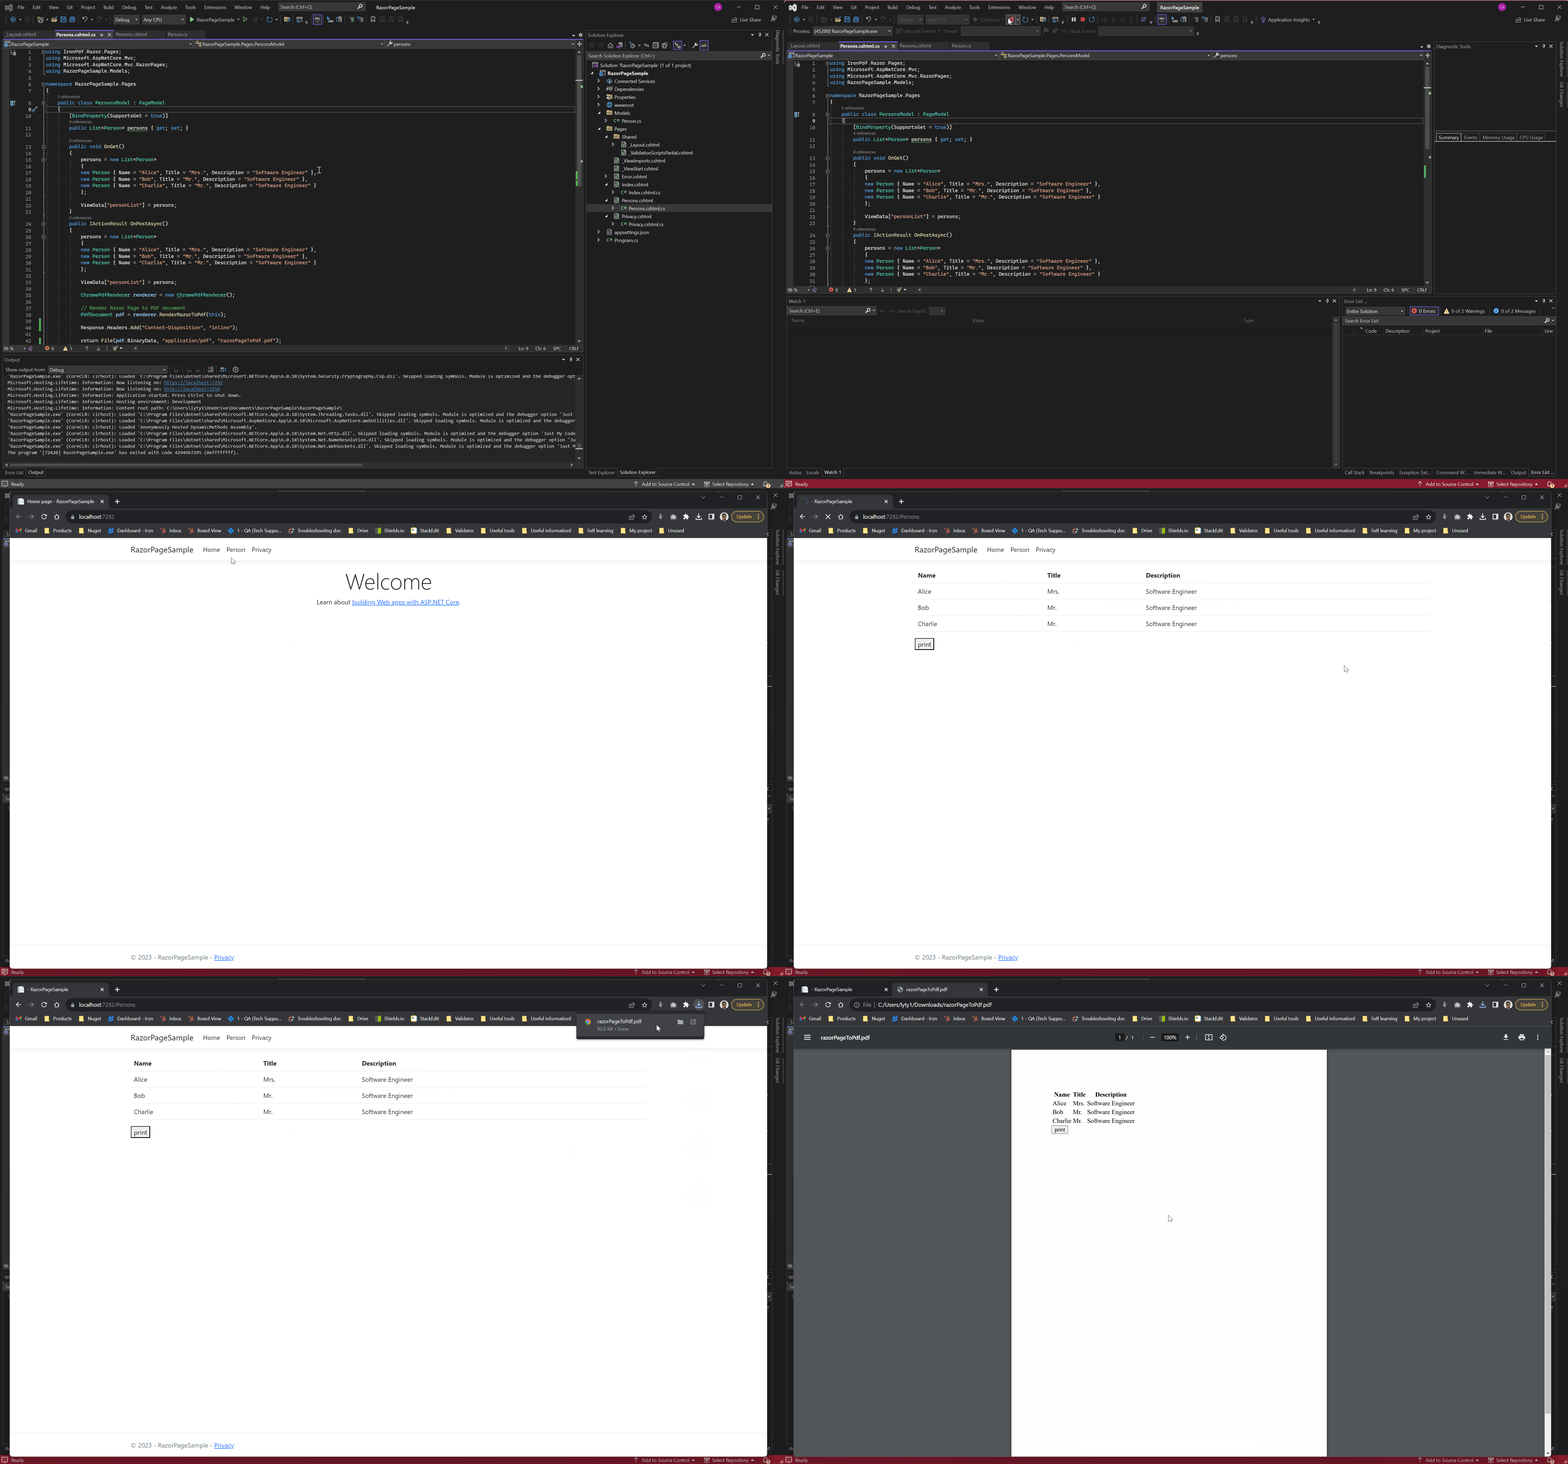
これは、プロジェクトを実行し、PDFドキュメントを生成する方法を示しています。 Person"ナビゲーションリンクをクリックすると、データが表形式で表示されます。 Print "ボタンをクリックすると、PDF生成プロセスが開始され、現在のRazor Pageビューがダウンロード可能なPDFドキュメントに変換されます。

生成されるPDFは、Razorページのすべてのスタイルと書式を維持し、ウェブビューとPDF出力の間で一貫した外観を保証します。 このアプローチは、レポートや請求書の作成、またはアプリケーションのデータベースやビジネスロジックからのデータを必要とする文書の作成に特に役立ちます。
完全なASP.NET Core Webアプリの例はどこでダウンロードできますか?
このガイドの完全なコードをVisual Studioで開くことができるASP.NET Core Web Appプロジェクトとしてzipファイルでダウンロードできます。
よくある質問
ASP.NET CoreでRazor PagesをPDFに変換するには?
IronPDF の RenderRazorToPdf メソッドを使用して、ASP.NET Core で Razor Pages を PDF に変換することができます。IronPdf.Extensions.Razorパッケージをインストールし、ChromePdfRendererを使って.cshtmlファイルを直接PDFドキュメントにレンダリングします。
Razor から PDF への変換に必要な NuGet パッケージは何ですか?
2つのNuGetパッケージが必要です:IronPdf.Extensions.Razor(拡張パッケージ)とIronPdf(メインパッケージ)です。どちらのパッケージもASP.NET Core Web AppsでRazor PagesをPDFドキュメントにレンダリングするために必要です。
PDFに変換する際、Razor Pagesでダイナミックデータを使用できますか?
はい、IronPDFはRazor Pagesのダイナミックデータを完全にサポートしています。C#コード、モデルバインディング、すべての標準的なRazor構文機能をPDFに変換する際に使用することができ、動的コンテンツを含むレポート、請求書、証明書の生成に最適です。
Razor Pages からどのような文書を作成できますか?
IronPDFのRazorからPDFへの変換は、レポート、請求書、証明書、領収書、その他既存のHTMLやCSSのスタイルを維持しながらダイナミックなデータ表示が必要なドキュメントなど、様々なドキュメントタイプの生成に最適です。
Razor から PDF への変換をプロジェクトに導入するには、どのくらい時間がかかりますか?
IronPDFを使えば数分でRazorからPDFへの変換を実装できます。ライブラリのインストール、モデルクラスの追加、Razorページの作成、RenderRazorToPdfメソッドを使用するための.csファイルの編集、そしてアプリケーションの実行です。
HTMLとCSSのスタイリングは維持されますか?
はい、IronPDFはRazor PagesをPDFに変換する際、HTMLとCSSのスタイルを保持します。これにより、すでに作成した同じスタイリングとレイアウトを使用して、WebビューとPDF出力の一貫性を維持することができます。


