

Jak konwertować Widoki do PDF w ASP.NET MVC za pomocą C
IronPDF umożliwia konwersję Widoków ASP.NET MVC do dokumentów PDF przy użyciu metody ChromePdfRenderer.RenderView() w zaledwie kilku liniach kodu. Pakiet IronPdf.Extensions.Mvc.Framework zapewnia bezproblemową integrację z projektami ASP.NET MVC do renderowania widoków CSHTML jako PDF.
Widok to komponent w .NET Framework używany do generowania znaczników HTML w aplikacjach internetowych. Jest to część wzorca Model-View-Controller (MVC), powszechnie stosowanego w aplikacjach ASP.NET MVC i ASP.NET Core MVC. Widoki są odpowiedzialne za prezentację danych użytkownikowi poprzez dynamiczne renderowanie treści HTML. Moc Chrome PDF Rendering Engine IronPDF zapewnia, że widoki są renderowane z dokładnością do piksela, zachowując wszelkie style, układy i elementy interaktywne.
ASP.NET Web Application (.NET Framework) MVC jest frameworkiem aplikacji internetowych zapewnianym przez Microsoft. Podąża za ustrukturyzowanym wzorcem architektonicznym znanym jako Model-View-Controller (MVC), aby organizować i usprawniać rozwój aplikacji internetowych.
- Model: Zarządza danymi, logiką biznesową i integralnością danych.
- Widok: Prezentuje interfejs użytkownika i renderuje informacje.
- Kontroler: Obsługuje wejście użytkownika, przetwarza żądania i orkiestruje interakcje między Modelem a Widokiem.
IronPDF upraszcza proces tworzenia plików PDF z Widoków w projekcie ASP.NET MVC. To sprawia, że generowanie PDF jest proste i bezpośrednie w ASP.NET MVC. Niezależnie od tego, czy generowane są faktury, raporty, czy jakiekolwiek dokumenty z widoków internetowych, IronPDF dostarcza narzędzi potrzebnych do profesjonalnego generowania PDF. Dla kompleksowego przewodnika po konfiguracji, odwiedź stronę Installation Overview.
Szybki start: Konwertuj Widok ASP.NET MVC na PDF bez wysiłku
Dowiedz się, jak szybko przekształcać Widoki ASP.NET MVC w dokumenty PDF używając IronPDF. W kilku liniach kodu można renderować widoki CSHTML do wysokiej jakości plików PDF, zwiększając funkcjonalność aplikacji. IronPDF upraszcza ten proces, czyniąc go dostępnym dla programistów na każdym poziomie. Warto rozpocząć, integrując IronPDF z projektami ASP.NET Core, aby bez wysiłku generować PDF z Widoków.
-
Install IronPDF with NuGet Package Manager
PM > Install-Package IronPdf -
Skopiuj i uruchom ten fragment kodu.
// Install-Package IronPdf.Extensions.Razor var pdf = new IronPdf.ChromePdfRenderer.RenderRazorToPdf(this.ControllerContext); -
Wdrożenie do testowania w środowisku produkcyjnym
Rozpocznij używanie IronPDF w swoim projekcie już dziś z darmową wersją próbną

Minimalny proces (5 kroków)
- Pobierz bibliotekę C# do konwersji Widoków do PDF w ASP.NET MVC
- Dodaj klasę modelu dla danych
- Utwórz akcję 'Person' w kontrolerze i użyj metody
RenderView - Dodaj Widok używając szkieletu Widoku MVC 5
- Pobierz przykładowy projekt, aby szybko rozpocząć pracę
Jakiego pakietu rozszerzeń potrzebuję?
Dlaczego IronPDF wymaga pakietu rozszerzeń?
Pakiet IronPdf.Extensions.Mvc.Framework jest rozszerzeniem głównego pakietu IronPdf. Do renderowania Widoków jako dokumentów PDF w ASP.NET MVC wymagane są zarówno pakiety IronPdf.Extensions.Mvc.Framework, jak i IronPdf. To rozdzielenie pozwala na zoptymalizowaną funkcjonalność specyficzną dla frameworka MVC przy jednoczesnym zachowaniu podstawowych możliwości renderowania PDF.
Jak zainstalować pakiet rozszerzeń?
Install-Package IronPdf.Extensions.Mvc.Framework
Zainstaluj za pomocą NuGet
Install-Package IronPdf.Extensions.Mvc.Framework
Jak renderować widoki do plików PDF?
Jakiego typu projektu potrzeba?
Do konwersji Widoków na pliki PDF wymagany jest projekt ASP.NET Web Application (.NET Framework) MVC. IronPDF obsługuje różne wersje MVC i oferuje rozbudowane opcje renderowania, pozwalające dostosować wyjście PDF do wymagań projektu.
Jak dodać klasę modelu?
Gdzie należy utworzyć Model?
- Przejdź do folderu 'Models'.
- Utwórz nowy plik klasy C# o nazwie 'Person'. Ta klasa służy jako model do reprezentowania danych indywidualnych. Użyj poniższego kodu:
:path=/static-assets/pdf/content-code-examples/how-to/cshtml-to-pdf-mvc-framework-model.csnamespace ViewToPdfMVCSample.Models
{
public class Person
{
public int Id { get; set; }
public string Name { get; set; }
public string Title { get; set; }
public string Description { get; set; }
}
}Namespace ViewToPdfMVCSample.Models
Public Class Person
Public Property Id() As Integer
Public Property Name() As String
Public Property Title() As String
Public Property Description() As String
End Class
End NamespaceJak edytować kontroler?
Jaki kod należy dodać do kontrolera?
Przejdź do folderu 'Controllers' i otwórz plik 'HomeController'. Dodaj akcję 'Persons' używając następującego kodu:
W podanym kodzie najpierw tworzona jest klasa ChromePdfRenderer. Aby użyć metody RenderView, podaj jej HttpContext, określ ścieżkę do pliku 'Persons.cshtml' i dostarcz List<Person> zawierającą niezbędne dane. Podczas renderowania Widoku można użyć RenderingOptions, aby dostosować marginesy, dodać niestandardowe nagłówki i stopki tekstowe oraz HTML i zastosować numery stron do tworzonego dokumentu PDF.
File(pdf.BinaryData, "application/pdf", "viewToPdfMVC.pdf").using IronPdf;
using System.Collections.Generic;
using System.Web.Mvc;
using ViewToPdfMVCSample.Models;
namespace ViewToPdfMVCSample.Controllers
{
public class HomeController : Controller
{
public ActionResult Index()
{
return View();
}
// GET: Person
public ActionResult Persons()
{
// Create a list of Person objects
var persons = new List<Person>
{
new Person { Name = "Alice", Title = "Mrs.", Description = "Software Engineer" },
new Person { Name = "Bob", Title = "Mr.", Description = "Software Engineer" },
new Person { Name = "Charlie", Title = "Mr.", Description = "Software Engineer" }
};
if (HttpContext.Request.HttpMethod == "POST")
{
// Define the path to the View file
var viewPath = "~/Views/Home/Persons.cshtml";
// Instantiate the ChromePdfRenderer
ChromePdfRenderer renderer = new ChromePdfRenderer();
// Render the view to a PDF document
PdfDocument pdf = renderer.RenderView(this.HttpContext, viewPath, persons);
// Set headers to view the PDF in-browser
Response.Headers.Add("Content-Disposition", "inline");
// Return the generated PDF file
return File(pdf.BinaryData, "application/pdf");
}
return View(persons);
}
public ActionResult About()
{
ViewBag.Message = "Your application description page.";
return View();
}
public ActionResult Contact()
{
ViewBag.Message = "Your contact page.";
return View();
}
}
}using IronPdf;
using System.Collections.Generic;
using System.Web.Mvc;
using ViewToPdfMVCSample.Models;
namespace ViewToPdfMVCSample.Controllers
{
public class HomeController : Controller
{
public ActionResult Index()
{
return View();
}
// GET: Person
public ActionResult Persons()
{
// Create a list of Person objects
var persons = new List<Person>
{
new Person { Name = "Alice", Title = "Mrs.", Description = "Software Engineer" },
new Person { Name = "Bob", Title = "Mr.", Description = "Software Engineer" },
new Person { Name = "Charlie", Title = "Mr.", Description = "Software Engineer" }
};
if (HttpContext.Request.HttpMethod == "POST")
{
// Define the path to the View file
var viewPath = "~/Views/Home/Persons.cshtml";
// Instantiate the ChromePdfRenderer
ChromePdfRenderer renderer = new ChromePdfRenderer();
// Render the view to a PDF document
PdfDocument pdf = renderer.RenderView(this.HttpContext, viewPath, persons);
// Set headers to view the PDF in-browser
Response.Headers.Add("Content-Disposition", "inline");
// Return the generated PDF file
return File(pdf.BinaryData, "application/pdf");
}
return View(persons);
}
public ActionResult About()
{
ViewBag.Message = "Your application description page.";
return View();
}
public ActionResult Contact()
{
ViewBag.Message = "Your contact page.";
return View();
}
}
}Imports IronPdf
Imports System.Collections.Generic
Imports System.Web.Mvc
Imports ViewToPdfMVCSample.Models
Namespace ViewToPdfMVCSample.Controllers
Public Class HomeController
Inherits Controller
Public Function Index() As ActionResult
Return View()
End Function
' GET: Person
Public Function Persons() As ActionResult
' Create a list of Person objects
'INSTANT VB NOTE: The local variable persons was renamed since Visual Basic will not allow local variables with the same name as their enclosing function or property:
Dim persons_Conflict = New List(Of Person) From {
New Person With {
.Name = "Alice",
.Title = "Mrs.",
.Description = "Software Engineer"
},
New Person With {
.Name = "Bob",
.Title = "Mr.",
.Description = "Software Engineer"
},
New Person With {
.Name = "Charlie",
.Title = "Mr.",
.Description = "Software Engineer"
}
}
If HttpContext.Request.HttpMethod = "POST" Then
' Define the path to the View file
Dim viewPath = "~/Views/Home/Persons.cshtml"
' Instantiate the ChromePdfRenderer
Dim renderer As New ChromePdfRenderer()
' Render the view to a PDF document
Dim pdf As PdfDocument = renderer.RenderView(Me.HttpContext, viewPath, persons_Conflict)
' Set headers to view the PDF in-browser
Response.Headers.Add("Content-Disposition", "inline")
' Return the generated PDF file
Return File(pdf.BinaryData, "application/pdf")
End If
Return View(persons_Conflict)
End Function
Public Function About() As ActionResult
ViewBag.Message = "Your application description page."
Return View()
End Function
Public Function Contact() As ActionResult
ViewBag.Message = "Your contact page."
Return View()
End Function
End Class
End NamespaceJak mogę dostosować opcje renderowania PDF?
Dla bardziej zaawansowanych scenariuszy można dostosować wyjście PDF za pomocą różnych opcji renderowania. Oto przykład z niestandardowymi marginesami, rozmiarem papieru i dodatkowymi ustawieniami:
// Advanced rendering with custom options
public ActionResult PersonsAdvanced()
{
    var persons = GetPersonsList();

    if (HttpContext.Request.HttpMethod == "POST")
    {
        var viewPath = "~/Views/Home/Persons.cshtml";

        // Configure the renderer with custom options
        ChromePdfRenderer renderer = new ChromePdfRenderer();

        // Set custom rendering options
        renderer.RenderingOptions.MarginTop = 40;
        renderer.RenderingOptions.MarginBottom = 40;
        renderer.RenderingOptions.MarginLeft = 20;
        renderer.RenderingOptions.MarginRight = 20;

        // Set custom paper size
        renderer.RenderingOptions.PaperSize = IronPdf.Rendering.PdfPaperSize.A4;
        renderer.RenderingOptions.PaperOrientation = IronPdf.Rendering.PdfPaperOrientation.Portrait;

        // Add header and footer
        renderer.RenderingOptions.TextHeader.DrawDividerLine = true;
        renderer.RenderingOptions.TextHeader.CenterText = "{pdf-title}";
        renderer.RenderingOptions.TextHeader.Font = IronPdf.Font.FontTypes.Helvetica;
        renderer.RenderingOptions.TextHeader.FontSize = 12;

        renderer.RenderingOptions.TextFooter.DrawDividerLine = true;
        renderer.RenderingOptions.TextFooter.Font = IronPdf.Font.FontTypes.Arial;
        renderer.RenderingOptions.TextFooter.FontSize = 10;
        renderer.RenderingOptions.TextFooter.RightText = "{page} of {total-pages}";

        // Enable JavaScript execution if needed
        renderer.RenderingOptions.EnableJavaScript = true;
        renderer.RenderingOptions.RenderDelay = 500; // Wait for JS to execute

        // Render the view to PDF
        PdfDocument pdf = renderer.RenderView(this.HttpContext, viewPath, persons);

        // Optional: Apply compression to reduce file size
        pdf.CompressImages(60);

        Response.Headers.Add("Content-Disposition", "inline");
        return File(pdf.BinaryData, "application/pdf");
    }

    return View("Persons", persons);
}
// Advanced rendering with custom options
public ActionResult PersonsAdvanced()
{
var persons = GetPersonsList();
if (HttpContext.Request.HttpMethod == "POST")
{
var viewPath = "~/Views/Home/Persons.cshtml";
// Configure the renderer with custom options
ChromePdfRenderer renderer = new ChromePdfRenderer();
// Set custom rendering options
renderer.RenderingOptions.MarginTop = 40;
renderer.RenderingOptions.MarginBottom = 40;
renderer.RenderingOptions.MarginLeft = 20;
renderer.RenderingOptions.MarginRight = 20;
// Set custom paper size
renderer.RenderingOptions.PaperSize = IronPdf.Rendering.PdfPaperSize.A4;
renderer.RenderingOptions.PaperOrientation = IronPdf.Rendering.PdfPaperOrientation.Portrait;
// Add header and footer
renderer.RenderingOptions.TextHeader.DrawDividerLine = true;
renderer.RenderingOptions.TextHeader.CenterText = "{pdf-title}";
renderer.RenderingOptions.TextHeader.Font = IronPdf.Font.FontTypes.Helvetica;
renderer.RenderingOptions.TextHeader.FontSize = 12;
renderer.RenderingOptions.TextFooter.DrawDividerLine = true;
renderer.RenderingOptions.TextFooter.Font = IronPdf.Font.FontTypes.Arial;
renderer.RenderingOptions.TextFooter.FontSize = 10;
renderer.RenderingOptions.TextFooter.RightText = "{page} of {total-pages}";
// Enable JavaScript execution if needed
renderer.RenderingOptions.EnableJavaScript = true;
renderer.RenderingOptions.RenderDelay = 500; // Wait for JS to execute
// Render the view to PDF
PdfDocument pdf = renderer.RenderView(this.HttpContext, viewPath, persons);
// Optional: Apply compression to reduce file size
pdf.CompressImages(60);
Response.Headers.Add("Content-Disposition", "inline");
return File(pdf.BinaryData, "application/pdf");
}
return View("Persons", persons);
}Imports System.Web.Mvc
Imports IronPdf
' Advanced rendering with custom options
Public Function PersonsAdvanced() As ActionResult
Dim persons = GetPersonsList()
If HttpContext.Request.HttpMethod = "POST" Then
Dim viewPath = "~/Views/Home/Persons.cshtml"
' Configure the renderer with custom options
Dim renderer As New ChromePdfRenderer()
' Set custom rendering options
renderer.RenderingOptions.MarginTop = 40
renderer.RenderingOptions.MarginBottom = 40
renderer.RenderingOptions.MarginLeft = 20
renderer.RenderingOptions.MarginRight = 20
' Set custom paper size
renderer.RenderingOptions.PaperSize = IronPdf.Rendering.PdfPaperSize.A4
renderer.RenderingOptions.PaperOrientation = IronPdf.Rendering.PdfPaperOrientation.Portrait
' Add header and footer
renderer.RenderingOptions.TextHeader.DrawDividerLine = True
renderer.RenderingOptions.TextHeader.CenterText = "{pdf-title}"
renderer.RenderingOptions.TextHeader.Font = IronPdf.Font.FontTypes.Helvetica
renderer.RenderingOptions.TextHeader.FontSize = 12
renderer.RenderingOptions.TextFooter.DrawDividerLine = True
renderer.RenderingOptions.TextFooter.Font = IronPdf.Font.FontTypes.Arial
renderer.RenderingOptions.TextFooter.FontSize = 10
renderer.RenderingOptions.TextFooter.RightText = "{page} of {total-pages}"
' Enable JavaScript execution if needed
renderer.RenderingOptions.EnableJavaScript = True
renderer.RenderingOptions.RenderDelay = 500 ' Wait for JS to execute
' Render the view to PDF
Dim pdf As PdfDocument = renderer.RenderView(Me.HttpContext, viewPath, persons)
' Optional: Apply compression to reduce file size
pdf.CompressImages(60)
Response.Headers.Add("Content-Disposition", "inline")
Return File(pdf.BinaryData, "application/pdf")
End If
Return View("Persons", persons)
End FunctionWięcej informacji o optymalizacji marginesów zawiera przewodnik Ustaw niestandardowe marginesy. Jeśli zachodzi potrzeba pracy z konkretnymi wymiarami papieru, warto zapoznać się z dokumentacją Niestandardowy rozmiar papieru.
Co można zrobić z wygenerowanym PDF?
Po uzyskaniu obiektu PdfDocument za pomocą metody RenderView możliwe jest dokonanie różnych ulepszeń i dostosowań. Można przekonwertować PDF na format PDFA lub PDFUA, zastosować podpisy cyfrowe do utworzonego PDF lub scalić i rozdzielić dokumenty PDF według potrzeb. Biblioteka umożliwia obracanie stron, dodawanie adnotacji lub zakładek oraz zastosowanie unikalnych znaków wodnych do plików PDF.
Aby zoptymalizować rozmiar pliku, rozważ użycie technik Kompresji PDF. Podczas pracy z treściami bogatymi w JavaScript nasz przewodnik renderowania JavaScript dostarcza szczegółowych informacji na temat radzenia sobie z z opóźnieniami renderowania. Dla różnych opcji eksportu, zapoznaj się z naszym obszernym przewodnikiem Zapisz i eksportuj dokumenty PDF.
Jak dodać widok?
Jakie kroki należy podjąć, aby utworzyć Widok?
- Kliknij prawym przyciskiem myszy na dodaną akcję Person i wybierz 'Add View'.
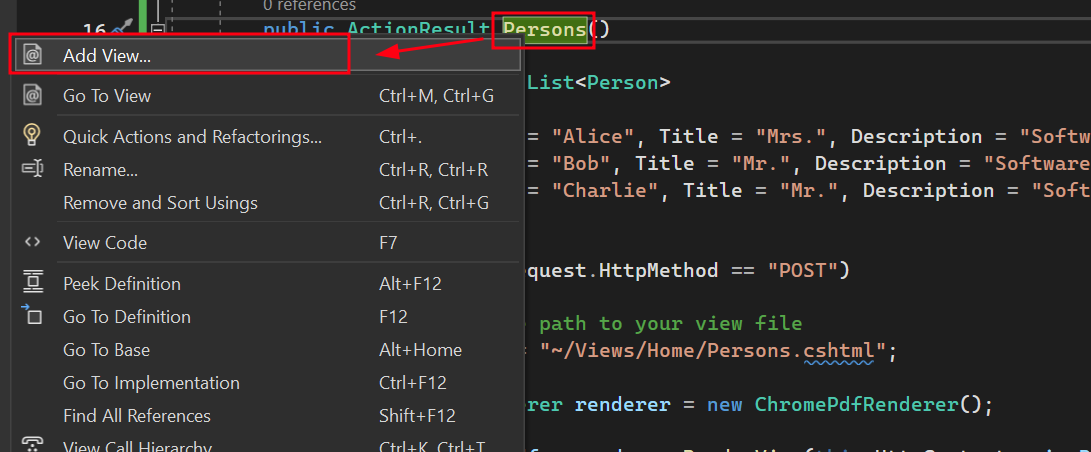
- Wybierz 'MVC 5 View' dla nowego elementu Scaffolded.
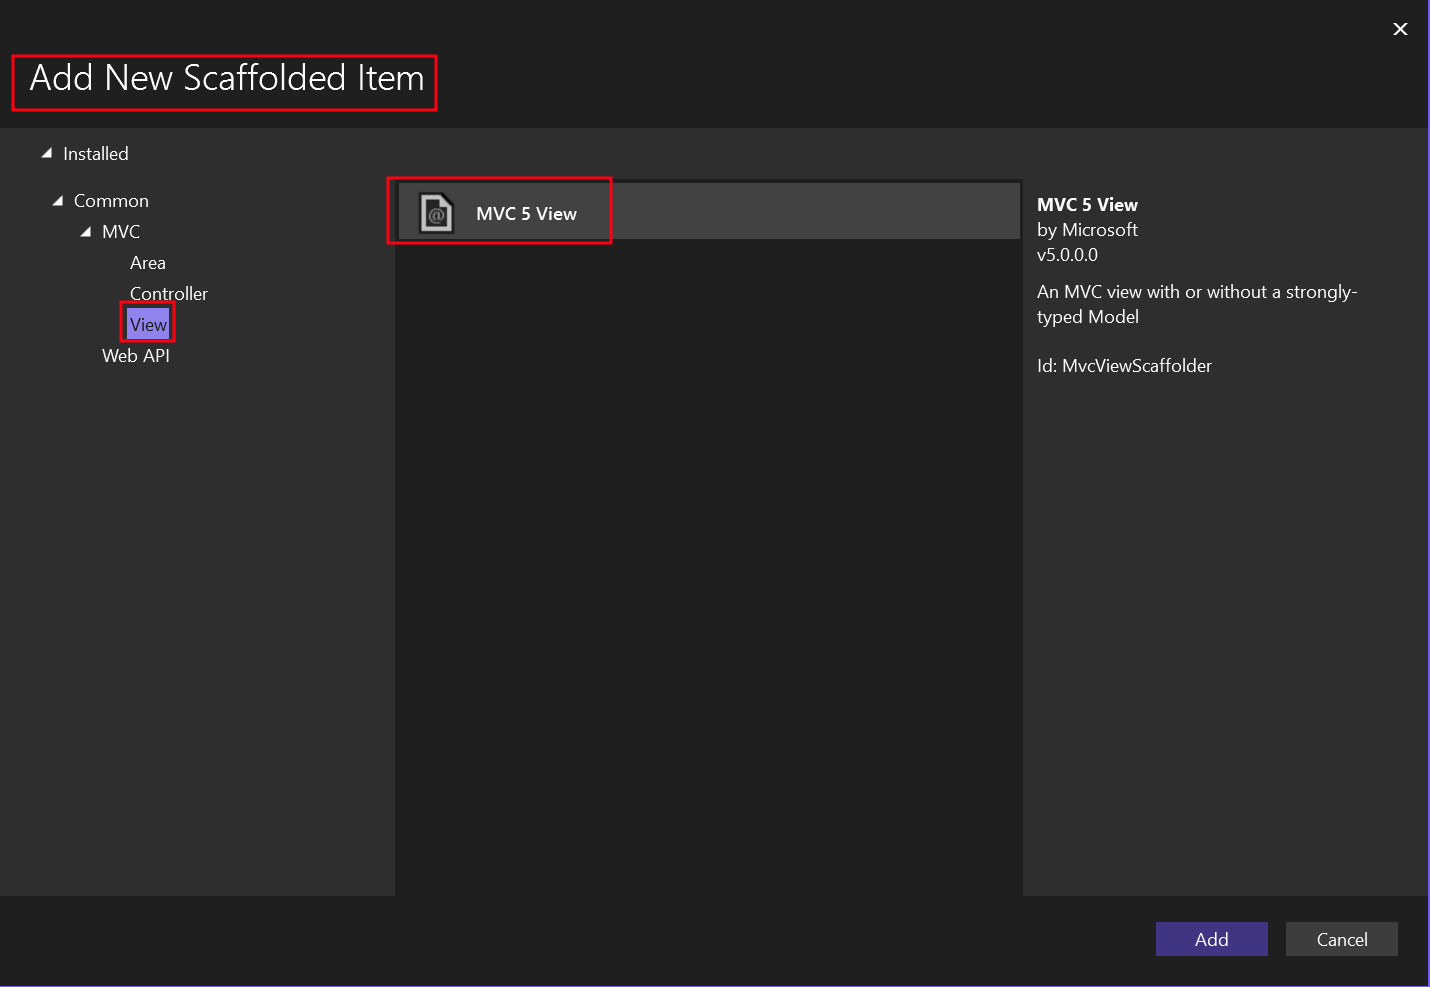
- Wybierz szablon 'List' oraz klasę modelu 'Person'.
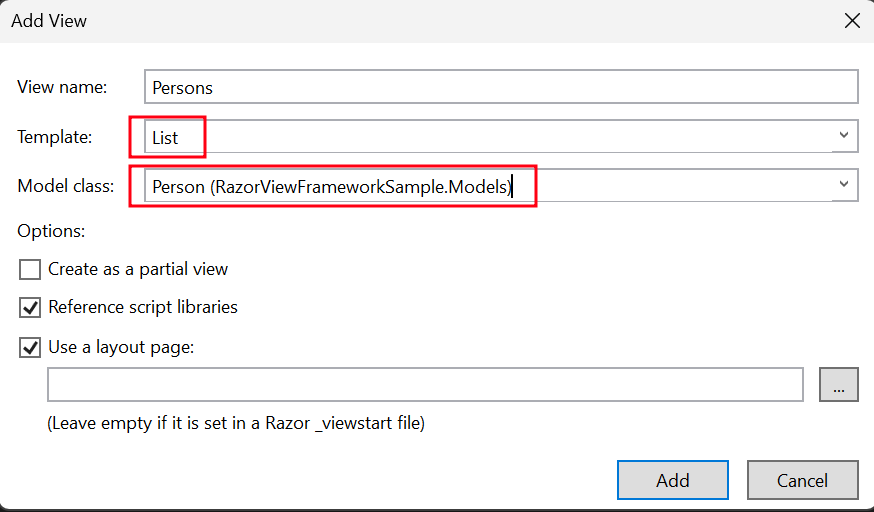
Tworzy to plik .cshtml o nazwie 'Persons'.
Jak dodać przycisk drukowania do Widoku?
- Przejdź do folderu 'Views' -> folderu 'Home' -> pliku 'Persons.cshtml'.
Aby dodać przycisk, który wywołuje akcję 'Persons', użyj poniższego kodu:
@using (Html.BeginForm("Persons", "Home", FormMethod.Post))
{
    <input type="submit" value="Print Person" />
}
@using (Html.BeginForm("Persons", "Home", FormMethod.Post))
{
<input type="submit" value="Print Person" />
}Jak dodać sekcję do górnego paska nawigacyjnego?
Gdzie należy zaktualizować nawigację?
- W folderze 'Views', przejdź do folderu 'Shared' -> plik '_Layout.cshtml'. Umieść element nawigacyjny 'Person' po 'Home'.
Upewnij się, że wartości dla metody ActionLink dokładnie pasują do naszej nazwy pliku, czyli 'Persons'.
<nav class="navbar navbar-expand-sm navbar-toggleable-sm navbar-dark bg-dark">
    <div class="container">
        @Html.ActionLink("Application name", "Index", "Home", new { area = "" }, new { @class = "navbar-brand" })
        <button type="button" class="navbar-toggler" data-bs-toggle="collapse" data-bs-target=".navbar-collapse" title="Toggle navigation" aria-controls="navbarSupportedContent" aria-expanded="false" aria-label="Toggle navigation">
            <span class="navbar-toggler-icon"></span>
        </button>
        <div class="collapse navbar-collapse d-sm-inline-flex justify-content-between">
            <ul class="navbar-nav flex-grow-1">
                <li>@Html.ActionLink("Home", "Index", "Home", new { area = "" }, new { @class = "nav-link" })</li>
                <li>@Html.ActionLink("Persons", "Persons", "Home", new { area = "" }, new { @class = "nav-link" })</li>
                <li>@Html.ActionLink("About", "About", "Home", new { area = "" }, new { @class = "nav-link" })</li>
                <li>@Html.ActionLink("Contact", "Contact", "Home", new { area = "" }, new { @class = "nav-link" })</li>
            </ul>
        </div>
    </div>
</nav>
<nav class="navbar navbar-expand-sm navbar-toggleable-sm navbar-dark bg-dark">
<div class="container">
@Html.ActionLink("Application name", "Index", "Home", new { area = "" }, new { @class = "navbar-brand" })
<button type="button" class="navbar-toggler" data-bs-toggle="collapse" data-bs-target=".navbar-collapse" title="Toggle navigation" aria-controls="navbarSupportedContent" aria-expanded="false" aria-label="Toggle navigation">
<span class="navbar-toggler-icon"></span>
</button>
<div class="collapse navbar-collapse d-sm-inline-flex justify-content-between">
<ul class="navbar-nav flex-grow-1">
<li>@Html.ActionLink("Home", "Index", "Home", new { area = "" }, new { @class = "nav-link" })</li>
<li>@Html.ActionLink("Persons", "Persons", "Home", new { area = "" }, new { @class = "nav-link" })</li>
<li>@Html.ActionLink("About", "About", "Home", new { area = "" }, new { @class = "nav-link" })</li>
<li>@Html.ActionLink("Contact", "Contact", "Home", new { area = "" }, new { @class = "nav-link" })</li>
</ul>
</div>
</div>
</nav>Jak uruchomić i przetestować projekt?
Uruchom projekt
To pokazuje, jak uruchomić projekt i wygenerować dokument PDF.

Wynik w formacie PDF
Gdzie mogę pobrać kompletny projekt?
Co zawiera przykładowy projekt?
Możesz pobrać kompletny kod dla tego przewodnika. Jest dostarczany jako spakowany plik, który można otworzyć w Visual Studio jako projekt ASP.NET Web Application (.NET Framework) MVC. Przykład zawiera wszystkie niezbędne konfiguracje, klasy modelu, kontrolery i widoki, aby szybko rozpocząć pracę z generowaniem PDF w aplikacjach MVC.
Często Zadawane Pytania
How can I convert CSHTML views to PDF in ASP.NET MVC?
You can convert CSHTML views to PDF in ASP.NET MVC using IronPDF's ChromePdfRenderer.RenderView() method. Simply install the IronPdf.Extensions.Mvc.Framework package and use the rendering method to transform your views into high-quality PDF documents with just a few lines of code.
What is the minimal code required to render a view as PDF?
The minimal code to render a view as PDF is: var pdf = new IronPdf.ChromePdfRenderer.RenderRazorToPdf(this.ControllerContext); This single line of code using IronPDF will convert your current view into a PDF document.
Which extension package do I need for ASP.NET MVC PDF generation?
For ASP.NET MVC applications, you need the IronPdf.Extensions.Mvc.Framework package. This extension provides seamless integration with ASP.NET MVC projects and works alongside the main IronPdf package to enable view-to-PDF conversion functionality.
What rendering engine is used for converting views to PDF?
IronPDF uses the Chrome PDF Rendering Engine, which ensures pixel-perfect accuracy when converting views to PDF. This engine maintains all styling, layouts, and interactive elements from your original CSHTML views in the final PDF output.
Can I generate invoices and reports from MVC views?
Yes, IronPDF is perfect for generating invoices, reports, and any other documents from your MVC views. The library provides professional PDF output capabilities, making it ideal for creating business documents directly from your web application views.
What are the basic steps to implement view-to-PDF conversion?
The basic implementation involves 5 steps: 1) Download and install IronPDF library, 2) Add a model class for your data, 3) Create a controller action using the RenderView method, 4) Add a View using MVC 5 View Scaffolding, and 5) Execute the conversion using IronPDF's rendering methods.
Does the PDF output maintain the original view styling?
Yes, IronPDF's Chrome rendering engine ensures that all CSS styling, layouts, and interactive elements from your CSHTML views are preserved in the PDF output. This provides pixel-perfect accuracy and maintains the visual integrity of your original web views.


Wciąż przewijasz?
Czy chcesz szybko dowodu? PM > Install-Package IronPdf
Uruchom przykład i zobacz, jak Twój kod HTML zamienia się w plik PDF.


