IronPDF Blazor Server Tutorial: Render HTML to PDF in C#
IronPDF enables HTML-to-PDF conversion in Blazor Server applications using C# with minimal setup, supporting .NET 6 and providing PDF generation capabilities directly from your Blazor components.
Quickstart: Render PDFs in Blazor Server
Get started with IronPDF in your Blazor Server applications. This example demonstrates how to render HTML content to a PDF. Transform your Blazor components into PDFs with a few lines of code.
 Get started making PDFs with NuGet now:
Install IronPDF with NuGet Package Manager
Copy and run this code snippet.
IronPdf.HtmlToPdf.RenderHtmlAsPdf(htmlContent).SaveAs(outputPath);Deploy to test on your live environment
Minimal Workflow (5 steps)
- Install the HTML-to-PDF Library for Blazor Applications
- Create a new Blazor Project in Visual Studio.
- Convert the web pages by URL into PDF documents
- Render the web pages into the client's web browser
- View PDF documents from HTML strings
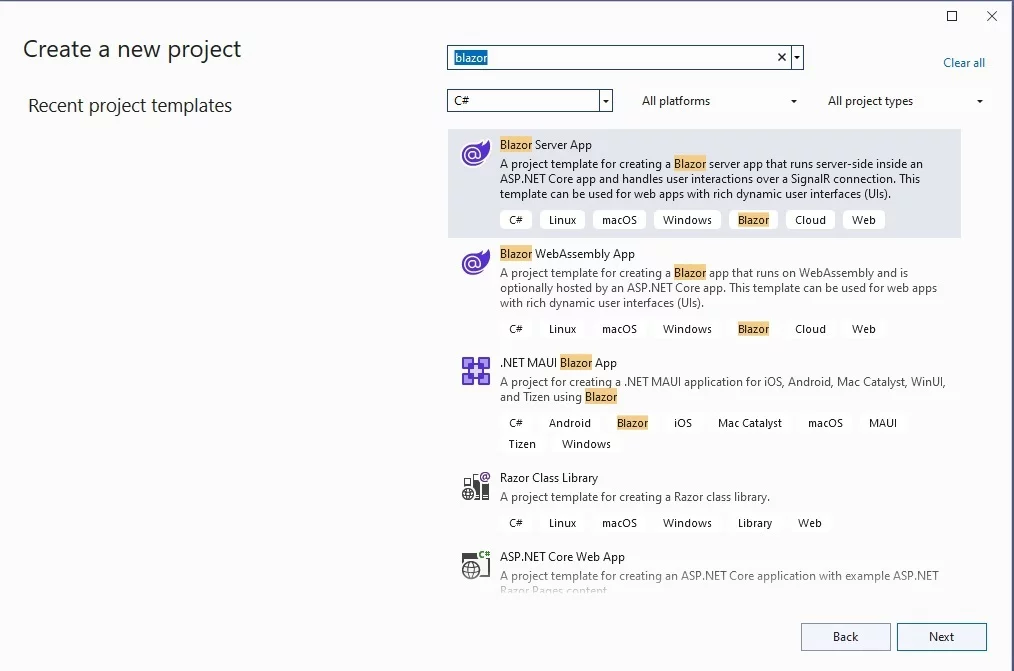
How Do I Create a New Blazor Server Project?
Create a new project and select the type Blazor Server App. Visual Studio provides a template for building server-side Blazor applications that can use .NET for PDF generation. The Blazor Server hosting model executes your application logic on the server, making it suitable for PDF generation scenarios that require server-side processing.

What Are the Prerequisites for Blazor Server Apps?
Before creating a Blazor Server application with IronPDF, ensure you have Visual Studio 2022 or later installed with the ASP.NET and web development workload. You need the .NET 6 SDK or higher. Blazor Server apps require a constant connection to the server, making them suitable for scenarios where you need to generate PDFs from complex HTML content or when working with sensitive data that should remain on the server.
Which .NET Version Should I Use?
For compatibility and performance with IronPDF in Blazor Server applications, use .NET 6 or higher. IronPDF is compatible with .NET Core 3.1, .NET 5, .NET 6, .NET 7, and .NET 8. The latest LTS version (.NET 6 or .NET 8) provides stability and long-term support. When deploying to Azure, ensure your Azure App Service plan supports your chosen .NET version.
How Do I Configure the Project Settings?
When configuring your Blazor Server project, select "Configure for HTTPS" to ensure secure communication between client and server. Leave "Enable Docker" unchecked unless you plan to run IronPDF in Docker. For authentication, choose "None" initially - you can add authentication later if needed. The project name should follow C# naming conventions and avoid spaces or special characters.
How Do I Install IronPDF into My Blazor Project?
After creating the project, follow these steps to install the IronPDF library from NuGet within Visual Studio. IronPDF provides an API for creating PDFs from HTML strings, URLs, and existing PDF documents.
- In the Solution Explorer window in Visual Studio, right-click
Referencesand chooseManage NuGet Packages. - Select Browse and search for
IronPdf. - Select the latest version of the package, check the checkbox for your project, and click install.
Alternatively, you can use the .NET CLI to install it:
Install-Package IronPdf
For projects targeting specific platforms, you might need platform-specific packages. For example, if deploying to Linux, review the Linux installation guide.
Why Choose NuGet Package Manager Over CLI?
The NuGet Package Manager GUI in Visual Studio provides a visual interface that makes it easier to browse package versions, view dependencies, and manage multiple projects simultaneously. It helps developers new to IronPDF explore available packages and their descriptions. The CLI approach is faster for experienced developers and better suited for automated build pipelines or when working with Docker containers.
What Version of IronPDF Should I Install?
Install the latest stable version of IronPDF for access to new features, performance improvements, and security updates. Check the changelog for details about recent updates. If you're working with an existing project, ensure version compatibility with your other dependencies. For production environments, test thoroughly before upgrading major versions.
How Do I Verify the Installation Was Successful?
After installation, verify IronPDF is correctly installed by checking the "Packages" folder in Solution Explorer. You should see "IronPdf" listed among your project dependencies. Add using IronPdf; to a C# file - IntelliSense should recognize the namespace. You can also run a simple test by creating a basic PDF from HTML to confirm everything works correctly.
How Do I Add a New Razor Component for PDF Generation?
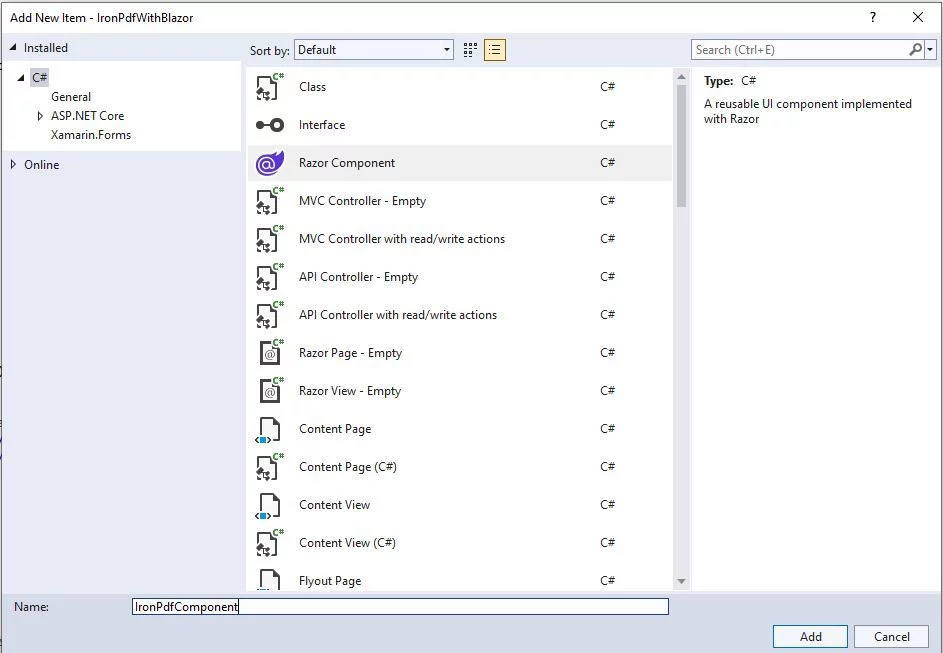
Once IronPDF is installed in your Blazor project, add a new Razor Component. For this tutorial, name it "IronPdfComponent". This component will handle user input and generate PDFs dynamically based on HTML content. The component architecture in Blazor makes it easy to create reusable PDF generation functionality that can be shared across your application.

After that, update the code as follows:
@page "/IronPdf"
@inject IJSRuntime JS

<h3>IronPdfComponent</h3>

<EditForm Model="@_InputMsgModel" id="inputText">
  <div>
    <InputTextArea @bind-Value="@_InputMsgModel.HTML" rows="20" />
  </div>
  <div>
    <button type="button" @onclick="@SubmitHTML">Render HTML</button>
  </div>
</EditForm>
@page "/IronPdf"
@inject IJSRuntime JS
<h3>IronPdfComponent</h3>
<EditForm Model="@_InputMsgModel" id="inputText">
<div>
<InputTextArea @bind-Value="@_InputMsgModel.HTML" rows="20" />
</div>
<div>
<button type="button" @onclick="@SubmitHTML">Render HTML</button>
</div>
</EditForm>@code {
// Model to bind user input
private InputHTMLModel _InputMsgModel = new InputHTMLModel();
private async Task SubmitHTML()
{
// Set your IronPDF license key
IronPdf.License.LicenseKey = "IRONPDF-MYLICENSE-KEY-1EF01";
// Create a renderer to convert HTML to PDF
var render = new IronPdf.ChromePdfRenderer();
// Configure rendering options for better output
render.RenderingOptions.PaperSize = IronPdf.Rendering.PdfPaperSize.A4;
render.RenderingOptions.MarginTop = 40;
render.RenderingOptions.MarginBottom = 40;
// Render the HTML input into a PDF document
var doc = render.RenderHtmlAsPdf(_InputMsgModel.HTML);
var fileName = "iron.pdf";
// Create a stream reference for the PDF content
using var streamRef = new DotNetStreamReference(stream: doc.Stream);
// Invoke JavaScript function to download the PDF in the browser
await JS.InvokeVoidAsync("SubmitHTML", fileName, streamRef);
}
public class InputHTMLModel
{
public string HTML { get; set; } = @"<h1>Welcome to IronPDF</h1>
<p>This is a sample PDF generated from HTML content in Blazor Server.</p>
<ul>
<li>Easy to use API</li>
<li>High-quality rendering</li>
<li>Full HTML5 and CSS3 support</li>
</ul>";
}
}@code {
// Model to bind user input
private InputHTMLModel _InputMsgModel = new InputHTMLModel();
private async Task SubmitHTML()
{
// Set your IronPDF license key
IronPdf.License.LicenseKey = "IRONPDF-MYLICENSE-KEY-1EF01";
// Create a renderer to convert HTML to PDF
var render = new IronPdf.ChromePdfRenderer();
// Configure rendering options for better output
render.RenderingOptions.PaperSize = IronPdf.Rendering.PdfPaperSize.A4;
render.RenderingOptions.MarginTop = 40;
render.RenderingOptions.MarginBottom = 40;
// Render the HTML input into a PDF document
var doc = render.RenderHtmlAsPdf(_InputMsgModel.HTML);
var fileName = "iron.pdf";
// Create a stream reference for the PDF content
using var streamRef = new DotNetStreamReference(stream: doc.Stream);
// Invoke JavaScript function to download the PDF in the browser
await JS.InvokeVoidAsync("SubmitHTML", fileName, streamRef);
}
public class InputHTMLModel
{
public string HTML { get; set; } = @"<h1>Welcome to IronPDF</h1>
<p>This is a sample PDF generated from HTML content in Blazor Server.</p>
<ul>
<li>Easy to use API</li>
<li>High-quality rendering</li>
<li>Full HTML5 and CSS3 support</li>
</ul>";
}
}This component uses the ChromePdfRenderer class for PDF generation. You can customize the rendering with various options like custom paper sizes, margins, and headers/footers.
Add this JavaScript code to _layout.cshtml to allow downloading of the PDF rendered by IronPDF in the Blazor Application:
<script>
    // JavaScript function to download PDFs generated by IronPdf
    window.SubmitHTML = async (fileName, contentStreamReference) => {
        // Get the PDF content as an ArrayBuffer
        const arrayBuffer = await contentStreamReference.arrayBuffer();

        // Create a Blob from the ArrayBuffer
        const blob = new Blob([arrayBuffer]);

        // Create an object URL for the Blob
        const url = URL.createObjectURL(blob);

        // Create an anchor element to initiate the download
        const anchorElement = document.createElement("a");
        anchorElement.href = url;
        anchorElement.download = fileName ?? "download.pdf";

        // Programmatically click the anchor to start the download
        anchorElement.click();

        // Clean up by removing the anchor and revoking the object URL
        anchorElement.remove();
        URL.revokeObjectURL(url);
    };
</script>
<script>
// JavaScript function to download PDFs generated by IronPdf
window.SubmitHTML = async (fileName, contentStreamReference) => {
// Get the PDF content as an ArrayBuffer
const arrayBuffer = await contentStreamReference.arrayBuffer();
// Create a Blob from the ArrayBuffer
const blob = new Blob([arrayBuffer]);
// Create an object URL for the Blob
const url = URL.createObjectURL(blob);
// Create an anchor element to initiate the download
const anchorElement = document.createElement("a");
anchorElement.href = url;
anchorElement.download = fileName ?? "download.pdf";
// Programmatically click the anchor to start the download
anchorElement.click();
// Clean up by removing the anchor and revoking the object URL
anchorElement.remove();
URL.revokeObjectURL(url);
};
</script>Edit the NavMenu.razor file in the Shared folder to include a navigation tab to our new Razor component. Add the following code:
<div class="nav-item px-3">
    <NavLink class="nav-link" href="IronPdf">
        <span class="oi oi-list-rich" aria-hidden="true"></span> IronPdf
    </NavLink>
</div>
<div class="nav-item px-3">
<NavLink class="nav-link" href="IronPdf">
<span class="oi oi-list-rich" aria-hidden="true"></span> IronPdf
</NavLink>
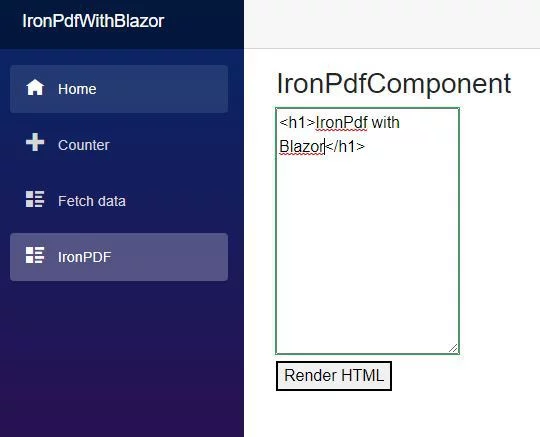
</div>Once this has all been applied, you can run your solution and you should see this:

Why Use JavaScript for PDF Downloads in Blazor?
Blazor Server operates on a SignalR connection where all C# code executes on the server. JavaScript interop is required to trigger browser-specific actions like file downloads. The DotNetStreamReference class transfers binary data from server to client without loading the entire PDF into memory at once. This approach is more efficient than base64 encoding and works well for large PDFs. For alternative approaches, consider exporting PDFs to memory streams.
What Are Common Issues When Implementing PDF Downloads?
Common challenges include handling large files that may timeout the SignalR connection, managing concurrent PDF generation requests, and ensuring proper disposal of resources. To avoid memory leaks, always dispose of PDF documents and streams properly. Consider implementing async PDF generation for better performance. If you encounter rendering issues, check the rendering options documentation for configuration tips.
How Do I Handle Large PDF Files?
For large PDFs, consider implementing progress indicators and chunked downloads. You can optimize PDF size using compression techniques. Set appropriate timeouts in your Blazor Server configuration:
services.AddServerSideBlazor()
    .AddHubOptions(options =>
    {
        options.MaximumReceiveMessageSize = 10 * 1024 * 1024; // 10MB
        options.ClientTimeoutInterval = TimeSpan.FromSeconds(60);
    });
services.AddServerSideBlazor()
.AddHubOptions(options =>
{
options.MaximumReceiveMessageSize = 10 * 1024 * 1024; // 10MB
options.ClientTimeoutInterval = TimeSpan.FromSeconds(60);
});For very large documents, consider saving to server storage first and providing a download link instead of streaming directly.
When Should I Use Stream References vs Direct Downloads?
Use DotNetStreamReference for PDFs under 50MB that need immediate download. For larger files or when you need to save PDFs to disk, consider generating the PDF on the server and providing a download link. Direct downloads work well for reports and invoices, while batch processing or merging multiple PDFs might benefit from server-side storage. Consider your application's memory constraints and user experience requirements when choosing an approach.
Frequently Asked Questions
How do I create a new Blazor Server project for PDF generation?
To create a Blazor Server project with IronPDF, select 'Blazor Server App' as the project type in Visual Studio. The Blazor Server hosting model executes application logic on the server, making it ideal for PDF generation scenarios that require server-side processing with IronPDF.
What are the prerequisites for using Blazor Server apps with PDF generation?
You need Visual Studio 2022 or later with the ASP.NET and web development workload, plus .NET 6 SDK or higher. Blazor Server apps require a constant server connection, making them suitable for generating PDFs from complex HTML content using IronPDF or when working with sensitive data that should remain on the server.
Which .NET version should I use for PDF generation in Blazor?
For optimal compatibility and performance with IronPDF in Blazor Server applications, use .NET 6 or higher. IronPDF supports .NET Core 3.1, .NET 5, .NET 6, .NET 7, and .NET 8. The latest LTS versions (.NET 6 or .NET 8) provide stability and long-term support.
How do I configure project settings for a Blazor PDF application?
When configuring your Blazor Server project for IronPDF, select 'Configure for HTTPS' for secure communication. Leave 'Enable Docker' unchecked unless you plan to run IronPDF in Docker containers. Start with 'None' for authentication - you can add it later. Use proper C# naming conventions without spaces or special characters.
How can I quickly generate PDFs from HTML in Blazor Server?
IronPDF provides a simple one-line solution for HTML to PDF conversion in Blazor Server: IronPdf.HtmlToPdf.RenderHtmlAsPdf(htmlContent).SaveAs(outputPath). This allows you to transform your Blazor components into PDFs with minimal code.
What is the minimal workflow for implementing PDF generation in Blazor?
The minimal workflow consists of 5 steps: 1) Install IronPDF HTML-to-PDF library, 2) Create a new Blazor Project in Visual Studio, 3) Convert web pages by URL into PDF documents using IronPDF, 4) Render the web pages into the client's web browser, and 5) View PDF documents generated from HTML strings.


