

How to Convert Views to PDFs in C# ASP.NET Core MVC
Convert ASP.NET Core MVC Views to PDFs using IronPDF's RenderRazorViewToPdf method, which transforms .cshtml files into high-quality PDF documents with a single line of code in your MVC application.
A View is a component in the ASP.NET framework used for generating HTML markup in web applications. It is part of the Model-View-Controller (MVC) pattern, commonly used in ASP.NET MVC and ASP.NET Core MVC applications. Views are responsible for presenting data to users by rendering HTML content dynamically. Views typically use Razor syntax, a markup syntax for embedding server-based code into webpages, making them powerful tools for creating data-driven PDF documents.
Quickstart: Convert CSHTML to PDF in ASP.NET Core
Transform ASP.NET Core MVC Views to PDFs using IronPDF. With one line of code, render your .cshtml files into PDF documents. Integrate this functionality directly into your MVC application for seamless PDF generation from dynamic HTML views. Follow this guide to set up your environment and start converting.
-
Install IronPDF with NuGet Package Manager
-
Copy and run this code snippet.
// using IronPdf.Extensions.Mvc.Core new IronPdf.ChromePdfRenderer().RenderRazorViewToPdf(HttpContext, "Views/Home/Report.cshtml", model).SaveAs("report.pdf"); -
Deploy to test on your live environment
Start using IronPDF in your project today with a free trial

ASP.NET Core Web App MVC (Model-View-Controller) is a web application framework provided by Microsoft for building web applications using ASP.NET Core.
Model: Represents data and business logic, manages data interactions, communicates with data sources.View: Presents the user interface, displays data, renders information to users.Controller: Handles user input, responds to requests, communicates with theModel, orchestrates Model-View interactions.
IronPDF enables direct PDF file creation from Views within ASP.NET Core MVC projects. This makes PDF generation straightforward in ASP.NET Core MVC, supporting modern features including CSS styling, JavaScript execution, and custom fonts.
Minimal Workflow (5 steps)
- Download the C# library for converting Views to PDFs in ASP.NET Core MVC
- Add a model class for the data
- Edit the "HomeController.cs" file and use the
RenderRazorViewToPdfmethod - Create a new View and edit the ".cshtml" file to render the PDF
- Download the sample project for a quick start
What Package Do I Need for IronPDF Extensions?
The IronPdf.Extensions.Mvc.Core package is an extension of the main IronPdf package. Both IronPdf.Extensions.Mvc.Core and IronPdf packages are needed to render Views to PDF documents in ASP.NET Core MVC. The extension package provides specific functionality for integrating with ASP.NET Core's dependency injection system and Razor view rendering pipeline.
Install-Package IronPdf.Extensions.Mvc.Core
Why Do I Need Both IronPDF and the Extensions Package?
The main IronPDF package contains the core PDF rendering engine and fundamental functionality, while the Extensions.Mvc.Core package provides specialized integration with ASP.NET Core MVC's view rendering system. This separation allows for better modularity and ensures you only include the specific functionality needed for your project type. The extension package includes the IRazorViewRenderer interface and implementation needed to convert Razor views to HTML before PDF generation.
Which NuGet Package Version Should I Use?
Always use matching versions of IronPdf and IronPdf.Extensions.Mvc.Core to ensure compatibility. For the latest stable releases and version compatibility information, check the NuGet packages documentation. When updating, ensure both packages are updated together to maintain proper functionality.
What Are Common Installation Issues?
Common installation issues include version mismatches between the core and extension packages, missing dependencies, or platform-specific requirements. If you encounter issues, ensure your project targets a supported .NET version and review the installation overview for troubleshooting steps.
Install with NuGet
Install-Package IronPdf.Extensions.Mvc.Core
How Do I Render Views to PDFs?
You need an ASP.NET Core Web App (Model-View-Controller) project to convert Views into PDF files. The process involves creating a controller action that uses IronPDF's RenderRazorViewToPdf method to transform your Razor views into PDF documents. This approach leverages the full power of Razor syntax, allowing you to create complex, data-driven PDFs with dynamic content.
What Project Type Should I Use?
Use the ASP.NET Core Web App (Model-View-Controller) template for optimal compatibility with IronPDF's view rendering features. This project type provides the necessary infrastructure for view rendering, including the Razor view engine and proper routing. For existing projects, ensure they follow the MVC pattern and have the required view rendering capabilities installed.
Can I Use This with Minimal APIs?
While Minimal APIs don't have built-in view support, you can still use IronPDF's HTML to PDF conversion features. For view-based PDF generation, use the traditional MVC approach or consider Razor Pages as an alternative.
How Do I Add a Model Class?
- Navigate to the "Models" folder.
- Create a new C# class file named “Person.” This class will act as a model to represent individual data. Use the following code snippet:
:path=/static-assets/pdf/content-code-examples/how-to/cshtml-to-pdf-mvc-core-model.csnamespace ViewToPdfMVCCoreSample.Models
{
public class Person
{
public int Id { get; set; }
public string Name { get; set; }
public string Title { get; set; }
public string Description { get; set; }
}
}Namespace ViewToPdfMVCCoreSample.Models
Public Class Person
Public Property Id() As Integer
Public Property Name() As String
Public Property Title() As String
Public Property Description() As String
End Class
End NamespaceWhy Do I Need a Model for PDF Generation?
Models provide structured data that can be passed to views for rendering. This separation of concerns ensures your PDF generation logic remains clean and maintainable. The model acts as a contract between your controller and view, ensuring type safety and enabling IntelliSense support in your Razor views.
What Data Types Work Best with Views?
Simple data types and collections work best for PDF generation. Complex nested objects can be used but may require additional view logic. For optimal performance, flatten complex data structures in your controller before passing them to the view. Consider using ViewModels specifically designed for PDF output when your domain models are too complex.
Here’s an example of a more complex model structure suitable for PDF generation:
public class InvoiceViewModel
{
    public string InvoiceNumber { get; set; }
    public DateTime InvoiceDate { get; set; }
    public decimal TotalAmount { get; set; }
    public List<InvoiceLineItem> LineItems { get; set; }
    public CustomerInfo Customer { get; set; }

    // Computed property for PDF display
    public string FormattedTotal => TotalAmount.ToString("C");
}

public class InvoiceLineItem
{
    public string Description { get; set; }
    public int Quantity { get; set; }
    public decimal UnitPrice { get; set; }
    public decimal LineTotal => Quantity * UnitPrice;
}

public class CustomerInfo
{
    public string Name { get; set; }
    public string Email { get; set; }
    public string Address { get; set; }
}
public class InvoiceViewModel
{
public string InvoiceNumber { get; set; }
public DateTime InvoiceDate { get; set; }
public decimal TotalAmount { get; set; }
public List<InvoiceLineItem> LineItems { get; set; }
public CustomerInfo Customer { get; set; }
// Computed property for PDF display
public string FormattedTotal => TotalAmount.ToString("C");
}
public class InvoiceLineItem
{
public string Description { get; set; }
public int Quantity { get; set; }
public decimal UnitPrice { get; set; }
public decimal LineTotal => Quantity * UnitPrice;
}
public class CustomerInfo
{
public string Name { get; set; }
public string Email { get; set; }
public string Address { get; set; }
}Public Class InvoiceViewModel
Public Property InvoiceNumber As String
Public Property InvoiceDate As DateTime
Public Property TotalAmount As Decimal
Public Property LineItems As List(Of InvoiceLineItem)
Public Property Customer As CustomerInfo
' Computed property for PDF display
Public ReadOnly Property FormattedTotal As String
Get
Return TotalAmount.ToString("C")
End Get
End Property
End Class
Public Class InvoiceLineItem
Public Property Description As String
Public Property Quantity As Integer
Public Property UnitPrice As Decimal
Public ReadOnly Property LineTotal As Decimal
Get
Return Quantity * UnitPrice
End Get
End Property
End Class
Public Class CustomerInfo
Public Property Name As String
Public Property Email As String
Public Property Address As String
End ClassHow Do I Edit the Controller?
Navigate to the "Controllers" folder and open the HomeController.cs file. We will make changes only to the HomeController and add the Persons action. Refer to the code below for guidance:
The code below first instantiates the ChromePdfRenderer class, passing an IRazorViewRenderer, the path to our Views/Home/Persons.cshtml, and the List that contains the required data to the RenderRazorViewToPdf method. Users can use RenderingOptions to access a range of features, such as adding custom text, including HTML headers and footers in the resulting PDF, defining custom margins, and applying page numbers. For more advanced rendering options, see the rendering options documentation.
File(pdf.BinaryData, "application/pdf"). However, downloading the PDF after viewing it in the browser results in a damaged PDF document.using IronPdf.Extensions.Mvc.Core;
using Microsoft.AspNetCore.Mvc;
using System.Diagnostics;
using ViewToPdfMVCCoreSample.Models;
namespace ViewToPdfMVCCoreSample.Controllers
{
public class HomeController : Controller
{
private readonly ILogger<HomeController> _logger;
private readonly IRazorViewRenderer _viewRenderService;
private readonly IHttpContextAccessor _httpContextAccessor;
public HomeController(ILogger<HomeController> logger, IRazorViewRenderer viewRenderService, IHttpContextAccessor httpContextAccessor)
{
_logger = logger;
_viewRenderService = viewRenderService;
_httpContextAccessor = httpContextAccessor;
}
public IActionResult Index()
{
return View();
}
public async Task<IActionResult> Persons()
{
// Example list of persons
var persons = new List<Person>
{
new Person { Name = "Alice", Title = "Mrs.", Description = "Software Engineer" },
new Person { Name = "Bob", Title = "Mr.", Description = "Software Engineer" },
new Person { Name = "Charlie", Title = "Mr.", Description = "Software Engineer" }
};
// Check if the request method is POST
if (_httpContextAccessor.HttpContext.Request.Method == HttpMethod.Post.Method)
{
// Create a new PDF renderer
ChromePdfRenderer renderer = new ChromePdfRenderer();
// Configure rendering options for better output
renderer.RenderingOptions.MarginTop = 40;
renderer.RenderingOptions.MarginBottom = 40;
renderer.RenderingOptions.PaperOrientation = IronPdf.Rendering.PdfPaperOrientation.Portrait;
renderer.RenderingOptions.Title = "Persons Report";
// Render View to PDF document
PdfDocument pdf = renderer.RenderRazorViewToPdf(_viewRenderService, "Views/Home/Persons.cshtml", persons);
Response.Headers.Add("Content-Disposition", "inline");
// Output PDF document
return File(pdf.BinaryData, "application/pdf", "viewToPdfMVCCore.pdf");
}
return View(persons);
}
public IActionResult Privacy()
{
return View();
}
[ResponseCache(Duration = 0, Location = ResponseCacheLocation.None, NoStore = true)]
public IActionResult Error()
{
return View(new ErrorViewModel { RequestId = Activity.Current?.Id ?? HttpContext.TraceIdentifier });
}
}
}using IronPdf.Extensions.Mvc.Core;
using Microsoft.AspNetCore.Mvc;
using System.Diagnostics;
using ViewToPdfMVCCoreSample.Models;
namespace ViewToPdfMVCCoreSample.Controllers
{
public class HomeController : Controller
{
private readonly ILogger<HomeController> _logger;
private readonly IRazorViewRenderer _viewRenderService;
private readonly IHttpContextAccessor _httpContextAccessor;
public HomeController(ILogger<HomeController> logger, IRazorViewRenderer viewRenderService, IHttpContextAccessor httpContextAccessor)
{
_logger = logger;
_viewRenderService = viewRenderService;
_httpContextAccessor = httpContextAccessor;
}
public IActionResult Index()
{
return View();
}
public async Task<IActionResult> Persons()
{
// Example list of persons
var persons = new List<Person>
{
new Person { Name = "Alice", Title = "Mrs.", Description = "Software Engineer" },
new Person { Name = "Bob", Title = "Mr.", Description = "Software Engineer" },
new Person { Name = "Charlie", Title = "Mr.", Description = "Software Engineer" }
};
// Check if the request method is POST
if (_httpContextAccessor.HttpContext.Request.Method == HttpMethod.Post.Method)
{
// Create a new PDF renderer
ChromePdfRenderer renderer = new ChromePdfRenderer();
// Configure rendering options for better output
renderer.RenderingOptions.MarginTop = 40;
renderer.RenderingOptions.MarginBottom = 40;
renderer.RenderingOptions.PaperOrientation = IronPdf.Rendering.PdfPaperOrientation.Portrait;
renderer.RenderingOptions.Title = "Persons Report";
// Render View to PDF document
PdfDocument pdf = renderer.RenderRazorViewToPdf(_viewRenderService, "Views/Home/Persons.cshtml", persons);
Response.Headers.Add("Content-Disposition", "inline");
// Output PDF document
return File(pdf.BinaryData, "application/pdf", "viewToPdfMVCCore.pdf");
}
return View(persons);
}
public IActionResult Privacy()
{
return View();
}
[ResponseCache(Duration = 0, Location = ResponseCacheLocation.None, NoStore = true)]
public IActionResult Error()
{
return View(new ErrorViewModel { RequestId = Activity.Current?.Id ?? HttpContext.TraceIdentifier });
}
}
}Imports IronPdf.Extensions.Mvc.Core
Imports Microsoft.AspNetCore.Mvc
Imports System.Diagnostics
Imports ViewToPdfMVCCoreSample.Models
Namespace ViewToPdfMVCCoreSample.Controllers
Public Class HomeController
Inherits Controller
Private ReadOnly _logger As ILogger(Of HomeController)
Private ReadOnly _viewRenderService As IRazorViewRenderer
Private ReadOnly _httpContextAccessor As IHttpContextAccessor
Public Sub New(logger As ILogger(Of HomeController), viewRenderService As IRazorViewRenderer, httpContextAccessor As IHttpContextAccessor)
_logger = logger
_viewRenderService = viewRenderService
_httpContextAccessor = httpContextAccessor
End Sub
Public Function Index() As IActionResult
Return View()
End Function
Public Async Function Persons() As Task(Of IActionResult)
' Example list of persons
Dim persons = New List(Of Person) From {
New Person With {.Name = "Alice", .Title = "Mrs.", .Description = "Software Engineer"},
New Person With {.Name = "Bob", .Title = "Mr.", .Description = "Software Engineer"},
New Person With {.Name = "Charlie", .Title = "Mr.", .Description = "Software Engineer"}
}
' Check if the request method is POST
If _httpContextAccessor.HttpContext.Request.Method = HttpMethod.Post.Method Then
' Create a new PDF renderer
Dim renderer As New ChromePdfRenderer()
' Configure rendering options for better output
renderer.RenderingOptions.MarginTop = 40
renderer.RenderingOptions.MarginBottom = 40
renderer.RenderingOptions.PaperOrientation = IronPdf.Rendering.PdfPaperOrientation.Portrait
renderer.RenderingOptions.Title = "Persons Report"
' Render View to PDF document
Dim pdf As PdfDocument = renderer.RenderRazorViewToPdf(_viewRenderService, "Views/Home/Persons.cshtml", persons)
Response.Headers.Add("Content-Disposition", "inline")
' Output PDF document
Return File(pdf.BinaryData, "application/pdf", "viewToPdfMVCCore.pdf")
End If
Return View(persons)
End Function
Public Function Privacy() As IActionResult
Return View()
End Function
<ResponseCache(Duration:=0, Location:=ResponseCacheLocation.None, NoStore:=True)>
Public Function Error() As IActionResult
Return View(New ErrorViewModel With {.RequestId = If(Activity.Current?.Id, HttpContext.TraceIdentifier)})
End Function
End Class
End NamespaceAfter using the RenderRazorViewToPdf method, you receive a PdfDocument object that's open to further enhancements and modifications. You can convert the PDF to PDF/A or PDF/UA formats, add your digital signature to the generated PDF, or merge and split PDF documents as needed. Additionally, the library allows you to rotate pages, insert annotations or bookmarks, and imprint unique watermarks onto your PDF files.
What Is the IRazorViewRenderer Service?
The IRazorViewRenderer is a service interface provided by the IronPdf.Extensions.Mvc.Core package that handles the conversion of Razor views to HTML. It integrates with ASP.NET Core's view engine to process .cshtml files with their associated models, executing all Razor syntax and producing the final HTML that IronPDF converts to PDF.
Why Check for POST Method Before Rendering?
Checking for POST ensures the PDF generation only occurs when explicitly requested through a form submission. This prevents accidental PDF generation on page loads and allows the same action to serve both the HTML view (on GET) and the PDF download (on POST). This pattern follows RESTful principles and provides a better user experience.
How Can I Customize the PDF Output?
IronPDF offers extensive customization options through the RenderingOptions property. Here’s an example with more advanced settings:
:path=/static-assets/pdf/content-code-examples/how-to/cshtml-to-pdf-mvc-core-6.cs// Advanced rendering configuration example
var renderer = new ChromePdfRenderer();
// Page setup
renderer.RenderingOptions.PaperSize = IronPdf.Rendering.PdfPaperSize.A4;
renderer.RenderingOptions.MarginLeft = 20;
renderer.RenderingOptions.MarginRight = 20;
// Headers and footers with merge fields
renderer.RenderingOptions.HtmlHeader = new HtmlHeaderFooter()
{
Height = 25,
HtmlFragment = "<div style='text-align: center; font-size: 12px;'>Page {page} of {total-pages}</div>"
};
// JavaScript execution delay for dynamic content
renderer.RenderingOptions.WaitFor.RenderDelay(500); // Wait 500ms for JS execution
renderer.RenderingOptions.WaitFor.NetworkIdle0(); // Wait for network requests
// Apply watermark
renderer.RenderingOptions.TextHeader = new TextHeaderFooter()
{
DrawDividerLine = true,
CenterText = "CONFIDENTIAL",
Font = IronSoftware.Drawing.FontTypes.Arial,
FontSize = 16
};
Imports IronPdf
Imports IronSoftware.Drawing

' Advanced rendering configuration example
Dim renderer = New ChromePdfRenderer()

' Page setup
renderer.RenderingOptions.PaperSize = IronPdf.Rendering.PdfPaperSize.A4
renderer.RenderingOptions.MarginLeft = 20
renderer.RenderingOptions.MarginRight = 20

' Headers and footers with merge fields
renderer.RenderingOptions.HtmlHeader = New HtmlHeaderFooter() With {
    .Height = 25,
    .HtmlFragment = "<div style='text-align: center; font-size: 12px;'>Page {page} of {total-pages}</div>"
}

' JavaScript execution delay for dynamic content
renderer.RenderingOptions.WaitFor.RenderDelay(500) ' Wait 500ms for JS execution
renderer.RenderingOptions.WaitFor.NetworkIdle0() ' Wait for network requests

' Apply watermark
renderer.RenderingOptions.TextHeader = New TextHeaderFooter() With {
    .DrawDividerLine = True,
    .CenterText = "CONFIDENTIAL",
    .Font = FontTypes.Arial,
    .FontSize = 16
}What Are Common Controller Errors?
Common errors include null reference exceptions when services aren't properly injected, path issues when specifying view locations, and model binding problems. Ensure all required services are registered in Program.cs and use relative paths from the project root when specifying view locations. For troubleshooting, enable detailed error messages in development mode.
My favorite library of this kind is IronPDF. It allows for fast and efficient manipulation of PDF files. It also has many valuable features, like exporting to PDF/A format and digitally signing PDF documents.
IronOCR means we can save $40,000 annually from manual processing, while enhancing productivity and freeing up resources for high-impact tasks. I would highly recommend it.
The IronSuite play a crucial role in our operations. These are tools that increase efficiencies across the business including creating floor plans and improving inventory management.
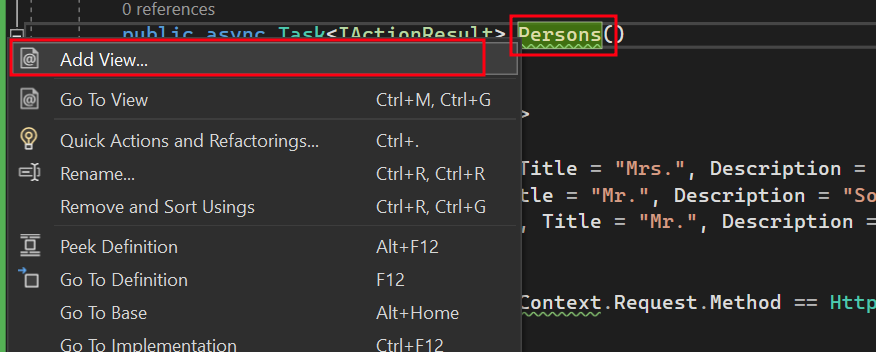
How Do I Add a View?
- Right-click on the newly added
Personaction and select "Add View."
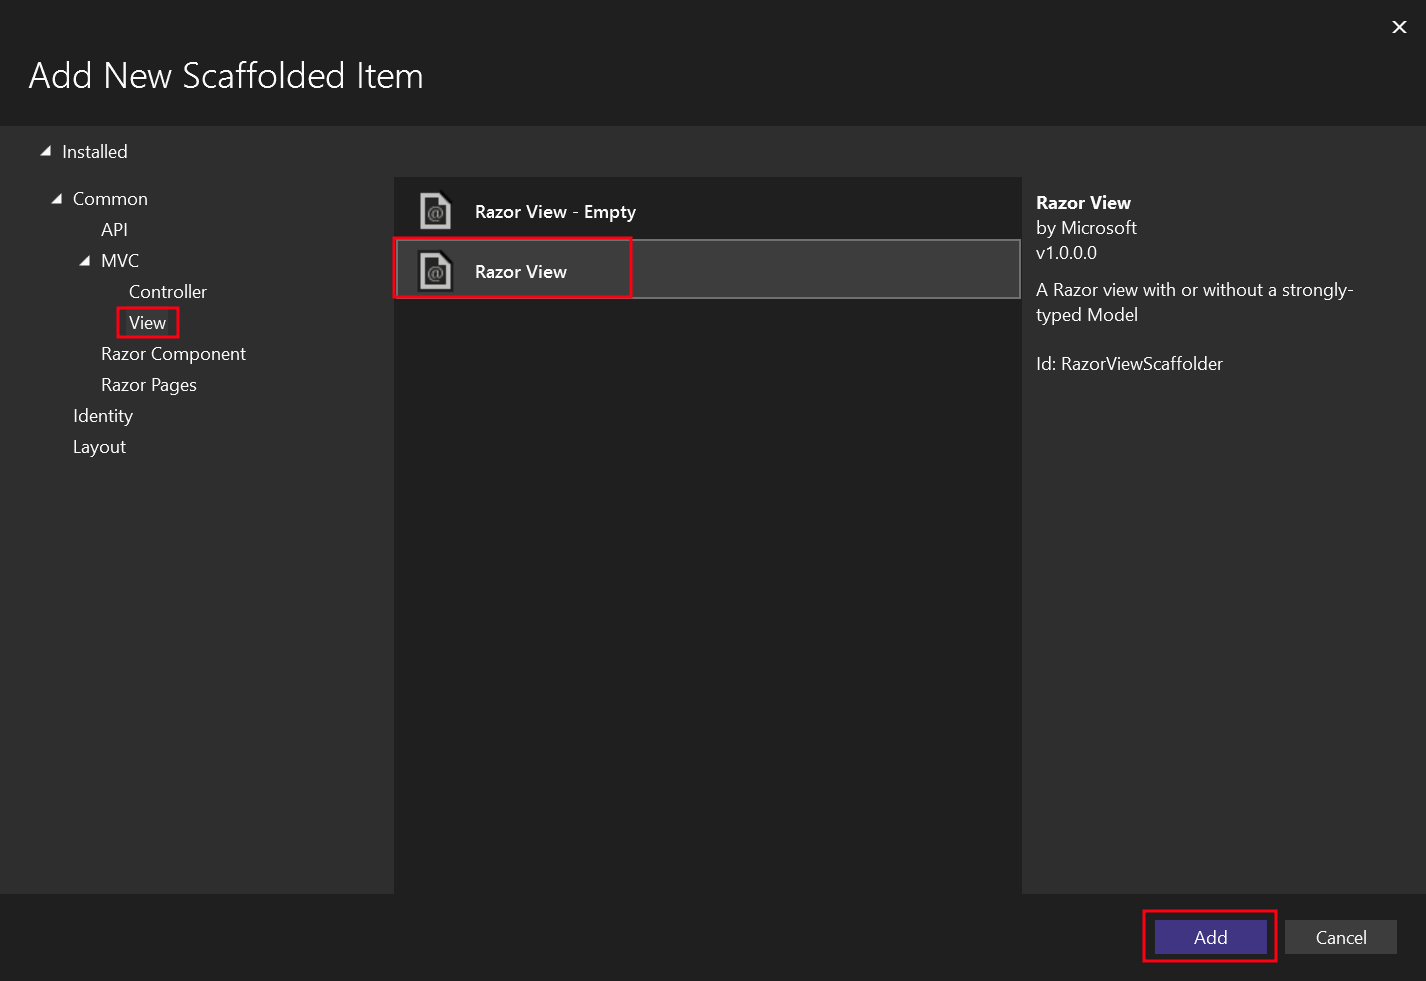
- Choose "Razor View" for the new Scaffolded item.
- Select the "List" template and the
Personmodel class.
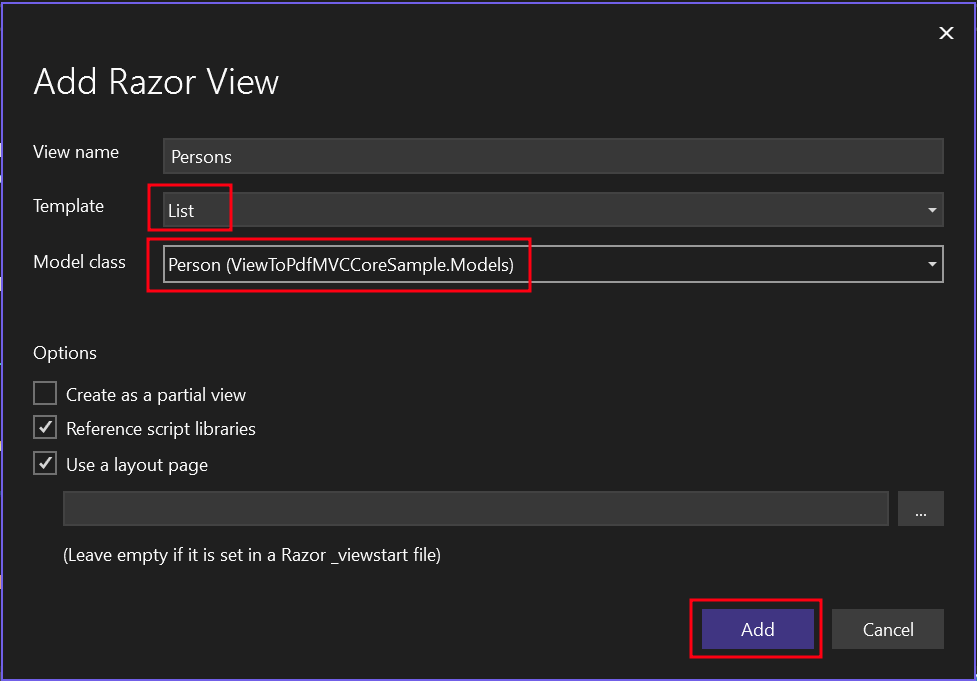
This creates a .cshtml file named Persons.
- Navigate to the "Views" folder -> "Home" folder ->
Persons.cshtmlfile.
IronPdf.Extensions.Mvc.Core
To add a button that invokes the Persons action, use the code below:
@using (Html.BeginForm("Persons", "Home", FormMethod.Post))
{
    <input type="submit" value="Print Person" />
}
@using (Html.BeginForm("Persons", "Home", FormMethod.Post))
{
<input type="submit" value="Print Person" />
}Why Use FormMethod.Post for PDF Generation?
Using FormMethod.Post for PDF generation follows web best practices by making the action explicit and preventing unwanted PDF generation from browser refreshes or bookmarked URLs. GET requests should be safe and idempotent (not change server state), while POST requests indicate an action that produces a result – in this case, generating a PDF document.
How Can I Style the PDF Print Button?
Style the print button using CSS classes and enhance it with JavaScript for a better user experience. Here’s an enhanced version:
@using (Html.BeginForm("Persons", "Home", FormMethod.Post, new { @class = "pdf-form" }))
{
    <button type="submit" class="btn btn-primary pdf-download-btn">
        <i class="fas fa-file-pdf"></i> Download as PDF
    </button>
}

<style>
    .pdf-download-btn {
        background-color: #dc3545;
        color: white;
        padding: 10px 20px;
        border: none;
        border-radius: 5px;
        cursor: pointer;
        transition: background-color 0.3s ease;
    }

    .pdf-download-btn:hover {
        background-color: #c82333;
    }

    .pdf-download-btn:active {
        transform: translateY(1px);
    }
</style>

<script>
    // Optional: Show loading indicator during PDF generation
    document.querySelector('.pdf-form').addEventListener('submit', function() {
        const button = this.querySelector('button');
        button.innerHTML = '<i class="fas fa-spinner fa-spin"></i> Generating PDF...';
        button.disabled = true;
    });
</script>
@using (Html.BeginForm("Persons", "Home", FormMethod.Post, new { @class = "pdf-form" }))
{
<button type="submit" class="btn btn-primary pdf-download-btn">
<i class="fas fa-file-pdf"></i> Download as PDF
</button>
}
<style>
.pdf-download-btn {
background-color: #dc3545;
color: white;
padding: 10px 20px;
border: none;
border-radius: 5px;
cursor: pointer;
transition: background-color 0.3s ease;
}
.pdf-download-btn:hover {
background-color: #c82333;
}
.pdf-download-btn:active {
transform: translateY(1px);
}
</style>
<script>
// Optional: Show loading indicator during PDF generation
document.querySelector('.pdf-form').addEventListener('submit', function() {
const button = this.querySelector('button');
button.innerHTML = '<i class="fas fa-spinner fa-spin"></i> Generating PDF...';
button.disabled = true;
});
</script>What View Templates Work Best for PDFs?
The List and Details templates work particularly well for PDF generation as they provide structured layouts. Custom templates designed specifically for PDF output often yield the best results. Consider creating dedicated PDF views that optimize for print layout rather than screen display, removing navigation elements and focusing on content presentation.
How Do I Add a Section to the Top Navigation Bar?
- In the same "Views" folder navigate to the "Shared" folder ->
_Layout.cshtml. Place thePersonnavigation item afterHome.
Make sure the value for the asp-action attribute matches exactly with our file name, which in this case is Persons.
<header>
    <nav class="navbar navbar-expand-sm navbar-toggleable-sm navbar-light bg-white border-bottom box-shadow mb-3">
        <div class="container-fluid">
            <a class="navbar-brand" asp-area="" asp-controller="Home" asp-action="Index">ViewToPdfMVCCoreSample</a>
            <button class="navbar-toggler" type="button" data-bs-toggle="collapse" data-bs-target=".navbar-collapse" aria-controls="navbarSupportedContent"
                    aria-expanded="false" aria-label="Toggle navigation">
                <span class="navbar-toggler-icon"></span>
            </button>
            <div class="navbar-collapse collapse d-sm-inline-flex justify-content-between">
                <ul class="navbar-nav flex-grow-1">
                    <li class="nav-item">
                        <a class="nav-link text-dark" asp-area="" asp-controller="Home" asp-action="Index">Home</a>
                    </li>
                    <li class="nav-item">
                        <a class="nav-link text-dark" asp-area="" asp-controller="Home" asp-action="Persons">Person</a>
                    </li>
                    <li class="nav-item">
                        <a class="nav-link text-dark" asp-area="" asp-controller="Home" asp-action="Privacy">Privacy</a>
                    </li>
                </ul>
            </div>
        </div>
    </nav>
</header>
<header>
<nav class="navbar navbar-expand-sm navbar-toggleable-sm navbar-light bg-white border-bottom box-shadow mb-3">
<div class="container-fluid">
<a class="navbar-brand" asp-area="" asp-controller="Home" asp-action="Index">ViewToPdfMVCCoreSample</a>
<button class="navbar-toggler" type="button" data-bs-toggle="collapse" data-bs-target=".navbar-collapse" aria-controls="navbarSupportedContent"
aria-expanded="false" aria-label="Toggle navigation">
<span class="navbar-toggler-icon"></span>
</button>
<div class="navbar-collapse collapse d-sm-inline-flex justify-content-between">
<ul class="navbar-nav flex-grow-1">
<li class="nav-item">
<a class="nav-link text-dark" asp-area="" asp-controller="Home" asp-action="Index">Home</a>
</li>
<li class="nav-item">
<a class="nav-link text-dark" asp-area="" asp-controller="Home" asp-action="Persons">Person</a>
</li>
<li class="nav-item">
<a class="nav-link text-dark" asp-area="" asp-controller="Home" asp-action="Privacy">Privacy</a>
</li>
</ul>
</div>
</div>
</nav>
</header>Why Does the asp-action Need to Match Exactly?
The asp-action attribute uses ASP.NET Core's tag helpers to generate the correct URL based on your routing configuration. An exact match ensures the link resolves to the correct controller action. Mismatches result in 404 errors or routing to unintended actions. The tag helper system is case-sensitive and must match the exact method name in your controller.
What Happens If Navigation Links Don't Match?
When navigation links don't match controller actions, users encounter 404 errors or are routed to incorrect pages. During development, ASP.NET Core's developer exception page shows detailed routing errors. In production, users see generic error pages. Always verify navigation links match controller action names exactly to prevent broken user experiences.
How Do I Edit the Program.cs File?
Register the IHttpContextAccessor and IRazorViewRenderer interface to the dependency injection (DI) container. Check the code below for reference.
:path=/static-assets/pdf/content-code-examples/how-to/cshtml-to-pdf-mvc-core-10.csusing IronPdf.Extensions.Mvc.Core;
using Microsoft.AspNetCore.Mvc.ViewFeatures;
var builder = WebApplication.CreateBuilder(args);
// Add services to the container.
builder.Services.AddControllersWithViews();
builder.Services.AddSingleton<IHttpContextAccessor, HttpContextAccessor>();
builder.Services.AddSingleton<ITempDataProvider, CookieTempDataProvider>();
// Register IRazorViewRenderer here
builder.Services.AddSingleton<IRazorViewRenderer, RazorViewRenderer>();
// Optional: Configure IronPDF license if you have one
IronPdf.License.LicenseKey = "YOUR-LICENSE-KEY-HERE";
var app = builder.Build();
// Configure the HTTP request pipeline.
if (!app.Environment.IsDevelopment())
{
app.UseExceptionHandler("/Home/Error");
// The default HSTS value is 30 days. You may want to change this for production scenarios, see https://aka.ms/aspnetcore-hsts.
app.UseHsts();
}
app.UseHttpsRedirection();
app.UseStaticFiles();
app.UseRouting();
app.UseAuthorization();
app.MapControllerRoute(
name: "default",
pattern: "{controller=Home}/{action=Index}/{id?}");
app.Run();
Imports IronPdf.Extensions.Mvc.Core
Imports Microsoft.AspNetCore.Mvc.ViewFeatures

Dim builder = WebApplication.CreateBuilder(args)

' Add services to the container.
builder.Services.AddControllersWithViews()

builder.Services.AddSingleton(Of IHttpContextAccessor, HttpContextAccessor)()
builder.Services.AddSingleton(Of ITempDataProvider, CookieTempDataProvider)()

' Register IRazorViewRenderer here
builder.Services.AddSingleton(Of IRazorViewRenderer, RazorViewRenderer)()

' Optional: Configure IronPDF license if you have one
IronPdf.License.LicenseKey = "YOUR-LICENSE-KEY-HERE"

Dim app = builder.Build()

' Configure the HTTP request pipeline.
If Not app.Environment.IsDevelopment() Then
    app.UseExceptionHandler("/Home/Error")
    ' The default HSTS value is 30 days. You may want to change this for production scenarios, see https://aka.ms/aspnetcore-hsts.
    app.UseHsts()
End If

app.UseHttpsRedirection()
app.UseStaticFiles()

app.UseRouting()

app.UseAuthorization()

app.MapControllerRoute(
    name:="default",
    pattern:="{controller=Home}/{action=Index}/{id?}")

app.Run()Why Register Services as Singleton?
Singleton services are created once and reused throughout the application's lifetime, making them efficient for stateless services like IRazorViewRenderer. This pattern reduces memory overhead and improves performance since the view rendering service doesn't maintain request-specific state. The IHttpContextAccessor must be singleton to be accessible across different service lifetimes.
What Is ITempDataProvider Used For?
ITempDataProvider enables temporary data storage between requests, commonly used for displaying messages after redirects. In the context of PDF generation, it ensures view state is properly maintained when rendering views to PDF. The CookieTempDataProvider stores this temporary data in encrypted cookies, providing a secure mechanism for state management.
Can I Use Scoped Services Instead?
While you could use scoped services for some scenarios, IRazorViewRenderer works best as a singleton because it doesn't hold request-specific state. Using scoped services would create new instances for each request, increasing memory usage without benefit. However, if you need to inject scoped services into your views, ensure proper service lifetime management to avoid runtime errors.
Run the Project
This shows how to run the project and generate a PDF document. When you run the application, navigate to the Persons page using the top navigation menu, then click the Print Person button to generate and download the PDF.

Where Can I Download the ASP.NET Core MVC Project?
Download the complete code for this guide. It comes as a zipped file that you can open in Visual Studio as an ASP.NET Core Web App (Model-View-Controller) project.
Download the ASP.NET Core MVC Sample Project
What's Included in the Sample Project?
The sample project includes a fully configured ASP.NET Core MVC application with IronPDF integration, demonstrating view-to-PDF conversion. It contains the Person model, HomeController with PDF generation logic, Persons view with proper Razor syntax, and all necessary service registrations in Program.cs. The project also includes example styling and layout configurations optimized for PDF output.
Which Visual Studio Version Should I Use?
Visual Studio 2022 (version 17.x or later) is recommended for the best experience with .NET 8 (LTS) and .NET 10 projects. Visual Studio Code with C# extensions also works well for cross-platform development. Ensure you have the ASP.NET and web development workload installed. The project targets .NET 8 by default but can be updated to newer versions.
How Do I Troubleshoot Project Setup Issues?
Common setup issues include missing NuGet packages, incorrect .NET SDK versions, or configuration problems. First, restore NuGet packages using dotnet restore or through Visual Studio's Package Manager. Verify your .NET SDK version matches the project requirements using dotnet --version. For licensing issues, see the license key documentation. If rendering problems occur, check the troubleshooting guide for solutions.
Ready to see what else you can do? Check out our tutorial page here: Convert PDFs
Frequently Asked Questions
What is the easiest way to convert CSHTML views to PDF in ASP.NET Core MVC?
The easiest way is using IronPDF's RenderRazorViewToPdf method, which can convert your .cshtml files to PDF documents with just one line of code. Simply call: new IronPdf.ChromePdfRenderer().RenderRazorViewToPdf(HttpContext, "Views/Home/Report.cshtml", model).SaveAs("report.pdf");
Which NuGet packages do I need to convert Views to PDFs in ASP.NET Core MVC?
You need two packages: IronPdf (the main package) and IronPdf.Extensions.Mvc.Core (the extension package). The extension package provides specific functionality for integrating with ASP.NET Core's dependency injection system and Razor view rendering pipeline.
Can I apply CSS styling and JavaScript when converting CSHTML to PDF?
Yes, IronPDF fully supports CSS styling, JavaScript execution, and custom fonts when rendering Views to PDF. This ensures your PDFs maintain the same appearance and functionality as your web views, including responsive CSS and dynamic JavaScript content.
What are the main steps to implement View to PDF conversion in my ASP.NET Core MVC project?
The workflow involves 5 steps: 1) Download IronPDF and its MVC Core extension, 2) Add a model class for your data, 3) Edit your Controller to use the RenderRazorViewToPdf method, 4) Create or modify a View (.cshtml file) for PDF rendering, and 5) Run your application to generate PDFs.
How does the MVC pattern work with PDF generation from Views?
In ASP.NET Core MVC, the Model contains your data and business logic, the View (your .cshtml file) presents the UI and displays data, and the Controller handles requests and uses IronPDF's RenderRazorViewToPdf method to orchestrate the PDF generation from the View.


Still Scrolling?
Want proof fast? PM > Install-Package IronPdf
run a sample watch your HTML become a PDF.


