

How to Convert Views to PDFs in ASP.NET MVC with C#
IronPDF enables you to convert ASP.NET MVC Views to PDF documents using the ChromePdfRenderer.RenderView() method with just a few lines of code. The IronPdf.Extensions.Mvc.Framework package provides seamless integration with ASP.NET MVC projects for rendering CSHTML views as PDFs.
A View is a component in the ASP.NET framework used for generating HTML markup in web applications. It is part of the Model-View-Controller (MVC) pattern, commonly used in ASP.NET MVC and ASP.NET Core MVC applications. Views are responsible for presenting data to the user by rendering HTML content dynamically. The power of IronPDF's Chrome PDF Rendering Engine ensures that your views are rendered with pixel-perfect accuracy, maintaining all styling, layouts, and interactive elements.
ASP.NET Web Application (.NET Framework) MVC is a web application framework provided by Microsoft. It follows a structured architectural pattern known as Model-View-Controller (MVC) to organize and streamline the development of web applications.
- Model: Manages data, business logic, and data integrity.
- View: Presents the user interface and renders information.
- Controller: Handles user input, processes requests, and orchestrates interactions between Model and View.
IronPDF simplifies the process of creating PDF files from Views within an ASP.NET MVC project. This makes PDF generation easy and direct in ASP.NET MVC. Whether you're generating invoices, reports, or any document from your web views, IronPDF provides the tools needed for professional PDF output. For a comprehensive setup guide, visit the Installation Overview page.
Quickstart: Convert ASP.NET MVC View to PDF Effortlessly
Learn how to quickly convert your ASP.NET MVC Views into PDF documents using IronPDF. With just a few lines of code, you can render your CSHTML views to high-quality PDFs, enhancing your application's functionality. IronPDF simplifies the process, making it accessible for developers at all levels. Get started by integrating IronPDF into your ASP.NET Core projects to effortlessly generate PDFs from your Views.
-
Install IronPDF with NuGet Package Manager
-
Copy and run this code snippet.
// Install-Package IronPdf.Extensions.Razor var pdf = new IronPdf.ChromePdfRenderer.RenderRazorToPdf(this.ControllerContext); -
Deploy to test on your live environment
Start using IronPDF in your project today with a free trial

Minimal Workflow (5 steps)
- Download the C# library for converting Views to PDFs in ASP.NET MVC
- Add a model class for the data
- Create a "Person" action in the controller and use the
RenderViewmethod - Add a View using the MVC 5 View Scaffolded
- Download the sample project for a quick start
What Extension Package Do I Need?
Why Does IronPDF Require an Extension Package?
The IronPdf.Extensions.Mvc.Framework package is an extension of the main IronPDF package. Both the IronPdf.Extensions.Mvc.Framework and IronPdf packages are required to render Views to PDF documents in ASP.NET MVC. This separation allows for optimized functionality specific to the MVC framework while maintaining the core PDF rendering capabilities.
How to Install the Extension Package?
Install-Package IronPdf.Extensions.Mvc.Framework
Install with NuGet
Install-Package IronPdf.Extensions.Mvc.Framework
How Do I Render Views to PDFs?
What Project Type Do I Need?
To convert Views into PDF files, you need an ASP.NET Web Application (.NET Framework) MVC project. IronPDF supports various MVC versions and provides extensive Rendering Options to customize your PDF output according to your requirements.
How Do I Add a Model Class?
Where Should I Create the Model?
- Navigate to the "Models" folder
- Create a new C# class file named
Person. This class serves as a model to represent individual data. Use the following code:
:path=/static-assets/pdf/content-code-examples/how-to/cshtml-to-pdf-mvc-framework-model.csnamespace ViewToPdfMVCSample.Models
{
public class Person
{
public int Id { get; set; }
public string Name { get; set; }
public string Title { get; set; }
public string Description { get; set; }
}
}Namespace ViewToPdfMVCSample.Models
Public Class Person
Public Property Id() As Integer
Public Property Name() As String
Public Property Title() As String
Public Property Description() As String
End Class
End NamespaceMy favorite library of this kind is IronPDF. It allows for fast and efficient manipulation of PDF files. It also has many valuable features, like exporting to PDF/A format and digitally signing PDF documents.
IronOCR means we can save $40,000 annually from manual processing, while enhancing productivity and freeing up resources for high-impact tasks. I would highly recommend it.
The IronSuite play a crucial role in our operations. These are tools that increase efficiencies across the business including creating floor plans and improving inventory management.
How Do I Edit the Controller?
What Code Should I Add to the Controller?
Navigate to the "Controllers" folder and open the HomeController file. Add the Persons action using the following code:
In the provided code, the ChromePdfRenderer class is first created. To use the RenderView method, provide it with an HttpContext, specify the path to the "Persons.cshtml" file, and provide a List<Person> containing the necessary data. When rendering the View, you can utilize RenderingOptions to customize margins, add custom text and HTML headers and footers, and apply page numbers to the resulting PDF document.
File(pdf.BinaryData, "application/pdf", "viewToPdfMVC.pdf").using IronPdf;
using System.Collections.Generic;
using System.Web.Mvc;
using ViewToPdfMVCSample.Models;
namespace ViewToPdfMVCSample.Controllers
{
public class HomeController : Controller
{
public ActionResult Index()
{
return View();
}
// GET: Person
public ActionResult Persons()
{
// Create a list of Person objects
var persons = new List<Person>
{
new Person { Name = "Alice", Title = "Mrs.", Description = "Software Engineer" },
new Person { Name = "Bob", Title = "Mr.", Description = "Software Engineer" },
new Person { Name = "Charlie", Title = "Mr.", Description = "Software Engineer" }
};
if (HttpContext.Request.HttpMethod == "POST")
{
// Define the path to the View file
var viewPath = "~/Views/Home/Persons.cshtml";
// Instantiate the ChromePdfRenderer
ChromePdfRenderer renderer = new ChromePdfRenderer();
// Render the view to a PDF document
PdfDocument pdf = renderer.RenderView(this.HttpContext, viewPath, persons);
// Set headers to view the PDF in-browser
Response.Headers.Add("Content-Disposition", "inline");
// Return the generated PDF file
return File(pdf.BinaryData, "application/pdf");
}
return View(persons);
}
public ActionResult About()
{
ViewBag.Message = "Your application description page.";
return View();
}
public ActionResult Contact()
{
ViewBag.Message = "Your contact page.";
return View();
}
}
}using IronPdf;
using System.Collections.Generic;
using System.Web.Mvc;
using ViewToPdfMVCSample.Models;
namespace ViewToPdfMVCSample.Controllers
{
public class HomeController : Controller
{
public ActionResult Index()
{
return View();
}
// GET: Person
public ActionResult Persons()
{
// Create a list of Person objects
var persons = new List<Person>
{
new Person { Name = "Alice", Title = "Mrs.", Description = "Software Engineer" },
new Person { Name = "Bob", Title = "Mr.", Description = "Software Engineer" },
new Person { Name = "Charlie", Title = "Mr.", Description = "Software Engineer" }
};
if (HttpContext.Request.HttpMethod == "POST")
{
// Define the path to the View file
var viewPath = "~/Views/Home/Persons.cshtml";
// Instantiate the ChromePdfRenderer
ChromePdfRenderer renderer = new ChromePdfRenderer();
// Render the view to a PDF document
PdfDocument pdf = renderer.RenderView(this.HttpContext, viewPath, persons);
// Set headers to view the PDF in-browser
Response.Headers.Add("Content-Disposition", "inline");
// Return the generated PDF file
return File(pdf.BinaryData, "application/pdf");
}
return View(persons);
}
public ActionResult About()
{
ViewBag.Message = "Your application description page.";
return View();
}
public ActionResult Contact()
{
ViewBag.Message = "Your contact page.";
return View();
}
}
}Imports IronPdf
Imports System.Collections.Generic
Imports System.Web.Mvc
Imports ViewToPdfMVCSample.Models
Namespace ViewToPdfMVCSample.Controllers
Public Class HomeController
Inherits Controller
Public Function Index() As ActionResult
Return View()
End Function
' GET: Person
Public Function Persons() As ActionResult
' Create a list of Person objects
'INSTANT VB NOTE: The local variable persons was renamed since Visual Basic will not allow local variables with the same name as their enclosing function or property:
Dim persons_Conflict = New List(Of Person) From {
New Person With {
.Name = "Alice",
.Title = "Mrs.",
.Description = "Software Engineer"
},
New Person With {
.Name = "Bob",
.Title = "Mr.",
.Description = "Software Engineer"
},
New Person With {
.Name = "Charlie",
.Title = "Mr.",
.Description = "Software Engineer"
}
}
If HttpContext.Request.HttpMethod = "POST" Then
' Define the path to the View file
Dim viewPath = "~/Views/Home/Persons.cshtml"
' Instantiate the ChromePdfRenderer
Dim renderer As New ChromePdfRenderer()
' Render the view to a PDF document
Dim pdf As PdfDocument = renderer.RenderView(Me.HttpContext, viewPath, persons_Conflict)
' Set headers to view the PDF in-browser
Response.Headers.Add("Content-Disposition", "inline")
' Return the generated PDF file
Return File(pdf.BinaryData, "application/pdf")
End If
Return View(persons_Conflict)
End Function
Public Function About() As ActionResult
ViewBag.Message = "Your application description page."
Return View()
End Function
Public Function Contact() As ActionResult
ViewBag.Message = "Your contact page."
Return View()
End Function
End Class
End NamespaceHow Can I Customize PDF Rendering Options?
For more advanced scenarios, you can customize the PDF output using various rendering options. Here's an example with custom margins, paper size, and additional settings:
// Advanced rendering with custom options
public ActionResult PersonsAdvanced()
{
    var persons = GetPersonsList();

    if (HttpContext.Request.HttpMethod == "POST")
    {
        var viewPath = "~/Views/Home/Persons.cshtml";

        // Configure the renderer with custom options
        ChromePdfRenderer renderer = new ChromePdfRenderer();

        // Set custom rendering options
        renderer.RenderingOptions.MarginTop = 40;
        renderer.RenderingOptions.MarginBottom = 40;
        renderer.RenderingOptions.MarginLeft = 20;
        renderer.RenderingOptions.MarginRight = 20;

        // Set custom paper size
        renderer.RenderingOptions.PaperSize = IronPdf.Rendering.PdfPaperSize.A4;
        renderer.RenderingOptions.PaperOrientation = IronPdf.Rendering.PdfPaperOrientation.Portrait;

        // Add header and footer
        renderer.RenderingOptions.TextHeader.DrawDividerLine = true;
        renderer.RenderingOptions.TextHeader.CenterText = "{pdf-title}";
        renderer.RenderingOptions.TextHeader.Font = IronPdf.Font.FontTypes.Helvetica;
        renderer.RenderingOptions.TextHeader.FontSize = 12;

        renderer.RenderingOptions.TextFooter.DrawDividerLine = true;
        renderer.RenderingOptions.TextFooter.Font = IronPdf.Font.FontTypes.Arial;
        renderer.RenderingOptions.TextFooter.FontSize = 10;
        renderer.RenderingOptions.TextFooter.RightText = "{page} of {total-pages}";

        // Enable JavaScript execution if needed
        renderer.RenderingOptions.EnableJavaScript = true;
        renderer.RenderingOptions.RenderDelay = 500; // Wait for JS to execute

        // Render the view to PDF
        PdfDocument pdf = renderer.RenderView(this.HttpContext, viewPath, persons);

        // Optional: Apply compression to reduce file size
        pdf.CompressImages(60);

        Response.Headers.Add("Content-Disposition", "inline");
        return File(pdf.BinaryData, "application/pdf");
    }

    return View("Persons", persons);
}
// Advanced rendering with custom options
public ActionResult PersonsAdvanced()
{
var persons = GetPersonsList();
if (HttpContext.Request.HttpMethod == "POST")
{
var viewPath = "~/Views/Home/Persons.cshtml";
// Configure the renderer with custom options
ChromePdfRenderer renderer = new ChromePdfRenderer();
// Set custom rendering options
renderer.RenderingOptions.MarginTop = 40;
renderer.RenderingOptions.MarginBottom = 40;
renderer.RenderingOptions.MarginLeft = 20;
renderer.RenderingOptions.MarginRight = 20;
// Set custom paper size
renderer.RenderingOptions.PaperSize = IronPdf.Rendering.PdfPaperSize.A4;
renderer.RenderingOptions.PaperOrientation = IronPdf.Rendering.PdfPaperOrientation.Portrait;
// Add header and footer
renderer.RenderingOptions.TextHeader.DrawDividerLine = true;
renderer.RenderingOptions.TextHeader.CenterText = "{pdf-title}";
renderer.RenderingOptions.TextHeader.Font = IronPdf.Font.FontTypes.Helvetica;
renderer.RenderingOptions.TextHeader.FontSize = 12;
renderer.RenderingOptions.TextFooter.DrawDividerLine = true;
renderer.RenderingOptions.TextFooter.Font = IronPdf.Font.FontTypes.Arial;
renderer.RenderingOptions.TextFooter.FontSize = 10;
renderer.RenderingOptions.TextFooter.RightText = "{page} of {total-pages}";
// Enable JavaScript execution if needed
renderer.RenderingOptions.EnableJavaScript = true;
renderer.RenderingOptions.RenderDelay = 500; // Wait for JS to execute
// Render the view to PDF
PdfDocument pdf = renderer.RenderView(this.HttpContext, viewPath, persons);
// Optional: Apply compression to reduce file size
pdf.CompressImages(60);
Response.Headers.Add("Content-Disposition", "inline");
return File(pdf.BinaryData, "application/pdf");
}
return View("Persons", persons);
}Imports System.Web.Mvc
Imports IronPdf
' Advanced rendering with custom options
Public Function PersonsAdvanced() As ActionResult
Dim persons = GetPersonsList()
If HttpContext.Request.HttpMethod = "POST" Then
Dim viewPath = "~/Views/Home/Persons.cshtml"
' Configure the renderer with custom options
Dim renderer As New ChromePdfRenderer()
' Set custom rendering options
renderer.RenderingOptions.MarginTop = 40
renderer.RenderingOptions.MarginBottom = 40
renderer.RenderingOptions.MarginLeft = 20
renderer.RenderingOptions.MarginRight = 20
' Set custom paper size
renderer.RenderingOptions.PaperSize = IronPdf.Rendering.PdfPaperSize.A4
renderer.RenderingOptions.PaperOrientation = IronPdf.Rendering.PdfPaperOrientation.Portrait
' Add header and footer
renderer.RenderingOptions.TextHeader.DrawDividerLine = True
renderer.RenderingOptions.TextHeader.CenterText = "{pdf-title}"
renderer.RenderingOptions.TextHeader.Font = IronPdf.Font.FontTypes.Helvetica
renderer.RenderingOptions.TextHeader.FontSize = 12
renderer.RenderingOptions.TextFooter.DrawDividerLine = True
renderer.RenderingOptions.TextFooter.Font = IronPdf.Font.FontTypes.Arial
renderer.RenderingOptions.TextFooter.FontSize = 10
renderer.RenderingOptions.TextFooter.RightText = "{page} of {total-pages}"
' Enable JavaScript execution if needed
renderer.RenderingOptions.EnableJavaScript = True
renderer.RenderingOptions.RenderDelay = 500 ' Wait for JS to execute
' Render the view to PDF
Dim pdf As PdfDocument = renderer.RenderView(Me.HttpContext, viewPath, persons)
' Optional: Apply compression to reduce file size
pdf.CompressImages(60)
Response.Headers.Add("Content-Disposition", "inline")
Return File(pdf.BinaryData, "application/pdf")
End If
Return View("Persons", persons)
End FunctionFor more information on optimizing margins, visit our guide on Set Custom Margins. If you need to work with specific paper dimensions, check out our Custom Paper Size documentation.
What Can I Do with the Generated PDF?
Once you obtain the PdfDocument object through the RenderView method, you can make various improvements and adjustments to it. You can convert the PDF to PDFA or PDFUA formats, apply digital signatures to the created PDF, or merge and split PDF documents as required. The library enables you to rotate pages, insert annotations or bookmarks, and apply distinct watermarks to your PDF files.
For file size optimization, consider using PDF Compression techniques. When dealing with JavaScript-heavy content, our JavaScript rendering guide provides detailed information on handling custom render delays. For various export options, see our comprehensive guide on Save & Export PDF Documents.
How Do I Add a View?
What Steps Should I Follow to Create the View?
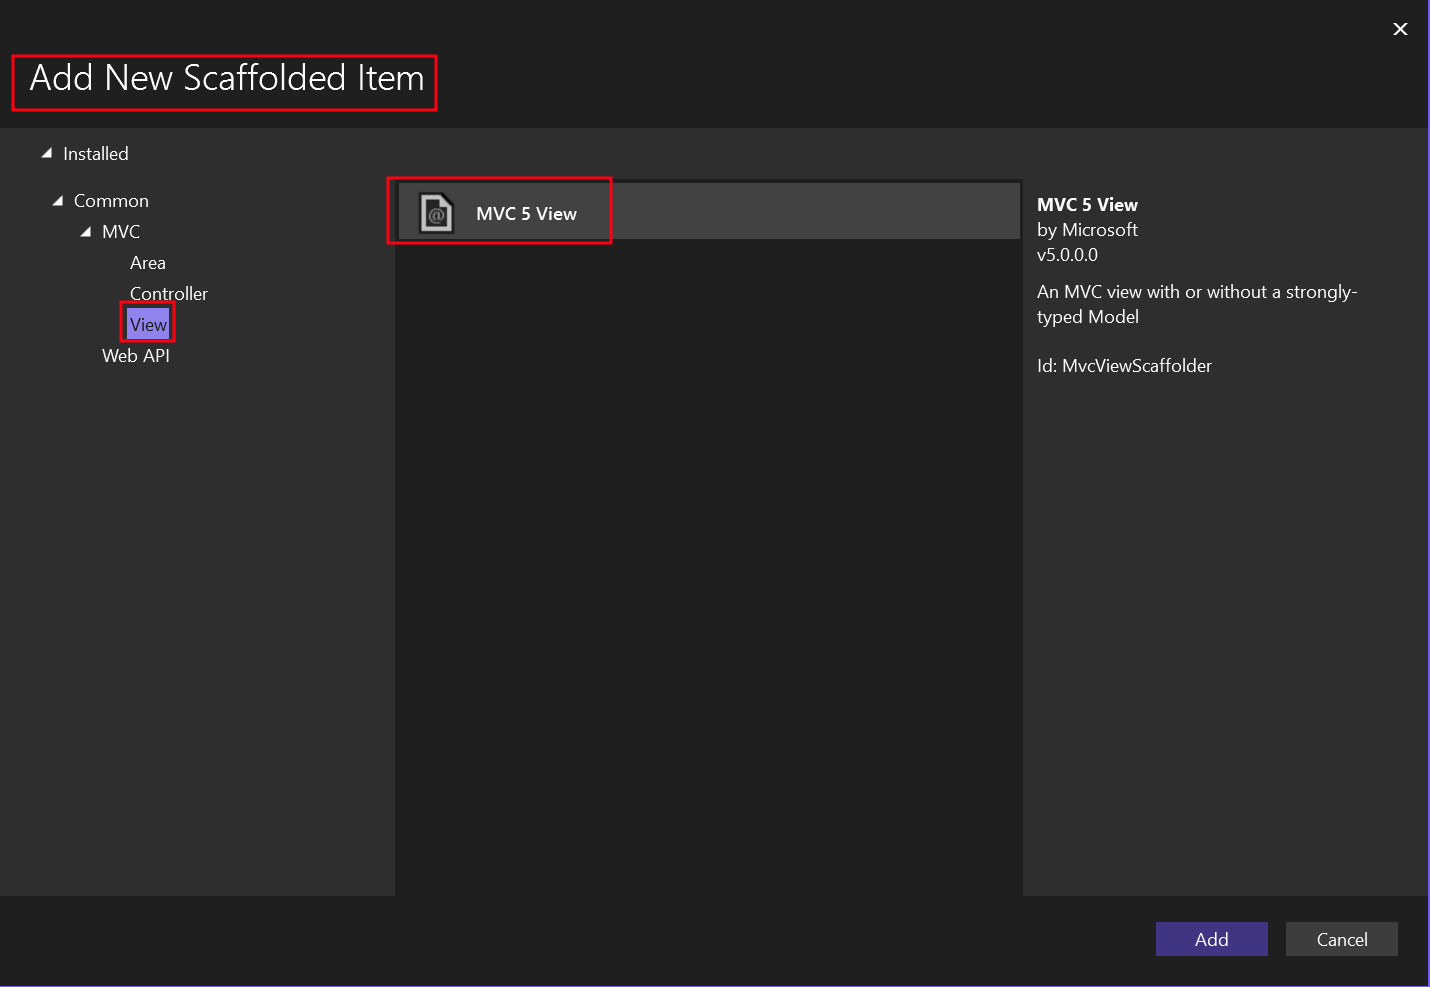
- Right-click on the newly added Person action and select "Add View."
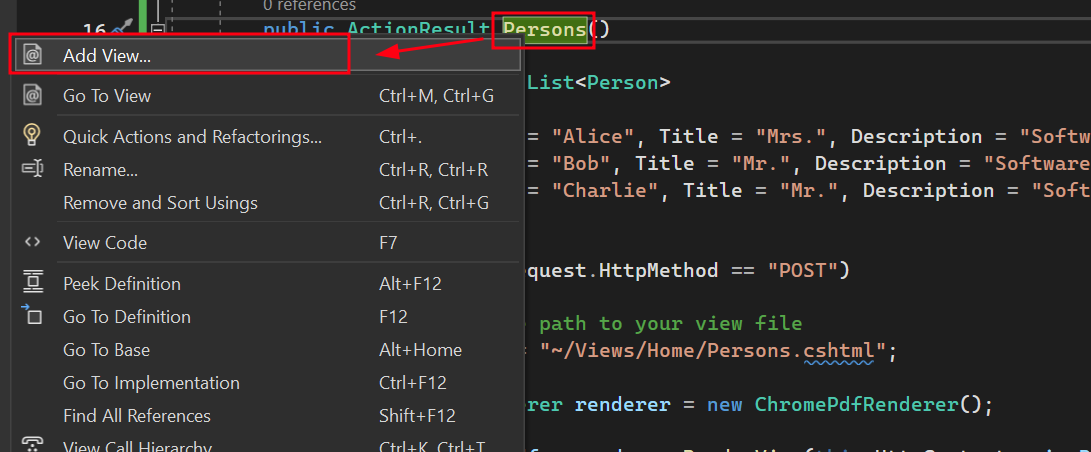
- Choose "MVC 5 View" for the new Scaffolded item.
- Select the "List" template and the
Personmodel class.
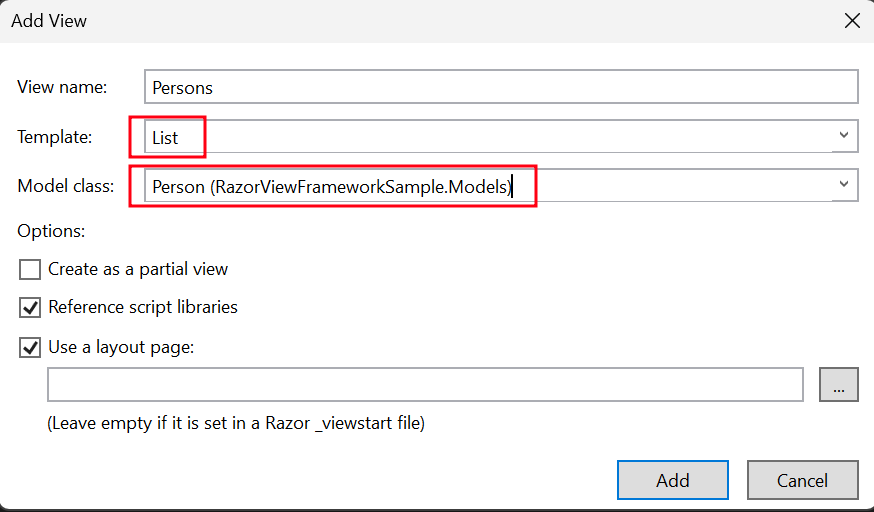
This creates a .cshtml file named "Persons."
How to Add a Print Button to the View?
- Navigate to the "Views" folder -> "Home" folder -> "Persons.cshtml" file.
To add a button that invokes the Persons action, use the code below:
@using (Html.BeginForm("Persons", "Home", FormMethod.Post))
{
    <input type="submit" value="Print Person" />
}
@using (Html.BeginForm("Persons", "Home", FormMethod.Post))
{
<input type="submit" value="Print Person" />
}How Do I Add a Section to the Top Navigation Bar?
Where Should I Update the Navigation?
- In the "Views" folder, navigate to the "Shared" folder -> "_Layout.cshtml" file. Place the "Person" navigation item after "Home."
Ensure that the values for the ActionLink method match exactly with our file name, which is "Persons."
<nav class="navbar navbar-expand-sm navbar-toggleable-sm navbar-dark bg-dark">
    <div class="container">
        @Html.ActionLink("Application name", "Index", "Home", new { area = "" }, new { @class = "navbar-brand" })
        <button type="button" class="navbar-toggler" data-bs-toggle="collapse" data-bs-target=".navbar-collapse" title="Toggle navigation" aria-controls="navbarSupportedContent" aria-expanded="false" aria-label="Toggle navigation">
            <span class="navbar-toggler-icon"></span>
        </button>
        <div class="collapse navbar-collapse d-sm-inline-flex justify-content-between">
            <ul class="navbar-nav flex-grow-1">
                <li>@Html.ActionLink("Home", "Index", "Home", new { area = "" }, new { @class = "nav-link" })</li>
                <li>@Html.ActionLink("Persons", "Persons", "Home", new { area = "" }, new { @class = "nav-link" })</li>
                <li>@Html.ActionLink("About", "About", "Home", new { area = "" }, new { @class = "nav-link" })</li>
                <li>@Html.ActionLink("Contact", "Contact", "Home", new { area = "" }, new { @class = "nav-link" })</li>
            </ul>
        </div>
    </div>
</nav>
<nav class="navbar navbar-expand-sm navbar-toggleable-sm navbar-dark bg-dark">
<div class="container">
@Html.ActionLink("Application name", "Index", "Home", new { area = "" }, new { @class = "navbar-brand" })
<button type="button" class="navbar-toggler" data-bs-toggle="collapse" data-bs-target=".navbar-collapse" title="Toggle navigation" aria-controls="navbarSupportedContent" aria-expanded="false" aria-label="Toggle navigation">
<span class="navbar-toggler-icon"></span>
</button>
<div class="collapse navbar-collapse d-sm-inline-flex justify-content-between">
<ul class="navbar-nav flex-grow-1">
<li>@Html.ActionLink("Home", "Index", "Home", new { area = "" }, new { @class = "nav-link" })</li>
<li>@Html.ActionLink("Persons", "Persons", "Home", new { area = "" }, new { @class = "nav-link" })</li>
<li>@Html.ActionLink("About", "About", "Home", new { area = "" }, new { @class = "nav-link" })</li>
<li>@Html.ActionLink("Contact", "Contact", "Home", new { area = "" }, new { @class = "nav-link" })</li>
</ul>
</div>
</div>
</nav>How to Run and Test the Project?
Run the Project
This shows you how to run the project and generate a PDF document.

Output PDF
Where Can I Download the Complete Project?
What Does the Sample Project Include?
You can download the complete code for this guide. It comes as a zipped file that you can open in Visual Studio as an ASP.NET Web Application (.NET Framework) MVC project. The sample includes all the necessary configurations, model classes, controllers, and views to get you started quickly with PDF generation in your MVC applications.
Frequently Asked Questions
How can I convert CSHTML views to PDF in ASP.NET MVC?
You can convert CSHTML views to PDF in ASP.NET MVC using IronPDF's ChromePdfRenderer.RenderView() method. Simply install the IronPdf.Extensions.Mvc.Framework package and use the rendering method to transform your views into high-quality PDF documents with just a few lines of code.
What is the minimal code required to render a view as PDF?
The minimal code to render a view as PDF is: var pdf = new IronPdf.ChromePdfRenderer.RenderRazorToPdf(this.ControllerContext); This single line of code using IronPDF will convert your current view into a PDF document.
Which extension package do I need for ASP.NET MVC PDF generation?
For ASP.NET MVC applications, you need the IronPdf.Extensions.Mvc.Framework package. This extension provides seamless integration with ASP.NET MVC projects and works alongside the main IronPdf package to enable view-to-PDF conversion functionality.
What rendering engine is used for converting views to PDF?
IronPDF uses the Chrome PDF Rendering Engine, which ensures pixel-perfect accuracy when converting views to PDF. This engine maintains all styling, layouts, and interactive elements from your original CSHTML views in the final PDF output.
Can I generate invoices and reports from MVC views?
Yes, IronPDF is perfect for generating invoices, reports, and any other documents from your MVC views. The library provides professional PDF output capabilities, making it ideal for creating business documents directly from your web application views.
What are the basic steps to implement view-to-PDF conversion?
The basic implementation involves 5 steps: 1) Download and install IronPDF library, 2) Add a model class for your data, 3) Create a controller action using the RenderView method, 4) Add a View using MVC 5 View Scaffolding, and 5) Execute the conversion using IronPDF's rendering methods.
Does the PDF output maintain the original view styling?
Yes, IronPDF's Chrome rendering engine ensures that all CSS styling, layouts, and interactive elements from your CSHTML views are preserved in the PDF output. This provides pixel-perfect accuracy and maintains the visual integrity of your original web views.


Still Scrolling?
Want proof fast? PM > Install-Package IronPdf
run a sample watch your HTML become a PDF.


